


1.源码分析
探讨自定义控件的第二步onLayout即确定控件的位置,上篇文章我们说到performTraversals方法中会调用host.measure方法,在调用完host.measure方法后,就会调用host.layout对View进行定位,这也是今天我们要讨论的内容。
首先我们来看看layout的源码
    public final void layout(int l, int t, int r, int b) {
            boolean changed = setFrame(l, t, r, b);
            if (changed || (mPrivateFlags & LAYOUT_REQUIRED) == LAYOUT_REQUIRED) {
                if (ViewDebug.TRACE_HIERARCHY) {
                    ViewDebug.trace(this, ViewDebug.HierarchyTraceType.ON_LAYOUT);
                }
                onLayout(changed, l, t, r, b);
                mPrivateFlags &= ~LAYOUT_REQUIRED;
            }
            mPrivateFlags &= ~FORCE_LAYOUT;
        }
    protected boolean setFrame(int left, int top, int right, int bottom) {
            boolean changed = false;
            if (mLeft != left || mRight != right || mTop != top || mBottom != bottom) {
                changed = true;

                。。。省略部分代码。。。

                mLeft = left;
                mTop = top;
                mRight = right;
                mBottom = bottom;

                。。。省略部分代码。。。

            }
            return changed;
        }
在setFrame方法中将left,top,right,bottom这四个值保存下来。也就是说在layout中的setFrame方法中会将子View相对于父View的左,上,右,下这四个值保存下来,这四个值就会确定子View在父View中的位置。仔细的看layout方法的源码你会发现和measure方法一样在layout中调用了onLayout方法,赶紧先去看看View的onLayout的逻辑
View——onLayout
    protected void onLayout(boolean changed, int left, int top, int right, int bottom) {
} ViewGroup——onLayout
    @Override
        protected abstract void onLayout(boolean changed,
                int l, int t, int r, int b);
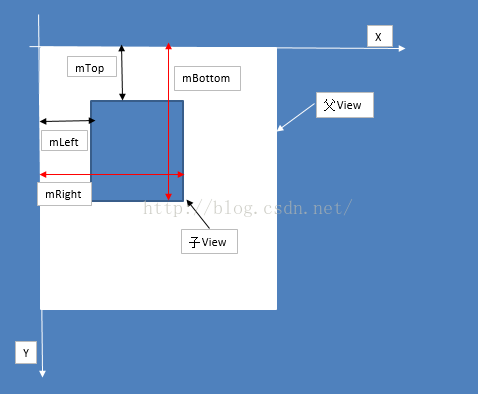
mLeft,mTop,mRight,mBottom的讲解
mLeft——View.getLeft():子View的左边界到父View的左边界的距离
     // 获取子View的左边界到父View的左边界的距离
ublic final int getLeft() {
return mLeft;
mTop——View.getTop():子View的顶部到父View顶部的距离
mRight——View.getRight():子View的右边界到父View的左边界的距离
mBottom——View.getBottom():子View的底部到父View的顶部的距离
它们在源码中的表现如下:
      /**
 * Top position of this view relative to its parent.
 *
 * @return The top of this view, in pixels.
 */
// 获取子View的顶部到父View顶部的距离
public final int getTop() {
    return mTop;
}

// 获取子View的底部到父View的顶部的距离
public final int getBottom() {
    return mBottom;
}

// 获取子View的左边界到父View的左边界的距离
public final int getLeft() {
    return mLeft;
}

// 获取子View的右边界到父View的左边界的距离
public final int getRight() {
    return mRight;
}

public final int getWidth() {
    return mRight - mLeft;
}

/**
 * Return the height of your view.
 *
 * @return The height of your view, in pixels.
 */
public final int getHeight() {
    return mBottom - mTop;
}

/**
 * The height of this view as measured in the most recent call to measure().
 * This should be used during measurement and layout calculations only. Use
 * {@link #getHeight()} to see how tall a view is after layout.
 *
 * @return The measured height of this view.
 */
// 获取测量的宽度
public final int getMeasuredWidth() {
    return mMeasuredWidth;
}

/**
 * The width of this view as measured in the most recent call to measure().
 * This should be used during measurement and layout calculations only. Use
 * {@link #getWidth()} to see how wide a view is after layout.
 *
 * @return The measured width of this view.
 */
// 获取测量的高度
public final int getMeasuredHeight() {
    return mMeasuredHeight;
} ①getMeasureWidth()方法在measure()过程结束后就可以获得到它的值,而getWidth()方法要在layout()过程结束后才能获取到。这么说有什么依据?首先看看getMeasureWidth()方法的返回值,它是mMeasureWidth,对于它你熟悉吗?这就是在上篇博客中通过setMeasureDimension()方法设置的值,而getWidth()的返回值是mRight-mLeft,这两个值是在layout()过程中的setFrame方法中才设置的值,也就是说在layout结束后才确定的。
②getMeasureWidth()方法中的值是通过setMeasuredDimension()方法来进行设置的,而getWidth()方法中的值则是通过视图右边的坐标减去左边的坐标计算出来的。关于这两个方法的区别,现在有网上的很多说法是不正确的,我将通过一篇博客来给大家详细的说说这两个值的区别。
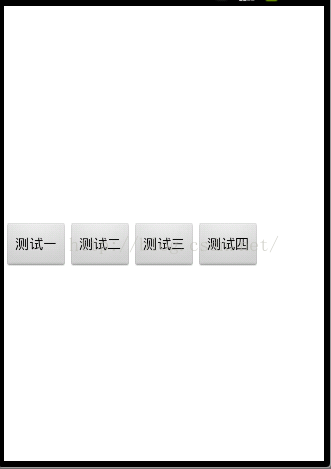
2.示例接下来通过一个简单的例子来了解下latyout的过程,这个例子是这样的,自定义一个ViewGroup让其子View在屏幕中间位置横向排列,首先我们来谈谈它的思想,我觉得当你在做一件事情的时候一定认真的去分析它的实现过程,按照自己的思想去设计自己的东西,不管可不可行,去尝试即使错了对自己也是一个很好的历练,这样时间长了你会发现你的技术提升了很多
我的思路是这样的
让自定义的ViewGroup的子View在屏幕中间横向排列思路:
①获得屏幕的高度
②获得子View的宽度和高度,通过屏幕的高度和子View的高度来计算layout时子View到父View顶端的距离
③因为子View是横向排列的,所以需要设定一个变量表示子View到父View左边界的距离,每次循环加上子View的宽度来设定下一个子View到父View左侧的距离
先上效果图
import android.app.Activity;
import android.content.Context;
import android.util.AttributeSet;
import android.util.DisplayMetrics;
import android.view.View;
import android.view.ViewGroup;

public class MyViewGroup extends ViewGroup {

    private Context mContext;
    private int sreenH;

    public MyViewGroup(Context context, AttributeSet attrs) {
        super(context, attrs);
        mContext = context;
        // 获取屏幕的高度
        sreenH = getScreenSize(((Activity) mContext))[1];
    }

    @Override
    protected void onMeasure(int widthMeasureSpec, int heightMeasureSpec) {

        super.onMeasure(widthMeasureSpec, widthMeasureSpec);
        // 测量子View
        measureChildren(widthMeasureSpec, heightMeasureSpec);
    }

    @Override
    protected void onLayout(boolean changed, int l, int t, int r, int b) {
        // 获得子View个数
        int childCount = getChildCount();
        // 设置一个变量保存到父View左侧的距离
        int mLeft = 0;
        // 遍历子View
        for (int i = 0; i < childCount; i++) {

            View childView = getChildAt(i);
            // 获得子View的高度
            int childViewHeight = childView.getMeasuredHeight();
            // 获得子View的宽度
            int childViewWidth = childView.getMeasuredWidth();
            // 让子View在竖直方向上显示在屏幕的中间位置
            int height = sreenH / 2 - childViewHeight / 2;
            // 调用layout给每一个子View设定位置mLeft,mTop,mRight,mBottom.左上右下
            childView.layout(mLeft, height, mLeft + childViewWidth, height
                    + childViewHeight);
            // 改变下一个子View到父View左侧的距离
            mLeft += childViewWidth;
        }
    }

    /**
     * 获取屏幕尺寸
     */
    public static int[] getScreenSize(Activity activity) {
        DisplayMetrics metrics = new DisplayMetrics();
        activity.getWindowManager().getDefaultDisplay().getMetrics(metrics);
        return new int[] { metrics.widthPixels, metrics.heightPixels };
    }
}
<com.example.customviewpractice.MyViewGroup xmlns:android="http://schemas.android.com/apk/res/android"
    xmlns:tools="http://schemas.android.com/tools"
    android:layout_width="match_parent"
    android:layout_height="match_parent" >

    <Button
        android:id="@+id/btn1"
        android:layout_width="wrap_content"
        android:layout_height="wrap_content"
        android:text="测试一" />

    <Button
        android:id="@+id/btn2"
        android:layout_width="wrap_content"
        android:layout_height="wrap_content"
        android:text="测试二" />

    <Button
        android:id="@+id/btn3"
        android:layout_width="wrap_content"
        android:layout_height="wrap_content"
        android:text="测试三" />

    <Button
        android:id="@+id/btn4"
        android:layout_width="wrap_content"
        android:layout_height="wrap_content"
        android:text="测试四" />

</com.example.customviewpractice.MyViewGroup> 


 1267
1267

 被折叠的 条评论
为什么被折叠?
被折叠的 条评论
为什么被折叠?
 到【灌水乐园】发言


