


Json的概念以及与XML的比较:
Json是什么?
JSON(JavaScript Object Notation)是一种轻量级(轻量级?简单、易操作、快捷)的数据交换格式。主要目的就是给出一套通用的数据格式,大家按照这种格式定义自己的数据,方便数据的交换。特点是(相对来说)易于人阅读和编写,易于机器解析和生成。
Json与XML的比较:
- JSON和XML的数据可读性基本相同;
- JSON和XML同样拥有丰富的解析手段
- JSON相对于XML来讲,数据的体积小
- JSON与JavaScript的交互更加方便
- JSON对数据的描述性比XML较差
- JSON的速度要远远快于XML
Json的解析(Gson的用法)
1) 使用Gson解析较简单的数组类型Json数据
[{“name”:”xxx”,”age”:xx}]
这里我们直接把Json数据写入代码中。
首先我们需要定义一个Bean文件:
JavaBean类 Person.java
public class Person {
    int id;
    String name;
    int age;

    public int getId() {
        return id;
    }

    public void setId(int id) {
        this.id = id;
    }

    public String getName() {
        return name;
    }

    public void setName(String name) {
        this.name = name;
    }

    public int getAge() {
        return age;
    }

    public void setAge(int age) {
        this.age = age;
    }

    public String toString(){
        return "name is "+ name+" ,age is "+age;
    }
}
MainActivity.class
public class MainActivity extends AppCompatActivity implements View.OnClickListener{
    String data = "[\n" +
            "{ \"id\":\"1\",\"name\":\"基神\",\"age\":\"18\" },\n" +
            "{ \"id\":\"2\",\"name\":\"B神\",\"age\":\"18\"  },\n" +
            "{ \"id\":\"3\",\"name\":\"曹神\",\"age\":\"18\" }\n" +
            "]";
    private Button button;
    private ListView listVeiw;
    private List<Person> persons;
    private ArrayAdapter<Person> arrayAdapter;

    @Override
    protected void onCreate(Bundle savedInstanceState) {
        super.onCreate(savedInstanceState);
        setContentView(R.layout.activity_main);
        initView();
    }

    private void initView() {
        button = (Button)this.findViewById(R.id.button);
        button.setOnClickListener(this);
        listVeiw = (ListView)this.findViewById(R.id.listView);


    }

    @Override
    public void onClick(View v) {
        if(v.getId()==R.id.button){
            persons = readJsonForGson(data);
            Log.i("GsonJson",persons.toString());
            arrayAdapter = new ArrayAdapter<Person>(this,android.R.layout.simple_list_item_1,persons);
            listVeiw.setAdapter(arrayAdapter);
        }
    }

    private List<Person> readJsonForGson(String data) {
        List<Person> personList = null;
        Person person = new Person();
        try{
            //如果需要解析Json数组数据,先要生成一个Type对象
            Type listType = new TypeToken<List<Person>>(){}.getType();
            //创建Gson对象
            Gson gson = new Gson();
            //这行代码就可以获得Json数据,是不是很简单
            personList = gson.fromJson(data,listType);
            Log.i("Gson",personList.toString());

        }catch(Exception e){
            e.printStackTrace();
        }

        return personList;
    }
}
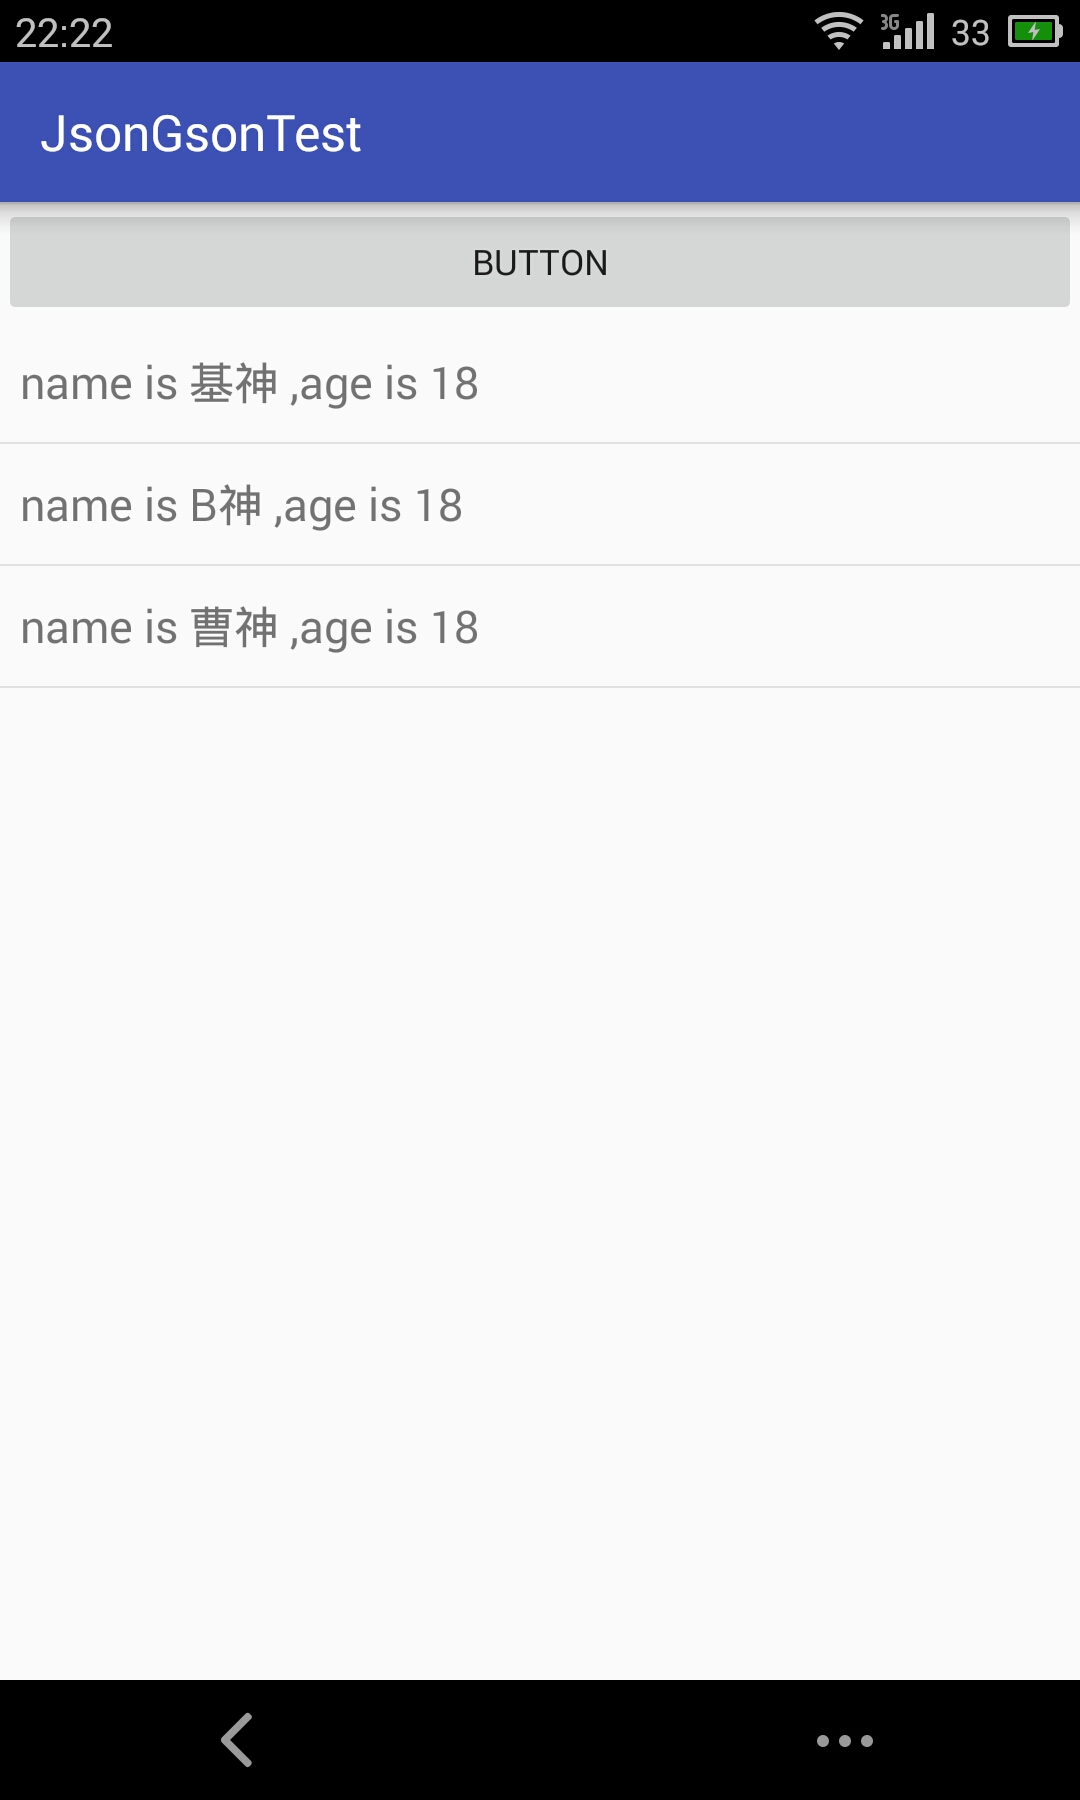
解析效果展示:

2) Gson解析较复杂Json数据
我们将上面的Json数据变得复杂一点,如下:
{ “ch”:[
{ “id”:”1”,”name”:”基神”,”age”:”18” },
{ “id”:”2”,”name”:”B神”,”age”:”18” }
{ “id”:”3”,”name”:”曹神”,”age”:”18” }
]};
还是一样,先定义一个Bean类,定义Bean类很简单,看见一个{}就定义一个类,看见[]就定义一个List<>;
JavaBean类 Person类
public class Person {

    public List<Ch> ch;

    public List<Ch> getCh() {
        return ch;
    }

    public void setCh(List<Ch> ch) {
        this.ch = ch;
    }

    public String toString(){
        return "result ——>"+ch;
    }
}
ch类
public class Ch {
    int id;
    String name;
    int age;

    public int getId() {
        return id;
    }

    public void setId(int id) {
        this.id = id;
    }

    public String getName() {
        return name;
    }

    public void setName(String name) {
        this.name = name;
    }

    public int getAge() {
        return age;
    }

    public void setAge(int age) {
        this.age = age;
    }

    public String toString(){
        return "name is "+ name+" ,age is "+age;
    }
}
MainActivity.class
public class MainActivity extends AppCompatActivity implements View.OnClickListener{
    String data = "{ \"ch\":[\n" +
            "{ \"id\":\"1\",\"name\":\"基神\",\"age\":\"18\" },\n" +
            "{ \"id\":\"2\",\"name\":\"B神\",\"age\":\"18\"  },\n" +
            "{ \"id\":\"3\",\"name\":\"曹神\",\"age\":\"18\" }\n" +
            "]}";
    private Button button;
    private ListView listVeiw;
    private List<Ch> persons;
    private ArrayAdapter<Ch> arrayAdapter;

    @Override
    protected void onCreate(Bundle savedInstanceState) {
        super.onCreate(savedInstanceState);
        setContentView(R.layout.activity_main);
        initView();
    }

    private void initView() {
        button = (Button)this.findViewById(R.id.button);
        button.setOnClickListener(this);
        listVeiw = (ListView)this.findViewById(R.id.listView);


    }

    @Override
    public void onClick(View v) {
        if(v.getId()==R.id.button){
            persons = readJsonForGson(data);
            Log.i("GsonJson",persons.toString());
            arrayAdapter = new ArrayAdapter<Ch>(this,android.R.layout.simple_list_item_1,persons);
            listVeiw.setAdapter(arrayAdapter);
        }
    }

    private List<Ch> readJsonForGson(String data) {
        List<Ch> chList = null;
        try{
            //如果需要解析Json数据,先要生成一个Type对象
           //Type listType = new TypeToken<List<Person>>(){}.getType();
            Gson gson = new Gson();
            //这里和刚才有所变化,也很简单吧
            Person person = gson.fromJson(data,Person.class);
           // personList = gson.fromJson(data,listType);
            Log.i("Gson",person.toString());

            chList = person.getCh();
            Log.i("Gson",chList.toString());

        }catch(Exception e){
            e.printStackTrace();
        }
    //返回List数据
        return chList;
    }
}
解析效果展示:
3)使用Gson解析网络较复杂Json数据
实际运用中,我们不可能把Json数据直接添加到我们的项目中,而更多的是以访问网络来获得Json数据,比如,这里我们用一个自己搭建的网页来作为一个例子:
你需要配置一个tomcat服务器,这里就不教大家了,网上有详细的教程,然后在 【你的tomcat存放位置\apache-tomcat-7.0.55\webapps\ROOT】 中新建一个weather.html文件,将json数据写进去,双击bin目录下面的startup.bat就可以启动服务器,再然后输入网址:【http://你的ip地址:8080/weather.html】
再教大家一个查看ip的小技巧:cmd中输入命令行ipconfig
好了,准备工作做好之后,我们就可以看到如下数据了:
{
    "error": 0,
    "status": "success",
    "date": "2015-03-10",
    "results": [
        {
            "currentCity": "北京",
            "weather_data": [
                {
                    "date": "周一(今天, 实时:19℃)",
                    "dayPictureUrl": "http://api.map.baidu.com/images/weather/day/dayu.png",
                    "nightPictureUrl": "http://api.map.baidu.com/images/weather/night/dayu.png",
                    "weather": "大雨",
                    "wind": "东南风5-6级",
                    "temperature": "18℃"
                },
                {
                    "date": "周二",
                    "dayPictureUrl": "http://api.map.baidu.com/images/weather/day/zhenyu.png",
                    "nightPictureUrl": "http://api.map.baidu.com/images/weather/night/duoyun.png",
                    "weather": "阵雨转多云",
                    "wind": "西北风4-5级",
                    "temperature": "21 ~ 14℃"
                },
                {
                    "date": "周三",
                    "dayPictureUrl": "http://api.map.baidu.com/images/weather/day/leizhenyu.png",
                    "nightPictureUrl": "http://api.map.baidu.com/images/weather/night/leizhenyu.png",
                    "weather": "雷阵雨",
                    "wind": "西北风4-5级",
                    "temperature": "22 ~ 18℃"
                },
                {
                    "date": "周四",
                    "dayPictureUrl": "http://api.map.baidu.com/images/weather/day/qing.png",
                    "nightPictureUrl": "http://api.map.baidu.com/images/weather/night/qing.png",
                    "weather": "晴",
                    "wind": "东南风2级",
                    "temperature": "28℃"
                }
            ]
        }
    ]
}
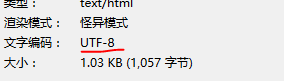
需要注意的是你的页面文字编码和你的Android studio一定要保持一致。比如说我的页面文字编码是UTF-8,那么开发工具也一定要是UTF-8,不然会出现乱码。
好了,下面我们正式开始解析这个复杂的Json数据:
使用Gson解析数据我们一开始需要定义一个序列化的Bean,那么,这个Bean怎么定义呢,其实很简单:
- 看到JSON结构里面有{ }你就定义一个类,看到[ ]你就定义一个List;
- 最后只剩下最简单的如String、int等基本类型直接定义就好;
- 内部嵌套的类,请使用public static class className { };
- 类内部的属性名,必须与JSON串里面的Key名称保持一致。
根据上面的规则我们定义如下三个Bean文件:
最外层的Bean文件
package com.example.httpjsontest;

import java.util.List;

/**
 * Created by Administrator on 2016/9/7 0007.
 */
public class Status {
    private String error;
    private String status;
    private String date;
    private List<Results> results;

    public String getError() {
        return error;
    }

    public void setError(String error) {
        this.error = error;
    }

    public String getStatus() {
        return status;
    }

    public void setStatus(String status) {
        this.status = status;
    }

    public String getDate() {
        return date;
    }

    public void setDate(String date) {
        this.date = date;
    }

    public List<Results> getResults() {
        return results;
    }

    public void setResults(List<Results> results) {
        this.results = results;
    }

    @Override
    public String toString() {
        return "Status [error=" + error + ", status=" + status + ", date="
                + date + ", result=" + results + "]";
    }

}
第二层的Bean文件
package com.example.httpjsontest;

import java.util.List;

/**
 * Created by Administrator on 2016/9/7 0007.
 */
public class Results {
    private String currentCity;
    private List<WeatherDate> weather_data;

    public String getCurrentCity() {
        return currentCity;
    }

    public void setCurrentCity(String currentCity) {
        this.currentCity = currentCity;
    }

    public List<WeatherDate> getWeather_data() {
        return weather_data;
    }

    public void setWeather_data(List<WeatherDate> weather_data) {
        this.weather_data = weather_data;
    }

    @Override
    public String toString() {
        return "results [curentCity=" + currentCity + ", weather_data="
                + weather_data + "]";
    }
}
最后一层Bean文件
package com.example.httpjsontest;

/**
 * Created by Administrator on 2016/9/7 0007.
 */
public class WeatherDate {
    private String date;
    private String dayPictureUrl;
    private String nightPictureUrl;
    private String weather;
    private String wind;
    private String temperature;

    public String getDate() {
        return date;
    }

    public void setDate(String date) {
        this.date = date;
    }

    public String getDayPictureUrl() {
        return dayPictureUrl;
    }

    public void setDayPictureUrl(String dayPictureUrl) {
        this.dayPictureUrl = dayPictureUrl;
    }

    public String getNightPictureUrl() {
        return nightPictureUrl;
    }

    public void setNightPictureUrl(String nightPictureUrl) {
        this.nightPictureUrl = nightPictureUrl;
    }

    public String getWeather() {
        return weather;
    }

    public void setWeather(String weather) {
        this.weather = weather;
    }

    public String getWind() {
        return wind;
    }

    public void setWind(String wind) {
        this.wind = wind;
    }

    public String getTemperature() {
        return temperature;
    }

    public void setTemperature(String temperature) {
        this.temperature = temperature;
    }

    @Override
    public String toString() {
        return "weather_data [date=" + date + ", dayPictureUrl="
                + dayPictureUrl + ", nightPictureUrl="
                + nightPictureUrl + ", weather=" + weather + ", wind="
                + wind + ", temperature=" + temperature + "]";
    }
}
有不懂的可以返回去看一看Bean文件的规则。
具体的JavaBean定义好了,我们就开始真正地解析Json数据:
(1)先写一个工具类(HttpUtils)用来获得json数据:
public class HttpUtils {

    public HttpUtils(){

    }
    //通过HttpURLCnnection获取链接(urlPath)里的数据,放到输入流(InputStream)里
    public static String getJsonContent(String urlPath) {
        try {
            URL url = new URL(urlPath);
            HttpURLConnection connection = (HttpURLConnection) url.openConnection();
            connection.setConnectTimeout(3000);
            connection.setRequestMethod("GET");
            connection.setDoInput(true);
            int code = connection.getResponseCode();
            if (code == 200) {
                return changeInputStream(connection.getInputStream());
            }
        } catch (Exception e) {

        }
        return "";
    }
    //将流转换为字符串
    private static String changeInputStream(InputStream inputStream) {
        String result = null;
        ByteArrayOutputStream outStream =  new ByteArrayOutputStream();
        byte[] buffer = new byte[1024];
        int len = 0;
        try{
            while((len=inputStream.read(buffer))!=-1){
                outStream.write(buffer,0,len);
            }
            inputStream.close();
            result = new String(outStream.toByteArray());
            Log.i("Jsontest",result);
        }catch(Exception e){
            e.printStackTrace();
        }
      return result;
    }
}
这是HttpURLConnection和IO流的相关用法,这里不进行介绍了。
获得数据之后,就可以开始使用Gson解析Json数据了,在onCreate方法里开启一个子线程:
protected void onCreate(Bundle savedInstanceState) {
    super.onCreate(savedInstanceState);
    setContentView(R.layout.activity_main);
    listView = (ListView)this.findViewById(R.id.listView);
    button = (Button)this.findViewById(R.id.button);
    button.setOnClickListener(this);
    new Thread(new Runnable() {
        @Override
        public void run() {
            try{

                HttpUtils httpUtils = new HttpUtils();
                detail = httpUtils.getJsonContent(urlPath);

                 Log.i("JsonOne",detail);
                 Gson gson = new Gson();
                 status = gson.fromJson(detail,Status.class);
                 Log.i("status ",status.toString());

                 results = status.getResults();
                 Log.i("results",results.toString());

                 weatherdate = results.get(0).getWeather_data();
                 Log.i("weatherDate",weatherdate.get(0).toString());

                 String weather = weatherdate.get(0).getWeather();
                 Log.i("weather",weather);

            }catch(Exception e){
                e.printStackTrace();
            }
        }
    }).start();
}
我们可以在logCat里面查看数据是否获得。
布局文件(activity_main.xml):
<LinearLayout xmlns:android="http://schemas.android.com/apk/res/android"
    xmlns:tools="http://schemas.android.com/tools"
    android:layout_width="match_parent"
    android:layout_height="match_parent"
    android:orientation="vertical">

    <Button
        android:id="@+id/button"
        android:layout_width="match_parent"
        android:layout_height="wrap_content"
        android:text="BUTTON" />
    <ListView
        android:id="@+id/listView"
        android:layout_width="match_parent"
        android:layout_height="match_parent" />
</LinearLayout>
定义一个listView来存放数据,点击按钮,显示数据传入ListView:
 public void onClick(View v) {
     if(v.getId()==R.id.button){
         arrayAdapter = new ArrayAdapter<WeatherDate>(this,android.R.layout.simple_list_item_1,weatherdate);
         listView.setAdapter(arrayAdapter);
     }
 }
最后把MainActivity的代码放上来看一下:
public class MainActivity extends AppCompatActivity implements View.OnClickListener{
    private Button button;
    private ListView listView;
    private String urlPath = "http://172.30.18.222:8080/weather.html";
    String detail = "";
    private Status status;
    private List<Results> results;
    private List<WeatherDate> weatherdate;
    private ArrayAdapter<WeatherDate> arrayAdapter;
    @Override
    protected void onCreate(Bundle savedInstanceState) {
        super.onCreate(savedInstanceState);
        setContentView(R.layout.activity_main);
        listView = (ListView)this.findViewById(R.id.listView);
        button = (Button)this.findViewById(R.id.button);
        button.setOnClickListener(this);

        new Thread(new Runnable() {
            @Override
            public void run() {
                try{
                    HttpUtils httpUtils = new HttpUtils();
                    detail = httpUtils.getJsonContent(urlPath);

                     Log.i("JsonOne",detail);
                     Gson gson = new Gson();
                     status = gson.fromJson(detail,Status.class);
                     Log.i("status ",status.toString());

                     results = status.getResults();
                     Log.i("results",results.toString());

                     weatherdate = results.get(0).getWeather_data();
                     Log.i("weatherDate",weatherdate.get(0).toString());

                     String weather = weatherdate.get(0).getWeather();
                     Log.i("weather",weather);

                }catch(Exception e){
                    e.printStackTrace();
                }
            }
        }).start();
    }

    @Override
    public void onClick(View v) {
        if(v.getId()==R.id.button){
            arrayAdapter = new ArrayAdapter<WeatherDate>(this,android.R.layout.simple_list_item_1,weatherdate);
            listView.setAdapter(arrayAdapter);
        }
    }
}
最后别忘了在清单文件中添加权限:
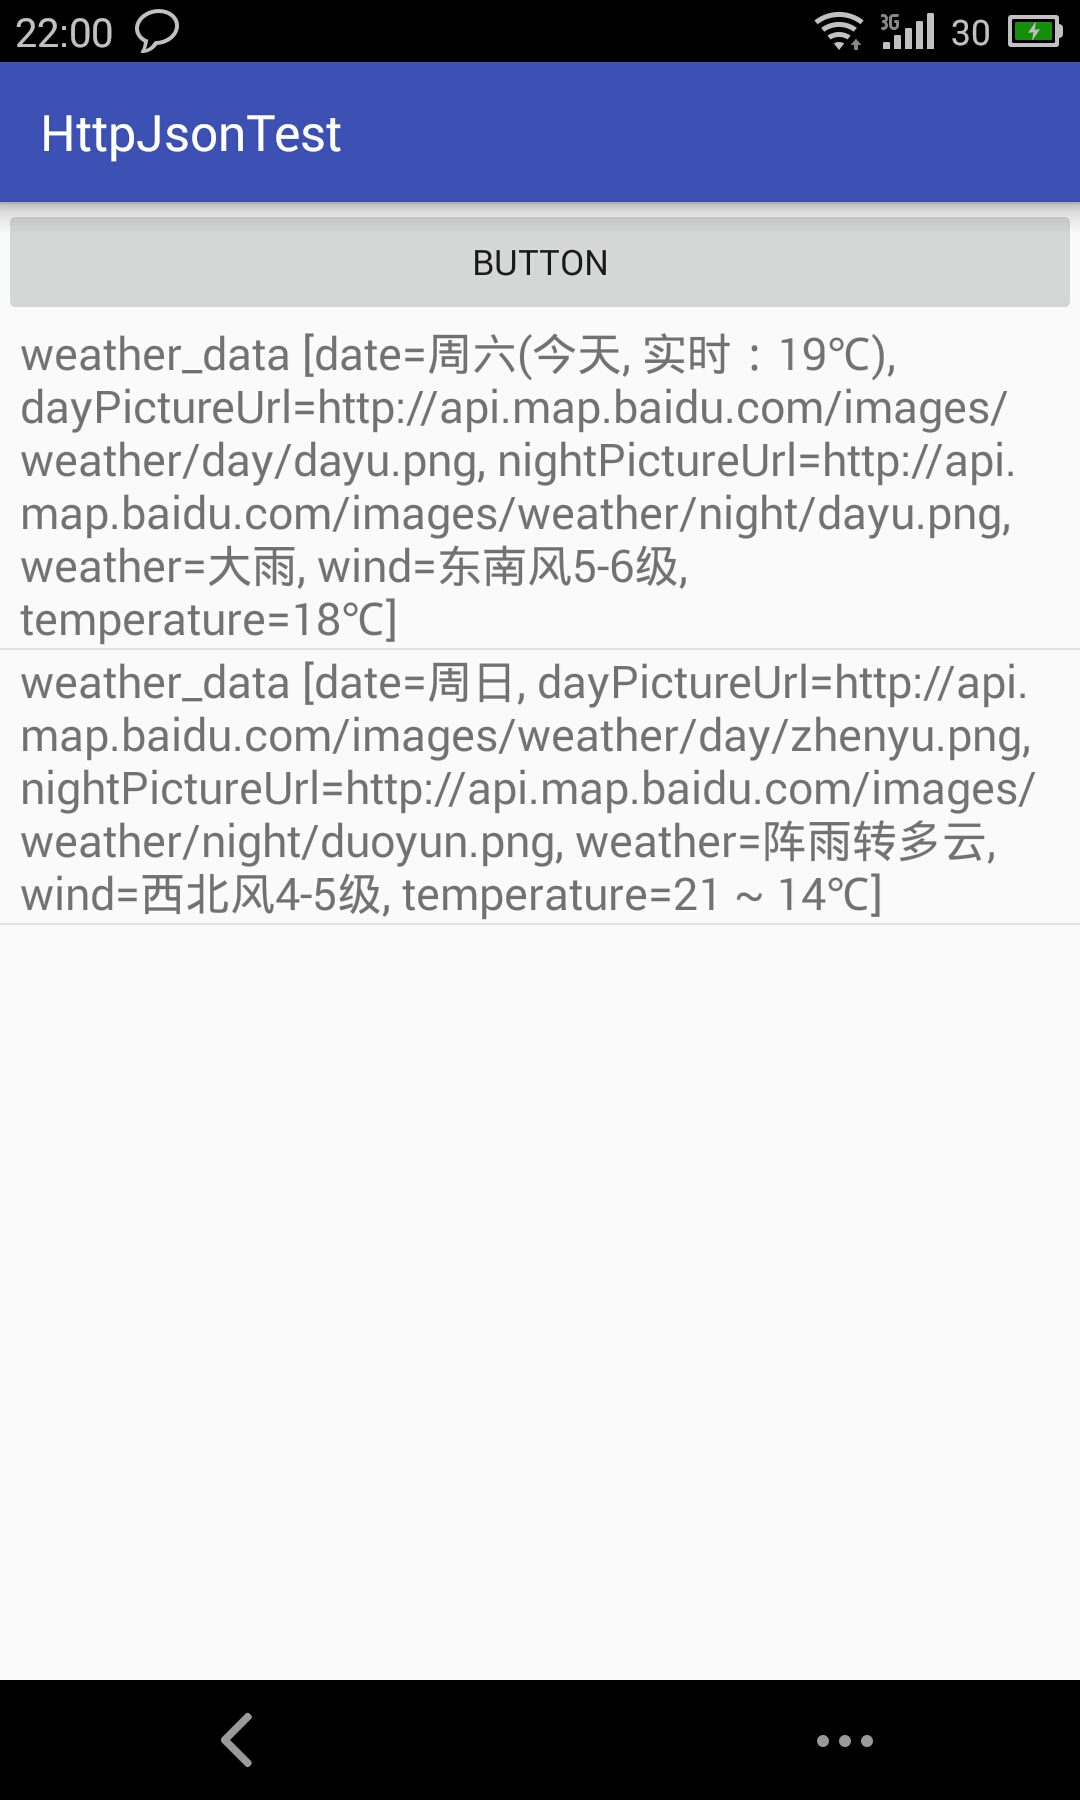
<uses-permission android:name="android.permission.INTERNET" />放上效果展示图:
这只是简单地将数据放进listView中,其实还可以自定义Adapter,将里面的数据再进行获取和解析,再填充进listView即可,这里不过多介绍。


 1885
1885

 被折叠的 条评论
为什么被折叠?
被折叠的 条评论
为什么被折叠?
 到【灌水乐园】发言


