


Fragment基本概念
Fragment是Android3.0后引入的一个新的API,他出现的初衷是为了适应大屏幕的平板电脑, 当然现在他仍然是平板APP UI设计的宠儿,而且我们普通手机开发也会加入这个Fragment, 我们可以把他看成一个小型的Activity,又称Activity片段!想想,如果一个很大的界面,我们 就一个布局,写起界面来会有多麻烦,而且如果组件多的话是管理起来也很麻烦!而使用Fragment 我们可以把屏幕划分成几块,然后进行分组,进行一个模块化的管理!从而可以更加方便的在 运行过程中动态地更新Activity的用户界面!另外Fragment并不能单独使用,他需要嵌套在Activity 中使用,尽管他拥有自己的生命周期,但是还是会受到宿主Activity的生命周期的影响,比如Activity 被destory销毁了,他也会跟着销毁!
下面的文档中给出了一个Fragment分别对应手机与平板间不同情况的处理图:
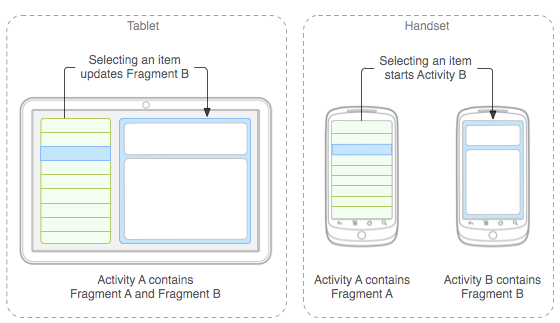
简单的新闻浏览页面,使用两个Fragment分别显示新闻列表与新闻内容;
托管Fragment
为了托管Fragment,activity必须做到:
- 在布局中为Fragment安排位置
- 管理Fragment实例的生命周期
Fragment的生命周期
下图展示了fragment的生命周期。类似于activity的生命周期,它既具有停止、暂停、运行状态,也拥有可以覆盖的方法。可以看到许多方法对应着activity的生命周期方法。
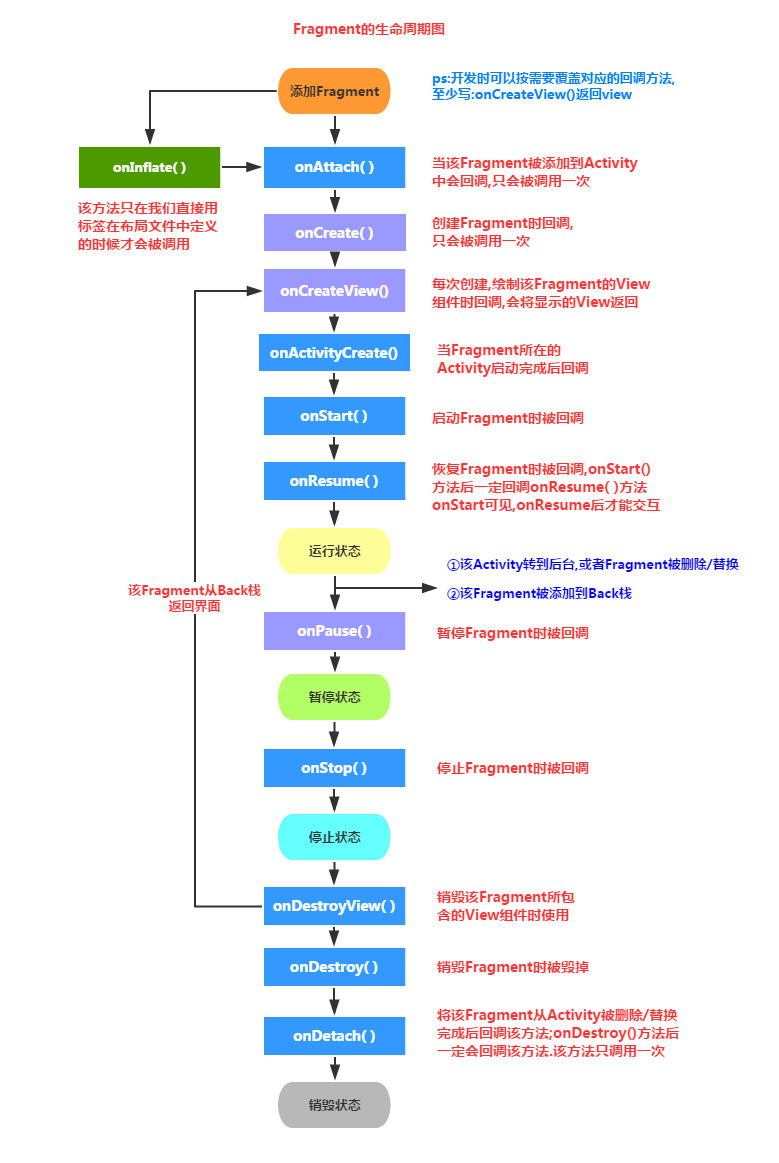
生命周期方法的对应非常重要。因为fragment代表activity正在工作,它的状态应该也反映了activity的状态。因而fragment需要对应的生命周期方法来处理activity的工作。
fragment生命周期与activity生命周期的一个关键区别就在于, fragment的生命周期方法是由托管它的activity而不是操作系统调用的。操作系统无从知晓activity用来管理视图的fragment。 fragment的使用是activity自己内部的事情。
托管Fragment的两种方式(创建Fragment)
在activity中托管一个Fragment,有如下两种方式:
- 静态加载Fragment(添加Fragment到activity布局中)
- 动态加载Fragment(在activity代码中添加fragment)
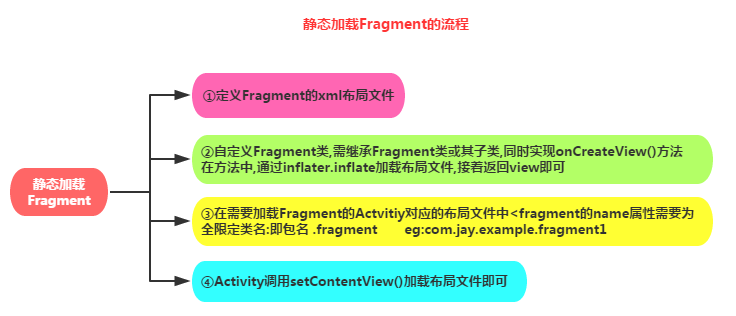
静态加载
实现流程:
示例代码:
Step 1:定义Fragment的布局,就是fragment显示内容的布局
res/layout/articles_view.xml
<LinearLayout xmlns:android="http://schemas.android.com/apk/res/android"
    android:orientation="vertical"
    android:layout_width="match_parent"
    android:layout_height="match_parent"
    android:background="@color/colorPrimary">

    <EditText
        android:id="@+id/mEditText"
        android:layout_width="match_parent"
        android:layout_height="wrap_content"
        android:hint="hint"/>

</LinearLayout>
Step 2:自定义一个Fragment类,需要继承Fragment或者他的子类,重写onCreateView()方法 在该方法中调用:inflater.inflate()方法加载Fragment的布局文件,接着返回加载的view对象。
import android.os.Bundle;
import android.support.v4.app.Fragment;
import android.view.LayoutInflater;
import android.view.ViewGroup;

public class ArticleFragment extends Fragment {
    @Override
    public View onCreateView(LayoutInflater inflater, ViewGroup container,
        Bundle savedInstanceState) {
        // Inflate the layout for this fragment
        View view = inflater.inflate(R.layout.article_view, container, false);
        return view;
    }
}
就像activity一样,当fragment从activity添加或者移除、当activity生命周期发生变化时,fragment通过生命周期回调函数管理其状态。例如,当activity的onPause()被调用时,它里面的所有fragment的onPause()方法也会被触发。
Step 3:在需要加载Fragment的Activity对应的布局文件中添加fragment的标签, 记住,name属性是全限定类名哦,就是要包含Fragment的包名,如:
res/layout/news_articles.xml
<LinearLayout xmlns:android="http://schemas.android.com/apk/res/android"
    android:orientation="horizontal"
    android:layout_width="fill_parent"
    android:layout_height="fill_parent">

    <fragment android:name="com.example.android.fragments.ArticleFragment"
              android:id="@+id/article_fragment"
              android:layout_weight="2"
              android:layout_width="0dp"
              android:layout_height="match_parent" />

</LinearLayout>
Step 4: Activity在onCreate( )方法中调用setContentView()加载布局文件即可!。
import android.os.Bundle;
import android.support.v4.app.FragmentActivity;

public class MainActivity extends FragmentActivity {
    @Override
    public void onCreate(Bundle savedInstanceState) {
        super.onCreate(savedInstanceState);
        setContentView(R.layout.news_articles);
    }
}
可以看到这种方式非常简单但是不够灵活。添加fragment到Activity布局中就等同于将fargment及其视图与activity的视图绑定在一起,且在activity的生命周期过程中,无法切换fragment视图。
接下来就要介绍一种更常用的加载fragment的方式。
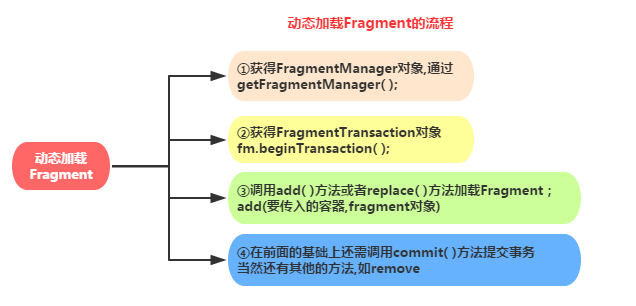
动态加载
实现流程:
示例代码:
Step 1:定义容器视图
运用fragment(尤其是那些在运行时添加的)的一个很重要的规则就是在布局中必须有一个容器View,fragment的layout将会放在这个view里面。
res/layout/news_articles.xml:
<?xml version="1.0" encoding="utf-8"?>
    <FrameLayout xmlns:android="http://schemas.android.com/apk/res/android"
        android:id="@+id/fragment_container"
        android:layout_width="match_parent"
        android:layout_height="match_parent" />
虽然当前的activity_crime.xml布局文件仅由一个服务于单个fragment的容器视图组成,但是稍后我们会编写代码,将fragment的视图放置到FrameLayout中
Step 2:定义Fragment的布局,就是fragment显示内容的布局
res/layout/articles_view.xml
<LinearLayout xmlns:android="http://schemas.android.com/apk/res/android"
    android:orientation="vertical"
    android:layout_width="match_parent"
    android:layout_height="match_parent"
    android:background="@color/colorPrimary">

    <EditText
        android:id="@+id/mEditText"
        android:layout_width="match_parent"
        android:layout_height="wrap_content"
        android:hint="hint"/>

</LinearLayout>
Step 3: 创建fragment类并设置其视图为定义的布局
public class HeadlinesFragment extends Fragment {
    private static final String TAG = "HeadlinesFragment";
    private EditText editText;

    @Override
    public void onCreate(Bundle savedInstanceState) {
        super.onCreate(savedInstanceState);
        Log.i(TAG,"headlinesFragment");
    }

    public View onCreateView(LayoutInflater inflater, ViewGroup container,
                             Bundle savedInstanceState) {
        // Inflate the layout for this fragment
        View view = inflater.inflate(R.layout.articles_view,container,false);
        //生成EditText组件
        editText = (EditText) view.findViewById(R.id.mEditText);
        return view;
    }
}
注意:
创建Fragment时至少需要实现三个方法:
onCreate( ),
onCreateView( ),
OnPause( );,
不过如果只写一个onCreateView也是可以的。
这里我还是写上onCreate()方法,是因为它与Activity中的onCreate()方法是有区别的:
- Fragment.onCreate(Bundle)是公共方法,而Activity.onCreate(Bundle)是保护
方法。因为需要被托管fragment的任何activity调用,因此Fragment.onCreate(…)方法及其他Fragment生命周期方法必须设计为公共方法。
最后注意,在Fragment.onCreate(…)方法中,并没有生成fragment的视图。创建和配置fragment视图是通过另一个fragment生命周期方法来完成的(如下所示):
 public View onCreateView(LayoutInflater inflater, ViewGroup container,
                             Bundle savedInstanceState) {
        // Inflate the layout for this fragment
        View view = inflater.inflate(R.layout.articles_view,container,false);
        return view;
    }
}
在onCreateView(…)方法中,fragment的视图是直接通过调用LayoutInflater.inflate(…)方法并传入布局的资源ID生成的。第二个参数是视图的父参数,通常我们需要父视图来正确配置组件。第三个参数告知布局生成器是否将生成的视图添加给父视图。这里我们传入false参数,因为我们将通过代码的方法添加视图。
Step 4: 添加fragment 到 FragmentManager
FragmentManager类负责管理fragment并将它们的视图添加到activity的视图层级结构中。
FragmentManager类具体管理的是:
- fragment队列;
- fragment事务的回退栈
FragmentManager的关系图如下图所示

1)在activity中,用Support Library APIs调用 getSupportFragmentManager()或getFragmentManager()方法获取FragmentManager 对象,然后调用 beginTransaction() 方法创建一个FragmentTransaction对象,然后调用add()方法添加一个fragment.
2)可以使用同一个 FragmentTransaction进行多次fragment事务。完成这些变化操作,准备开始执行改变时,必须调用commit()方法。
下例显示了如何添加一个fragment到之前的layout中:
public class MainActivity extends FragmentActivity {

    @Override
    protected void onCreate(Bundle savedInstanceState) {
        super.onCreate(savedInstanceState);
        setContentView(R.layout.activity_main);

        FragmentManager fragmentManager = getFragmentManager();
        Fragment fragment = fragmentManager.findFragmentById(R.id.fragment_container);

        if(fragment==null){
            fragment = new HeadlinesFragment();
              //创建一个新的fragment事务,加入一个添加操作,然后提交该事物
            FragmentTransaction transaction = fragmentManager.beginTransaction();
            transaction.add(R.id.fragment_container,fragment);
            transaction.commit();
        }


    }
}
这里我使用了支持库及FragmentActivity类。
FragmentManager.beginTransaction()方法创建并返回FragmentTransaction实例。
FragmentTransaction类使用了一个fluent interface接口方法,通过该方法配置FragmentTransaction返回FragmentTransaction类对象,而不是void,由此可得到一个FragmentTransaction队列。
add(…)方法是整个事务的核心部分,并含有两个参数,即容器视图资源ID和新创建的Fragment。容器视图资源ID我们应该很熟悉了,它是定义在activity_crime.xml 中的FrameLayout组件的资源ID。容器视图资源ID主要有两点作用:
告知FragmentManagerfragment视图应该出现在activity视图的什么地方;
是FragmentManager队列中fragment的唯一标识符。
这样我们就动态的加载了Fragment。
运行程序我们就可以看到定义在articles_view的视图:

Activity与Fragment之间的通信
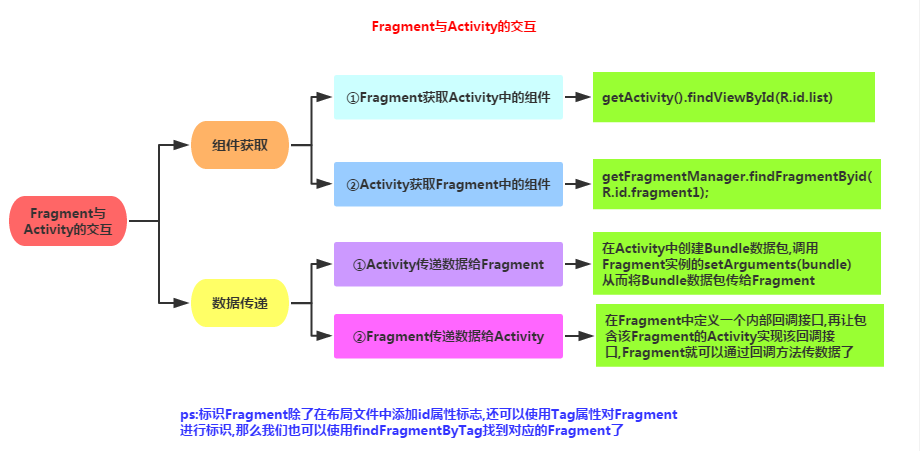
1)组件获取
Fragment获得Activity中的组件: getActivity().findViewById(R.id.list);
Activity获得Fragment中的组件(根据id和tag都可以):getFragmentManager.findFragmentById(R.id.fragment1);
2)数据传递
Activit传递数据给Fragment
每个fragment实例都可附带一个Bundle对象。该bundle包含有key-value对,我们可以如同附加extra到Activity的intent中那样使用它们。一个key-value对即一个argument。
要创建fragment argument,首先需创建Bundle对象。然后,使用Bundle限定类型的“ put”
方法(类似于Intent的方法) ,将argument添加到bundle中(如以下代码所示)。
 Bundle args = new Bundle();
        args.putInt(EXTRA_MY_INT,myInt);
        args.putSerializable(EXTRA_MY_OBJECT,myObject);
        args.putString(EXTRA_MY_STRING,myString);
附加argument bundle 给fragment,需调用Fragment.setArgument(Bundle args)方法。
注意:该任务必须在fragment创建之后、添加给Activity之前完成。
step1:添加名为newInstance()的静态方法给Fragment类。使用该方法,完成fragment实例及bundle对象的创建,然后将argument放入bundle中,最后再附加给fragment。
main/java/myFragment.java
public class MyFragment extends Fragment{
    private TextView mTextView;
    public static final String EXTRA_DATE = "com.example.fragmentesttwo.myfragment";

...

//方法参数为所要传递的数据
 public static MyFragment newInstance(String arg){
        MyFragment myFragment = new MyFragment();
        Bundle bundle = new Bundle();
        bundle.putString(EXTRA_DATE,arg);
        myFragment.setArguments(bundle);
        return myFragment;
    }
    }
step2: 当Activity创建Fragment时,应调用Fragment.newInstance(String)
方法,并传入数据,这里传入一个简单的字符串·。
public class MainActivity extends AppCompatActivity {

    @Override
    protected void onCreate(Bundle savedInstanceState) {
        super.onCreate(savedInstanceState);
        setContentView(R.layout.activity_main);

        if(savedInstanceState==null){
            MyFragment fragment = new MyFragment();
            FragmentManager fragmentManager = getFragmentManager();
            FragmentTransaction transaction = fragmentManager.beginTransaction();
            transaction.add(R.id.fragment_container,fragment.newInstance("param"));
            transaction.commit();
        }
    }
}
**step3:**fragment在需要获取它的argument时,会先调用Fragment类的getArguments()方法,接着再调用Bundle的限定类型的“ get”方法,如getString(…)方法。
main/java/myFragment.java
public View onCreateView(LayoutInflater inflater, ViewGroup container, Bundle savedInstanceState) {
View view = inflater.inflate(R.layout.fragment_layout,container,false);
mTextView = (TextView)view.findViewById(R.id.mTextView);
String result = getArguments().getString(EXTRA_DATE);
mTextView.setText(result);
return view;
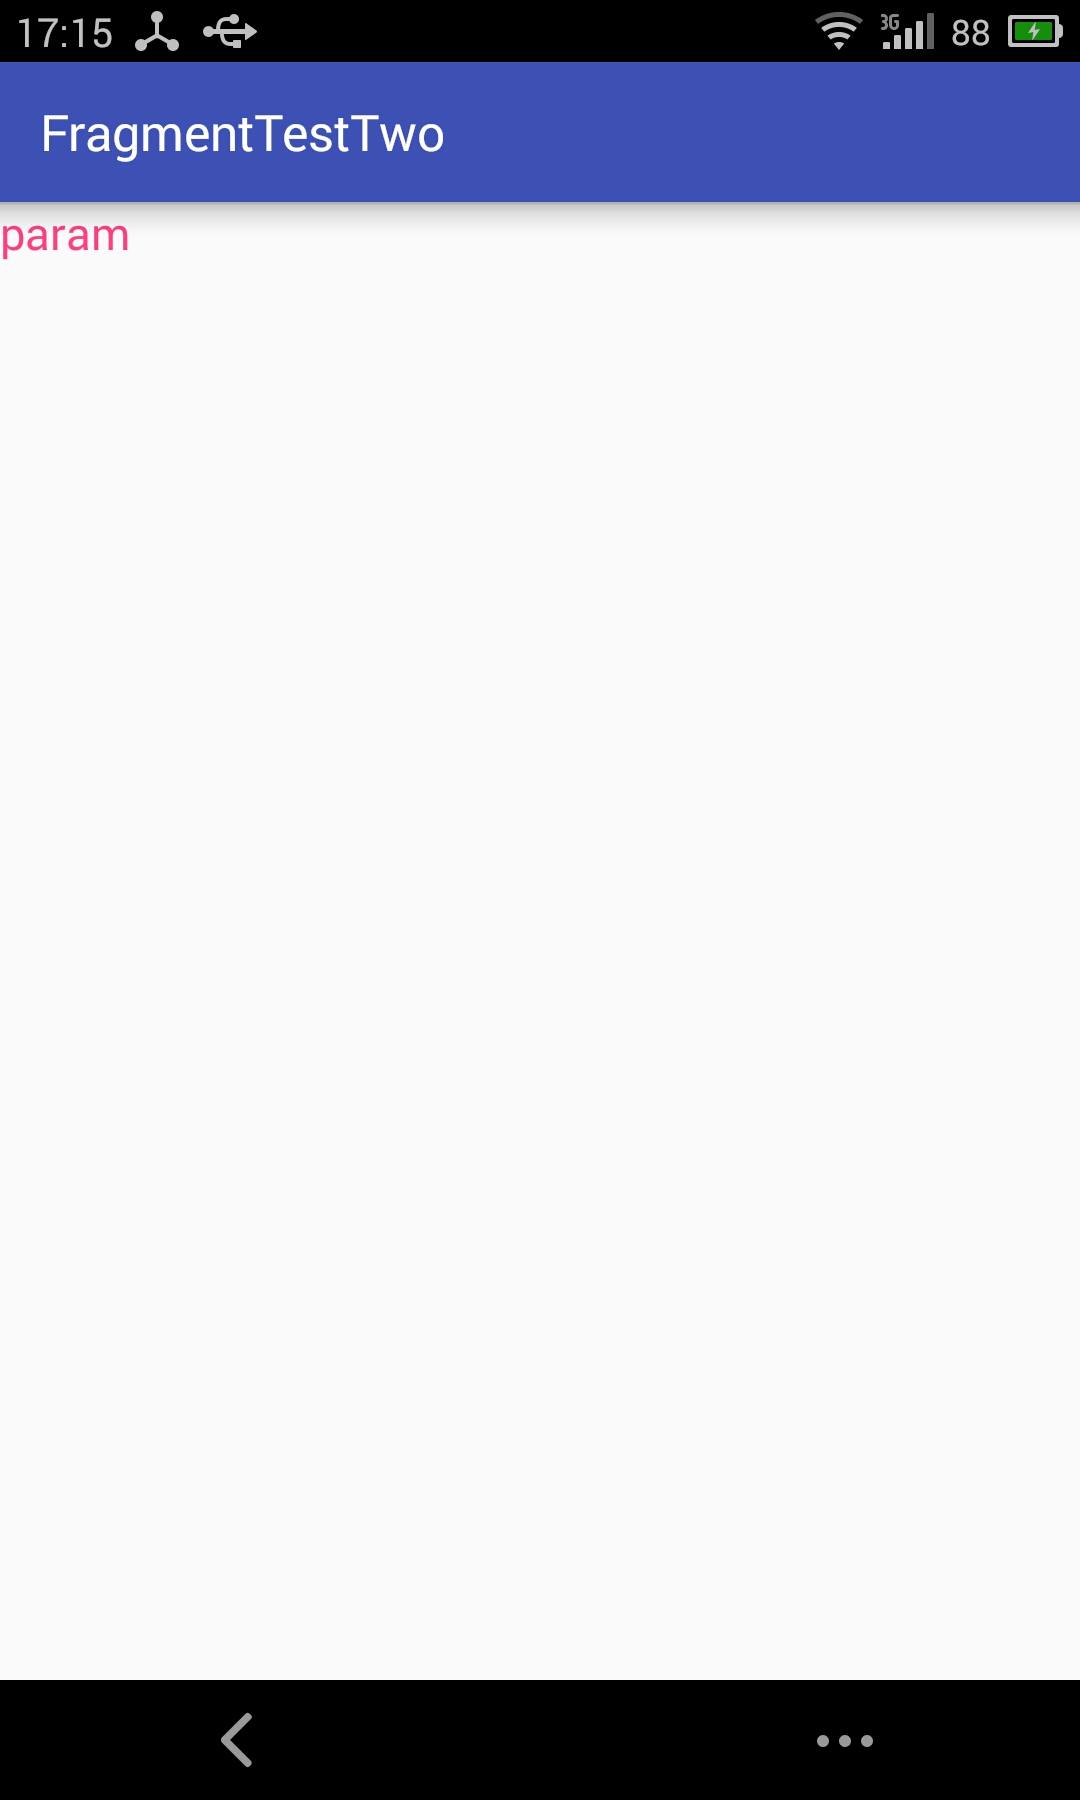
}从代码中可以看出我们将Activity中的字符串“param”通过setArgument()成功传递给了Fragment。
运行代码,结果如下所示:
Fragment传递数据给Activity
为了让fragment与activity交互,可以在Fragment 类中定义一个接口,并在activity中实现。Fragment在他们生命周期的onAttach()方法中获取接口的实现,然后调用接口的方法来与Activity交互。
下面是一个fragment与activity交互的例子:
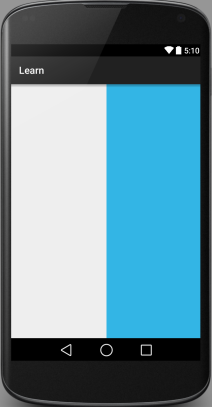
实现的目的:将一个activity用两个fragment分割填充,左侧的fragment中有3个Button,右侧作为内容显示,当点击左侧的按钮,显示对应的文字信息。
1)
首先是activity_main.xml的布局文件,这里我们用动态加载的方式,用两个容器分别托管leftFragment和rightFragment:
<?xml version="1.0" encoding="utf-8"?>
<LinearLayout xmlns:android="http://schemas.android.com/apk/res/android"
    xmlns:tools="http://schemas.android.com/tools"
    android:layout_width="match_parent"
    android:layout_height="match_parent"
    android:orientation="horizontal">

    <FrameLayout
        android:id="@+id/ui_container"
        android:layout_width="0dp"
        android:layout_height="match_parent"
        android:layout_weight="1">
    </FrameLayout>
    <FrameLayout
        android:id="@+id/details_container"
        android:layout_width="0dp"
        android:layout_height="match_parent"
        android:layout_weight="1"
        android:background="@android:color/holo_blue_light">
    </FrameLayout>

</LinearLayout>
效果图如下所示:
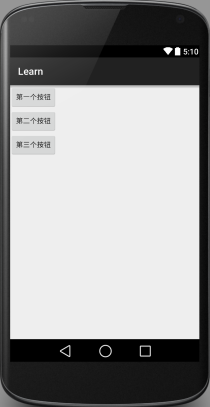
2)
左侧的fragment布局left_fragment.xml如下所示:
<?xml version="1.0" encoding="utf-8"?>
<LinearLayout xmlns:android="http://schemas.android.com/apk/res/android"
    android:orientation="vertical" android:layout_width="match_parent"
    android:layout_height="match_parent">

    <Button
        android:id="@+id/firstButton"
        android:layout_width="wrap_content"
        android:layout_height="wrap_content"
        android:text="@string/first_button"/>
    <Button
        android:id="@+id/secondButton"
        android:layout_width="wrap_content"
        android:layout_height="wrap_content"
        android:text="@string/second_button"/>
    <Button
        android:id="@+id/thenButton"
        android:layout_width="wrap_content"
        android:layout_height="wrap_content"
        android:text="@string/three_button"/>

</LinearLayout>
效果图如下:
3)右侧的fragment布局right_fragment.xml如下:
<?xml version="1.0" encoding="utf-8"?>
<LinearLayout xmlns:android="http://schemas.android.com/apk/res/android"
    android:orientation="vertical" android:layout_width="match_parent"
    android:layout_height="match_parent">

    <TextView
        android:id="@+id/content"
        android:layout_width="match_parent"
        android:layout_height="match_parent" />

</LinearLayout>
上面的布局文件非常简单,应该不用多说了。下面将使用调用接口的方式来与Activity交互。
Step 1:定义一个回调接口:(Fragment中)
在让Fragment关联Activity之前,可以在Fragment中定义一个接口,然后让宿主Activity来实现这个接口。接着,在Fragment中捕获这个接口,并且在onAttach()中 捕获Activity实例
public class LeftFragment extends Fragment {

     private Button mButton1;
     private Button mButton2;
     private Button mButton3;

      private MyListener myListener;

    //关联Fragment的Activity必须实现该接口
     public interface  MyListener{
        public void showMessage(int index);
    }

 public void onAttach(Activity activity) {
        super.onAttach(activity);

  // 确保关联fragment的activity实现该接口,如果没有实现则抛出异常

        try{
            myListener = (MyListener)activity;
        }catch(ClassCastException e){
            throw new ClassCastException(getActivity().getClass().getName()
            +"must implements interface MyListener");

        }
    }

      public View onCreateView(LayoutInflater inflater, ViewGroup container, Bundle savedInstanceState) {
        View view = inflater.inflate(R.layout.left_fragment,container,false);
        return view;
    }

 //初始化控件,并设置监听器
 public void onResume() {
        super.onResume();
        Log.i("LeftFragment","LeftFragment--->onResume");

        mButton1 = (Button) getActivity().findViewById(R.id.firstButton);
        mButton2 = (Button) getActivity().findViewById(R.id.secondButton);
        mButton3 = (Button) getActivity().findViewById(R.id.thenButton);

        MyButtonClickListener clickListener = new MyButtonClickListener();
        mButton1.setOnClickListener(clickListener);
        mButton2.setOnClickListener(clickListener);
        mButton3.setOnClickListener(clickListener);
    }
    ...
}现在Fragment就可以通过调用MyListener接口实例的myListener中的showMessage(int index)方法与activity**传递消息**。
举个例子,在fragment中的下面的方法在用户点击按钮时被调用,fragment 用回调接口来传递事件给父Activity.
res/main/leftFragment
 /** 按钮的监听器 */
    class MyButtonClickListener implements View.OnClickListener {
        public void onClick(View v) {
            Button button = (Button) v;
            if (button == mButton1)
            //调用接口方法,这样主activity中实现的时候,传入的index就可以被分享了
                myListener.showMessage(1);
            if (button == mButton2)
                myListener.showMessage(2);
            if (button == mButton3)
                myListener.showMessage(3);
        }
    }
Step 2:实现接口(Activity中)
为了接收回调事件,宿主activity必须实现在Fragment中定义的接口。
举个例子,下面的activity实现了上面例子中的接口。
public class MainActivity extends AppCompatActivity implements LeftFragment.MyListener{
    private TextView showMessageText;

    @Override
    protected void onCreate(Bundle savedInstanceState) {
        super.onCreate(savedInstanceState);
        setContentView(R.layout.activity_main);
        //动态加载Fragment
        FragmentManager fragmentManager = getFragmentManager();
        FragmentTransaction transaction = fragmentManager.beginTransaction();
        transaction.add(R.id.ui_container,new LeftFragment());
        transaction.add(R.id.details_container,new RightFragment());
        transaction.commit();
    }

//重写回调方法
    @Override
    public void showMessage(int index) {
        if(1==index){
            showMessageText.setText(R.string.first_pager);
        }
        else if(2==index){
            showMessageText.setText(R.string.second_pager);
        }
        else{
            showMessageText.setText(R.string.three_pager);
        }

    }

    //控件初始化
    @Override
    protected void onResume() {
        super.onResume();
        showMessageText =(TextView)findViewById(R.id.content);
    }
}
Step 3:传数据给Fragment(Activity中)
例如:
宿主Activity 包含了三个按钮,当每个按钮被点击的时候,我们希望LeftFragment向另外一个RightFragment传递一个信息用来展示不同的内容。
最后是RightFragment.java中的代码:
public class RightFragment extends Fragment {
    @Override
    public void onCreate(Bundle savedInstanceState) {
        super.onCreate(savedInstanceState);
    }

    @Nullable
    @Override
    public View onCreateView(LayoutInflater inflater, ViewGroup container, Bundle savedInstanceState) {
        View view = inflater.inflate(R.layout.right_fragment,container,false);
        return view;
    }
}
总结一下,对于两个Fragment之间的交互过程,如果想向Fragment发出什么请求,直接把这个请求封装成一个接口,暴露出去,交由宿主来实现就好了。
整个代码的实现效果图如下:
注意onAttach()方法有两种,onAttach(Activity activity)和onAttach(Context context),前者已经被弃用了,但是后者目前还是个坑,会报空指针错误!!所以我这里用的是onAttach(Activity activity)方法,发现还是可以用的!
最后,总结一下接口的回调机制:
举个例子:
有一天 A 遇到一个很难的问题,问题是“1 + 1 = ?”,就打电话问 B,B 一下子也不知道,就跟A说,等我办完手上的事情,就去想想答案,A 也不会傻傻的拿着电话去等 B 的答案吧,于是 A 就对 B 说,我还要去逛街,你知道了答案就打我电话告诉我,于是挂了电话,自己办自己的事情,过了一个小时,B打了A 的电话,告诉 A 答案是2
我们看到在例子中B需要传递数据给A,因此,
- 在B类中定义一个接口;
public interface CallBack {
    /**
     * 这个是 B 知道答案时要调用的函数告诉 A ,也就是回调方法
     * @param result 是答案
     */
    public void solve(String result); //相当于是打电话这个事件
} - 调用接口方法;
在需要用到的地方调用接口方法,比如在此例中 我们点击一下按钮,则B传送了数据到A,那么我们就在B类的点击方法中,调用solve()方法,传入一个参数
- A实现这个接口,重写回调方法


 61
61


 被折叠的 条评论
为什么被折叠?
被折叠的 条评论
为什么被折叠?
 到【灌水乐园】发言


