


目录
一、代码环境说明
本人尝试用python通过os.system()调用ants命令进行批量配准,尝试了各种方法都没成功,相信很多人和我有相同的遭遇,因此在这里我将自己使用antspy成功实现批量配准的过程分享给大家,希望大家在科研途中不要被数据预处理挡住了前进的步伐!
(1)python-3.6
(2)ubuntu-18.04.1-desktop-amd64
(3)VMware-workstation-full-15.5.0
说明:本示例是在虚拟机上实现的,其它版本的软件估计也可以,多尝试。
二、安装antspy
1、安装方法:
有很多种安装方式,比如:
(1)pip install antspyx
(2)conda install antspyx
2、注意:
(1)antspy目前似乎只能在Linux系统上使用,本人尝试在windows系统中安装过,但没成功;
(2)可能出现安装多次不成功的情况,更多的安装方式和解决办法需要百度查询,耐心解决问题。
三、调用antspy命令实现批量配准
1、设置文件夹层级:
(1)按照下图所示的结构来放置你的nii.gz文件。
(2)说明:这是按照我的需要设置的文件夹结构,大家看懂代码后可以自己根据需要调整文件夹结构。
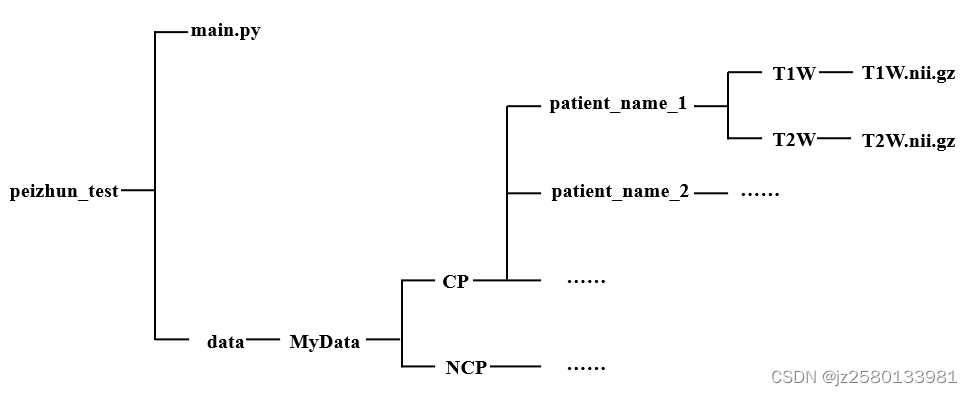
图1 文件夹结构示意图
2、执行下面的代码:
(1)设置好文件夹以后,直接运行如下代码,就可以得到配准后的文件。
(2)这里示例展示的是T2W配准到T1W,大家也可根据自己需要调整代码,比如实现T2W和T1W全部配准到一个模板,不难。
代码示例:
import os
import ants

def registration():
    dir = '/home/yourname/peizhun_test/data/MyData/'
    types = os.listdir(dir)

    for type_name in types:
        type_path = os.path.join(dir, type_name)
        patients = os.listdir(type_path)
        for patient_name in patients:
            patient_path = os.path.join(type_path, patient_name)
            MRI_type = os.listdir(patient_path)
            for file_name in MRI_type:
                print("file_name: ", file_name)
                if file_name == 'T1W':
                    t1w_folder = os.path.join(patient_path, file_name)
                    t1w_files = os.listdir(t1w_folder)
                    for t1w_file in t1w_files:
                        if t1w_file == 'T1W.nii.gz':
                            fixed_image_path = os.path.join(t1w_folder, t1w_file)
                            print("Fixed_image_path: ", fixed_image_path)
                        else:
                            pass
                elif file_name == 'T2W':
                    t2w_folder = os.path.join(patient_path, file_name)
                    t2w_files = os.listdir(t2w_folder)
                    for t2w_file in t2w_files:
                        if t2w_file == 'T2W.nii.gz':
                            moving_image_path = os.path.join(t2w_folder, t2w_file)
                            print("Moving_image_path: ", moving_image_path)
                        else:
                            pass
                else:
                    pass

            # 读取待处理的图像
            fix_img = ants.image_read(fixed_image_path, pixeltype='float')
            move_img = ants.image_read(moving_image_path, pixeltype='float')

            out = ants.registration(fix_img, move_img, type_of_transform='Rigid', outprefix=patient_path+'/t2Rt1_')
            reg_img = out['warpedmovout']  # 获取配准结果
            reg_img.to_file(patient_path+'/NT2W.nii.gz')


if __name__ == "__main__":
    registration()
四、注意事项
(1)装antspy的过程中可能遇到很多问题,这里没有统一的解决办法,需要耐心百度尝试解决;
(2)有其它解决此类问题的经验,欢迎大家在评论区补充!


 9444
9444


 被折叠的 条评论
为什么被折叠?
被折叠的 条评论
为什么被折叠?
 到【灌水乐园】发言


