


第一步,安装nginx-rtmp-module 模块
因为nginx搭建流媒体服务需要用到 nginx-rtmp-module 模块,所以先安装nginx-rtmp-module
# cd /root
# mkdir module && cd module          //创建一个存放模块的目录
# wget https://github.com/arut/nginx-rtmp-module/archive/master.zip        //下载模块
# unzip master.zip                //解压
# ls nginx-rtmp-module-master/         //查看模块目录
第二步,编译安装nginx
# yum -y install pcre-devel openssl openssl-devel        //安装依赖
# wget http://nginx.org/download/nginx-1.12.2.tar.gz        //下载nginx包
# tar xf nginx-1.12.2.tar.gz
# cd nginx-1.12.2
# ./configure --add-module=/root/module/nginx-rtmp-module-master --with-http_ssl_module    //编译安装nginx,并指定上面下载的模块路径
# make
# make install


以下步骤是在上面第四步骤执行出问题的时候执行的:

如果在  ./configure --add-module=/root/module/nginx-rtmp-module-master --with-http_ssl_module   这一步骤报错 SSL modules require the OpenSSL library 可以尝试通过yum -y install openssl openssl-devel  命令安装OpenSSL,如果该命令无法安装,则需要采用如下步骤:
1:下载openssl-1.0.1l   (下载地址:https://download.csdn.net/download/k0307x1990y/86756566)
2:上传openssl至指定路径,此处为/usr/local/src下
3.cd /usr/local/src
4.tar -zxvf openssl-1.0.1.tar.gz
5:在nginx解压目录,再次执行   ./configure --add-module=/root/module/nginx-rtmp-module-master --with-http_ssl_module --with-http_realip_module --with-openssl=/usr/local/src/openssl-1.0.1l
好的,到此这个问题解决了,下面再继续执行
# make
# make install
此步骤nginx被安装到了 /usr/local/nginx,进入此目录下的conf文件夹,修改nginx配置文件nginx.conf,加入rtmp配置(该配置如果默认生成了就不需要添加了):
rtmp {
    server {
        listen 1935;      #监听的端口号
        application myapp {     #自定义的名字
            live on;
       }
        application hls {
            live on;
            hls on;
            hls_path /tmp/hls;
            hls_fragment 1s;
            hls_playlist_length 3s;
       }
    }
}
然后启动nginx
# cd /usr/local/nginx/sbin
# ./nginx
此时通过端口查看命令可以看见linux监听的80端口和1935端口已经全部启动
# netstat -tunlp | grep 80
# netstat -tunlp | grep 1935
nginx.conf完整配置文件如下:
#user  nobody;
worker_processes  1;

#error_log  logs/error.log;
#error_log  logs/error.log  notice;
#error_log  logs/error.log  info;

#pid        logs/nginx.pid;


events {
    worker_connections  1024;
}

rtmp {
    server {
        listen 1935;      #监听的端口号
        application myapp {     #自定义的名字
            live on;
       }
        application hls {
            live on;
            hls on;
            hls_path /tmp/hls;
            hls_fragment 1s;
            hls_playlist_length 3s;
       }
    }
}


http {
    include       mime.types;
    default_type  application/octet-stream;

    #log_format  main  '$remote_addr - $remote_user [$time_local] "$request" '
    #                  '$status $body_bytes_sent "$http_referer" '
    #                  '"$http_user_agent" "$http_x_forwarded_for"';

    #access_log  logs/access.log  main;

    sendfile        on;
    #tcp_nopush     on;

    #keepalive_timeout  0;
    keepalive_timeout  65;

    #gzip  on;

    server {
        listen       80;
        server_name  localhost;

        #charset koi8-r;

        #access_log  logs/host.access.log  main;

        location / {
            root   html;
            index  index.html index.htm;
        }

        #error_page  404              /404.html;

        # redirect server error pages to the static page /50x.html
        #
        error_page   500 502 503 504  /50x.html;
        location = /50x.html {
            root   html;
        }

        # proxy the PHP scripts to Apache listening on 127.0.0.1:80
        #
        #location ~ \.php$ {
        #    proxy_pass   http://127.0.0.1;
        #}

        # pass the PHP scripts to FastCGI server listening on 127.0.0.1:9000
        #
        #location ~ \.php$ {
        #    root           html;
        #    fastcgi_pass   127.0.0.1:9000;
        #    fastcgi_index  index.php;
        #    fastcgi_param  SCRIPT_FILENAME  /scripts$fastcgi_script_name;
        #    include        fastcgi_params;
        #}

        # deny access to .htaccess files, if Apache's document root
        # concurs with nginx's one
        #
        #location ~ /\.ht {
        #    deny  all;
        #}
    }


    # another virtual host using mix of IP-, name-, and port-based configuration
    #
    #server {
    #    listen       8000;
    #    listen       somename:8080;
    #    server_name  somename  alias  another.alias;

    #    location / {
    #        root   html;
    #        index  index.html index.htm;
    #    }
    #}


    # HTTPS server
    #
    #server {
    #    listen       443 ssl;
    #    server_name  localhost;

    #    ssl_certificate      cert.pem;
    #    ssl_certificate_key  cert.key;

    #    ssl_session_cache    shared:SSL:1m;
    #    ssl_session_timeout  5m;

    #    ssl_ciphers  HIGH:!aNULL:!MD5;
    #    ssl_prefer_server_ciphers  on;

    #    location / {
    #        root   html;
    #        index  index.html index.htm;
    #    }
    #}

}
第二步,编译安装ffmpeg
(1)首先安装yasm, FFmpeg 为了提高编译速度,使用了汇编指令,如MMX和SSE等。如果系统中没有yasm指令的话,编译FFmpeg时就会报错nasm/yasm not found or too old. Use --disable-x86asm for a crippled build.
# yum install yasm -y该步骤如果无法安装则采用如下步骤安装yasm,建议用下面的方式,上面的步骤可能不起作用
# cd /root
1)下载:wget http://www.tortall.net/projects/yasm/releases/yasm-1.3.0.tar.gz
2)解压:tar zxvf yasm-1.3.0.tar.gz
3)切换路径: cd yasm-1.3.0
4)执行配置: ./configure
5)编译:make
6)安装:make install
(2)下载ffmpeg并安装
# git clone https://git.ffmpeg.org/ffmpeg.git ffmpeg    //下载ffmpeg
# cd ffmpeg
# ./configure --prefix=/usr/local/ffmpeg
# make
# make install
(3)拷贝命令到/usr/bin(方便后面调用)
# ls /usr/local/ffmpeg/        //查看安装目录生成的文件
bin  include  lib  share
# cp /usr/local/ffmpeg/bin/* /usr/bin/
(4) 通过ffmpeg推流
推流之前需要确定视频的rtsp地址:
关于rtsp地址不同的摄像头地址表现方式不一样,可以参考下面的解释:
rtsp://用户名:密码@IP:554/Streaming/Channels/101

→录像机示例:

取第1个通道的主码流预览

rtsp://admin:hik12345@10.16.4.25:554/Streaming/Channels/101

取第1个通道的子码流预览

rtsp://admin:hik12345@10.16.4.25:554/Streaming/Channels/102

取第1个通道的第三码流预览

rtsp://admin:hik12345@10.16.4.25:554/Streaming/Channels/103

取第12个通道的主码流预览

rtsp://admin:hik12345@10.16.4.25:554/Streaming/Channels/1201

→网络摄像机/网络球机示例:

取主码流的URL:

rtsp://admin:hik123456@192.168.1.64:554/Streaming/Channels/101


★如果是多播取流的话,则使用以下路径
rtsp://用户名:密码@IP:554/Streaming/Channels/101?transportmode=multicast

→录像机示例:

取第1个通道的主码流预览

rtsp://admin:hik12345@10.16.4.25:554/Streaming/Channels/101?transportmode=unicast


★2012年之前的设备URL规定:
rtsp://username:password@//ch/

路径后面不能有空格、回车等符号,否则会连接失败。

→举例说明:

主码流取流:

rtsp://admin:12345@192.0.0.64:554/h264/ch1/main/av_stream

子码流取流:

rtsp://admin:12345@192.0.0.64:554/h264/ch1/sub/av_stream

零通道取流:

rtsp://admin:12345@192.0.0.64:554/h264/ch0/main/av_stream


如果摄像机密码是a12345678,IP是192.168.1.,64,RTSP端口默认554未做改动,是H.264编码,那么

主码流取流:

rtsp://admin:a12345678@192.168.1.64:554/h264/ch1/main/av_stream

子码流取流:

rtsp://admin:a12345678@192.168.1.64:554/h264/ch1/sub/av_stream

【如果是H.265编码的,那么将H.264替换成H.265即可】

注意:URL中“:”“?”“&”等符号均为英文半角。
要判断rtsp地址是否有效,可以通过EasyPlayer-RTSP播放器查看地址是否可以正常观看视频:
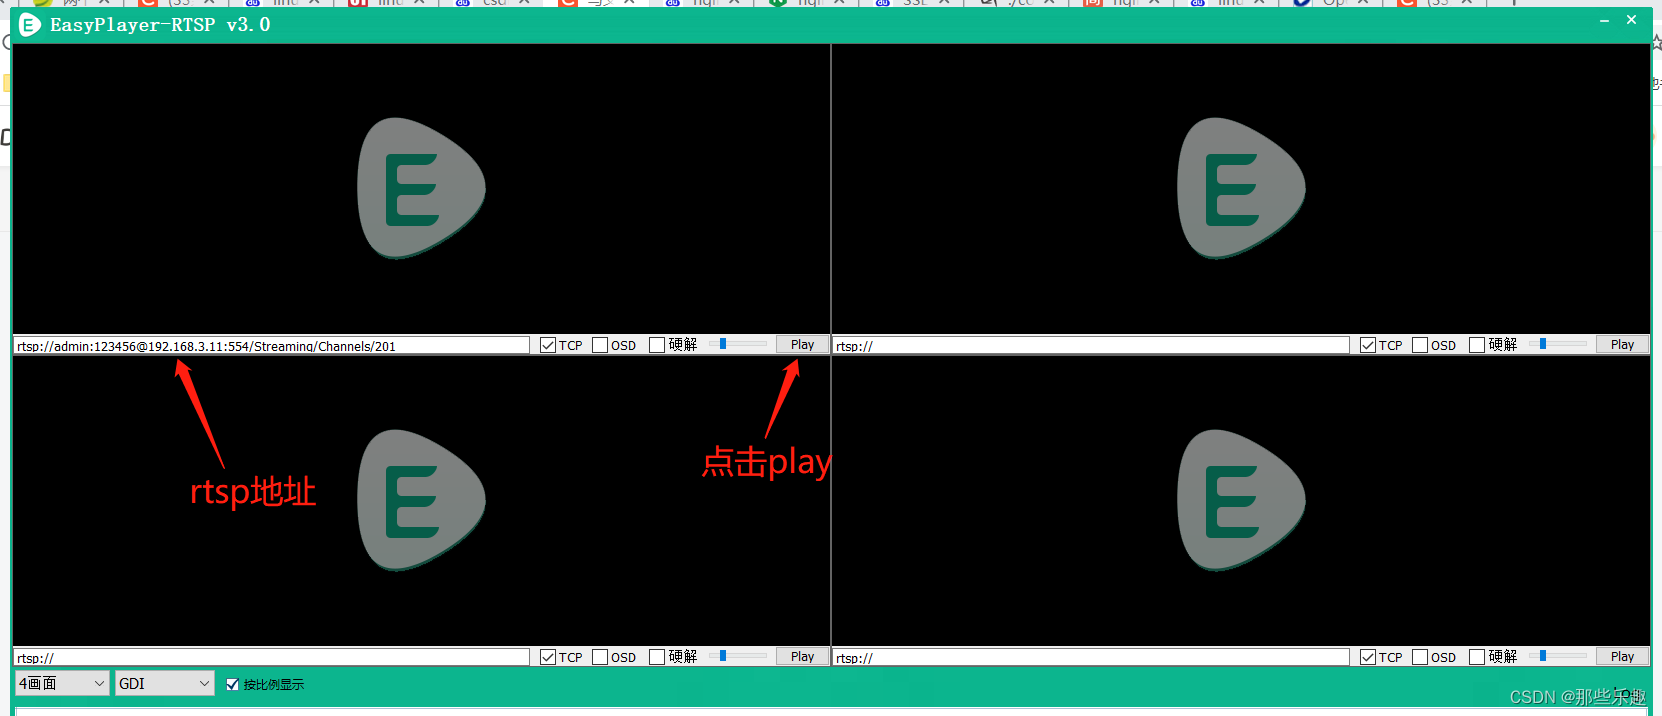
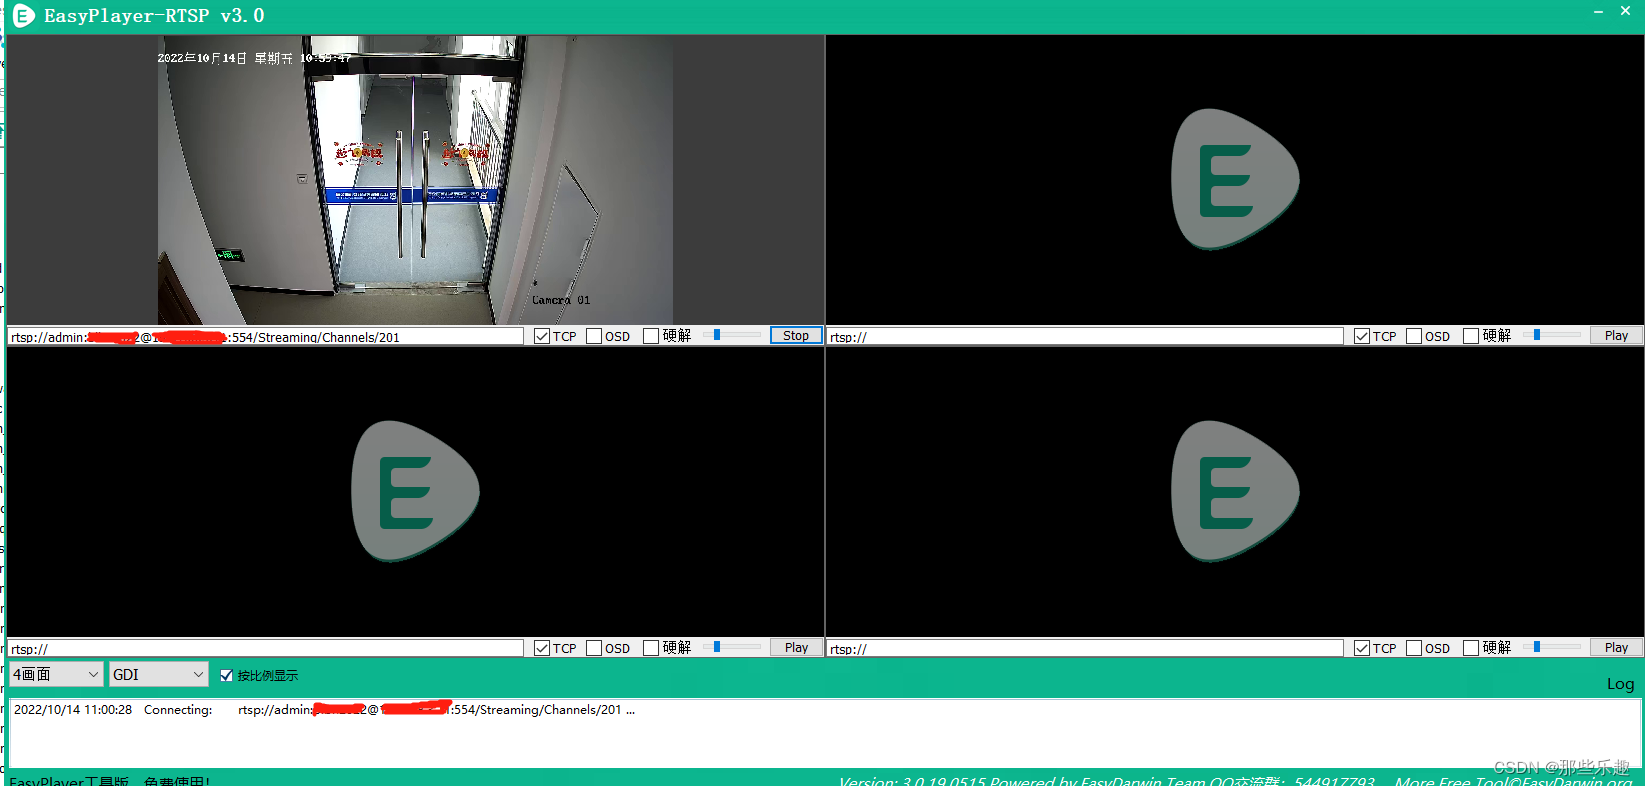
如图视频可以正常播放,说明rtsp地址正确,可以进行 ffmpeg推流了。(EasyPlayer-RTSP-Win-V3.0.19.0515播放器下载地址:https://download.csdn.net/download/k0307x1990y/86756566)
第一种方式:
# ffmpeg -i rtsp://admin:123456@192.168.3.11:554/Streaming/Channels/101 -acodec aac -strict experimental -ar 44100 -ac 2 -b:a 96k -r 25 -b:v 500k -s 640*480 -f flv rtmp://192.168.3.125:1935/myapp/zl

格式解释
-i 要处理视频文件的路径,此处地址是一个监控摄像头
-s 像素
rtmp://192.168.1.11:1935/myapp/23  说明:rtmp://IP:PORT/ myapp指nginx配置文件中自定义的,22指输出文件的名字
-f 强迫采用flv格式
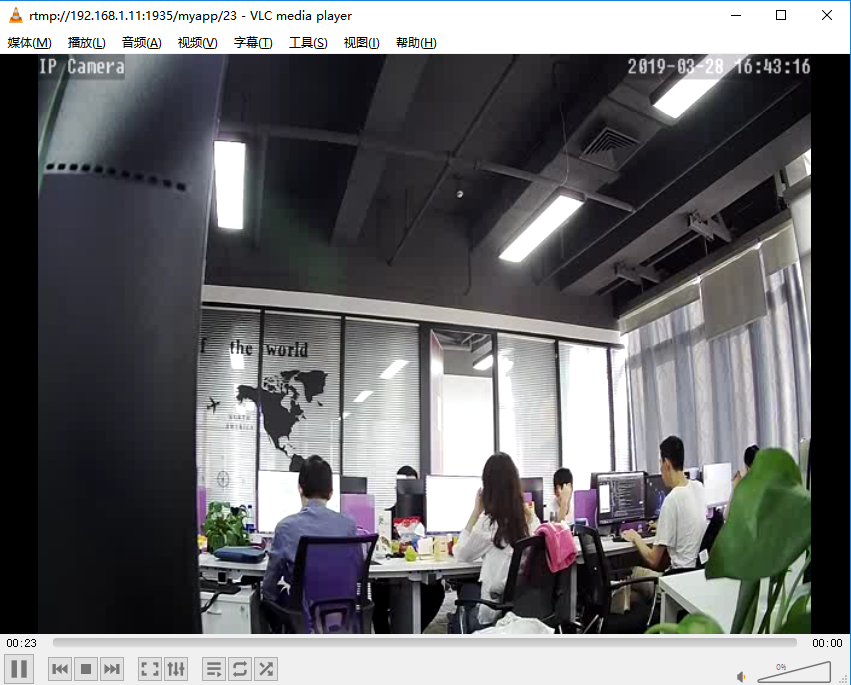
推流成功会出现如下信息:

打开VLC 媒体——>流——>网络
进入服务器查看输出的位置可以发现已生成文件
# ll /tmp/hls/
total 1636
-rw-r--r-- 1 root root 500644 Mar 28 17:05 22-1955.ts
-rw-r--r-- 1 root root 384460 Mar 28 17:05 22-1956.ts
-rw-r--r-- 1 root root 413036 Mar 28 17:05 22-1957.ts
-rw-r--r-- 1 root root 366036 Mar 28 17:05 22-1958.ts
-rw-r--r-- 1 root root    154 Mar 28 17:05 22.m3u8
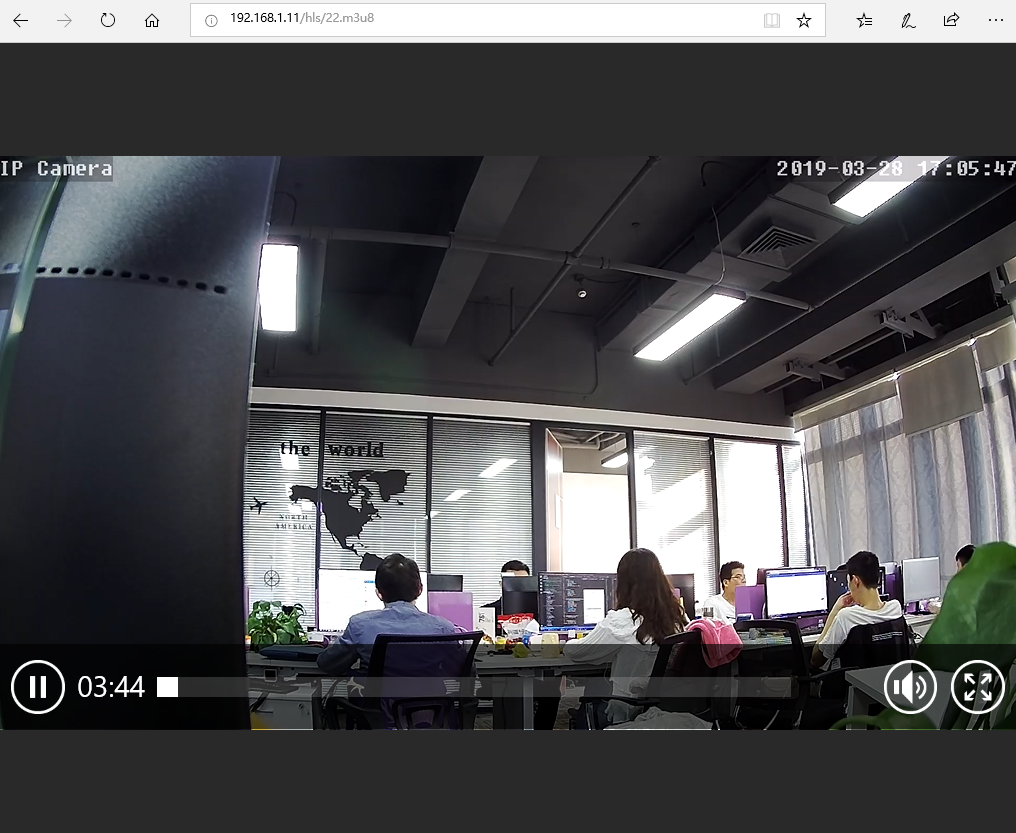
还可以使用浏览器这样访问 http://192.168.1.11/hls/22.m3u8
第二种推流方式
#ffmpeg -i "rtsp://admin:1234565@192.168.3.11:554/h264/ch1/main/av_stream" -c copy -f hls -hls_time 2.0 -hls_list_size 1 -hls_wrap 15 /usr/local/nginx/html/hls/test1_1.m3u8

上面这种方式如果报错不支持hls_wrap,那种用-hls_list_size 2 -hls_flags 2 代替-hls_list_size 1 -hls_wrap 15
下面这个就是代替后的推流方式


# ffmpeg -i "rtsp://admin:123456@192.168.3.11:554/Streaming/Channels/101" -c copy -f hls -hls_time 2.0 -hls_list_size 2 -hls_flags 2 /usr/local/nginx/html/hls/zl.m3u8


该种方式推流,会把m3u8视频流存储到上面写的/usr/local/nginx/html/hls目录下
到时候页面直接访问  http://192.168.3.125/hls/zl.m3u8就可以访问到视频了
以上两种推流方式都是前台推流,服务器关闭会中断,需要改成后台启动,可以写一个sh脚本,脚本内容如下:
#!/bin/sh

ffmpeg -i "rtsp://admin:123456@192.168.3.11:554/Streaming/Channels/101" -c copy -f hls -hls_time 2.0 -hls_list_size 2 -hls_flags 2 /usr/local/nginx/html/hls/zl.m3u8 &            # 注意:必须有&让其后台执行,否则没有pid生成
ffmpeg -i "rtsp://admin:123456@192.168.3.11:554/Streaming/Channels/201" -c copy -f hls -hls_time 2.0 -hls_list_size 2 -hls_flags 2 /usr/local/nginx/html/hls/blm.m3u8 &
ffmpeg -i "rtsp://admin:123456@192.168.3.11:554/Streaming/Channels/301" -c copy -f hls -hls_time 2.0 -hls_list_size 2 -hls_flags 2 /usr/local/nginx/html/hls/cg.m3u8 &
ffmpeg -i "rtsp://admin:123456@192.168.3.11:554/Streaming/Channels/401" -c copy -f hls -hls_time 2.0 -hls_list_size 2 -hls_flags 2 /usr/local/nginx/html/hls/yf.m3u8 &
ffmpeg -i "rtsp://admin:123456@192.168.3.11:554/Streaming/Channels/501" -c copy -f hls -hls_time 2.0 -hls_list_size 2 -hls_flags 2 /usr/local/nginx/html/hls/qt.m3u8 &

echo $! > tpid                           # 将jar包启动对应的pid写入文件中,为停止时提供pid
echo "视频转流系统服务开启成功...."
sh脚本地址:https://download.csdn.net/download/k0307x1990y/86757388
ps:如果前端需要访问/usr/local/nginx/html/hls下面的m3u8格式的视频
需要在nginx下增加配置,允许跨域,否则访问视频会报跨域错误:
location /hls/ {
         types {
             application/vnd.apple.mpegusr m3u8;
             video/mp2t ts;
         }
         root html;
         add_header Cache-Control no-cache;
         add_header Access-Control-Allow-Origin *;
         add_header Access-Control-Allow-Headers "Origin, X-Requested-With,      Content-Type, Accept";
         add_header Access-Control-Methods "GET, POST, OPTIONS";

        }
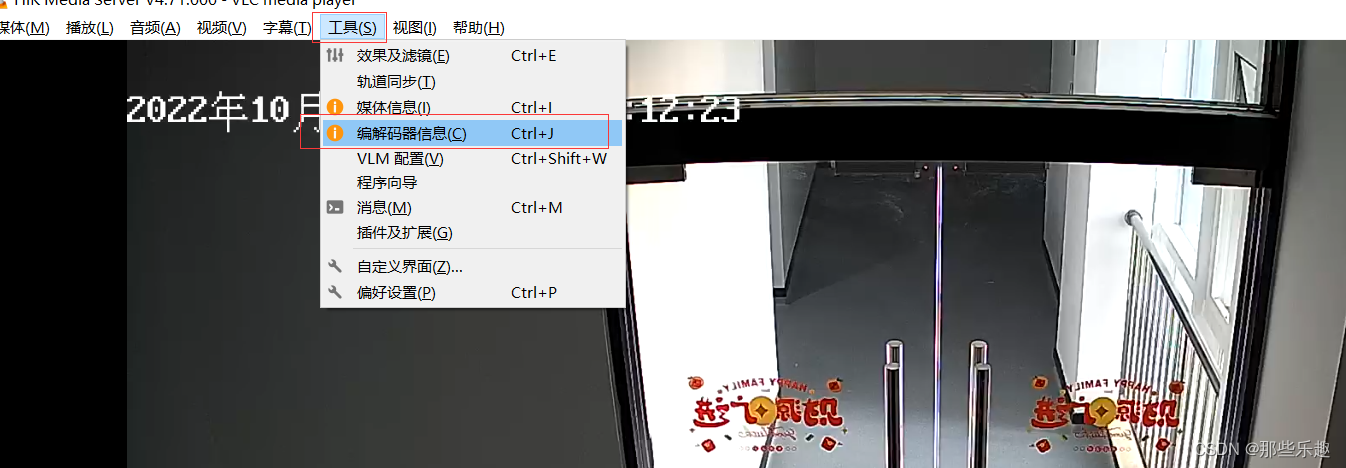
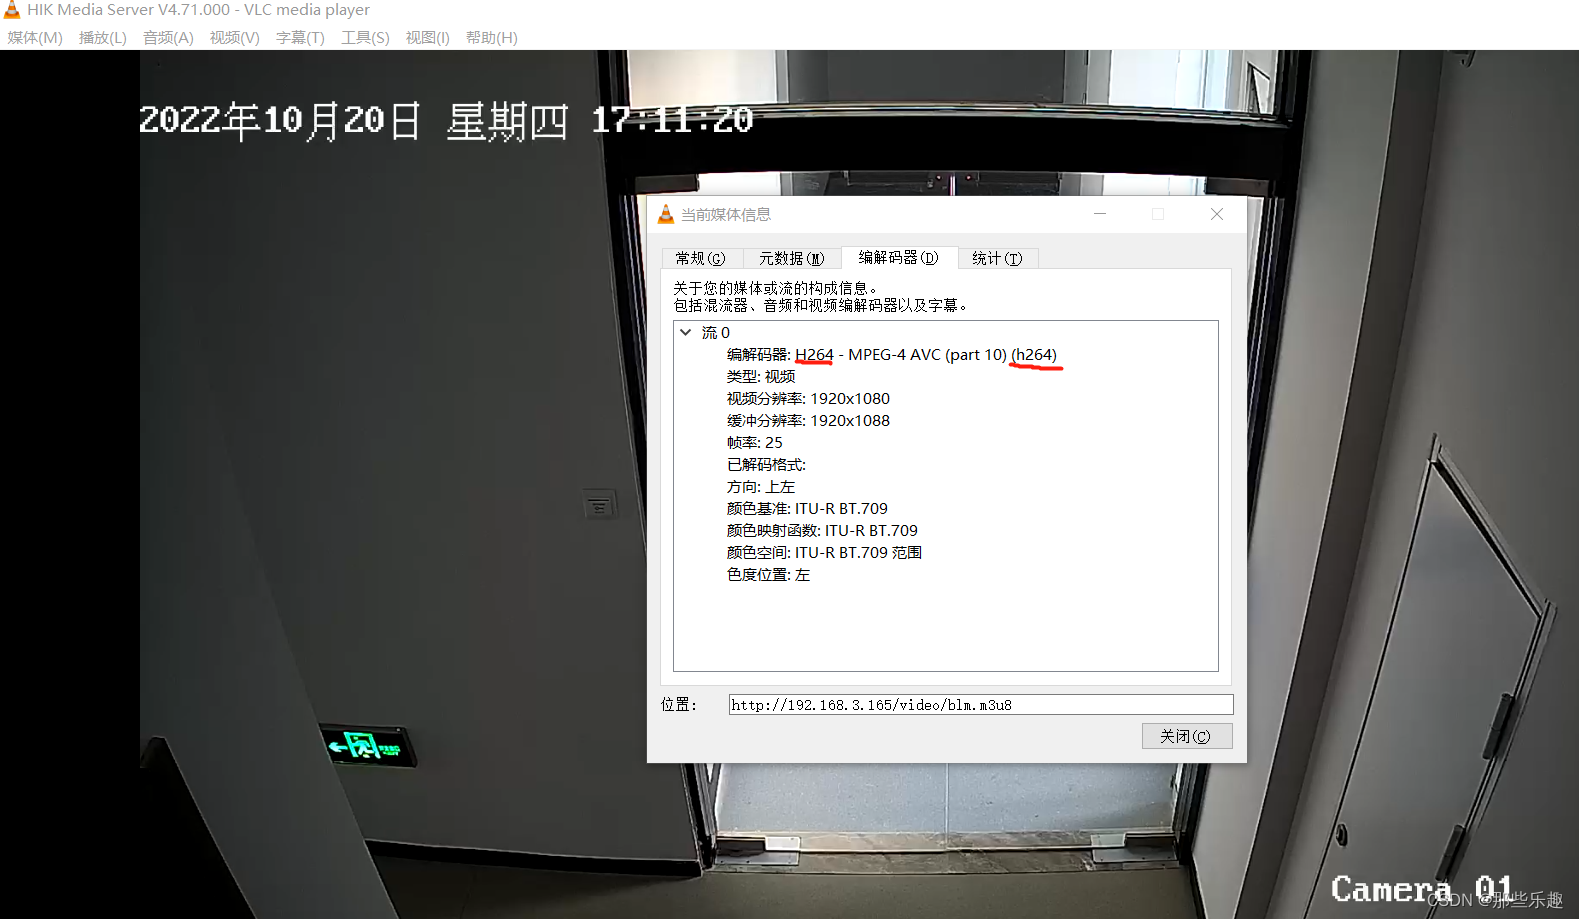
如果访问报错,不能访问265格式的视频,需要把rtmp视频格式设置成264格式,然后需要重新启动转流脚本,这时候用过VLC的工具中的编解码器信息查看视频格式就是264格式了:
nginx.conf完整配置如下:
#user  nobody;
worker_processes  1;

#error_log  logs/error.log;
#error_log  logs/error.log  notice;
#error_log  logs/error.log  info;

#pid        logs/nginx.pid;


events {
    worker_connections  1024;
}

rtmp {
    server {
        listen 1935;      #监听的端口号
        application myapp {     #自定义的名字
            live on;
       }
        application hls {
            live on;
            hls on;
            hls_path /tmp/hls;
            hls_fragment 1s;
            hls_playlist_length 3s;
       }
    }
}


http {
    include       mime.types;
    default_type  application/octet-stream;

    #log_format  main  '$remote_addr - $remote_user [$time_local] "$request" '
    #                  '$status $body_bytes_sent "$http_referer" '
    #                  '"$http_user_agent" "$http_x_forwarded_for"';

    #access_log  logs/access.log  main;

    sendfile        on;
    #tcp_nopush     on;

    #keepalive_timeout  0;
    keepalive_timeout  65;

    #gzip  on;

    server {
        listen       80;
        server_name  127.0.0.1;

        #charset koi8-r;

        #access_log  logs/host.access.log  main;

        location / {
            root   html;
            index  index.html index.htm;
        }

        location /live {
            add_header Access-Control-Allow-Origin *;
            types {
                application/vnd.apple.mpegurl m3u8;
                video/mp2t ts;
            }
            alias /usr/local/nginx/html/hls;
            expires -1;
            add_header Cache-Control no-cache;
        }

        location /hls/ {
                types {
                   application/vnd.apple.mpegusr m3u8;
                   video/mp2t ts;
                }
                root html;
                add_header Cache-Control no-cache;
                add_header Access-Control-Allow-Origin *;
                add_header Access-Control-Allow-Headers "Origin, X-Requested-With, 	Content-Type, Accept";
                add_header Access-Control-Methods "GET, POST, OPTIONS";

        }

        location /video/ {
                alias /usr/local/nginx/html/hls/;
                add_header Cache-Control no-cache;
                add_header Access-Control-Allow-Origin *;
        }

        #error_page  404              /404.html;


        # redirect server error pages to the static page /50x.html
        #
        error_page   500 502 503 504  /50x.html;
        location = /50x.html {
            root   html;
        }

        # proxy the PHP scripts to Apache listening on 127.0.0.1:80
        #
        #location ~ \.php$ {
        #    proxy_pass   http://127.0.0.1;
        #}

        # pass the PHP scripts to FastCGI server listening on 127.0.0.1:9000
        #
        #location ~ \.php$ {
        #    root           html;
        #    fastcgi_pass   127.0.0.1:9000;
        #    fastcgi_index  index.php;
        #    fastcgi_param  SCRIPT_FILENAME  /scripts$fastcgi_script_name;
        #    include        fastcgi_params;
        #}

        # deny access to .htaccess files, if Apache's document root
        # concurs with nginx's one
        #
        #location ~ /\.ht {
        #    deny  all;
        #}
    }


    # another virtual host using mix of IP-, name-, and port-based configuration
    #
    #server {
    #    listen       8000;
    #    listen       somename:8080;
    #    server_name  somename  alias  another.alias;

    #    location / {
    #        root   html;
    #        index  index.html index.htm;
    #    }
    #}


    # HTTPS server
    #
    #server {
    #    listen       443 ssl;
    #    server_name  localhost;

    #    ssl_certificate      cert.pem;
    #    ssl_certificate_key  cert.key;

    #    ssl_session_cache    shared:SSL:1m;
    #    ssl_session_timeout  5m;

    #    ssl_ciphers  HIGH:!aNULL:!MD5;
    #    ssl_prefer_server_ciphers  on;

    #    location / {
    #        root   html;
    #        index  index.html index.htm;
    #    }
    #}

}
到此大功告成!
上面的推流服务脚本启动后,有多个视频就会产生多个进程,如果需要重启时,需要关闭多个进程比较麻烦,可以通过脚本启动时记录启动的pid到一个txt文本,再编写一个停止服务,根据txt文本的pid杀进程。
启动脚本pid写入txt文本示例:
#!/bin/sh

# 文件用来存储进程ID
pidfile="process_ids.txt"

# 清空之前的PID文件
> "$pidfile"

ffmpeg -i "rtsp://admin:blbn2022@192.168.3.11:554/Streaming/Channels/101" -c copy -f hls -hls_time 2.0 -hls_list_size 2 -hls_flags 2 /usr/local/nginx/html/hls/zl.m3u8 &            # 注意:必须有&让其后台执行,否则没有pid生成
# 进程ID写入pidfile
echo $! >> "$pidfile"
ffmpeg -i "rtsp://admin:blbn2022@192.168.3.11:554/Streaming/Channels/201" -c copy -f hls -hls_time 2.0 -hls_list_size 2 -hls_flags 2 /usr/local/nginx/html/hls/blm.m3u8 &
echo $! >> "$pidfile"
ffmpeg -i "rtsp://admin:blbn2022@192.168.3.11:554/Streaming/Channels/301" -c copy -f hls -hls_time 2.0 -hls_list_size 2 -hls_flags 2 /usr/local/nginx/html/hls/cg.m3u8 &
echo $! >> "$pidfile"
ffmpeg -i "rtsp://admin:blbn2022@192.168.3.11:554/Streaming/Channels/401" -c copy -f hls -hls_time 2.0 -hls_list_size 2 -hls_flags 2 /usr/local/nginx/html/hls/yf.m3u8 &
echo $! >> "$pidfile"
ffmpeg -i "rtsp://admin:blbn2022@192.168.3.11:554/Streaming/Channels/501" -c copy -f hls -hls_time 2.0 -hls_list_size 2 -hls_flags 2 /usr/local/nginx/html/hls/qt.m3u8 &

echo $! >> "$pidfile"                           # 将jar包启动对应的pid写入文件中,为停止时提供pid
echo "视频转流系统服务开启成功...."
停止脚本示例:
#!/bin/bash

# 文件用来存储进程ID
pidfile="process_ids.txt"

# 脚本结束前,关闭所有记录的进程
cleanup() {
    while read -r pid; do
        # 检查PID是否有效
        if kill -0 "$pid" 2>/dev/null; then
            echo "Killing process with PID $pid"
            kill "$pid"
        fi
    done < "$pidfile"
}

# 确保脚本退出时调用cleanup函数
trap cleanup EXIT


 1357
1357

 被折叠的 条评论
为什么被折叠?
被折叠的 条评论
为什么被折叠?
 到【灌水乐园】发言


