整合的框架理解
Spring mvc框架是前面展示使用JSP进行页面展示,使用ServletDispatcher或者ContextLoadListener作为bean的容器,其中包括拦截器和视图解析。业务层使用Controller进行业务包装,底层使用Service实现具体的数据交互。
Mybatis是针对sqlmap使用的语句作为实现返回到service中的方法。
环境:
Spring版本:3.2.1
Mybatis版本:3.3.0
JDK版本:1.6
IDE:eclipse
以下为具体的步骤
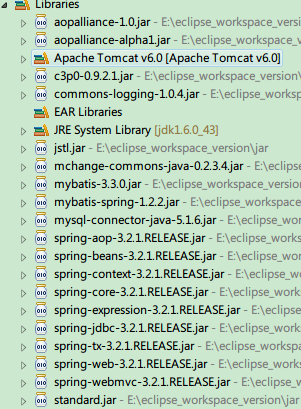
1.新建web项目Spring_Mybatis_Demo2,并引入相应的jar包。所需jar包如下图所示。
2.编辑web.xml
<?xml version="1.0" encoding="UTF-8"?>
<web-app xmlns:xsi="http://www.w3.org/2001/XMLSchema-instance" xmlns="http://java.sun.com/xml/ns/javaee" xsi:schemaLocation="http://java.sun.com/xml/ns/javaee http://java.sun.com/xml/ns/javaee/web-app_2_5.xsd" id="WebApp_ID" version="2.5">
  <display-name>Spring_Myibatis_Demo</display-name>

  <!-- 配置Dispatcher Servlet.这里所有的bean都放到了Dispatcher Servlet中,也是一种简单的方法-->
  <servlet>
     <servlet-name>SpringDispatcher</servlet-name>
     <servlet-class>org.springframework.web.servlet.DispatcherServlet</servlet-class>
     <init-param>
        <param-name>contextConfigLocation</param-name>
        <param-value>classpath:/applicationContext.xml</param-value>
     </init-param>
     <load-on-startup>1</load-on-startup>
  </servlet>

  <servlet-mapping>
    <servlet-name>SpringDispatcher</servlet-name>
    <url-pattern>/</url-pattern>
  </servlet-mapping>

  <!-- 配置Spring ContextLoaderListener -->
  <!--
  <listener>
    <listener-class>
        org.springframework.web.context.ContextLoaderListener
    </listener-class>
  </listener>
  <context-param>
    <param-name>contextConfigLocation</param-name>
    <param-value>
        classpath:/applicationContext*.xml
    </param-value>
  </context-param> -->


  <welcome-file-list>
    <welcome-file>index.html</welcome-file>
    <welcome-file>index.htm</welcome-file>
    <welcome-file>index.jsp</welcome-file>
    <welcome-file>default.html</welcome-file>
    <welcome-file>default.htm</welcome-file>
    <welcome-file>default.jsp</welcome-file>
  </welcome-file-list>
</web-app>
3.配置applicationContext.xml配置文件。
<?xml version="1.0" encoding="UTF-8"?>
<beans
  xmlns="http://www.springframework.org/schema/beans"
  xmlns:xsi="http://www.w3.org/2001/XMLSchema-instance"
  xmlns:context="http://www.springframework.org/schema/context"
  xmlns:dwr="http://www.directwebremoting.org/schema/spring-dwr"
  xmlns:mongo="http://www.springframework.org/schema/data/mongo"
  xmlns:tx="http://www.springframework.org/schema/tx"
  xsi:schemaLocation="http://www.springframework.org/schema/beans
    http://www.springframework.org/schema/beans/spring-beans-3.0.xsd
  http://www.springframework.org/schema/context
  http://www.springframework.org/schema/context/spring-context-3.0.xsd
   http://www.springframework.org/schema/data/mongo
    http://www.springframework.org/schema/data/mongo/spring-mongo-1.0.xsd
    http://www.directwebremoting.org/schema/spring-dwr
    http://www.directwebremoting.org/schema/spring-dwr-3.0.xsd
    http://www.springframework.org/schema/tx
    http://www.springframework.org/schema/tx/spring-tx-3.1.xsd">

    <!-- context properties路径配置.引入属性引用文件 -->
    <context:property-placeholder location="classpath:jdbc.properties" />

    <!-- component scan -->
    <context:component-scan base-package="." />

    <!-- Declare a datasource that has pooling capabilities -->
    <bean id="dataSource" class="com.mchange.v2.c3p0.ComboPooledDataSource" destroy-method="close">
        <property name="driverClass">
            <value>${app.jdbc.driverClassName}</value>
        </property>
        <property name="jdbcUrl">
            <value>${app.jdbc.url}</value>
        </property>
        <property name="user">
            <value>${app.jdbc.username}</value>
        </property>
        <property name="password">
            <value>${app.jdbc.password}</value>
        </property>
        <property name="acquireIncrement">
            <value>10</value>
        </property>
        <property name="idleConnectionTestPeriod">
            <value>60</value>
        </property>
        <property name="maxPoolSize">
            <value>100</value>
        </property>
        <property name="maxStatements">
            <value>50</value>
        </property>
        <property name="minPoolSize">
            <value>10</value>
        </property>
    </bean>

    <!-- Declare a transaction manager -->
    <bean id="transactionManger" class="org.springframework.jdbc.datasource.DataSourceTransactionManager">
        <property name="dataSource">
            <ref bean="dataSource" />
        </property>
    </bean>

    <!-- Enable annotation style of managing transactions -->
    <tx:annotation-driven transaction-manager="transactionManger" />

    <!-- define the SqlSessionFactory, notice that configLocation is not need when you user Mapper FactoryBean -->
    <bean id="sqlSessionFactory" class="org.mybatis.spring.SqlSessionFactoryBean">
        <property name="dataSource">
            <ref bean="dataSource" />
        </property>
        <property name="configLocation">
            <value>classpath:/sqlmap-config.xml</value>
        </property>
    </bean>

    <!-- 视图解析 -->
    <bean class="org.springframework.web.servlet.view.InternalResourceViewResolver">
      <property name="prefix" value="/WEB-INF/jsp/" />
      <property name="suffix" value=".jsp" />
    </bean>

    <!-- scan for mappers and let them be autowired -->
    <bean class="org.mybatis.spring.mapper.MapperScannerConfigurer">
        <property name="basePackage">
            <value>com.raistudies.persistence</value>
        </property>
    </bean>
</beans>
4.配置引用的jdbc.properties文件
#database properties
app.jdbc.driverClassName=com.mysql.jdbc.Driver
app.jdbc.url=jdbc:mysql://localhost/test
app.jdbc.username=root
app.jdbc.password=root@123
5.配置sqlSessionFactory引用的sqlmap-config.xml
<?xml version="1.0" encoding="UTF-8"?>
<!DOCTYPE configuration
PUBLIC "-//mybatis.org//DTD Config 3.0//EN"
"http://mybatis.org/dtd/mybatis-3-config.dtd">
<configuration>
    <settings>
        <!-- changes from the defaults -->
       <setting name="lazyLoadingEnabled" value="false" />
    </settings>
    <typeAliases>
        <typeAlias type="com.raistudies.domain.User" alias="user"/>
    </typeAliases>
</configuration>
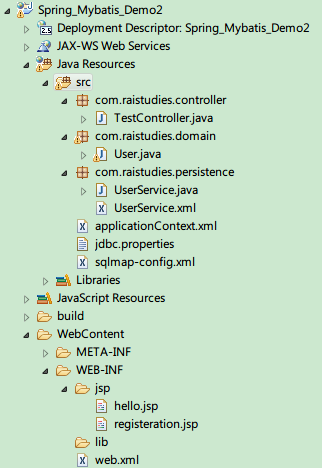
6.到这里所有的配置文件已经完成,可以进行接下来的开发。具体的项目文件如下图所示:

其中:
* com.raistudies.controller为controller包,下面存放controller。
* com.raistudies.domain为实体对象包,下面存放实体。
* com.raistudies.persistence为持久层包,下面存放具体的实现接口与Mapping的xml文件。
7.到此项目已经配置结束,可以进行测试。具体的文件可以从我的资源中下载。
涉及总结的错误:
1.org.apache.commons.logging.LogFactory
原因:commons-logging.jar
2.Attribute ‘destory-method’ is not allowed to appear in element ‘bean’.
这是因为destory-method写错了,应该是destroy-method,可以按alt+/提示出来。
3.Spring “The prefix ”tx“ for element ”tx:annotation-driven“ is not bound.”
Just like your other xmlns: definations, you need one for xmlns:tx
xmlns:tx="http://www.springframework.org/schema/tx"
4.org/springframework/aop/config/AopNamespaceUtils
原因是缺少aop-release.jar
5.MapperScannerConfigurer MapperScannerConfigurer使用properties的方法报错。
原先代码如下:
    <bean class="org.mybatis.spring.mapper.MapperScannerConfigurer">
        <property name="basePackage">
            <value>${MapperP}</value>
        </property>
    </bean>
总是在启动的时候就会报错:
Perhaps the problem may be in MapperScannerConfigurer. It is a BeanDefinitionRegistryPostProcessor and as Javadoc says:
Extension to the standard BeanFactoryPostProcessor SPI, allowing for the registration of further bean definitions before regular BeanFactoryPostProcessor detection kicks in.
所以修改代码直接写死,不适用属性引用的办法即可。
6.java.lang.NoClassDefFoundError: com/mchange/v2/ser/Indirector
已经添加了c3p0的jar包,但是还是需要添加另一个。
这里是缺少mchange-commons-java-x.x.x.jar
7.The markup in the document preceding the root element must be well-formed.
这是因为多空格或者标签不对的原因,仔细检查下就好了
8.访问页面的MAPPER的时候,比如/hello提示resource is not avaliable.
这个错误在此是因为ServletDispatcher设置的url-pattern是*.jsp,改为/就ok了。
<url-pattern>/</url-pattern>9.The absolute uri: http://java.sun.com/jsp/jstl/core cannot be resolved in either web.xml or the jar files
这是因为缺少jstl.jar和standar.jar


 326
326

 被折叠的 条评论
为什么被折叠?


