


池化
通过复用已有的资源来控制资源的总量,减少了资源的频繁创建和销毁带来的性能消耗。
线程池的好处
1.降低了线程创建和销毁带来的性能消耗
2.提高了响应速度;当有新的任务时可以直接使用已经创建好的线程,而不用等待线程创建。
3.合理的设置线程池的大小可以避免线程数超过硬件资源瓶颈带来的问题。
JAVA中提供的线程池的常用方法
newFixedThreadPool :创建一个固定数量的线程池。
newSingleThreadExecutor:创建只有一个线程的线程池。
newCachedThreadPool:允许动态调整伸缩,不会限制最大线程数量。
newScheduledThreadPool:有定时任务的线程池,可以设置线程定时执行或周期性执行。
线程池构造方法:
public ThreadPoolExecutor(int corePoolSize,//核心线程数量
                              int maximumPoolSize,//最大线程数
                              long keepAliveTime,//超出时间,超出核心线程数量以外的线程空余存活时间
                              TimeUnit unit,//存活时间单位
                              BlockingQueue<Runnable> workQueue,//保存等待被执行任务的队列
                              RejectedExecutionHandler handler //当任务无法执行的时候的处理方式
                              ) {
        this(corePoolSize, maximumPoolSize, keepAliveTime, unit, workQueue,
             Executors.defaultThreadFactory(), handler);
    }
对线程池进行监控
1.通过继承ThreadPoolExecutor,并重写beforeExecute及afterExecute来添加线程之前后事件
public class ThreadPoolSelf extends ThreadPoolExecutor {

    public ThreadPoolSelf(int corePoolSize, int maximumPoolSize, long keepAliveTime, TimeUnit unit, BlockingQueue<Runnable> workQueue) {
        super(corePoolSize, maximumPoolSize, keepAliveTime, unit, workQueue);
    }

    @Override
    protected void beforeExecute(Thread t, Runnable r) {
        System.out.println("before=====");
    }

    @Override
    protected void afterExecute(Runnable r, Throwable t) {
        System.out.println("after=====");
        System.out.println("当前线程数"+this.getPoolSize());
        System.out.println("当前核心线程数"+this.getCorePoolSize());
        System.out.println("当前执行数"+this.getActiveCount());
        System.out.println("当前完成数"+this.getCompletedTaskCount());
    }
}
2.自定义一个ExecutorSelf,通过上面创建的ThreadPoolSelf来创建线程池。
public class  ExecutorSelf  {
    public static ExecutorService newFixedThreadPool(int nThreads) {
        return new ThreadPoolSelf(nThreads, nThreads,
                0L, TimeUnit.MILLISECONDS,
                new LinkedBlockingQueue<Runnable>());
    }
}
3.使用自定义的Executor来创建连接池:== ExecutorService executorService = ExecutorSelf.newFixedThreadPool(3) ;==
另外,通过ThreadPoolExecutor executorService = (ThreadPoolExecutor) ExecutorSelf.newFixedThreadPool(3); executorService.prestartAllCoreThreads();还可以进行核心线程预热,使得线程启动时可以直接加到队列,不需要执行addWorker。
线程池运行原理
图解:
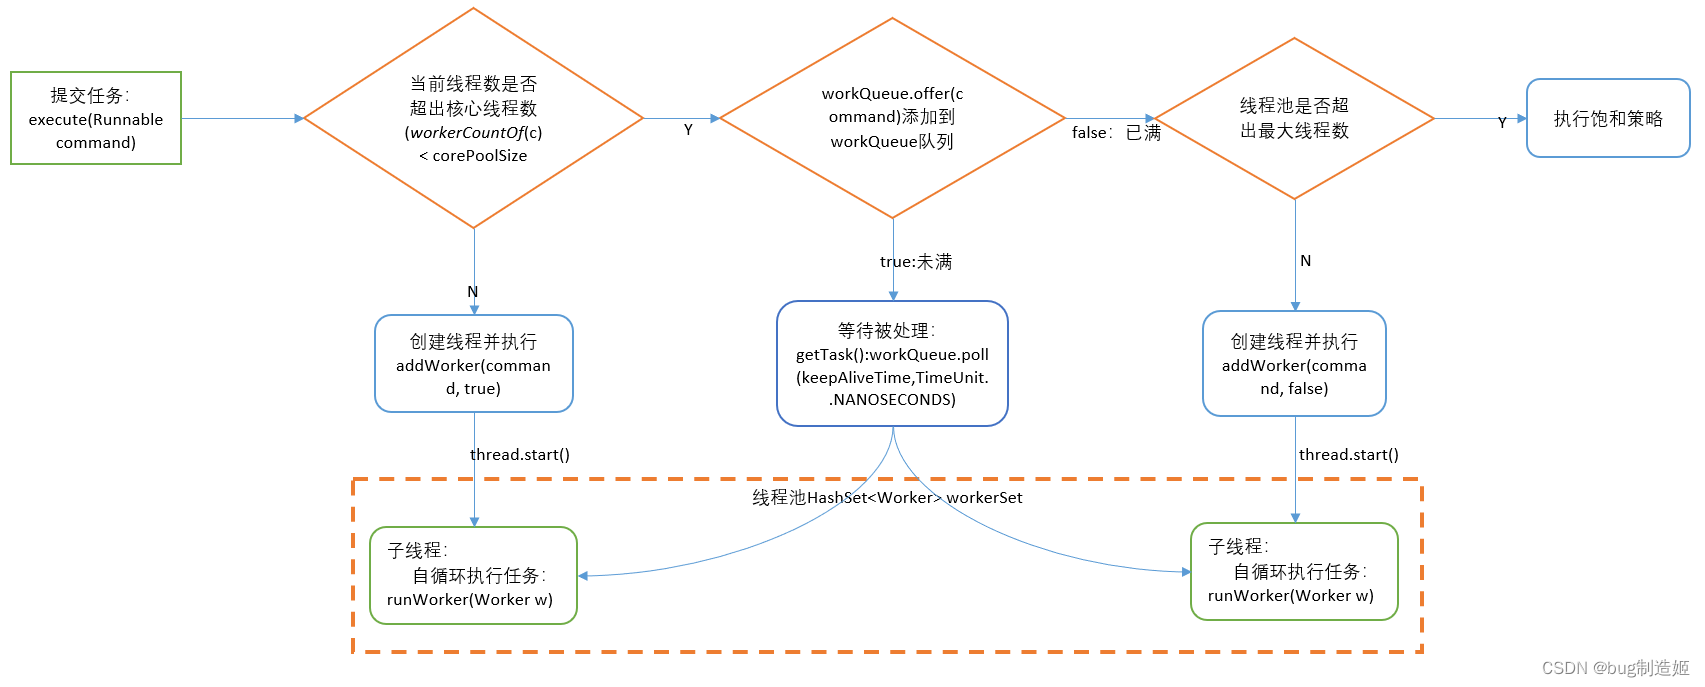
addWorker关键代码选段:
  w = new Worker(firstTask);
            final Thread t = w.thread;
            if (t != null) {
                final ReentrantLock mainLock = this.mainLock;
                mainLock.lock();
                try {
                    // Recheck while holding lock.
                    // Back out on ThreadFactory failure or if
                    // shut down before lock acquired.
                    int rs = runStateOf(ctl.get());

                    if (rs < SHUTDOWN ||
                        (rs == SHUTDOWN && firstTask == null)) {
                        if (t.isAlive()) // precheck that t is startable
                            throw new IllegalThreadStateException();
                        workers.add(w);
                        int s = workers.size();
                        if (s > largestPoolSize)
                            largestPoolSize = s;
                        workerAdded = true;
                    }
                } finally {
                    mainLock.unlock();
                }
                if (workerAdded) {
                    t.start();
                    workerStarted = true;
                }
            }
当前线程通过new Worker转化为worker类型的新的线程对象w
Worker(Runnable firstTask) {
           setState(-1); // inhibit interrupts until runWorker
           this.firstTask = firstTask;
           this.thread = getThreadFactory().newThread(this);
       }
并添加到线程池workerSet中,释放重入锁,执行w.thread.start()来调用worker类中的run方法: public void run() { runWorker(this); }
runWorker代码:除了执行本身的task以外,通过getTask向workQueue请求队列中的线程。需要注意的是,线程task的执行并不是使用start()方法,而是通过task.run()直接调用run方法,这是因为如果使用start方法,task将创建一个线程运行,无法控制在线程池的主线程内。
final void runWorker(Worker w) {
        Thread wt = Thread.currentThread();
        Runnable task = w.firstTask;
        w.firstTask = null;
        w.unlock(); // allow interrupts
        boolean completedAbruptly = true;
        try {
            while (task != null || (task = getTask()) != null) {
                w.lock();
                // If pool is stopping, ensure thread is interrupted;
                // if not, ensure thread is not interrupted.  This
                // requires a recheck in second case to deal with
                // shutdownNow race while clearing interrupt
                if ((runStateAtLeast(ctl.get(), STOP) ||
                     (Thread.interrupted() &&
                      runStateAtLeast(ctl.get(), STOP))) &&
                    !wt.isInterrupted())
                    wt.interrupt();
                try {
                    beforeExecute(wt, task);
                    Throwable thrown = null;
                    try {
                        task.run();
                    } catch (RuntimeException x) {
                        thrown = x; throw x;
                    } catch (Error x) {
                        thrown = x; throw x;
                    } catch (Throwable x) {
                        thrown = x; throw new Error(x);
                    } finally {
                        afterExecute(task, thrown);
                    }
                } finally {
                    task = null;
                    w.completedTasks++;
                    w.unlock();
                }
            }
            completedAbruptly = false;
        } finally {
            processWorkerExit(w, completedAbruptly);
        }
    }


 748
748


 被折叠的 条评论
为什么被折叠?
被折叠的 条评论
为什么被折叠?
 到【灌水乐园】发言


