


1.虚拟机配置网络为“NAT模式”

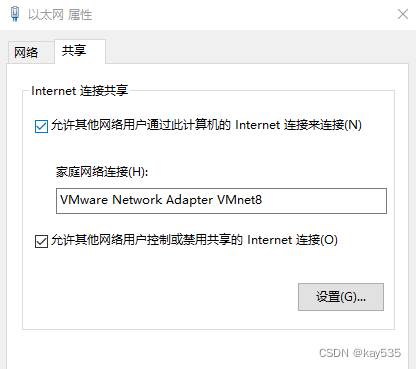
2.物理机开启网络共享
3.在bash中配置代理,注意ip地址为物理机中VMware Network Adapter VMnet8的ipv4地址
vim ~/.bashrc
#添加这两行
export http_proxy="http://proxy.example.com:port"
export https_proxy="http://proxy.example.com:port"
#注意修改为你的代理配置,一般https_proxy的配置需要写成http://......,否则可能报错
source ~/.bashrc
4.在docker中配置代理
sudo mkdir -p /etc/systemd/system/docker.service.d
sudo vim /etc/systemd/system/docker.service.d/http-proxy.conf
#添加以下内容,同样注意HTTPS_PROXY=http://proxy.example.com:port写成http开头。
[Service]
Environment="HTTP_PROXY=http://proxy.example.com:port"
Environment="HTTPS_PROXY=http://proxy.example.com:port"
Environment="NO_PROXY=localhost,127.0.0.1"
重启daemon以及docker
sudo systemctl daemon-reload
sudo systemctl restart docker
5.拉取镜像
参考:
https://blog.csdn.net/qq_43566042/article/details/140040510
https://blog.csdn.net/weixin_43406695/article/details/129929637


 970
970


 被折叠的 条评论
为什么被折叠?
被折叠的 条评论
为什么被折叠?
 到【灌水乐园】发言


