


 本文介绍了一种基于shadowmapping的深度投影阴影技术,通过渲染物体到深度纹理并利用该纹理计算被投影物体上的阴影。
目的:
物体投影在另一个物体身上,而另一个物体可能是平的,但大多数都是不平的多边形物体,这里考虑的是后者,这样可以适用于大多数场合的投影。
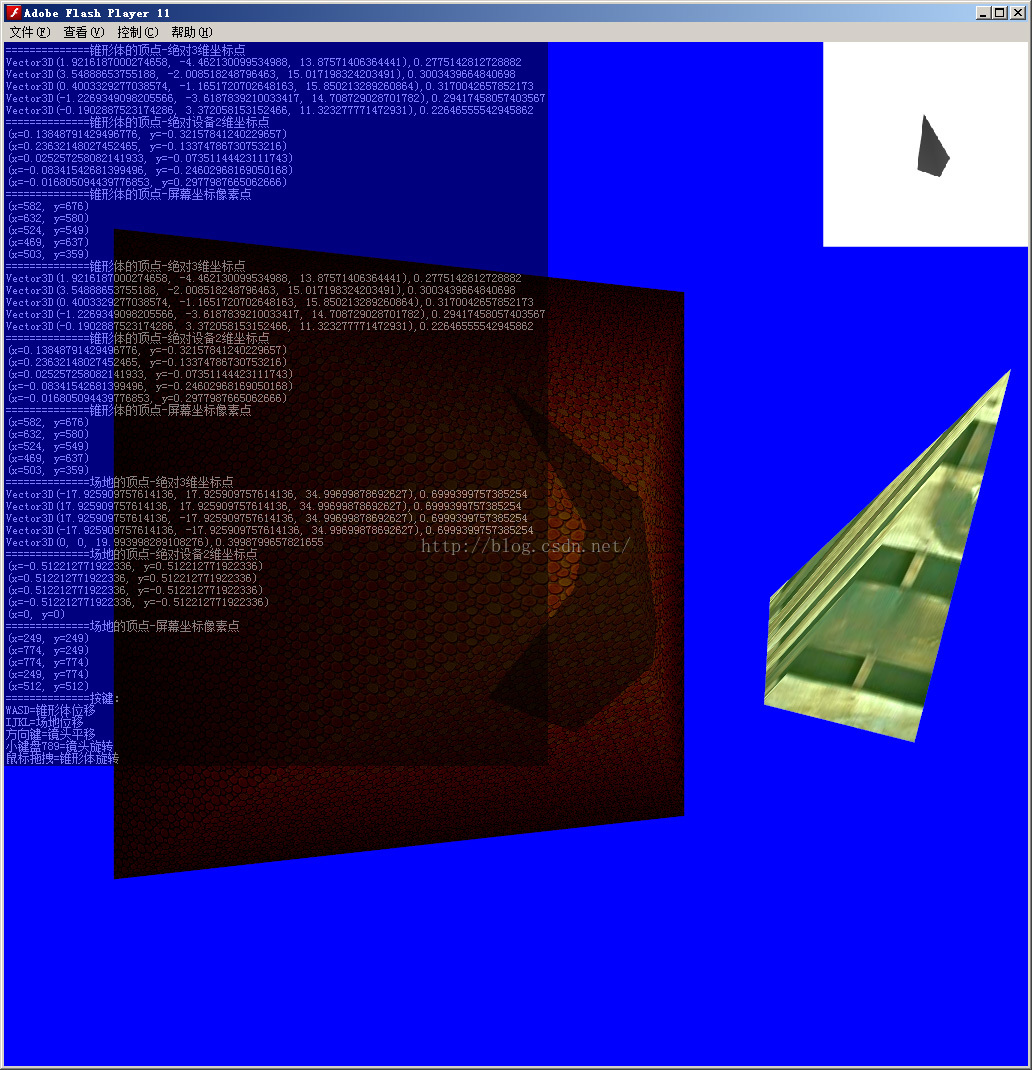
预览效果:
2、再次渲染场景的过程中,将每个片断(像素)变换到前述眼坐标系中,并缩放到[0,1]的范围内以便查询纹理。
3、以较暗的光照绘制场景
4、以当前片断在眼坐标中的S、T坐标查询深度纹理获得深度值,将此深度值与当前片断的R坐标进行比较,若R坐标大于深度值,则当前片断在阴影中;否则当前片断受光照。
2、绘制被投影物体:
-- 顶点仍然要以光点的视角转换(P),以便计算(但输出仍是实际相机视角输出)
-- 取得光点视角的点对应的深度图上的深度,通过将光视角上的点P转为设备坐标(范围[-1,1])P2,再转为深度图的坐标P3,
这样就相当于计算出了相对于深度图的正确UV坐标,这个时候可以用该UV去取得深度图的纹理了
-- 取得深度图中的该点对应P的深度值与该点P对比,大了就可以涂黑了
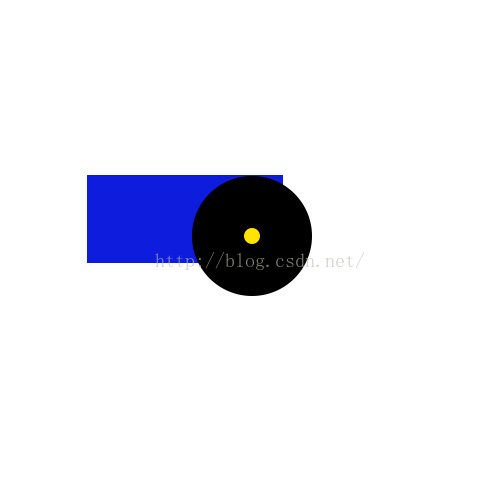
鼠绘图说明:
1、这个是以灯光视角查看物体和场地的效果预览,黄色是灯光,黑色是投影物体,蓝色是被投影的场地。
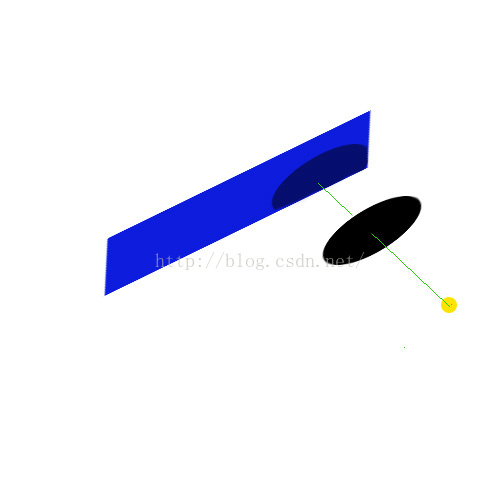
2、以相机视角查看效果预览,这里可以看得出理论上应该是投影成这个样子的(只是随手一画,并不严谨,参考即可)
关键代码--渲染被投影物体:
注意点:
1、绘制深度图时由于我们这里绘制的图是越离光近越黑越接近0,越远越白越接近1,所以默认让画布是白的表示其他地图最远,否则会认为黑色部分都是遮挡部分
物体投影在另一个物体身上,而另一个物体可能是平的,但大多数都是不平的多边形物体,这里考虑的是后者,这样可以适用于大多数场合的投影。
预览效果:
原理:
这里使用的是shadow mapping方式,其原理如下:
1、将场景的深度值预先渲染到 以光源位置为原点、光线发射方向为观察方向的投影坐标系中,形成深度纹理。2、再次渲染场景的过程中,将每个片断(像素)变换到前述眼坐标系中,并缩放到[0,1]的范围内以便查询纹理。
3、以较暗的光照绘制场景
4、以当前片断在眼坐标中的S、T坐标查询深度纹理获得深度值,将此深度值与当前片断的R坐标进行比较,若R坐标大于深度值,则当前片断在阴影中;否则当前片断受光照。
转换为stage3D后的流程
1、获得深度图:将要投影的模型以光点的视角绘制成图,.xyz取值[0,1],储存深度
2、绘制被投影物体:
-- 顶点仍然要以光点的视角转换(P),以便计算(但输出仍是实际相机视角输出)
-- 取得光点视角的点对应的深度图上的深度,通过将光视角上的点P转为设备坐标(范围[-1,1])P2,再转为深度图的坐标P3,
这样就相当于计算出了相对于深度图的正确UV坐标,这个时候可以用该UV去取得深度图的纹理了
-- 取得深度图中的该点对应P的深度值与该点P对比,大了就可以涂黑了
鼠绘图说明:
1、这个是以灯光视角查看物体和场地的效果预览,黄色是灯光,黑色是投影物体,蓝色是被投影的场地。
2、以相机视角查看效果预览,这里可以看得出理论上应该是投影成这个样子的(只是随手一画,并不严谨,参考即可)
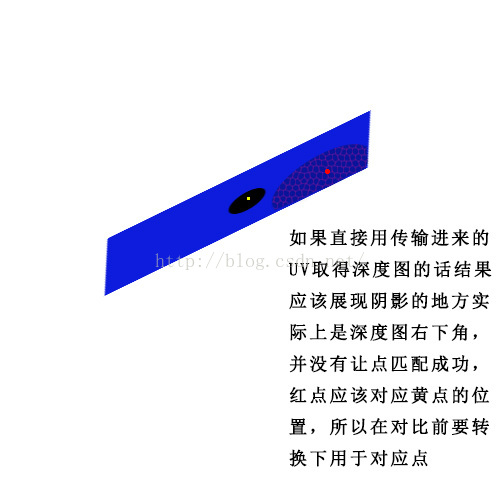
3、我们以灯光视角来绘制投影物体(黑),但只储存深度信息(z轴),所以越远越白,越近越黑,储存到纹理上
4、绘制被投影物体,要拿刚才那个深度图纹理对比,取得的点必须正确,如果取得红色点的话就是错的了,就会像下图那样显示在物体中间了,其实应该只显示一半的

关键代码--获得深度图:
"注意,由于我们这里绘制的图是越离光近越黑越接近0,越远越白越接近1,所以默认让画布是白的表示其他地图最远,否则计算结果不正确"
context3d.clear(1,1,1);

// vc0 MLP
finalMatrix.identity(); // 归零
finalMatrix.append(modelMatrix); // M 投影物体的模型矩阵
var lightMatrix:Matrix3D = new Matrix3D(); // 计算光点矩阵L(以光点为视角)
lightMatrix.appendTranslation(lightPos.x,lightPos.y,lightPos.z);
finalMatrix.append(lightMatrix.clone());
finalMatrix.append(projectionMatrix); // P矩阵

// fc0 用到两个常量 fc0.x=zFar  和  fc0.w 使生成的纹理.w=1
context3d.setProgramConstantsFromVector(Context3DProgramType.FRAGMENT,0,Vector.<Number>([zFar,0,0,1]));


// vertex shader
"m44 vt0 va0 vc0 \n" // 最终输出点vt0 = 原始顶点*MLP
"mov v1 vt0\n" + // 将它传输给片段着色器使用
"mov op vt0" // 将它输出

// fragment shader
"mov ft0.xyz v1.zzz\n" + // 让图片着色统一是z,取值范围 [0,zFar]
"mov ft0.w fc0.w\n" + // 图片色彩w = 1 即透明度
"div ft0.xyz ft0.xyz fc0.x\n" + // ft0.xyz = ft0.xyz / zFar 让取值变为范围[0,1]
"mov oc,ft0" // 输出,由于颜色值根据深度归为0~1,所以越远越接近1越白,越近越黑

// 获得图(由于这里不需要再在CPU上处理,直接GPU上处理即可,所以使用setRenderToTexture)
context3d.setRenderToTexture(texShadow,false,0,0); // 设置即将要渲染到的位图
context3d.clear(0,0,0); // 填色黑色
lightViewEntity(); // 渲染物体(绘制深度图)
context3d.setRenderToBackBuffer(); // 设置渲染到后台缓冲区(配合setRenderToTexture使用,用后恢复正常)


// 如果必须要到CPU上处理,还可以这样获得位图图源到bdShadow:BitmapData,
context3d.clear(0,0,0);
lightViewEntity();
context3d.drawToBitmapData(bdShadow);
texShadow.uploadFromBitmapData(bdShadow);<strong>
</strong>
关键代码--渲染被投影物体:
// 灯光坐标点
private var lightPos:Vector3D = new Vector3D(0,0,-15,0);

// vc0 MVP 相机视角最终矩阵
finalMatrix.identity();
finalMatrix.append(floorMatrix);
finalMatrix.append(viewMatrix);
finalMatrix.append(projectionMatrix);
context3d.setProgramConstantsFromMatrix(Context3DProgramType.VERTEX,0,finalMatrix,true);

// vc4 MLP 灯光视角最终矩阵
finalMatrix.identity();
finalMatrix.append(floorMatrix);
var lightMatrix:Matrix3D = new Matrix3D();
lightMatrix.appendTranslation(lightPos.x,lightPos.y,lightPos.z);
finalMatrix.append(lightMatrix.clone());
finalMatrix.append(projectionMatrix);
context3d.setProgramConstantsFromMatrix(Context3DProgramType.VERTEX,4,finalMatrix,true);

// -- 设置状态机当前的VB的坐标 到 va0 ,因为只有XYZ,所以偏移是0,长度是3
context3d.setVertexBufferAt(0,modelVbFloor,0,Context3DVertexBufferFormat.FLOAT_3);

// -- 设置状态机当前的VB的UV纹理坐标 到 va2
context3d.setVertexBufferAt(2,modelVbFloor,6,Context3DVertexBufferFormat.FLOAT_2);

// fc2 = x=zFar y=0.5(用于辅助计算)
context3d.setProgramConstantsFromVector(Context3DProgramType.FRAGMENT,2,Vector.<Number>([zFar,0.5,1,1]));


// vertex shader
"m44 vt0 va0 vc0 \n" + // vt0 = 原始顶点*MVP 相机视角
"m44 vt1 va0 vc4\n" + // vt1 = 原始顶点*MLP 光视角
"mov v1 vt1\n"+ // 灯光视角后的顶点传输到片段着色器
"mov v1 va2\n"+ // 被投影物体的UV
"mov op vt0\n" // 输出顶点(这个仍然是相机视角的)

// fragment shader
"tex ft1 v1 fs1<2d,linear,repeat,nomip>\n"+ // 被投影物的纹理采样
"div ft2.xy v0.xy v0.zz\n"+ // 转为设备空间,x和y的取值范围是[-1,1] 就是三维点转屏幕上的二维点
"mul ft2.xy ft2.xy fc2.y\n"+ // *0.5 为适应贴图坐标系([0,1]),我们将[-1,1]转为[0,1],转换方法是new=old*0.5+0.5,然后Y取反
"add ft2.xy ft2.xy fc2.y\n"+ // +0.5
"neg ft2.y ft2.y\n"+ // Y取反,因为屏幕坐标系Y是+往上,贴图坐标中Y是-往上,最终计算出来的可以说是UV坐标

"tex ft3 ft2.xy fs0<2d,linear,repeat,nomip>\n"+ // 根据计算出来的UV坐标和深度图纹理取得纹理
"mul ft5.z ft3.z fc2.x\n"+ // z扩大zFar,让原来的0-1变为0-zFar
"slt ft5.w ft5.z v0.z\n"+ // 如果深度图中的深度 小于 (顶点xMLP)的深度的话就是1,否则就是0 也就是说影子时1,非影子0

"mul ft5.w ft5.w fc2.y\n" + // 作出效果,让 影子1,非影子0 转为影子0.5,非影子1,这样直接与原始颜色相乘让影子部分的颜色等于原来的一半
"neg ft5.w ft5.w\n" +
"add ft5.w ft5.w fc2.y\n" +
"add ft5.w ft5.w fc2.y\n" +
"mul ft1 ft1 ft5.w\n"+

"mov oc ft1\n" // oc ft1<strong>
</strong>
注意点:
1、绘制深度图时由于我们这里绘制的图是越离光近越黑越接近0,越远越白越接近1,所以默认让画布是白的表示其他地图最远,否则会认为黑色部分都是遮挡部分
2、在绘制被投影物体的时候,如何转换坐标来对比,这里还是要临时转到灯光视角,然后计算到该视角中顶点对应的深度图纹理坐标,原理:
--- pMLP = 原始顶点 * 灯光最终矩阵 = p * MLP (这里的L就是V,只不过和灯光一个位置和角度了)
--- SB(pMLP) = pMLP.xy / pMLP.zz (就是x和y分别除以z,这样就转为屏幕坐标系了,就是中心点为0,0,左边框x=-1,右边框x=1,上边框y=1,下边看y=-1的这个坐标系),也就是说x和y的取值范围都是 [-1,1]
--- 因为贴图纹理坐标是[0,1],所以这里要把屏幕中的坐标对应那张深度图(屏幕大小的截图)的坐标,要转换坐标,并且Y是相反的 UV(pMVP) *0.5 + 0.5 = [0,1] ,同时纹理y=1-屏幕坐标系的y
范例工程下载:
链接:http://pan.baidu.com/s/1o84C3rk 密码:3cvo
全代码贴出(这里还在CPU上计算了顶点最终的对应的屏幕像素坐标,方便理解):
package
{
	import com.adobe.utils.AGALMiniAssembler;
	import com.adobe.utils.PerspectiveMatrix3D;

	import flash.display.Bitmap;
	import flash.display.BitmapData;
	import flash.display.Sprite;
	import flash.display.Stage3D;
	import flash.display3D.Context3D;
	import flash.display3D.Context3DCompareMode;
	import flash.display3D.Context3DProgramType;
	import flash.display3D.Context3DRenderMode;
	import flash.display3D.Context3DTextureFormat;
	import flash.display3D.Context3DVertexBufferFormat;
	import flash.display3D.IndexBuffer3D;
	import flash.display3D.Program3D;
	import flash.display3D.VertexBuffer3D;
	import flash.display3D.textures.Texture;
	import flash.events.ErrorEvent;
	import flash.events.Event;
	import flash.events.KeyboardEvent;
	import flash.events.MouseEvent;
	import flash.filters.BlurFilter;
	import flash.filters.GlowFilter;
	import flash.geom.Matrix3D;
	import flash.geom.Point;
	import flash.geom.Rectangle;
	import flash.geom.Vector3D;
	import flash.text.TextField;
	import flash.text.TextFieldAutoSize;
	import flash.ui.Keyboard;

	import utils.MatrixUtil;

	[SWF(width="1024", height="1024", frameRate="60", backgroundColor="#000000")]
	/**
	 * 锥形并且贴图纹理追加简单光照
	 * @author Xin Yan Kong 2016.4
	 *
	 */
	public class Main extends Sprite
	{
		/**
		 * 是否首次创建3D环境
		 */
		private var isFirstCreate:Boolean = true;
		/**
		 * 唯一状态机/画家
		 */
		private var context3d:Context3D;
		/**
		 * 模型M矩阵
		 */
		private var modelMatrix:Matrix3D;
		/**
		 * 镜头V矩阵
		 */
		private var viewMatrix:Matrix3D;
		/**
		 * 投影P矩阵,Adobe封装的,继承于Matrix3D
		 */
		private var projectionMatrix:PerspectiveMatrix3D;
		/**
		 * 最终矩阵,这个应该是M+V+P
		 */
		private var finalMatrix:Matrix3D;
		/**
		 * flash要用到的顶点信息:顶点缓冲数据(模型)
		 */
		private var modelVb:VertexBuffer3D;
		/**
		 * flash要用到的顶点索引信息:索引缓冲数据(模型) 告诉系统点的绘制顺序,系统才知道有多少个面,是怎样的面
		 */
		private var modelIb:IndexBuffer3D;
		/**
		 * flash要用的顶点信息:顶点缓冲数据(地板)
		 */
		private var modelVbFloor:VertexBuffer3D;
		/**
		 * flash要用的顶点信息:索引缓冲数据(地板)
		 */
		private var modelIbFloor:IndexBuffer3D;

		/**
		 * 画家绘制的代码,就是你告诉他应该如何绘制,调色等,他会按照这个方式来绘制,当然也是程序,汇编的风格... 也就是说你可以预先定制好N个代码来选择哪一个来绘制
		 */
		private var program:Program3D;

		private var programShadow:Program3D;


		private var programHasShadowFloor:Program3D; // 渲染含有阴影的图

		/**
		 * 当鼠标移动的时候记录的鼠标点
		 */
		private var onMouseDownPt:Point = new Point();
		/**
		 * 嵌入图片资源到SWF里
		 */
		[Embed(source = "wall.jpg")]
		private var wallClass:Class;
		private var wallBmp:Bitmap = new wallClass() as Bitmap;
		/**
		 * 嵌入图片资源到SWF里
		 */
		[Embed(source = "ground2.jpg")]
		private var groundClass:Class;
		private var groundBmp:Bitmap = new groundClass() as Bitmap;
		/**
		 * flash要用到的纹理信息
		 */
		private var tex:Texture;
		/**
		 * flash要用到的纹理信息
		 */
		private var texGround:Texture;
		/**
		 * 光照所在的点
		 */
		private var lightPos:Vector3D = new Vector3D(0,0,-15,0);
		/**
		 * 光照强度
		 */
		private var lightStr:Number = 0.5;
		private var lightStrAdd:Number = -0.01;
		/**
		 * 深度图储存的texture
		 */
		private var texShadow:Texture;
		/**
		 * 测试显示深度图用的BitmapData
		 */
		private var bdShadow:BitmapData;
		/**
		 * 测试显示用的深度图Bitmap
		 */
		private var shadowMapBmp:Bitmap = new Bitmap();
		/**
		 * 最远的距离
		 */
		private var zFar:Number = 50;


		public function Main()
		{
			// 初始化
			init();
		}

		/**
		 * 初始化
		 *
		 */
		private function init():void{
			// -- 如果没有3D环境的话
			if(stage.stage3Ds.length==0){
				throw("你没有可用的3D环境!");
				return;
			}
			// -- 取得一个stage3D舞台,这里取下标0,因为这个3D舞台100%存在。
			var stage3d:Stage3D = stage.stage3Ds[0];
			// -- 设置侦听:创建失败的情况
			stage3d.addEventListener(ErrorEvent.ERROR,onCreate3dError);
			// -- 设置侦听:创建成功的情况或设备恢复的情况
			stage3d.addEventListener(Event.CONTEXT3D_CREATE,onCreate3dSuccess);
			// -- 请求创建,如果你不请求创建,那么又有什么用呢?渲染模式为硬件模式,表示使用显卡GPU来计算
			stage3d.requestContext3D(Context3DRenderMode.AUTO);
		}
		/**
		 * 创建3D环境失败
		 * @param e
		 *
		 */
		private function onCreate3dError(e:ErrorEvent):void{
			throw("创建3D环境失败!");
		}
		/**
		 * 创建3D环境成功的情况或设备恢复的情况
		 * @param e
		 *
		 */
		private var debugTF:TextField = new TextField();
		private function onCreate3dSuccess(e:Event):void{
			// 如果找不到状态机context3d的话提示错误
			context3d = (e.target as Stage3D).context3D;
			if(context3d==null){
				throw("创建3D环境失败!");
				return;
			}
			// 当发生错误的时候会显示错误信息,着色语言阶段出错时开启此选项就会报具体的错误信息,你好因此排查错误(无论首次创建还是设备恢复都要重新设定此项)
			context3d.enableErrorChecking=true;
			// 设定后台缓冲区,一般就是要画画的区域大小了,还有抗锯齿为2的N次方(0表示不抗锯齿画的效率更高但画面更丑)(无论首次创建还是设备恢复都要重新设定此项)
			context3d.configureBackBuffer(stage.stageWidth, stage.stageHeight, 16, true);
			// 如果第一次创建的话而非设备恢复的情况
			if(isFirstCreate){
				// -- 标识下,说明不再是第一次创建3D环境了
				isFirstCreate = false;
				// -- 侦听:每帧渲染
				this.addEventListener(Event.ENTER_FRAME,onRender);
				// -- 侦听:键盘操控
				stage.addEventListener(KeyboardEvent.KEY_DOWN,onKeyDown);
				// -- 侦听:鼠标操控
				stage.addEventListener(MouseEvent.MOUSE_DOWN,onMouseDown);
				// -- 初始化物体相关信息
				initModel();
				// -- 初始化shader:着色语言
				initShader();
				// -- 创建镜头V矩阵
				viewMatrix = new Matrix3D();
				// -- 镜头拉后一点,因为屏幕向里是+,所以这个镜头实际在屏幕外的地方
				viewMatrix.appendTranslation(10,0,-10);
				viewMatrix.appendRotation(20,Vector3D.Y_AXIS);

//				viewMatrix.appendTranslation(lightPos.x,lightPos.y,lightPos.z);

				// -- 创建投影P矩阵
				projectionMatrix = new PerspectiveMatrix3D();
				// -- 设定为透视矩阵,越远越小越接近屏幕中心的那种,右手坐标系RightHand
				//    -- 第一个参数表示透视角度
				//    -- 第二个参数表示宽高比例
				//    -- 第三个参数表示裁剪的最近距离,比这个个还近就无法显示
				//    -- 第四个参数表示裁剪的最远距离,比这个还远的东西就无法显示
				projectionMatrix.perspectiveFieldOfViewRH(45.0,stage.stageWidth/stage.stageHeight,0.01,zFar);

				// -- 初始化深度图要用到的texture和bitmapData
				texShadow = context3d.createTexture(stage.stageWidth,stage.stageHeight,Context3DTextureFormat.BGRA,true);
				bdShadow = new BitmapData(stage.stageWidth,stage.stageHeight,true,0xffff00);
				this.addChild(shadowMapBmp);

				// -- for debug
				debugTF.background = true;
				debugTF.backgroundColor = 0x000000;
				debugTF.mouseEnabled = debugTF.selectable = false;
				debugTF.multiline = true;
				debugTF.textColor = 0xffffff;
				debugTF.alpha = 0.5;
				debugTF.autoSize = TextFieldAutoSize.LEFT;
				this.addChild(debugTF);

			}
				// 设备恢复的情况
			else{
				restore();
			}
		}
		/**
		 * 初始化物体相关信息
		 *
		 */
		private function initModel():void{
			// -- 最终矩阵
			finalMatrix = new Matrix3D();
			// -- 该物体的矩阵
			modelMatrix = new Matrix3D();
			// -- 该物体的顶点信息(坐标XYZ+对应的颜色RGB)这里5个顶点,我们要绘制一个锥形
			var vecVb:Vector.<Number> = Vector.<Number>([
				// X  Y Z R G B U V nX nY nZ
				-1, 1,0,1,0,0,0,0,0,0,0, // 0 左上角的点 + 红色 + UV坐标纹理的左上角点 + 法线(后面计算下)
				1, 1,0,0,1,0,1,0,0,0,0, // 1 右上角的点 + 绿色 + UV坐标纹理的右上角点 + 法线(后面计算下)
				1,-1,0,0,0,1,1,1,0,0,0, // 2 右下角的点 + 蓝色 + UV坐标纹理的右下角点 + 法线(后面计算下)
				-1,-1,0,1,1,0,0,1,0,0,0,  // 3 左下角的点 + 黄色 + UV坐标纹理的左下角点 + 法线(后面计算下)
				0,0,-5,0,1,1,0.5,0.5,0,0,0 // 4 里面中心的点 + 青色 + UV坐标纹理的中间的点 + 法线(后面计算下)
			]);
			calcNormal(vecVb,5);
			// -- 创建该物体的顶点缓冲:有多少个顶点(当然是4个),以及一个顶点包含多少个信息(上面一行的信息=11)
			modelVb = context3d.createVertexBuffer(vecVb.length/11,11);
			// -- 通过vector来上传顶点数据:顶点信息、偏移(由于这里vec全部信息只用于一个物体,偏移就是0)、顶点数
			modelVb.uploadFromVector(vecVb,0,vecVb.length/11);
			// -- 该物体的索引数据:按照下面的顺序来画三角形的
			var vecIdx:Vector.<uint> = Vector.<uint>([
				0,1,2, // 左上角的点 - 右上角的点 - 右下角的点   这里是顺时针绘制的吧,表示一个三角形
				2,3,0, // 右下角的点 - 左下角的点 - 左上角的点  这里也是顺时针绘制的吧,表示第二个三角形
				0,1,4, // 锥形面1
				0,4,3, // 锥形面2
				3,4,2, // 锥形面3
				1,2,4  // 锥形面4
			]);
			// -- 创建该物体的顶点索引缓冲:
			modelIb = context3d.createIndexBuffer(vecIdx.length);
			// -- 通过vector来上传顶点索引数据:顶点索引数据、偏移(同上由于整个vecIdx都用于一个物体了这里全部都是该物体的信息)、索引个数
			modelIb.uploadFromVector(vecIdx,0,vecIdx.length);
			// -- 创建纹理,由于使用BitmapData方式转为texture所以模式是RGBA,如果是ATF格式的话则是COMPRESSED,纹理必须是2的n次方宽高,如果不是可以转化一下
			tex = context3d.createTexture(wallBmp.width,wallBmp.height,Context3DTextureFormat.BGRA,false);
			// -- 上传纹理
			tex.uploadFromBitmapData(wallBmp.bitmapData);


			// -- 计算木板的顶点和索引
			vecVb = Vector.<Number>([
				// X  Y Z R G B U V nX nY nZ
				-10, 10,-20,1,0,0,0,0,0,0,1, // 0 左上角的点 + 红色 + UV坐标纹理的左上角点 + 法线(后面计算下)
				10, 10,-20,0,1,0,30,0,0,0,1, // 1 右上角的点 + 绿色 + UV坐标纹理的右上角点 + 法线(后面计算下)
				10,-10,-20,0,0,1,30,30,0,0,1, // 2 右下角的点 + 蓝色 + UV坐标纹理的右下角点 + 法线(后面计算下)
				-10,-10,-20,1,1,0,0,30,0,0,1,  // 3 左下角的点 + 黄色 + UV坐标纹理的左下角点 + 法线(后面计算下)
				0,0,-5,1,1,0,15,15,0,0,1


			]);
			modelVbFloor = context3d.createVertexBuffer(vecVb.length/11,11);
			modelVbFloor.uploadFromVector(vecVb,0,vecVb.length/11);
			vecIdx = Vector.<uint>([
				0,1,2, // 左上角的点 - 右上角的点 - 右下角的点   这里是顺时针绘制的吧,表示一个三角形
				2,3,0, // 右下角的点 - 左下角的点 - 左上角的点  这里也是顺时针绘制的吧,表示第二个三角形
				0,1,4, // 锥形面1
				0,4,3, // 锥形面2
				3,4,2, // 锥形面3
				1,2,4  // 锥形面4
			]);
			modelIbFloor = context3d.createIndexBuffer(vecIdx.length);
			modelIbFloor.uploadFromVector(vecIdx,0,vecIdx.length);
			// -- 创建纹理,由于使用BitmapData方式转为texture所以模式是RGBA,如果是ATF格式的话则是COMPRESSED,纹理必须是2的n次方宽高,如果不是可以转化一下
		    texGround = context3d.createTexture(groundBmp.width,groundBmp.height,Context3DTextureFormat.BGRA,false);
			// -- 上传纹理
			texGround.uploadFromBitmapData(groundBmp.bitmapData);
		}
		/**
		 * 计算法线 原理就是计算顶点所关联的所有三角形面的法线,然后取得它们平均值就是顶点的法线了(当然还有其他方式求得法线,比如权重)
		 * @param vecVb 顶点信息
		 * @param vertexNum 顶点数
		 * @param offsetNormal 法线的偏移值
		 * @param offsetVertex 顶点的偏移值
		 */
		private function calcNormal(vecVb:Vector.<Number>,vertexNum:int):void{
			var data32PerVertex:int = vecVb.length/vertexNum;
			var vertexArr:Array = [];
			for (var i:int=0;i<vertexNum;i++){
				var x:Number = vecVb[data32PerVertex*i];
				var y:Number = vecVb[data32PerVertex*i+1];
				var z:Number = vecVb[data32PerVertex*i+2];
				vertexArr.push(new Vector3D(x,y,z));
			}
			var calcNormal:Function = function(p1:Vector3D,p2:Vector3D,p3:Vector3D):Vector3D{
				var source2:Vector3D = new Vector3D(p2.x-p1.x,p2.y-p1.y,p2.z-p1.z);
				var source1:Vector3D = new Vector3D(p3.x-p1.x,p3.y-p1.y,p3.z-p1.z);
				var norV:Vector3D = new Vector3D();
				norV.x = source1.y * source2.z - source1.z * source2.y;
				norV.y = source1.z * source2.x - source1.x * source2.z;
				norV.z = source1.x * source2.y - source1.y * source2.x;
				norV.normalize();
				return norV;
			}
			// 计算平均法线:就是将N个三角面的法线平均一下,这里由于锥顶在背面,我们就将结果法线反向一下,让背面受光,而正面不受光,如果要双面受光的话后面再说
			var calcNormalAvg:Function = function(arr:Array,offsetNormal:int):void{
				var sideLen:int = arr.length/3;
				var sideAvg:Vector3D = new Vector3D();
				for (var i:int=0;i<sideLen;i++){
					var side:Vector3D = calcNormal(vertexArr[arr[i*3]],vertexArr[arr[i*3+1]],vertexArr[arr[i*3+2]]);
					sideAvg=sideAvg.add(side);
				}
				sideAvg.x = sideAvg.x/sideLen;
				sideAvg.y = sideAvg.y/sideLen;
				sideAvg.z = sideAvg.z/sideLen;
				sideAvg.normalize();
				vecVb[offsetNormal] = -sideAvg.x;
				vecVb[offsetNormal+1] = -sideAvg.y;
				vecVb[offsetNormal+2] = -sideAvg.z;
			}
			// 4-顶点的平均法线
			calcNormalAvg([
				4,0,1,
				4,3,0,
				4,2,3,
				4,1,2
			],vertexNum*data32PerVertex-3);

			// 3-顶点的平均法线
			calcNormalAvg([
				3,0,2,   // 裁掉不受光的那个面,否则影响受光面的光照
				3,0,4,
				3,4,2
			],(vertexNum-1)*data32PerVertex-3);

			// 2-顶点的平均法线
			calcNormalAvg([
				2,3,4,
				2,3,1, // 裁掉不受光的那个面,否则影响受光面的光照
				2,4,1
			],(vertexNum-2)*data32PerVertex-3);

			// 1-顶点的平均法线
			calcNormalAvg([
				1,2,4,
				1,2,3,   // 裁掉不受光的那个面,否则影响受光面的光照
				1,4,0
			],(vertexNum-3)*data32PerVertex-3);

			// 0-顶点的平均法线
			calcNormalAvg([
				0,1,4,
				0,1,2,   // 裁掉不受光的那个面,否则影响受光面的光照
				0,4,3
			],(vertexNum-4)*data32PerVertex-3);
		}
		/**
		 * 初始化着色语言:一般物体渲染,带有光照效果
		 *
		 */
		private function initShader():void{
			// -- 创建一个着色语言
			program = context3d.createProgram();
			// -- 创建一个AGALMiniAssembler辅助类用于写顶点着色代码
			//    主要用于输出最终的顶点位置,以及传一些数据给片段着色代码使用
			var vShader:AGALMiniAssembler = new AGALMiniAssembler();
			vShader.assemble(Context3DProgramType.VERTEX,
				"m44 op va0 vc0 \n" + // 输出 = 4个顶点 * 最终矩阵 (这里的*就是m44方法,表示每个点都作用了该矩阵)
				"mov v1 va1\n" + // 将4个点的颜色传到中转站以便片段着色代码使用
				"mov v2 va2\n" +   // 将4个点的使用纹理的坐标点传到中转站以便片段着色代码使用
				"mov v3 va3" // 将4个点坐标点传到中转站以便片段着色代码使用
			);

			// -- 创建一个AGALMiniAssembler辅助类用于写片段着色代码
			var fShader:AGALMiniAssembler = new AGALMiniAssembler();
			fShader.assemble(Context3DProgramType.FRAGMENT,
				//------------------------------------------------------------------------------------------------------
				// 通用变量:
				//   -- 纹理颜色
				//   -- 世界光照点 globalLight
				//   -- 世界法线   globalNormal
				//------------------------------------------------------------------------------------------------------
				"tex ft0, v2, fs0 <2d,linear,repeat,nomip>\n"+ //临时变量 ft0 = v2(UV坐标点)和图片纹理作用的颜色点  关于linear repeat nomip后面再说
				"mov ft1 fc0\n" + // 世界光照点 ft1 = 光照点
				"mov ft2 v3\n" + // 本地法线 ft2 = 法线
				"m44 ft2 ft2 fc3\n" + // 世界法线 ft2 = 法线 m44 模型变换矩阵

				//------------------------------------------------------------------------------------------------------
				// 环境反射 fc1
				//------------------------------------------------------------------------------------------------------

				//------------------------------------------------------------------------------------------------------
				// 漫反射:
				//   -- 计算光线与法线的角度(点乘)
				//   -- 修正背面负数的情况反转,因为背面的话是负数,角度是负数的话就转为正数(取绝对值或多步骤实现反转)
				//   -- 计算光照加成的颜色 = 像素颜色*角度
				//------------------------------------------------------------------------------------------------------
				// -- 漫反射:计算角度
				"dp3 ft3.w ft1 ft2\n" + // 点乘,计算角度
				// -- 漫反射:修正背面负数的情况反转(取绝对值)
				"abs ft3.w ft3.w\n" +
				// -- 漫反射:计算光照加成的颜色和根据强度系数调整
				"mul ft4 ft0 ft3.wwww\n" + // 光照加成颜色 ft4 = 原始颜色*光照
				"mul ft4 ft4 fc1.wwww\n" + // 根据强度系数调整

				//------------------------------------------------------------------------------------------------------
				// 镜面反射(高光):
				//   -- 计算入射角与光线一半的角度·世界法线
				//
				//------------------------------------------------------------------------------------------------------
				//				// -- 镜面反射:计算角度  ft2 = 入射角的一半·模型法线
				"dp3 ft6.w fc2 ft2\n" +
				// -- 镜面反射:修正背面负数的情况反转和计算高光颜色
				"abs ft6.w ft6.w\n" +
				"mul ft7 fc4 ft6.wwww\n" +

				//------------------------------------------------------------------------------------------------------
				// 计算最终输出的颜色
				//  -- 原始颜色
				//  -- += 漫反射
				//  -- += 高光
				//  -- += 环境光
				//  -- 输出
				//------------------------------------------------------------------------------------------------------
				// -- 镜面反射:高光加成颜色
				"add ft0 ft0 ft4\n" + // 原始颜色 += 漫反射光照加成颜色
				"add ft0 ft0 ft7\n" + // 原始颜色 += 高光加成颜色
				"add ft0 ft0 fc1\n" + // 颜色叠加
				"mov oc, ft0\n" // 直接输出颜色点 ft0  从这里看的出来shader就是用来处理点的颜色信息的,比如颜色混合、光照等等
			);
			program.upload(vShader.agalcode,fShader.agalcode);

			// --
			initShaderShadow();
			initShaderHasShadowFloor();
		}

		/**
		 * 用于输出深度图的shader
		 *
		 */
		private function initShaderShadow():void{
			// -- 创建一个着色语言
			programShadow = context3d.createProgram();
			// -- 创建一个AGALMiniAssembler辅助类用于写顶点着色代码
			//    主要用于输出最终的顶点位置,以及传一些数据给片段着色代码使用
			var vShader:AGALMiniAssembler = new AGALMiniAssembler();
			vShader.assemble(Context3DProgramType.VERTEX,
				"m44 vt0 va0 vc0 \n" + // 输出 = 4个顶点 * 最终矩阵 (这里的*就是m44方法,表示每个点都作用了该矩阵)
				"mov v1 vt0\n" +  // MLP z=0-50
				"mov op vt0\n"  // 顶点原始点
			);
			// -- 创建一个AGALMiniAssembler辅助类用于写片段着色代码
			var fShader:AGALMiniAssembler = new AGALMiniAssembler();
			fShader.assemble(Context3DProgramType.FRAGMENT,
				//------------------------------------------------------------------------------------------------------
				// 通用变量:
				//   -- 纹理颜色
				//   -- 世界光照点 globalLight
				//   -- 世界法线   globalNormal
				//------------------------------------------------------------------------------------------------------
				"mov ft0.xyz v1.zzz\n" + // ft1.x=v3.z ft1.xyz = (顶点·MLP).zzz  将顶点经灯光视角转换的深度存储到xyz
				"mov ft0.w fc0.y\n" + // ft1.w = 1 固定为1
				"div ft0.xyz ft0.xyz fc0.x\n" + // ft0.xyz = ft0.xyz / zFar 因为颜色数值范围在 0-1 所以这里除以zFar来得到0-1
				"mov oc,ft0" // 输出,这里离摄像机越近越黑(0),越远越白(1)
			);
			programShadow.upload(vShader.agalcode,fShader.agalcode);

		}
		/**
		 * 被投影者的代码,
		 *
		 */
		private function initShaderHasShadowFloor():void{
			// -- 创建一个着色语言
			programHasShadowFloor = context3d.createProgram();
			// -- 创建一个AGALMiniAssembler辅助类用于写顶点着色代码
			//    主要用于输出最终的顶点位置,以及传一些数据给片段着色代码使用
			var vShader:AGALMiniAssembler = new AGALMiniAssembler();
			vShader.assemble(Context3DProgramType.VERTEX,
				//投影到场景相机
				"m44 vt0 va0 vc0 \n" + // op 顶点****MVP
				//投影到场景灯光相机
				"m44 vt1 va0 vc4\n" + // vt1 = 顶点****MLP
				// 传输MLP
				"mov v0 vt1\n"+ // 投影到场景灯光相机
				// uv
				"mov v1 va2\n"+ // uv
				// 输出
				"mov op vt0\n"
			);

			// -- 创建一个AGALMiniAssembler辅助类用于写片段着色代码
			//1.将三维空间坐标转换到设备空间坐标[-1,1]上 (MLP后的坐标.xy/MLP后的坐标.z)
			//2.将设备空间转换到贴图坐标系上 设备空间坐标.xy*0.5+0.5,然后翻转y 这个时候我就知道我当前的点对应的是贴图坐标系中的哪个点了(类似UV坐标)
			//3.根据该计算出的UV坐标取得贴图,能够对应上点
			//4.直接深度对比后展现效果
			var fShader:AGALMiniAssembler = new AGALMiniAssembler();
			fShader.assemble(Context3DProgramType.FRAGMENT,
				// 木板纹理采样
				"tex ft1 v1 fs1<2d,linear,repeat,nomip>\n"+
				// 叠加,Z越大越黑
				"mov ft4.x v0.z\n" +
				"div ft4.x ft4.x fc2.x\n" +
				"sub ft1 ft1 ft4.x\n" +
				// 将坐标转换到设备空间坐标(屏幕坐标系) ft2.xy = MLP.xy/MLP.zz
				"div ft2.xy v0.xy v0.zz\n"+
				//将坐标转换到纹理UV fc2.y = 0.5   0.5 * xy + 0.5; 就可以让[-1,1] 转为[0,1]
				//ft2.xy *= 0.5
				"mul ft2.xy ft2.xy fc2.y\n"+
				//ft2.xy += 0.5;
				"add ft2.xy ft2.xy fc2.y\n"+
				//ft2.y = -ft2.y 以下两种写法都可以,因为纹理坐标超出会自动补差,比如1.2就是0.2,比如-0.2 就是0.8
//				"neg ft2.y ft2.y\n"+
				"sub ft2.y fc2.z ft2.y\n" +

				//阴影图深度采样
				"tex ft3 ft2.xy fs0<2d,linear,repeat,nomip>\n"+
				// ft5.z = ft3.z * fc2.x  = 深度 * zFar  因为保存的时候除以了zFar,现在还原来做对比
				"mul ft5.z ft3.x fc2.x\n"+
				// ft5.w = ft5.z>=v2.z?1:0 如果当前的深度 大于 (顶点xMLP)的深度的话就返回1  (1或者0)
				"slt ft5.w ft5.z v0.z\n"+ // 影子1,非影子0

				// 作出效果,让 影子1,非影子0 转为影子0.5,非影子1,这样直接与原始颜色相乘让影子部分的颜色等于原来的一半
				"mul ft5.w ft5.w fc2.y\n" +
				"neg ft5.w ft5.w\n" +
				"add ft5.w ft5.w fc2.y\n" +
				"add ft5.w ft5.w fc2.y\n" +
				"mul ft1 ft1 ft5.w\n"+
				// oc ft1
				"mov oc ft1\n"

			);
			programHasShadowFloor.upload(vShader.agalcode,fShader.agalcode);
		}

		/**
		 * 设备恢复的情况
		 *
		 */
		private function restore():void{
			initModel();
			initShader();
		}
		/**
		 * 侦听回调:逐帧渲染
		 * @param e
		 *
		 */
		private function onRender(e:Event):void{
			debugTF.text = "";
			// -- 如果设备丢失的话就暂时不绘制不然就报错了,不信你试试注释掉这个并且CTRL+ALT+DEL
			if(isContextDispose)return;
			// -- 设置深度
			context3d.setDepthTest(true,Context3DCompareMode.LESS);
			// -- 绘制到贴图中
			renderObject();
			// -- 颜色系数改变
			lightStr+=lightStrAdd;
			if(lightStr>1){
				lightStr=1;
				lightStrAdd=-lightStrAdd;
			}
			else if(lightStr<0){
				lightStr=0;
				lightStrAdd=-lightStrAdd;
			}
		}

		/**
		 * 将这个图作为tex来试试
		 *
		 */

		private function renderObject():void{
			// 以光线角度绘制深度图(GPU模式,无需经过CPU)
			context3d.setRenderToTexture(texShadow,false,0,0);
			context3d.clear(1,1,1);
			lightViewVertebral();
			context3d.setRenderToBackBuffer();

			// 以光线角度绘制深度图(GPU绘制后传给CPU使用,如果CPU不使用的话你可以屏蔽掉此段)
			context3d.clear(1,1,1);
			lightViewVertebral();
			context3d.drawToBitmapData(bdShadow);
			texShadow.uploadFromBitmapData(bdShadow);
			shadowMapBmp.bitmapData = bdShadow;
			shadowMapBmp.scaleX=shadowMapBmp.scaleY=0.2;
			shadowMapBmp.x = stage.stageWidth - shadowMapBmp.width;

			// 正常渲染场景,附加上影子
			context3d.clear(0,0,1);
			renderFloorTest();
			renderVertebral();
			context3d.present();
		}
		/**
		 * 渲染物体前初始化
		 *
		 */
		private function renderDefault():void{
			context3d.setVertexBufferAt(0, null);
			context3d.setVertexBufferAt(1, null);
			context3d.setVertexBufferAt(2, null);
			context3d.setVertexBufferAt(3, null);
			context3d.setTextureAt(0,null);
			context3d.setTextureAt(1,null);
		}
		/**
		 * 渲染锥形体,以相机视角,带光照和颜色变换效果
		 *
		 */
		private function renderVertebral():void{
			// -- 初始化
			renderDefault();
			// -- 最终矩阵先归零
			finalMatrix.identity();
			// -- 乘上M矩阵
			finalMatrix.append(modelMatrix);
			// -- 乘上V矩阵
			finalMatrix.append(viewMatrix);
			// -- 乘上P矩阵
			finalMatrix.append(projectionMatrix);
			// -- 设置状态机当前的VB的坐标 到 va0 ,因为只有XYZ,所以偏移是0,长度是3
			context3d.setVertexBufferAt(0,modelVb,0,Context3DVertexBufferFormat.FLOAT_3);
			// -- 设置状态机当前的VB的颜色 到 va1
			context3d.setVertexBufferAt(1,modelVb,3,Context3DVertexBufferFormat.FLOAT_3);
			// -- 设置状态机当前的VB的UV纹理坐标 到 va2
			context3d.setVertexBufferAt(2,modelVb,6,Context3DVertexBufferFormat.FLOAT_2);
			// -- 设置状态机当前的VB的法线 到 va3
			context3d.setVertexBufferAt(3,modelVb,8,Context3DVertexBufferFormat.FLOAT_3);
			// -- 设置状态机当前的vc0 静态常量:最终矩阵
			context3d.setProgramConstantsFromMatrix(Context3DProgramType.VERTEX,0,finalMatrix,true);
			// -- 设置状态机当前的fc0 静态常量:用于光照计算(这里的光照要进行模型的矩阵变换,因为它直接与法线作用,法线是固定的如果这里不变换的话模型即使变动了受光也是一样的)
			var light:Vector3D=lightPos.clone(); // 不含平移元素的变换
			light.normalize(); // 单位化
			context3d.setProgramConstantsFromVector(Context3DProgramType.FRAGMENT,0,Vector.<Number>([light.x,light.y,light.z,0]));
			// -- 设置状态机当前的fc1 静态常量:xyz用于 环境光颜色叠加 W用于漫反射光照强度   这里叠加一个红色环境光
			var ambientR:Number = lightStr*0.2;
			var ambientG:Number = (1-lightStr)*0.2;
			var ambientB:Number = (lightStr/2)*0.2;
			context3d.setProgramConstantsFromVector(Context3DProgramType.FRAGMENT,1,Vector.<Number>([ambientR,ambientG,ambientB,lightStr]));//lightStr
			// -- 设置状态机当前的fc2 静态常量:用于 高光点 这个点是视点和光线点夹角的一半
			var halfEyeLightPos:Vector3D = viewMatrix.position.clone();
			halfEyeLightPos=halfEyeLightPos.add(lightPos);
			//			halfEyeLightPos.scaleBy(0.5); 和下面的xyz/2是一个意思
			halfEyeLightPos.x/=2;
			halfEyeLightPos.y/=2;
			halfEyeLightPos.z/=2;
			halfEyeLightPos.normalize();
			context3d.setProgramConstantsFromVector(Context3DProgramType.FRAGMENT,2,Vector.<Number>([halfEyeLightPos.x,halfEyeLightPos.y,halfEyeLightPos.z,0]));
			// -- 设置状态机当前的fc3 静态常量:用于将模型矩阵变换传入
			context3d.setProgramConstantsFromMatrix(Context3DProgramType.FRAGMENT,3,modelMatrix);
			// -- 设置状态机当前的fc4 静态常量:高光颜色
			var specularStr:Number = lightStr*0.3;
			context3d.setProgramConstantsFromVector(Context3DProgramType.FRAGMENT,4,Vector.<Number>([1.0*specularStr,1.0*specularStr,1.0*specularStr,0]));
			// -- 设置状态机使用的纹理到当前的fs0
			context3d.setTextureAt(0,tex);
			// -- 设置状态机使用的代码
			context3d.setProgram(program);
			// -- 绘制三角形
			context3d.drawTriangles(modelIb);

		}

		/**
		 * 渲染深度图:以光线视角渲染锥形体,
		 *
		 */
		private function lightViewVertebral():void{
			// -- 初始化
			renderDefault();
			// -- 最终矩阵先归零
			finalMatrix.identity();
			// -- 乘上M矩阵
			finalMatrix.append(modelMatrix);
			// -- 乘上V矩阵
			var lightMatrix:Matrix3D = new Matrix3D();
			lightMatrix.appendTranslation(lightPos.x,lightPos.y,lightPos.z);
			finalMatrix.append(lightMatrix.clone());
			// -- 乘上P矩阵
			finalMatrix.append(projectionMatrix);
			// -- 设置状态机当前的VB的坐标 到 va0 ,因为只有XYZ,所以偏移是0,长度是3
			context3d.setVertexBufferAt(0,modelVb,0,Context3DVertexBufferFormat.FLOAT_3);
			// -- 传递最终矩阵(MLP) vc0
			context3d.setProgramConstantsFromMatrix(Context3DProgramType.VERTEX,0,finalMatrix,true);
			// -- 设置状态机当前的fc0 静态常量:x=zFar y=1(为了让渲染图的w固定为1)
			context3d.setProgramConstantsFromVector(Context3DProgramType.FRAGMENT,0,Vector.<Number>([zFar,1,0,0]));
			// -- 设置状态机使用的代码
			context3d.setProgram(programShadow);

			// -- for debug
			var VertebralVec1:Vector3D = MatrixUtil.transformPoint3D(finalMatrix,new Vector3D(-1, 1,0));
			var VertebralVec2:Vector3D = MatrixUtil.transformPoint3D(finalMatrix,new Vector3D(1, 1,0));
			var VertebralVec3:Vector3D = MatrixUtil.transformPoint3D(finalMatrix,new Vector3D(1,-1,0));
			var VertebralVec4:Vector3D = MatrixUtil.transformPoint3D(finalMatrix,new Vector3D(-1,-1,0));
			var VertebralVec5:Vector3D = MatrixUtil.transformPoint3D(finalMatrix,new Vector3D(0, 0,-5));

			VertebralVec1.w = VertebralVec1.z / zFar;
			VertebralVec2.w = VertebralVec2.z / zFar;
			VertebralVec3.w = VertebralVec3.z / zFar;
			VertebralVec4.w = VertebralVec4.z / zFar;
			VertebralVec5.w = VertebralVec5.z / zFar;

			// -- 测试顶点·MLP
			debugTF.appendText("==============锥形体的顶点-绝对3维坐标点"+"\n");
			debugTF.appendText(VertebralVec1.toString()+","+VertebralVec1.w+"\n");
			debugTF.appendText(VertebralVec2.toString()+","+VertebralVec2.w+"\n");
			debugTF.appendText(VertebralVec3.toString()+","+VertebralVec3.w+"\n");
			debugTF.appendText(VertebralVec4.toString()+","+VertebralVec4.w+"\n");
			debugTF.appendText(VertebralVec5.toString()+","+VertebralVec5.w+"\n");
			debugTF.appendText("==============锥形体的顶点-绝对设备2维坐标点"+"\n");
			var VertebralPoint:Point = new Point(VertebralVec1.x/VertebralVec1.z,VertebralVec1.y/VertebralVec1.z);
			var Vertebra2Point:Point = new Point(VertebralVec2.x/VertebralVec2.z,VertebralVec2.y/VertebralVec2.z);
			var Vertebra3Point:Point = new Point(VertebralVec3.x/VertebralVec3.z,VertebralVec3.y/VertebralVec3.z);
			var Vertebra4Point:Point = new Point(VertebralVec4.x/VertebralVec4.z,VertebralVec4.y/VertebralVec4.z);
			var Vertebra5Point:Point = new Point(VertebralVec5.x/VertebralVec5.z,VertebralVec5.y/VertebralVec5.z);
			debugTF.appendText(VertebralPoint.toString()+"\n");
			debugTF.appendText(Vertebra2Point.toString()+"\n");
			debugTF.appendText(Vertebra3Point.toString()+"\n");
			debugTF.appendText(Vertebra4Point.toString()+"\n");
			debugTF.appendText(Vertebra5Point.toString()+"\n");
			// -- 转为像素图
			var toTexPointFunc:Function = function(p:Point):String{
				p.x = int((p.x *0.5+0.5)*stage.stageWidth);
				p.y = int((1-(p.y *0.5+0.5))*stage.stageHeight);
				return p.toString() + "\n";
			}
			debugTF.appendText("==============锥形体的顶点-屏幕坐标像素点"+"\n");
			debugTF.appendText(toTexPointFunc(VertebralPoint));
			debugTF.appendText(toTexPointFunc(Vertebra2Point));
			debugTF.appendText(toTexPointFunc(Vertebra3Point));
			debugTF.appendText(toTexPointFunc(Vertebra4Point));
			debugTF.appendText(toTexPointFunc(Vertebra5Point));

			// -- 绘制三角形
			context3d.drawTriangles(modelIb);

		}
		/**
		 * 渲染被投影的木板,要用到深度图对比,同时
		 *
		 */
		var testFloorRo:Number=0;
		var changeRo:Number = 0.5;
		var floorMatrix:Matrix3D = new Matrix3D();
		private function renderFloorTest():void{
			// -- 初始化
			renderDefault();

			// -- 最终矩阵先归零
			finalMatrix.identity();
			// -- 乘上M矩阵
			finalMatrix.append(floorMatrix);
			// -- 乘上V矩阵
			finalMatrix.append(viewMatrix);
			// -- 乘上P矩阵
			finalMatrix.append(projectionMatrix);
			// -- 设置状态机当前的vc0 静态常量:最终矩阵
			context3d.setProgramConstantsFromMatrix(Context3DProgramType.VERTEX,0,finalMatrix,true);
			// -- 灯光相机 vc4=MLP
			finalMatrix.identity();
			finalMatrix.append(floorMatrix);
			var lightMatrix:Matrix3D = new Matrix3D();
			lightMatrix.appendTranslation(lightPos.x,lightPos.y,lightPos.z);
			finalMatrix.append(lightMatrix.clone());
			finalMatrix.append(projectionMatrix);
			context3d.setProgramConstantsFromMatrix(Context3DProgramType.VERTEX,4,finalMatrix,true);

			// -- 设置状态机当前的VB的坐标 到 va0 ,因为只有XYZ,所以偏移是0,长度是3
			context3d.setVertexBufferAt(0,modelVbFloor,0,Context3DVertexBufferFormat.FLOAT_3);
			// -- 设置状态机当前的VB的UV纹理坐标 到 va2
			context3d.setVertexBufferAt(2,modelVbFloor,6,Context3DVertexBufferFormat.FLOAT_2);

			// fc2 = x=zFar y=0.5(用于辅助计算)
			context3d.setProgramConstantsFromVector(Context3DProgramType.FRAGMENT,2,Vector.<Number>([zFar,0.5,1,1]));

			// -- 设置状态机使用的纹理到当前的fs0
			context3d.setTextureAt(1,texGround);
			context3d.setTextureAt(0,texShadow);
			// -- 设置状态机使用的代码
			context3d.setProgram(programHasShadowFloor);
			// -- 绘制三角形
			context3d.drawTriangles(modelIbFloor);

			// -- for debug
			var VertebralVec1:Vector3D = MatrixUtil.transformPoint3D(finalMatrix,new Vector3D(-10, 10,-20));
			var VertebralVec2:Vector3D = MatrixUtil.transformPoint3D(finalMatrix,new Vector3D(10, 10,-20));
			var VertebralVec3:Vector3D = MatrixUtil.transformPoint3D(finalMatrix,new Vector3D(10,-10,-20));
			var VertebralVec4:Vector3D = MatrixUtil.transformPoint3D(finalMatrix,new Vector3D(-10,-10,-20));
			var VertebralVec5:Vector3D = MatrixUtil.transformPoint3D(finalMatrix,new Vector3D(0,0,-5));

			VertebralVec1.w = VertebralVec1.z / zFar;
			VertebralVec2.w = VertebralVec2.z / zFar;
			VertebralVec3.w = VertebralVec3.z / zFar;
			VertebralVec4.w = VertebralVec4.z / zFar;
			VertebralVec5.w = VertebralVec5.z / zFar;

			// -- 测试顶点·MLP
			debugTF.appendText("==============场地的顶点-绝对3维坐标点"+"\n");
			debugTF.appendText(VertebralVec1.toString()+","+VertebralVec1.w+"\n");
			debugTF.appendText(VertebralVec2.toString()+","+VertebralVec2.w+"\n");
			debugTF.appendText(VertebralVec3.toString()+","+VertebralVec3.w+"\n");
			debugTF.appendText(VertebralVec4.toString()+","+VertebralVec4.w+"\n");
			debugTF.appendText(VertebralVec5.toString()+","+VertebralVec5.w+"\n");
			debugTF.appendText("==============场地的顶点-绝对设备2维坐标点"+"\n");
			var VertebralPoint:Point = new Point(VertebralVec1.x/VertebralVec1.z,VertebralVec1.y/VertebralVec1.z);
			var Vertebra2Point:Point = new Point(VertebralVec2.x/VertebralVec2.z,VertebralVec2.y/VertebralVec2.z);
			var Vertebra3Point:Point = new Point(VertebralVec3.x/VertebralVec3.z,VertebralVec3.y/VertebralVec3.z);
			var Vertebra4Point:Point = new Point(VertebralVec4.x/VertebralVec4.z,VertebralVec4.y/VertebralVec4.z);
			var Vertebra5Point:Point = new Point(VertebralVec5.x/VertebralVec5.z,VertebralVec5.y/VertebralVec5.z);
			debugTF.appendText(VertebralPoint.toString()+"\n");
			debugTF.appendText(Vertebra2Point.toString()+"\n");
			debugTF.appendText(Vertebra3Point.toString()+"\n");
			debugTF.appendText(Vertebra4Point.toString()+"\n");
			debugTF.appendText(Vertebra5Point.toString()+"\n");
			// -- 转为像素图
			var toTexPointFunc:Function = function(p:Point):String{
				p.x = int((p.x *0.5+0.5)*stage.stageWidth);
				p.y = int((1-(p.y *0.5+0.5))*stage.stageHeight);
				return p.toString() + "\n";
			}
			debugTF.appendText("==============场地的顶点-屏幕坐标像素点"+"\n");
			debugTF.appendText(toTexPointFunc(VertebralPoint));
			debugTF.appendText(toTexPointFunc(Vertebra2Point));
			debugTF.appendText(toTexPointFunc(Vertebra3Point));
			debugTF.appendText(toTexPointFunc(Vertebra4Point));
			debugTF.appendText(toTexPointFunc(Vertebra5Point));
			debugTF.appendText("==============按键:"+"\n");
			debugTF.appendText("WASD=锥形体位移"+"\n");
			debugTF.appendText("IJKL=场地位移"+"\n");
			debugTF.appendText("方向键=镜头平移"+"\n");
			debugTF.appendText("小键盘789=镜头旋转"+"\n");
			debugTF.appendText("鼠标拖拽=锥形体旋转"+"\n");
		}

		/**
		 * 侦听回调:键盘操作
		 * @param e
		 *
		 */
		private function onKeyDown(e:KeyboardEvent):void{
			switch(e.keyCode){
				case Keyboard.W:
					modelMatrix.appendTranslation(0,0,0.1);
					break;
				case Keyboard.S:
					modelMatrix.appendTranslation(0,0,-0.1);
					break;
				case Keyboard.A:
					modelMatrix.appendTranslation(0.1,0,0);
					break;
				case Keyboard.D:
					modelMatrix.appendTranslation(-0.1,0,0);
					break;
				case Keyboard.I:
					floorMatrix.appendTranslation(0,0,0.1);
					break;
				case Keyboard.K:
					floorMatrix.appendTranslation(0,0,-0.1);
					break;
				case Keyboard.J:
					floorMatrix.appendTranslation(0.1,0,0);
					break;
				case Keyboard.L:
					floorMatrix.appendTranslation(-0.1,0,0);
					break;
				case Keyboard.UP:
					viewMatrix.appendTranslation(0,0,-0.1);
					break;
				case Keyboard.DOWN:
					viewMatrix.appendTranslation(0,0,0.1);
					break;
				case Keyboard.LEFT:
					viewMatrix.appendTranslation(-0.1,0,0);
					break;
				case Keyboard.RIGHT:
					viewMatrix.appendTranslation(0.1,0,0);
					break;
				case Keyboard.NUMPAD_7:
					viewMatrix.appendRotation(1,Vector3D.X_AXIS);
					break;
				case Keyboard.NUMPAD_8:
					viewMatrix.appendRotation(1,Vector3D.Y_AXIS);
					break;
				case Keyboard.NUMPAD_9:
					viewMatrix.appendRotation(1,Vector3D.Z_AXIS);
					break;
			}
		}
		/**
		 * 鼠标移动旋转物体
		 * 原理无非就是根据每次移动时的像素差距来计算让物体矩阵M在当前的状态下再围绕X和Y旋转(至于围绕Z轴旋转可以自己添加试试)
		 * @param e
		 *
		 */
		private function onMouseDown(e:MouseEvent):void{
			onMouseDownPt.x = e.stageX;
			onMouseDownPt.y = e.stageY;
			stage.addEventListener(MouseEvent.MOUSE_MOVE,onMouseMove);
			stage.addEventListener(MouseEvent.MOUSE_UP,onMouseUp);
		}
		private function onMouseMove(e:MouseEvent):void{
			var dx:Number = e.stageX - onMouseDownPt.x;
			var dy:Number = e.stageY - onMouseDownPt.y;
			var degreesY:Number = dx/2;
			var degreesX:Number = dy/2;
			onMouseDownPt.x = e.stageX;
			onMouseDownPt.y = e.stageY;
			modelMatrix.appendRotation(degreesY,Vector3D.Y_AXIS);
			modelMatrix.appendRotation(degreesX,Vector3D.X_AXIS);
		}
		private function onMouseUp(e:MouseEvent):void{
			stage.removeEventListener(MouseEvent.MOUSE_MOVE,onMouseMove);
			stage.removeEventListener(MouseEvent.MOUSE_MOVE,onMouseUp);
		}
		/**
		 * 判断设备丢失
		 *
		 */
		private function get isContextDispose():Boolean{
			return context3d==null||context3d.driverInfo=="Disposed"||context3d.driverInfo=="";
		}


	}
}


 被折叠的 条评论
为什么被折叠?
被折叠的 条评论
为什么被折叠?
 到【灌水乐园】发言


