


因为csdn字数有限,只能另外写一篇把剩下的内容补充完整了。。。。。。

十六、SpringCloud Alibaba Nacos服务注册和配置中心
1. Nacos简介
⑴ Nacos名字的由来
前四个字母分别为Naming和Configuration的前两个字母,最后的s为Service。
⑵ Nacos是什么(Nacos = Eureka+Config +Bus)
一个更易于构建云原生应用的动态服务发现、配置管理和服务管理平台。
Nacos: Dynamic Naming and Configuration Service
Nacos就是注册中心 + 配置中心的组合
⑶ Nacos能干嘛
替代Eureka做服务注册中心
替代Config做服务配置中心
⑷ Nacos去哪下
Nacos下载地址https://github.com/alibaba/Nacos
官网文档:https://nacos.io/zh-cn/index.html
⑸ 各种注册中心比较

据说 Nacos 在阿里巴巴内部有超过 10 万的实例运行,已经过了类似双十一等各种大型流量的考验
2. 安装并运行Nacos
⑴ 安装Nacos的环境要求
本地Java8+Maven环境已经OK
⑵ 先从官网下载Nacos
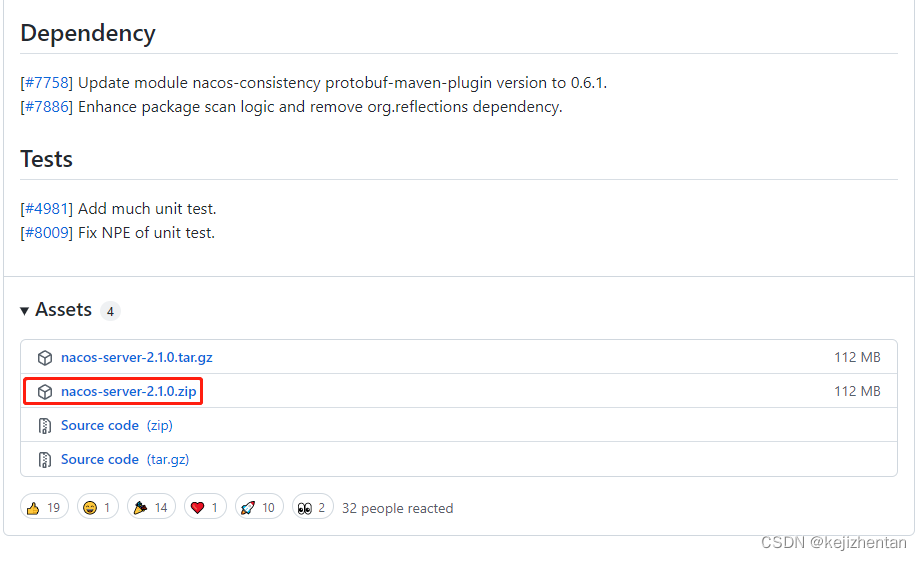
下载地址:https://github.com/alibaba/nacos/releases
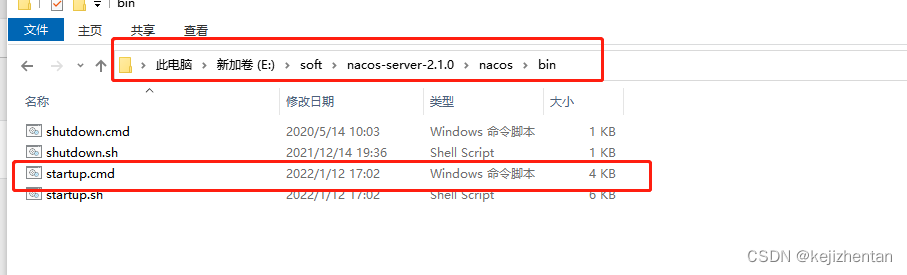
⑶ 解压安装包,直接运行bin目录下的startup.cmd
startup.cmd -m standalone
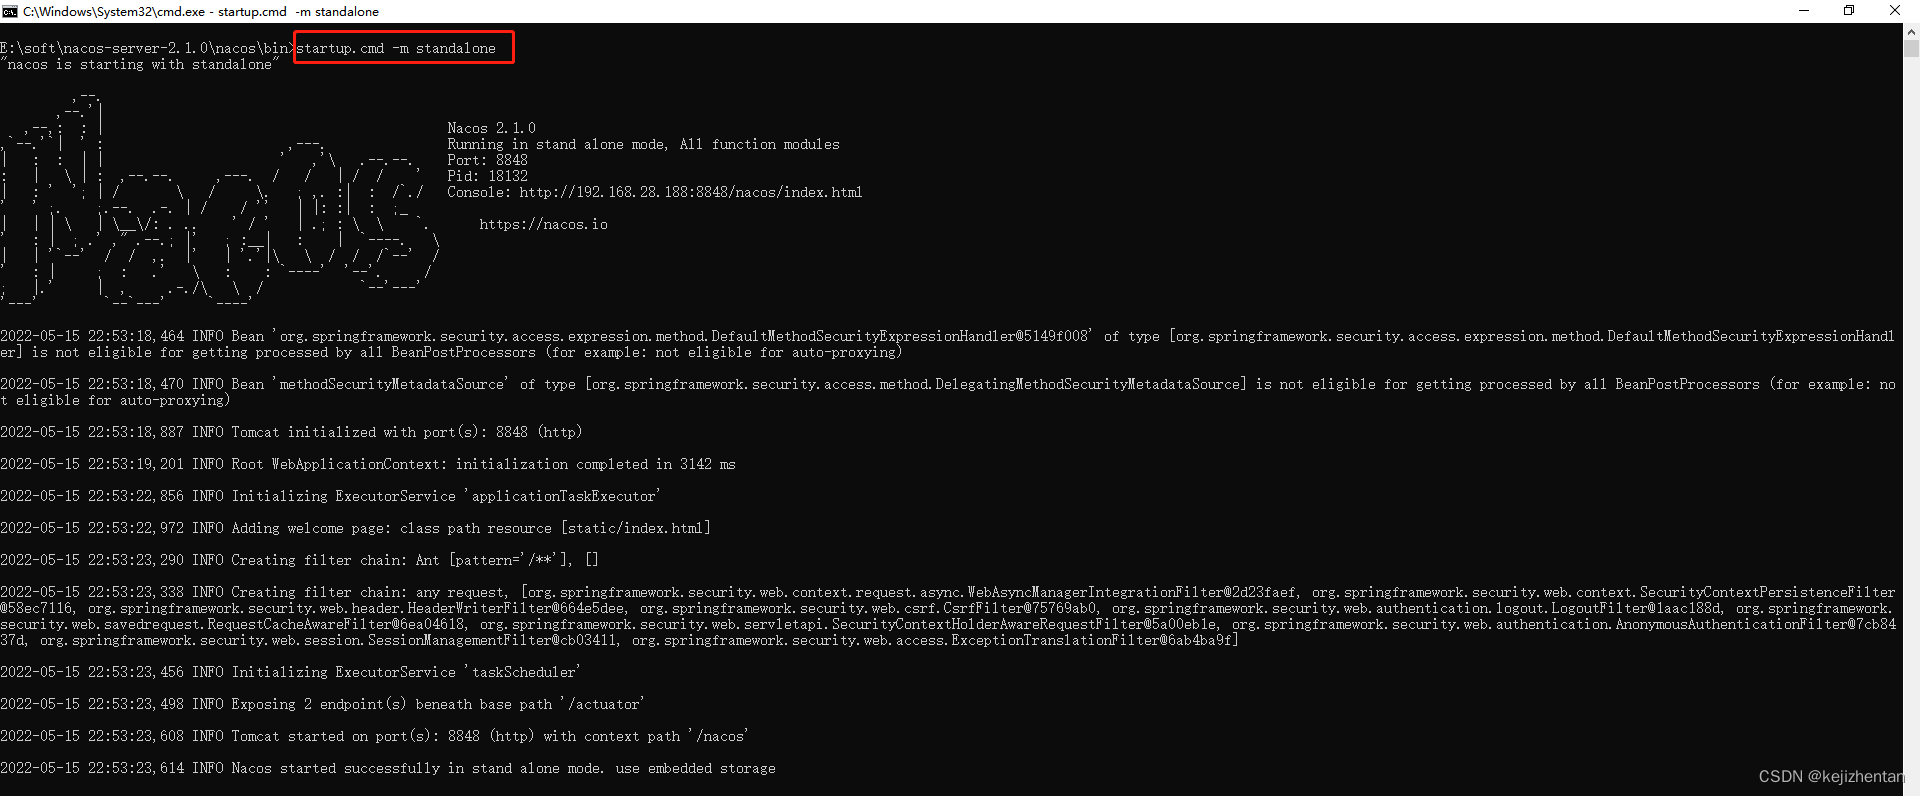
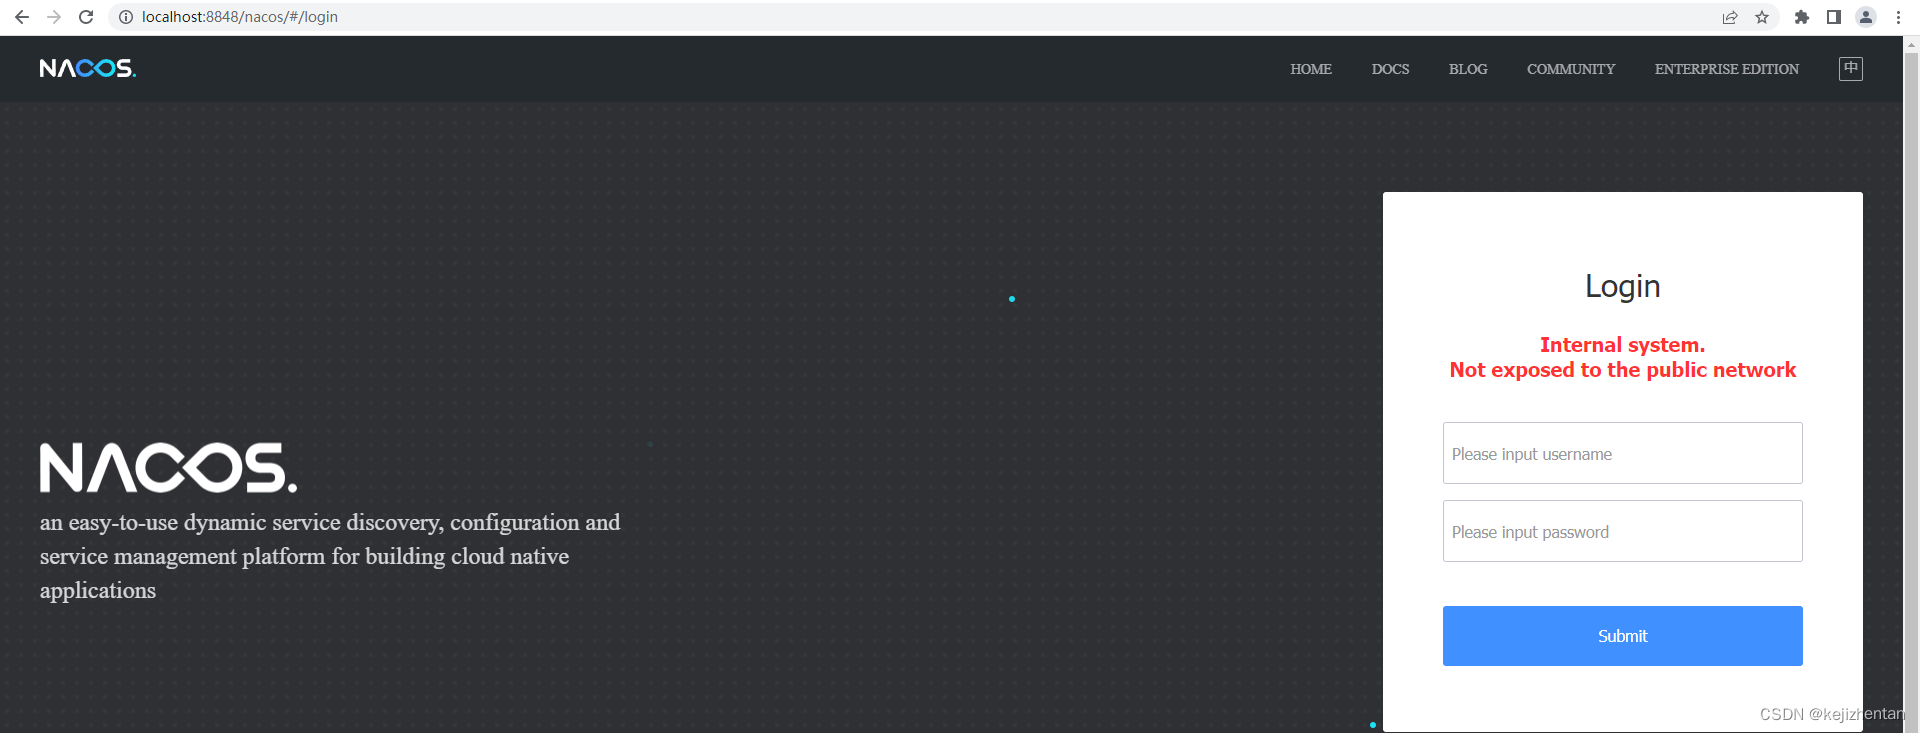
⑷ 命令运行成功后直接访问http://localhost:8848/nacos
默认账号密码都是nacos
3. Nacos作为服务注册中心演示
⑴ 官网文档
⑵ 基于Nacos的服务提供者
1) 新建Module cloudalibaba-provider-payment9001

2) 修改配置文件
① 父POM
<?xml version="1.0" encoding="UTF-8"?>

<project xmlns="http://maven.apache.org/POM/4.0.0" xmlns:xsi="http://www.w3.org/2001/XMLSchema-instance"
  xsi:schemaLocation="http://maven.apache.org/POM/4.0.0 http://maven.apache.org/xsd/maven-4.0.0.xsd">
  <modelVersion>4.0.0</modelVersion>

  <groupId>com.kejizhentan.springcloud</groupId>
  <artifactId>springcloud-project</artifactId>
  <version>1.0-SNAPSHOT</version>
  <modules>
    <module>cloud-provider-payment8001</module>
    <module>cloud-consumer-order80</module>
    <module>cloud-api-commons</module>
    <module>cloud-eureka-server7001</module>
      <module>cloud-eureka-server7002</module>
    <module>cloud-provider-payment8002</module>
      <module>cloud-provider-payment8004</module>
    <module>cloud-consumerzk-order80</module>
      <module>cloud-providerconsul-payment8006</module>
      <module>cloud-consumerconsul-order80</module>
      <module>cloud-consumer-feign-order80</module>
      <module>cloud-provider-hystrix-payment8001</module>
      <module>OrderHystrixMain80</module>
      <module>cloud-consumer-hystrix-dashboard9001</module>
      <module>cloud-zuul-gateway9527</module>
      <module>cloud-gateway-gateway9527</module>
      <module>cloud-config-center-3344</module>
      <module>cloud-config-client-3355</module>
      <module>cloud-config-client-3366</module>
      <module>cloud-stream-rabbitmq-provider8801</module>
      <module>cloud-stream-rabbitmq-consumer8802</module>
      <module>cloud-stream-rabbitmq-consumer8803</module>
      <module>cloudalibaba-provider-payment9001</module>
  </modules>
  <packaging>pom</packaging>

  <!-- 统一管理jar包版本 -->
  <properties>
    <project.build.sourceEncoding>UTF-8</project.build.sourceEncoding>
    <maven.compiler.source>1.8</maven.compiler.source>
    <maven.compiler.target>1.8</maven.compiler.target>
    <junit.version>4.12</junit.version>
    <log4j.version>1.2.17</log4j.version>
    <mysql.version>5.1.6</mysql.version>
    <druid.version>1.2.8</druid.version>
    <mybatis.spring.boot.version>2.1.4</mybatis.spring.boot.version>
  </properties>

  <!-- 子模块继承之后,提供作用:锁定版本+子modlue不用写groupId和version  -->
  <dependencyManagement>
    <dependencies>
      <!--spring boot 2.2.2-->
      <dependency>
        <groupId>org.springframework.boot</groupId>
        <artifactId>spring-boot-dependencies</artifactId>
        <version>2.2.2.RELEASE</version>
        <type>pom</type>
        <scope>import</scope>
      </dependency>
      <!--spring cloud Hoxton.SR1-->
      <dependency>
        <groupId>org.springframework.cloud</groupId>
        <artifactId>spring-cloud-dependencies</artifactId>
        <version>Hoxton.SR1</version>
        <type>pom</type>
        <scope>import</scope>
      </dependency>
      <!--spring cloud alibaba 2.1.0.RELEASE-->
      <dependency>
        <groupId>com.alibaba.cloud</groupId>
        <artifactId>spring-cloud-alibaba-dependencies</artifactId>
        <version>2.1.0.RELEASE</version>
        <type>pom</type>
        <scope>import</scope>
      </dependency>
      <dependency>
        <groupId>mysql</groupId>
        <artifactId>mysql-connector-java</artifactId>
        <version>${mysql.version}</version>
      </dependency>
      <dependency>
        <groupId>com.alibaba</groupId>
        <artifactId>druid</artifactId>
        <version>${druid.version}</version>
      </dependency>
      <dependency>
        <groupId>org.mybatis.spring.boot</groupId>
        <artifactId>mybatis-spring-boot-starter</artifactId>
        <version>${mybatis.spring.boot.version}</version>
      </dependency>
      <dependency>
        <groupId>junit</groupId>
        <artifactId>junit</artifactId>
        <version>${junit.version}</version>
      </dependency>
      <dependency>
        <groupId>log4j</groupId>
        <artifactId>log4j</artifactId>
        <version>${log4j.version}</version>
      </dependency>
      <dependency>
        <groupId>org.projectlombok</groupId>
        <artifactId>lombok</artifactId>
        <optional>true</optional>
      </dependency>
    </dependencies>
  </dependencyManagement>

  <build>
    <plugins>
      <plugin>
        <groupId>org.springframework.boot</groupId>
        <artifactId>spring-boot-maven-plugin</artifactId>
        <configuration>
          <fork>true</fork>
          <addResources>true</addResources>
        </configuration>
      </plugin>
    </plugins>
  </build>

</project>

② 本模块POM
<?xml version="1.0" encoding="UTF-8"?>
<project xmlns="http://maven.apache.org/POM/4.0.0"
         xmlns:xsi="http://www.w3.org/2001/XMLSchema-instance"
         xsi:schemaLocation="http://maven.apache.org/POM/4.0.0 http://maven.apache.org/xsd/maven-4.0.0.xsd">
    <parent>
        <artifactId>springcloud-project</artifactId>
        <groupId>com.kejizhentan.springcloud</groupId>
        <version>1.0-SNAPSHOT</version>
    </parent>
    <modelVersion>4.0.0</modelVersion>

    <artifactId>cloudalibaba-provider-payment9001</artifactId>
    <dependencies>
        <!--SpringCloud ailibaba nacos -->
        <dependency>
            <groupId>com.alibaba.cloud</groupId>
            <artifactId>spring-cloud-starter-alibaba-nacos-discovery</artifactId>
        </dependency>
        <!-- SpringBoot整合Web组件 -->
        <dependency>
            <groupId>org.springframework.boot</groupId>
            <artifactId>spring-boot-starter-web</artifactId>
        </dependency>
        <dependency>
            <groupId>org.springframework.boot</groupId>
            <artifactId>spring-boot-starter-actuator</artifactId>
        </dependency>
        <!--日常通用jar包配置-->
        <dependency>
            <groupId>org.springframework.boot</groupId>
            <artifactId>spring-boot-devtools</artifactId>
            <scope>runtime</scope>
            <optional>true</optional>
        </dependency>
        <dependency>
            <groupId>org.projectlombok</groupId>
            <artifactId>lombok</artifactId>
            <optional>true</optional>
        </dependency>
        <dependency>
            <groupId>org.springframework.boot</groupId>
            <artifactId>spring-boot-starter-test</artifactId>
            <scope>test</scope>
        </dependency>
    </dependencies>

</project>

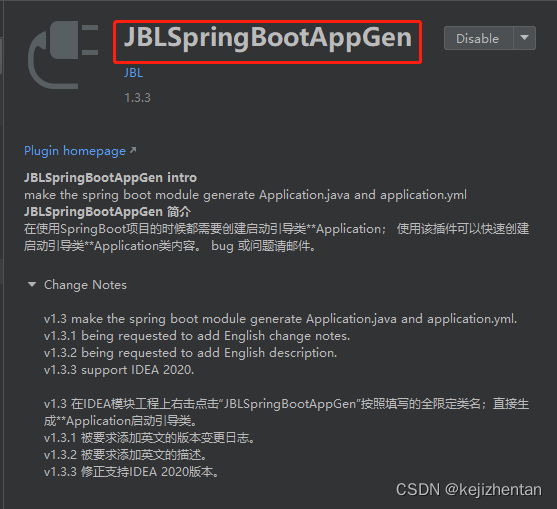
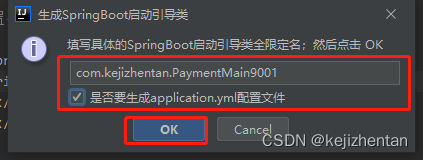
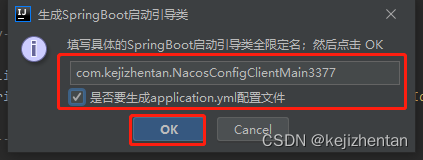
3) 创建cloudalibaba-provider-payment9001的YML和主启动:可以通过JBLSpringBootAppGen插件生成

4) 修改yml文件
server:
  port: 9001

spring:
  application:
    name: nacos-payment-provider
  cloud:
    nacos:
      discovery:
        server-addr: localhost:8848 #配置Nacos地址

management:
  endpoints:
    web:
      exposure:
        include: '*'
5) 修改主启动类
@SpringBootApplication
@EnableDiscoveryClient
public class PaymentMain9001 {
    public static void main(String[] args) {
        SpringApplication.run(PaymentMain9001.class, args);
    }
}
6) 创建业务类PaymentController
@RestController
public class PaymentController {
    @Value("${server.port}")
    private String serverPort;

    @GetMapping(value = "/payment/nacos/{id}")
    public String getPayment(@PathVariable("id") Integer id) {
        return "nacos registry, serverPort: " + serverPort + "\t id" + id;
    }
}
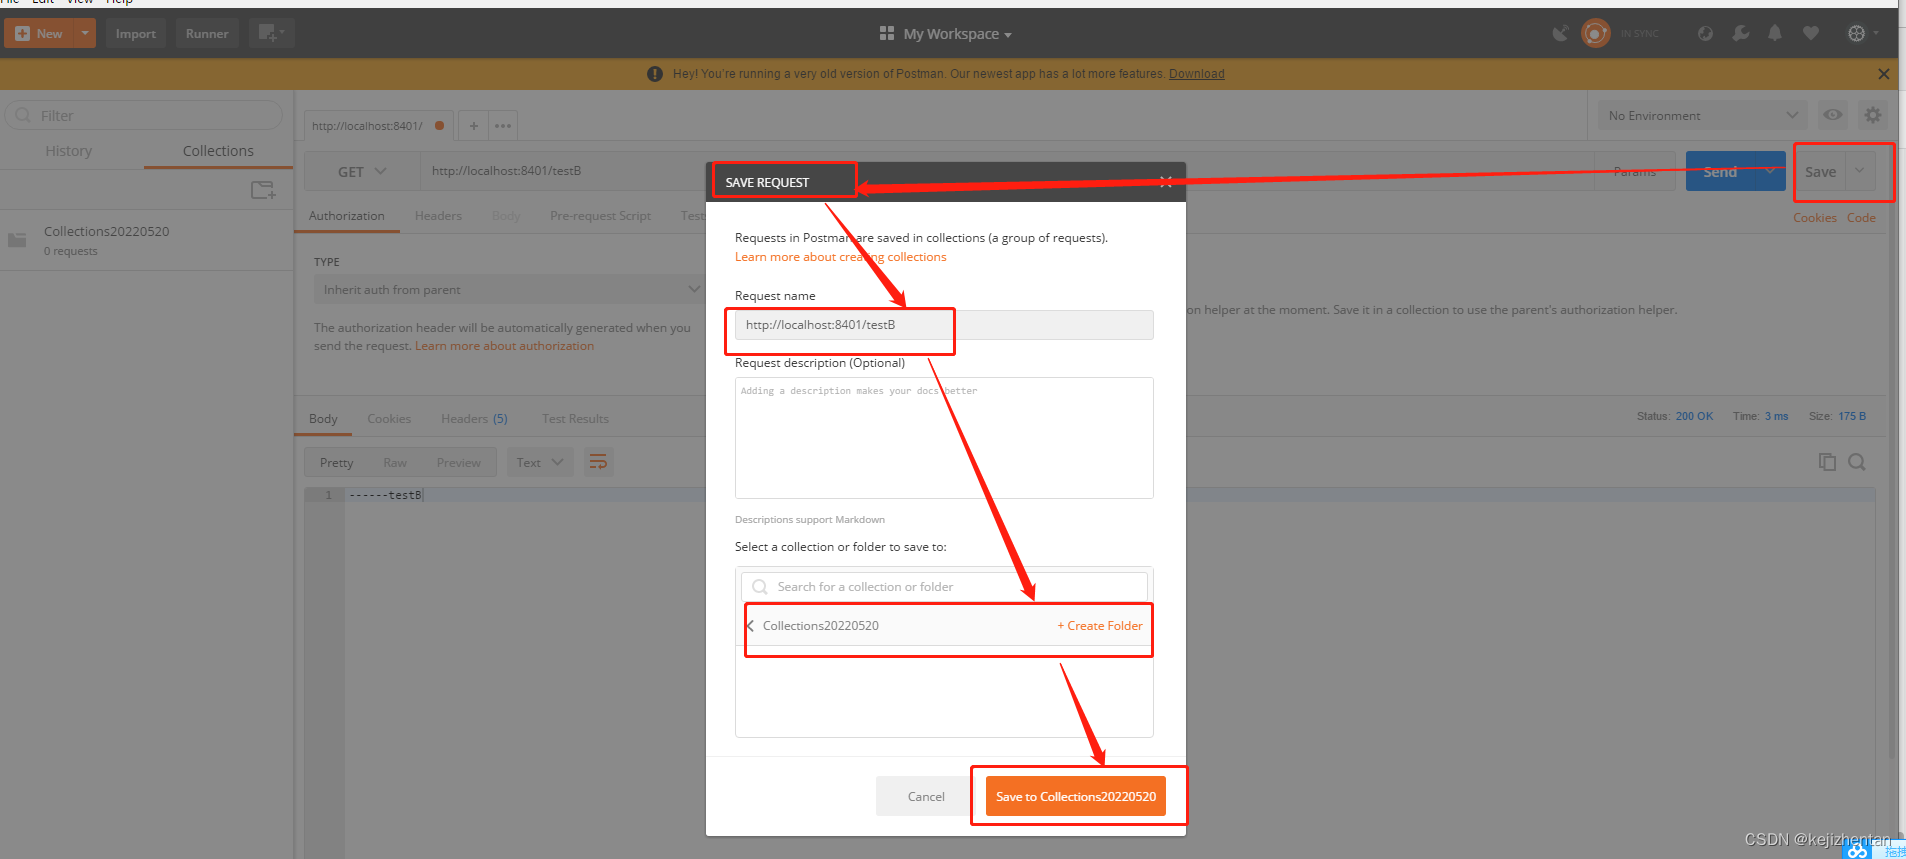
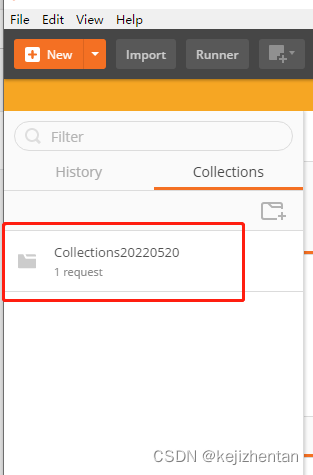
7) 测试
访问:http://localhost:9001/payment/nacos/1

nacos控制台
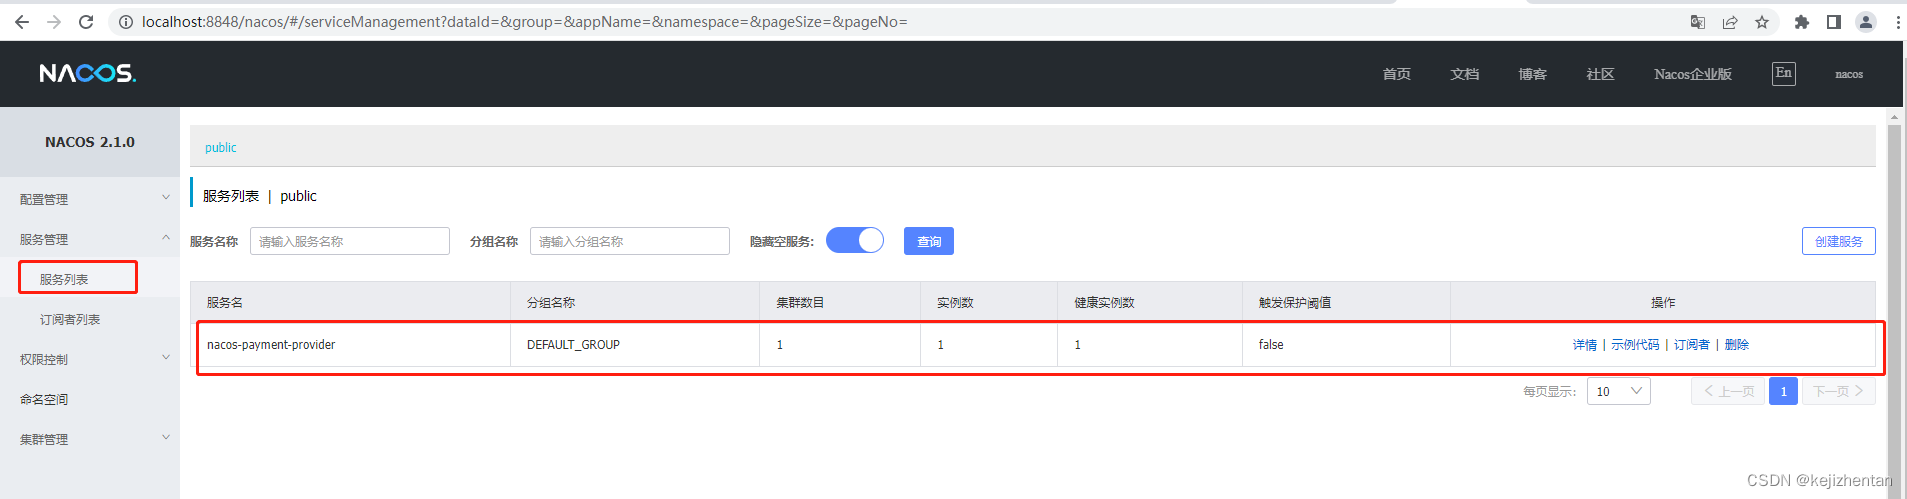
nacos服务注册中心+服务提供者9001都OK了
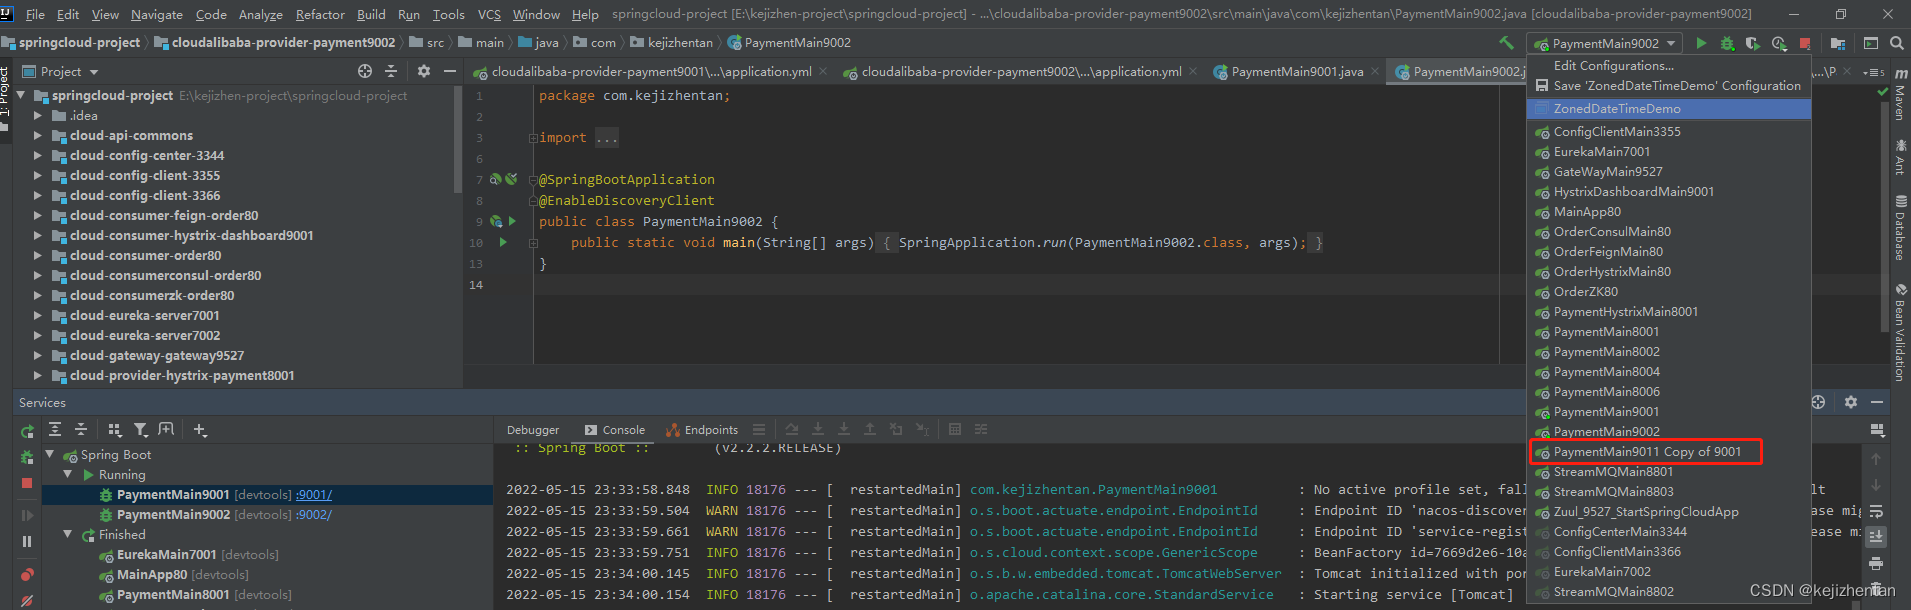
⑶ 为了下一章节演示nacos的负载均衡,参照cloudalibaba-provider-payment9001新建cloudalibaba-provider-payment9002
步骤与cloudalibaba-provider-payment9001一致,这里就不废话了
或者如果想偷懒的话也可以直接拷贝虚拟端口映射


⑷ 基于Nacos的服务消费者
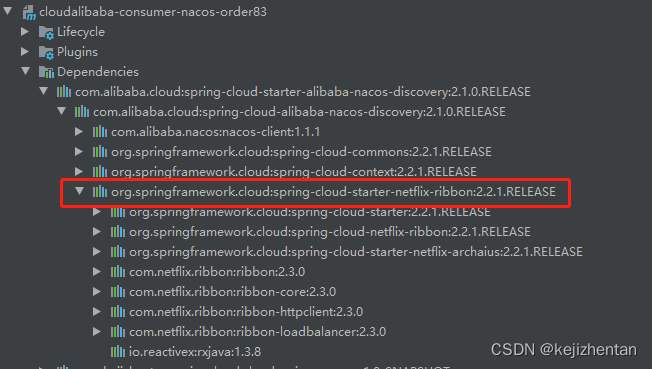
1) 创建cloudalibaba-consumer-nacos-order83 Module

2)修改pom文件
<?xml version="1.0" encoding="UTF-8"?>
<project xmlns="http://maven.apache.org/POM/4.0.0"
         xmlns:xsi="http://www.w3.org/2001/XMLSchema-instance"
         xsi:schemaLocation="http://maven.apache.org/POM/4.0.0 http://maven.apache.org/xsd/maven-4.0.0.xsd">
    <parent>
        <artifactId>springcloud-project</artifactId>
        <groupId>com.kejizhentan.springcloud</groupId>
        <version>1.0-SNAPSHOT</version>
    </parent>
    <modelVersion>4.0.0</modelVersion>

    <artifactId>cloudalibaba-consumer-nacos-order83</artifactId>

    <dependencies>
        <!--SpringCloud ailibaba nacos -->
        <dependency>
            <groupId>com.alibaba.cloud</groupId>
            <artifactId>spring-cloud-starter-alibaba-nacos-discovery</artifactId>
        </dependency>
        <!-- 引入自己定义的api通用包,可以使用Payment支付bean -->
        <dependency>
            <groupId>com.kejizhentan.springcloud</groupId>
            <artifactId>cloud-api-commons</artifactId>
            <version>${project.version}</version>
        </dependency>
        <!-- SpringBoot整合Web组件 -->
        <dependency>
            <groupId>org.springframework.boot</groupId>
            <artifactId>spring-boot-starter-web</artifactId>
        </dependency>
        <dependency>
            <groupId>org.springframework.boot</groupId>
            <artifactId>spring-boot-starter-actuator</artifactId>
        </dependency>
        <!--日常通用jar包配置-->
        <dependency>
            <groupId>org.springframework.boot</groupId>
            <artifactId>spring-boot-devtools</artifactId>
            <scope>runtime</scope>
            <optional>true</optional>
        </dependency>
        <dependency>
            <groupId>org.projectlombok</groupId>
            <artifactId>lombok</artifactId>
            <optional>true</optional>
        </dependency>
        <dependency>
            <groupId>org.springframework.boot</groupId>
            <artifactId>spring-boot-starter-test</artifactId>
            <scope>test</scope>
        </dependency>
    </dependencies>

</project>
为什么nacos支持负载均衡
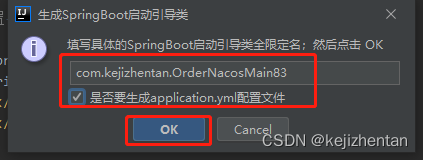
3)创建cloudalibaba-consumer-nacos-order83的YML和主启动:可以通过JBLSpringBootAppGen插件生成
4)修改YML文件
server:
  port: 83


spring:
  application:
    name: nacos-order-consumer
  cloud:
    nacos:
      discovery:
        server-addr: localhost:8848


#消费者将要去访问的微服务名称(注册成功进nacos的微服务提供者)
service-url:
  nacos-user-service: http://nacos-payment-provider
5)修改主启动OrderNacosMain83
@SpringBootApplication
@EnableDiscoveryClient
public class OrderNacosMain83 {
    public static void main(String[] args) {
        SpringApplication.run(OrderNacosMain83.class, args);
    }
}
6)业务类
① ApplicationContextBean
@Configuration
public class ApplicationContextBean {
    @Bean
    @LoadBalanced
    public RestTemplate getRestTemplate() {
        return new RestTemplate();
    }
}
② OrderNacosController
@RestController
public class OrderNacosController {
    @Resource
    private RestTemplate restTemplate;

    @Value("${service-url.nacos-user-service}")
    private String serverURL;

    @GetMapping("/consumer/payment/nacos/{id}")
    public String paymentInfo(@PathVariable("id") Long id) {
        return restTemplate.getForObject(serverURL + "/payment/nacos/" + id, String.class);
    }

}
7)测试
① 启动cloudalibaba-consumer-nacos-order83查看nacos控制台
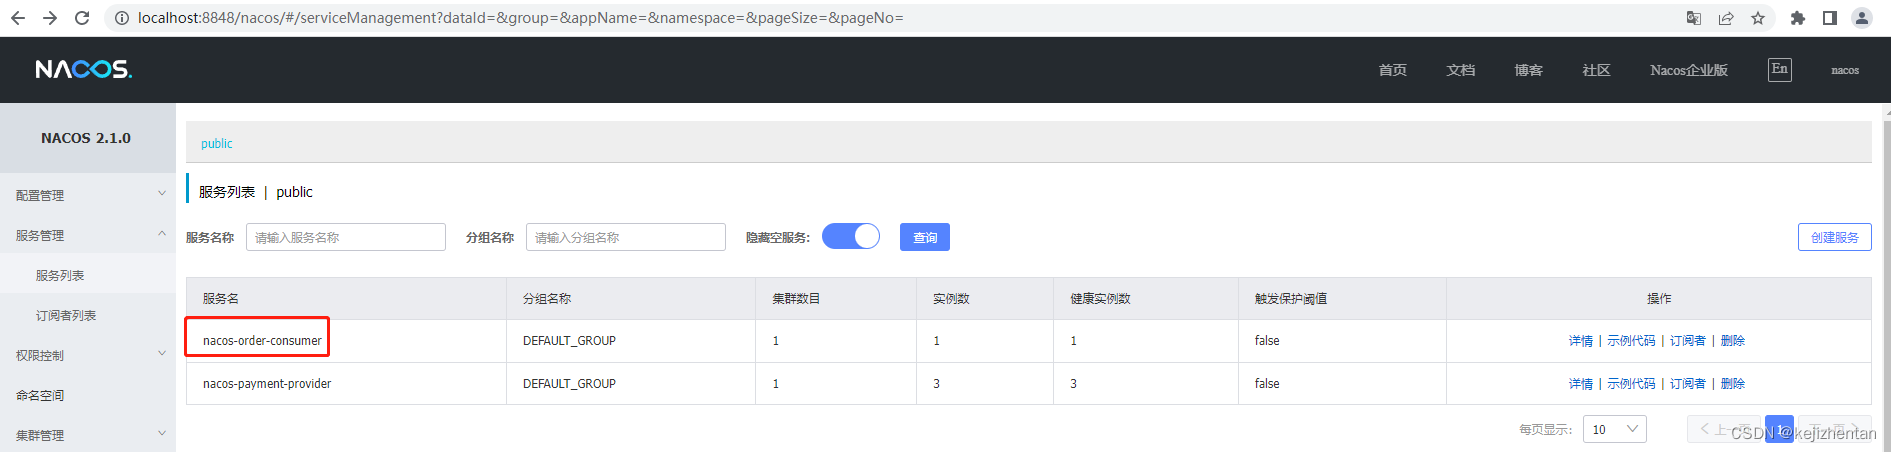
② 访问: http://localhost:83/consumer/payment/nacos/13

83访问9001/9002/9011,轮询负载OK
⑸ 服务注册中心对比
1) Nacos全景图所示

2) Nacos和CAP

3) Nacos支持AP和CP模式的切换
C是所有节点在同一时间看到的数据是一致的;而A的定义是所有的请求都会收到响应。
① 何时选择使用何种模式?
一般来说,
如果不需要存储服务级别的信息且服务实例是通过nacos-client注册,并能够保持心跳上报,那么就可以选择AP模式。当前主流的服务如 Spring cloud 和 Dubbo 服务,都适用于AP模式,AP模式为了服务的可能性而减弱了一致性,因此AP模式下只支持注册临时实例。
如果需要在服务级别编辑或者存储配置信息,那么 CP 是必须,K8S服务和DNS服务则适用于CP模式。
CP模式下则支持注册持久化实例,此时则是以 Raft 协议为集群运行模式,该模式下注册实例之前必须先注册服务,如果服务不存在,则会返回错误。
curl -X PUT '$NACOS_SERVER:8848/nacos/v1/ns/operator/switches?entry=serverMode&value=CP'
4. Nacos作为配置中心-基础配置 演示
⑴ 创建cloudalibaba-config-nacos-client3377项目

⑵ 修改pom文件
<?xml version="1.0" encoding="UTF-8"?>
<project xmlns="http://maven.apache.org/POM/4.0.0"
         xmlns:xsi="http://www.w3.org/2001/XMLSchema-instance"
         xsi:schemaLocation="http://maven.apache.org/POM/4.0.0 http://maven.apache.org/xsd/maven-4.0.0.xsd">
    <parent>
        <artifactId>springcloud-project</artifactId>
        <groupId>com.kejizhentan.springcloud</groupId>
        <version>1.0-SNAPSHOT</version>
    </parent>
    <modelVersion>4.0.0</modelVersion>

    <artifactId>cloudalibaba-config-nacos-client3377</artifactId>
    <dependencies>
        <!--nacos-config-->
        <dependency>
            <groupId>com.alibaba.cloud</groupId>
            <artifactId>spring-cloud-starter-alibaba-nacos-config</artifactId>
        </dependency>
        <!--nacos-discovery-->
        <dependency>
            <groupId>com.alibaba.cloud</groupId>
            <artifactId>spring-cloud-starter-alibaba-nacos-discovery</artifactId>
        </dependency>
        <!--web + actuator-->
        <dependency>
            <groupId>org.springframework.boot</groupId>
            <artifactId>spring-boot-starter-web</artifactId>
        </dependency>
        <dependency>
            <groupId>org.springframework.boot</groupId>
            <artifactId>spring-boot-starter-actuator</artifactId>
        </dependency>
        <!--一般基础配置-->
        <dependency>
            <groupId>org.springframework.boot</groupId>
            <artifactId>spring-boot-devtools</artifactId>
            <scope>runtime</scope>
            <optional>true</optional>
        </dependency>
        <dependency>
            <groupId>org.projectlombok</groupId>
            <artifactId>lombok</artifactId>
            <optional>true</optional>
        </dependency>
        <dependency>
            <groupId>org.springframework.boot</groupId>
            <artifactId>spring-boot-starter-test</artifactId>
            <scope>test</scope>
        </dependency>
    </dependencies>

</project>
⑶ 创建cloudalibaba-config-nacos-client3377的YML和主启动:可以通过JBLSpringBootAppGen插件生成
⑷ 修改application.yml文件
spring:
  profiles:
    active: dev # 表示开发环境
⑸ 创建bootstrap.yml文件
# nacos配置
server:
  port: 3377

spring:
  application:
    name: nacos-config-client
  cloud:
    nacos:
      discovery:
        server-addr: localhost:8848 #Nacos服务注册中心地址
      config:
        server-addr: localhost:8848 #Nacos作为配置中心地址
        file-extension: yaml #指定yaml格式的配置


# ${spring.application.name}-${spring.profile.active}.${spring.cloud.nacos.config.file-extension}
# nacos-config-client-dev.yml
⑹ why配置两个yml
Nacos同springcloud-config一样,在项目初始化时,要保证先从配置中心进行配置拉取,
拉取配置之后,才能保证项目的正常启动。
springboot中配置文件的加载是存在优先级顺序的,bootstrap优先级高于application
⑺ 修改主启动类NacosConfigClientMain3377
@SpringBootApplication
@EnableDiscoveryClient
public class NacosConfigClientMain3377 {
    public static void main(String[] args) {
        SpringApplication.run(NacosConfigClientMain3377.class, args);
    }
}
⑻ 业务类ConfigClientController
@RestController
@RefreshScope //在控制器类加入@RefreshScope注解使当前类下的配置支持Nacos的动态刷新功能。
public class ConfigClientController {
    @Value("${config.info}")
    private String configInfo;

    @GetMapping("/config/info")
    public String getConfigInfo() {
        return configInfo;
    }
}
@RefreshScope作用:
通过原生注解@RefreshScope实现配置自动更新
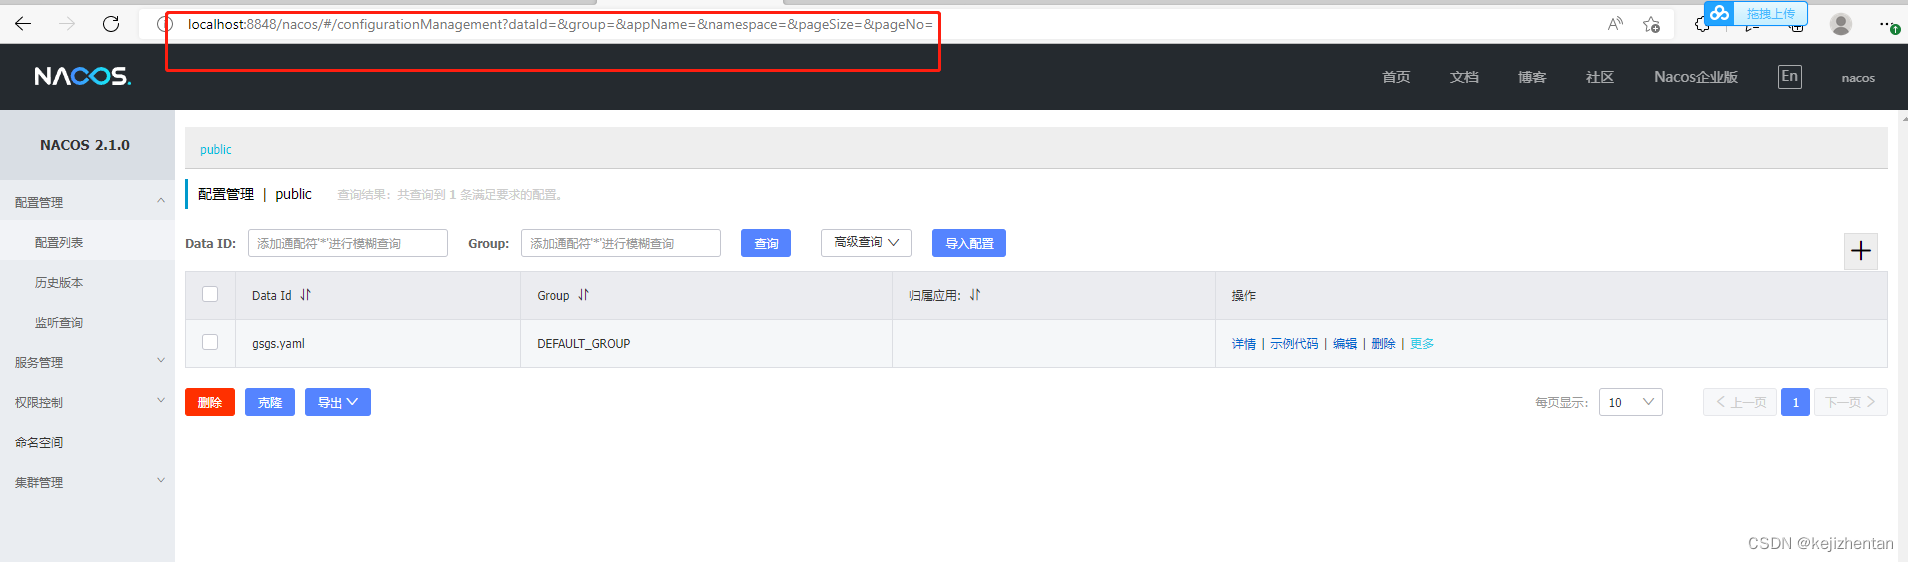
⑼ 在Nacos中添加配置信息
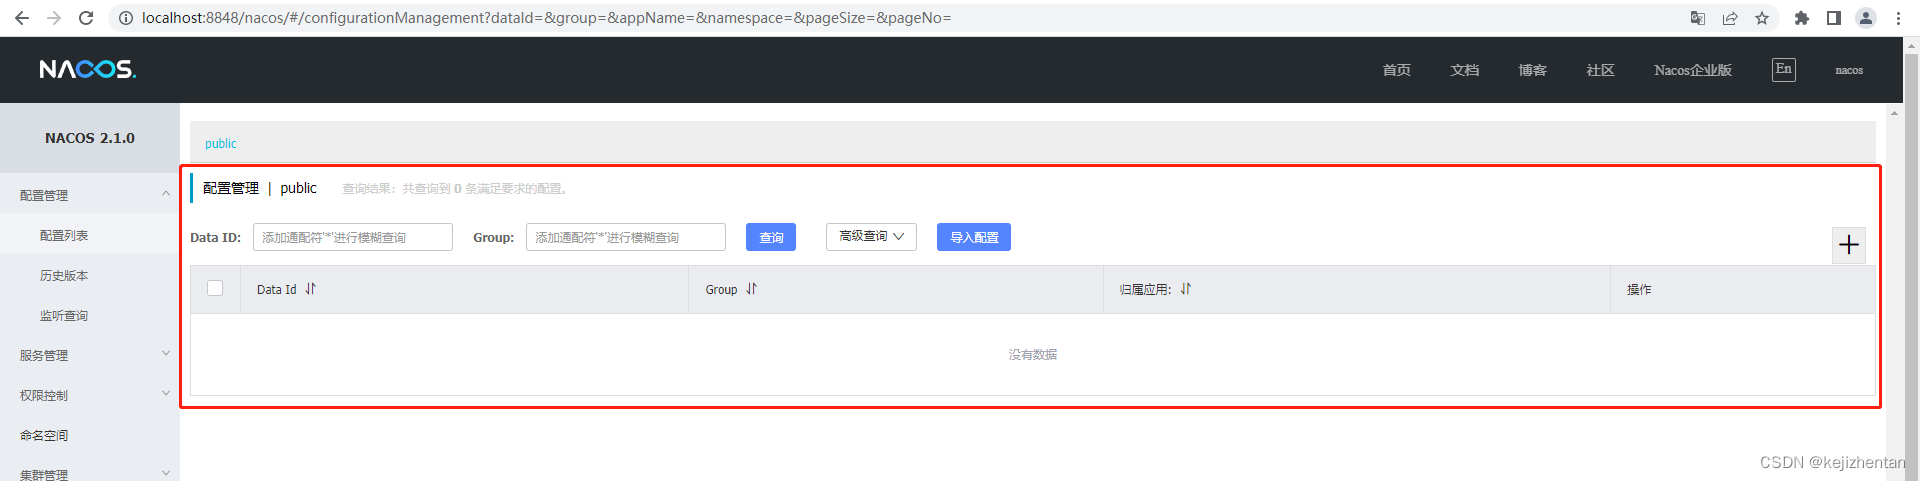
1)Nacos中的匹配规则理论
Nacos中的dataid的组成格式及与SpringBoot配置文件中的匹配规则
官网:https://nacos.io/zh-cn/docs/quick-start-spring-cloud.html

最后公式:
${spring.application.name}-${spring.profiles.active}.${spring.cloud.nacos.config.file-extension}
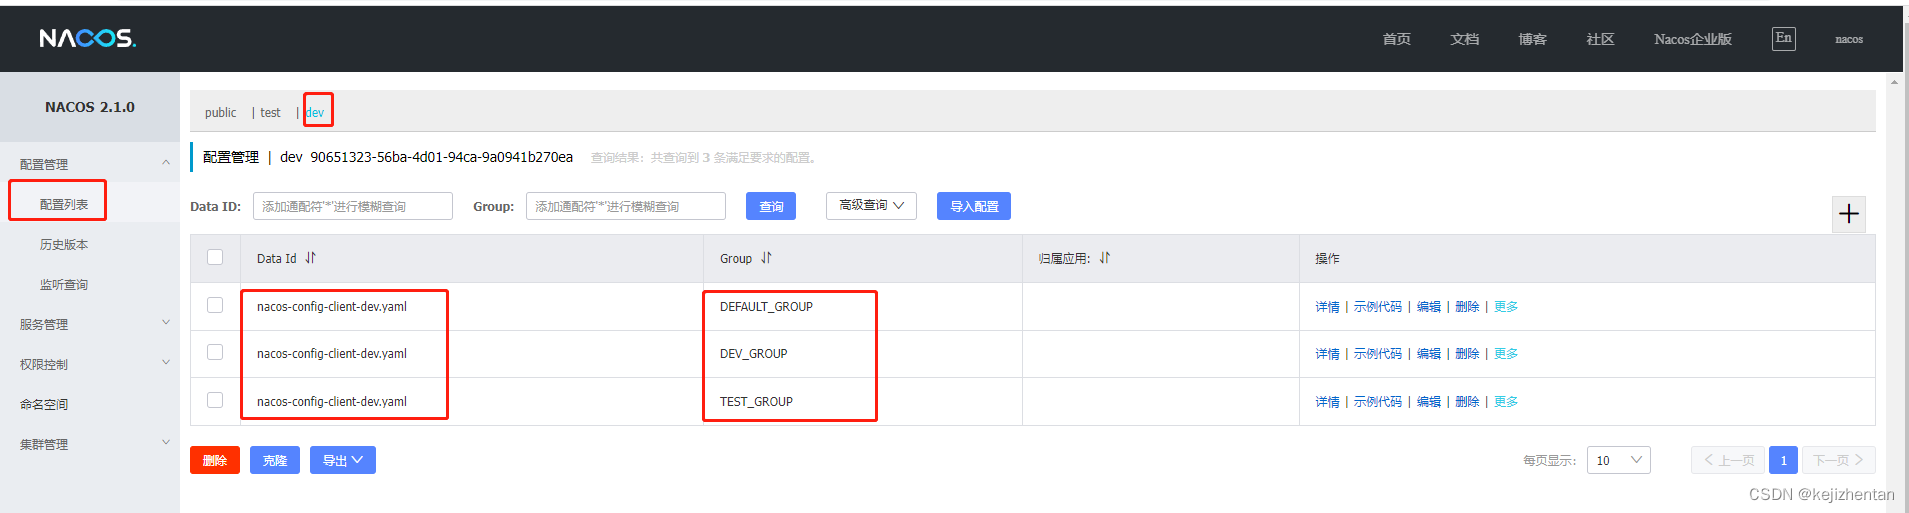
2)Nacos中的匹配规则实操
① 配置新增
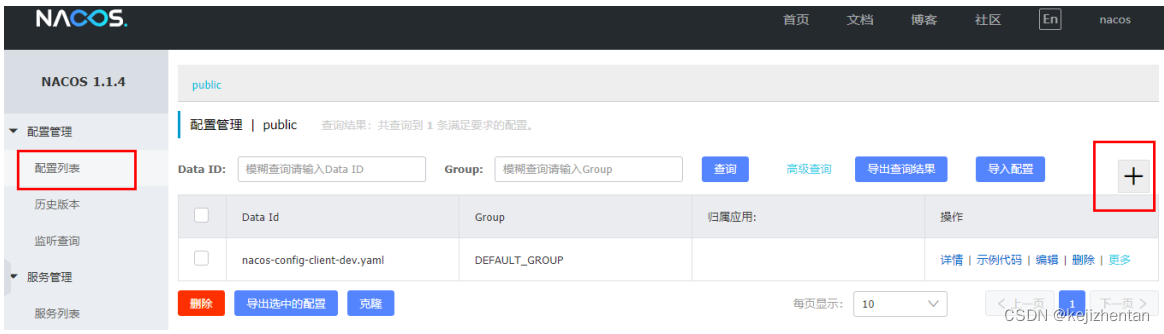
nacos-config-client-dev.yaml
② Nacos界面配置对应
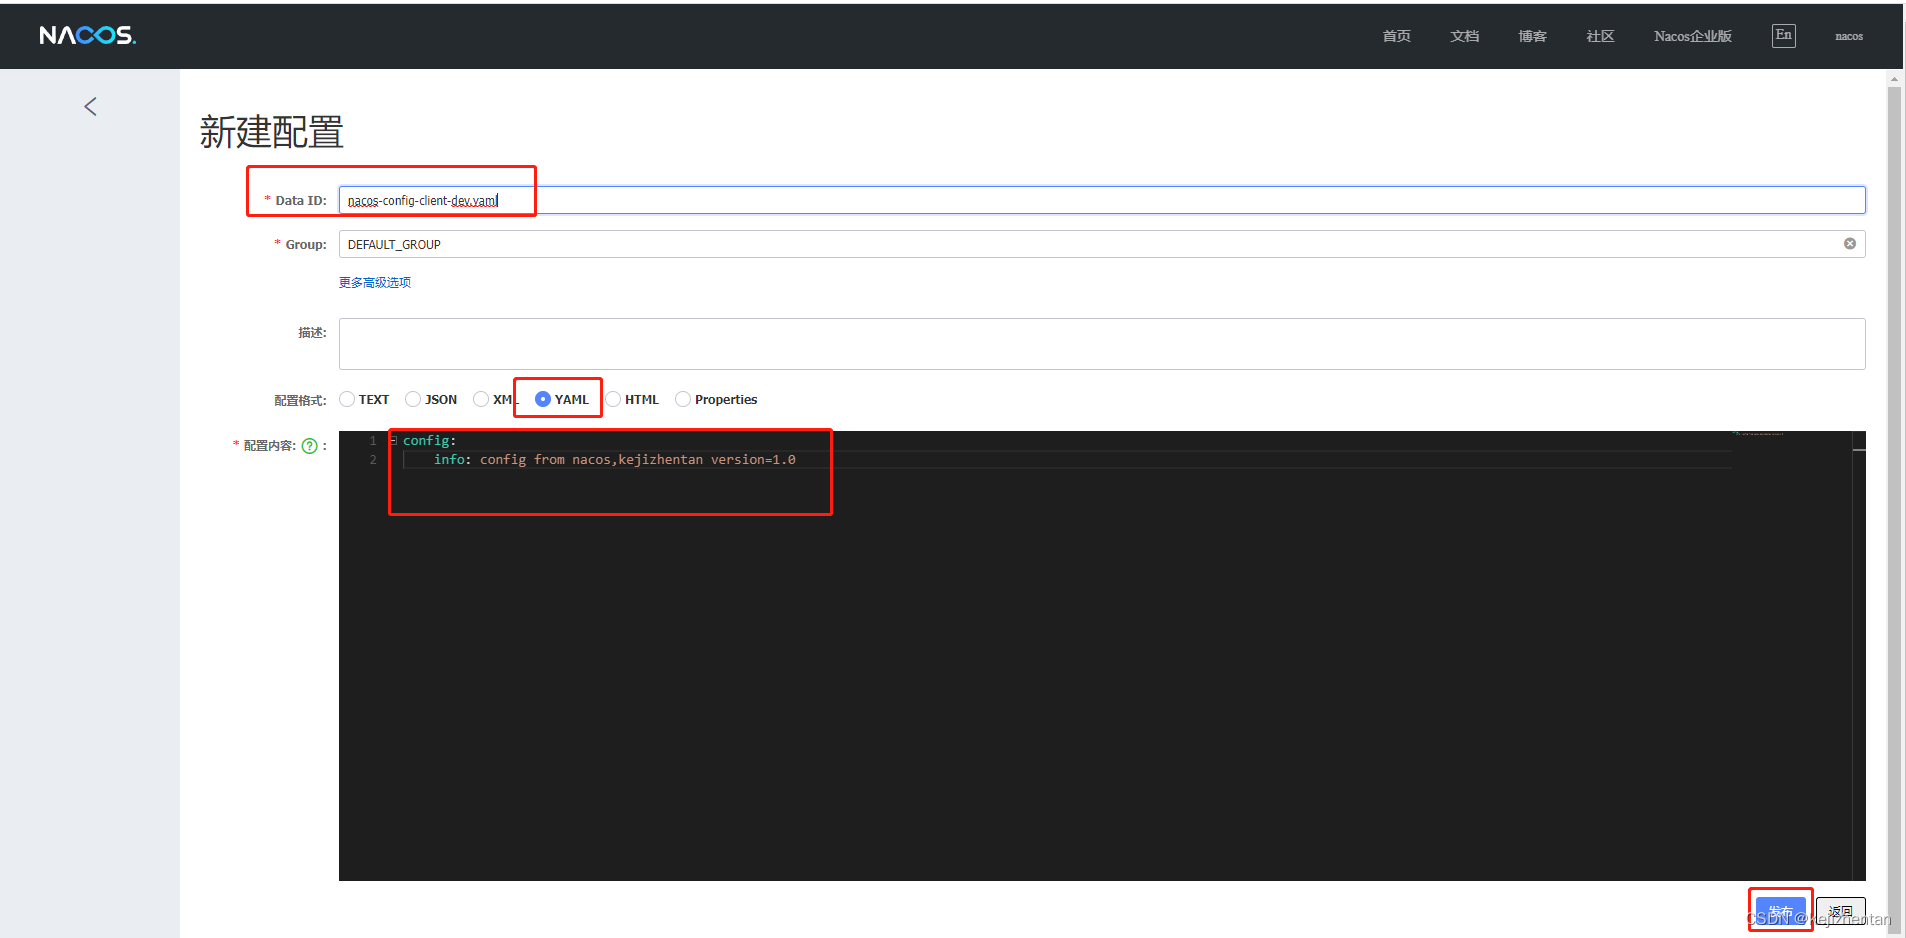
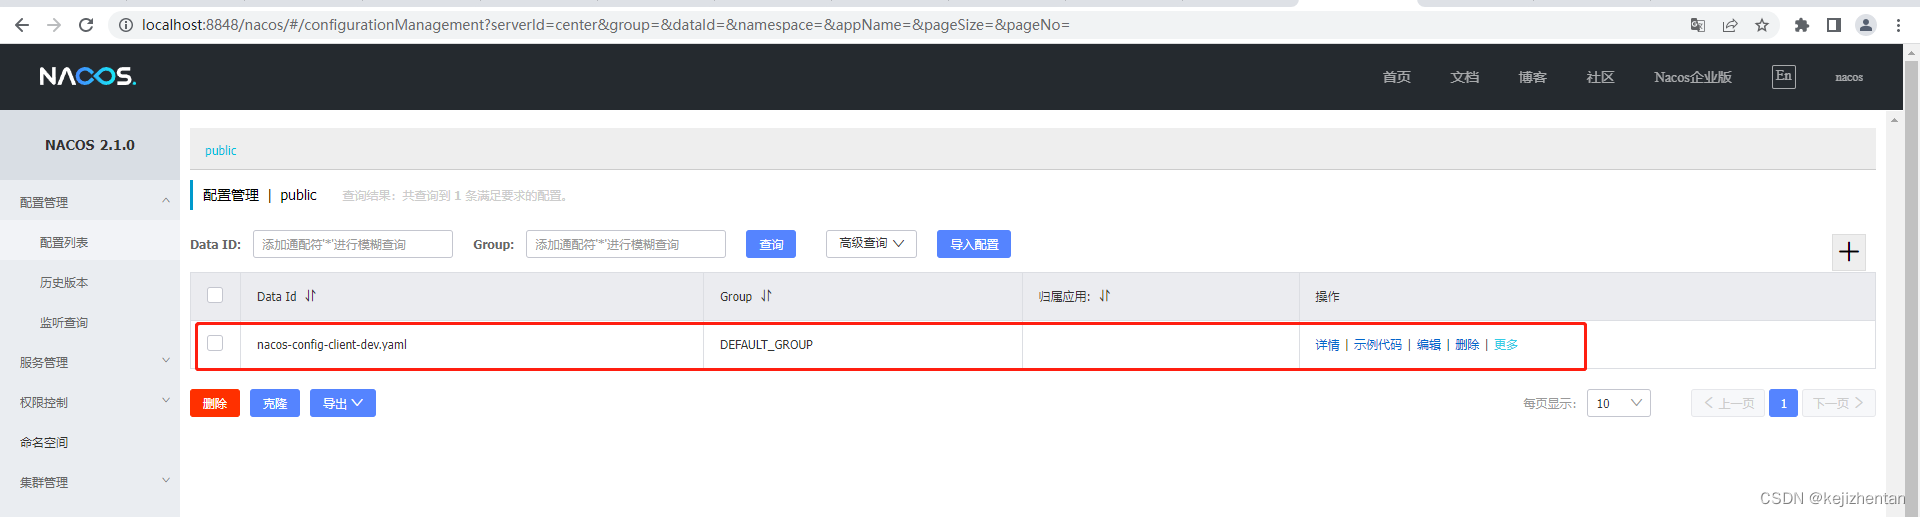
③ 设置DataId
○ 公式:${spring.application.name}-${spring.profiles.active}.${spring.cloud.nacos.config.file-extension}
○ prefix 默认为 spring.application.name 的值
○ spring.profile.active 即为当前环境对应的 profile,可以通过配置项 spring.profile.active 来配置。
○ file-exetension 为配置内容的数据格式,可以通过配置项 spring.cloud.nacos.config.file-extension 来配置
小总结说明:

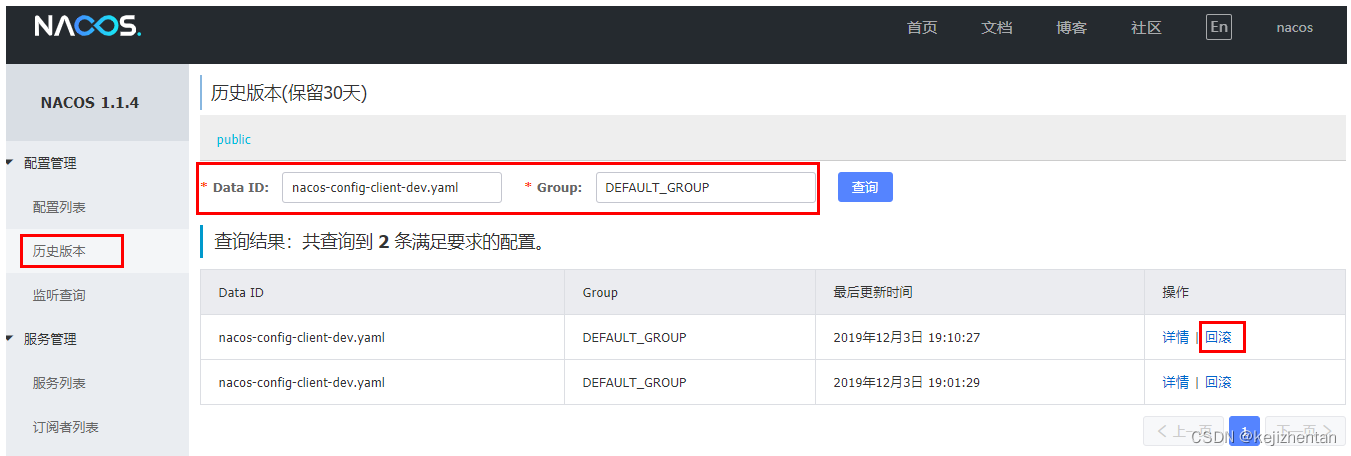
④ 历史配置介绍
Nacos会记录配置文件的历史版本默认保留30天,此外还有一键回滚功能,回滚操作将会触发配置更新
⑤ 测试
○ 启动前需要在nacos客户端-配置管理-配置管理栏目下有对应的yaml配置文件
○ 运行cloud-config-nacos-client3377的主启动类
○ 调用接口查看配置信息
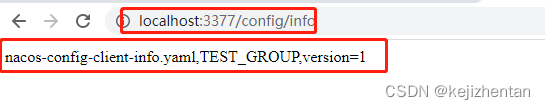
访问:http://localhost:3377/config/info

⑥ 自带动态刷新
修改下Nacos中的yaml配置文件,再次调用查看配置的接口,就会发现配置已经刷新

5. Nacos作为配置中心-分类配置 演示
⑴ 多环境多项目管理问题
1) 问题1:
实际开发中,通常一个系统会准备
dev开发环境
test测试环境
prod生产环境。
如何保证指定环境启动时服务能正确读取到Nacos上相应环境的配置文件呢?
2) 问题2:
一个大型分布式微服务系统会有很多微服务子项目,
每个微服务项目又都会有相应的开发环境、测试环境、预发环境、正式环境…
那怎么对这些微服务配置进行管理呢?
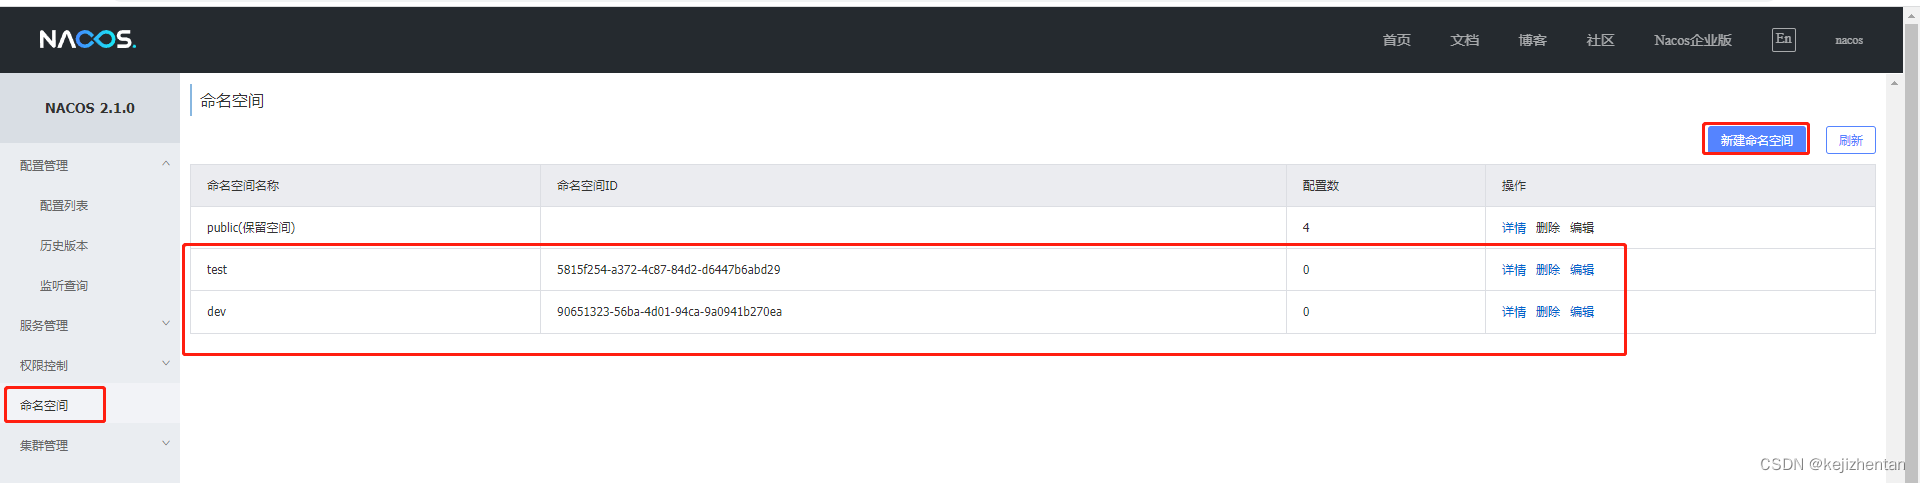
⑵ Nacos的图形化管理界面
1) 配置管理
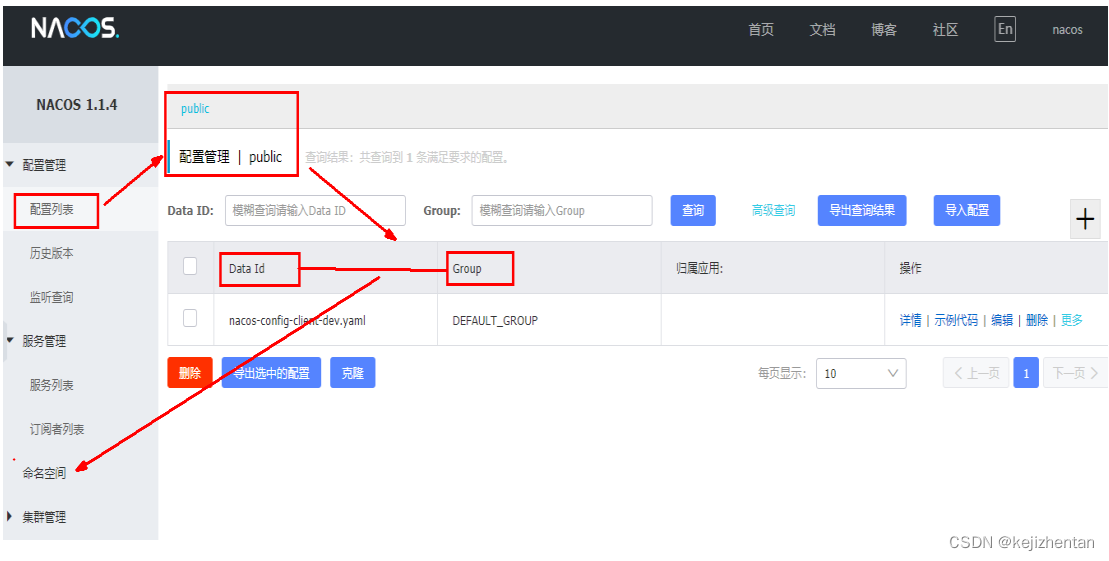
2) 命名空间

⑶ Namespace+Group+Data ID三者关系?为什么这么设计?
1) Namespace+Group+Data ID是什么
类似Java里面的package名和类名
最外层的namespace是可以用于区分部署环境的,Group和DataID逻辑上区分两个目标对象。
2) 三者情况

默认情况:
Namespace=public,Group=DEFAULT_GROUP, 默认Cluster是DEFAULT
Nacos默认的命名空间是public,Namespace主要用来实现隔离。
比方说我们现在有三个环境:开发、测试、生产环境,我们就可以创建三个Namespace,不同的Namespace之间是隔离的。
Group默认是DEFAULT_GROUP,Group可以把不同的微服务划分到同一个分组里面去
Service就是微服务;一个Service可以包含多个Cluster(集群),Nacos默认Cluster是DEFAULT,Cluster是对指定微服务的一个虚拟划分。
比方说为了容灾,将Service微服务分别部署在了杭州机房和广州机房,
这时就可以给杭州机房的Service微服务起一个集群名称(HZ),
给广州机房的Service微服务起一个集群名称(GZ),还可以尽量让同一个机房的微服务互相调用,以提升性能。
最后是Instance,就是微服务的实例。
⑷ 三种方案加载配置
1) DataID方案
① 指定spring.profile.active和配置文件的DataID来使不同环境下读取不同的配置
② 默认空间+默认分组+新建dev和test两个DataID
○ 新建dev配置DataID

○ 新建test配置DataID


③ 通过spring.profile.active属性就能进行多环境下配置文件的读取

④ 测试
访问:http://localhost:3377/config/info

2)Group方案:通过Group实现环境区分
① 新建Group :在nacos图形界面控制台上面新建配置文件DataID

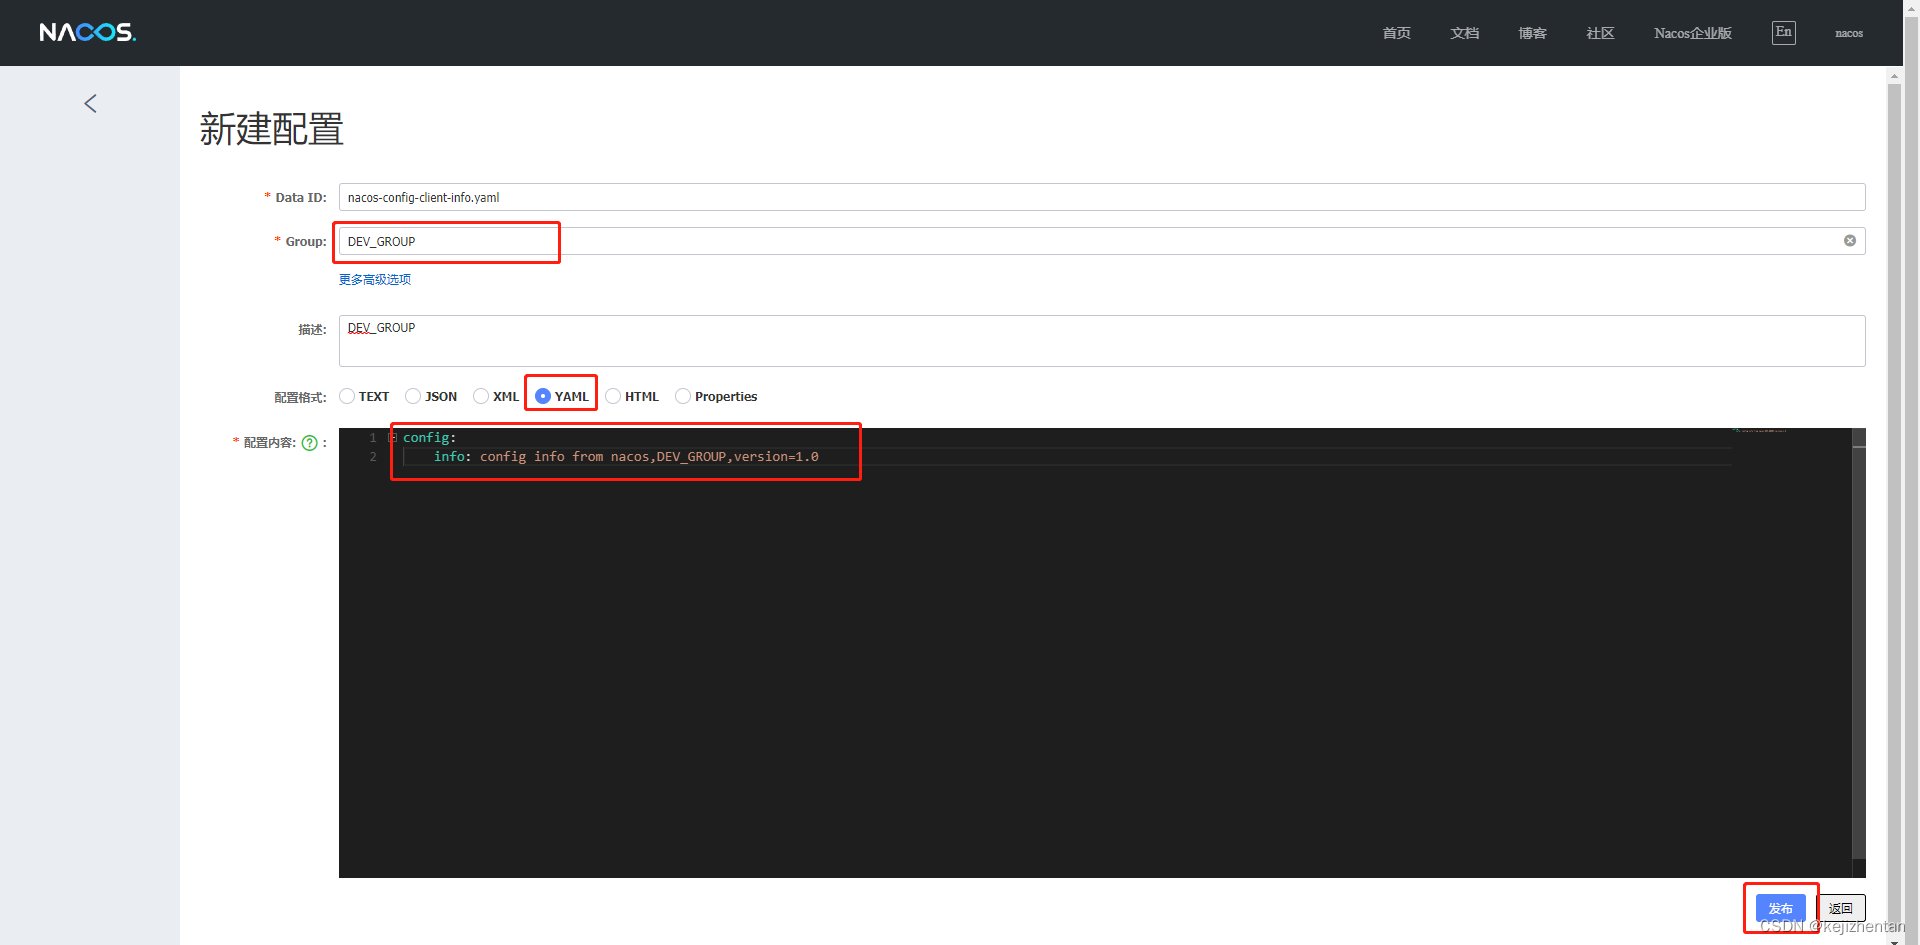

② 在config下增加一条group的配置即可。可配置为DEV_GROUP或TEST_GROUP

④ 测试
访问:http://localhost:3377/config/info
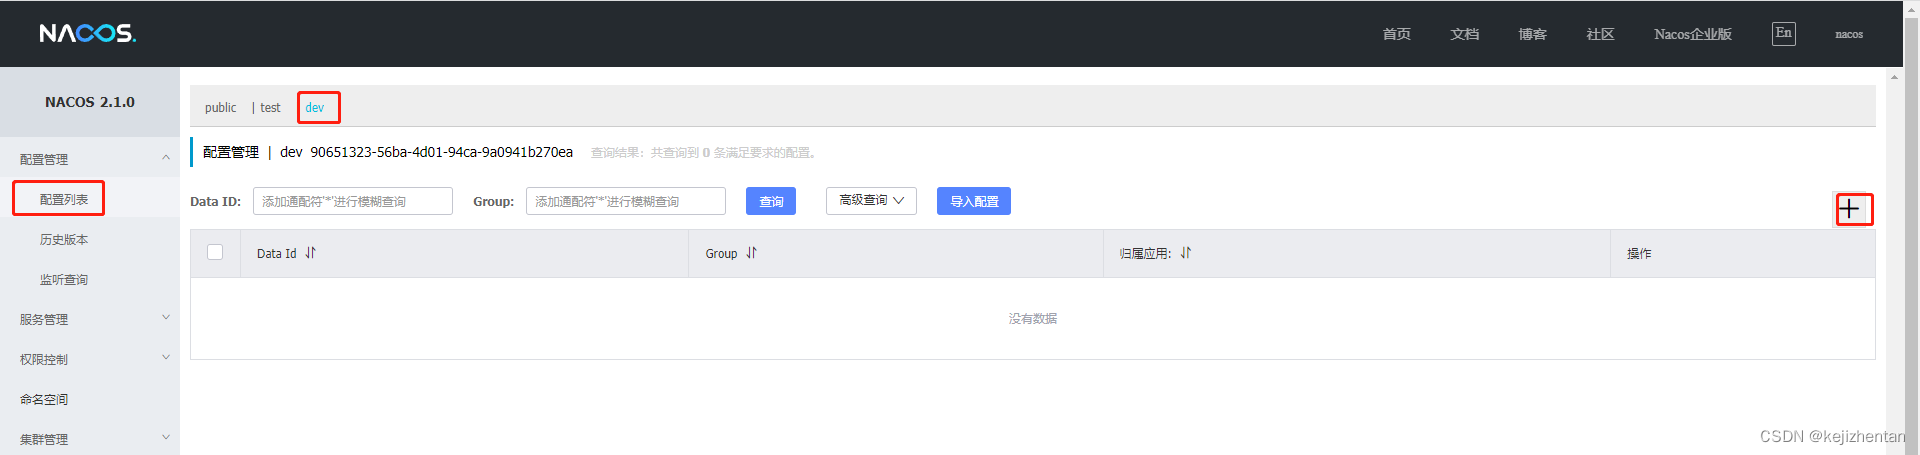
3)Namespace方案
① 新建dev/test的Namespace
注意下面的命名空间ID:

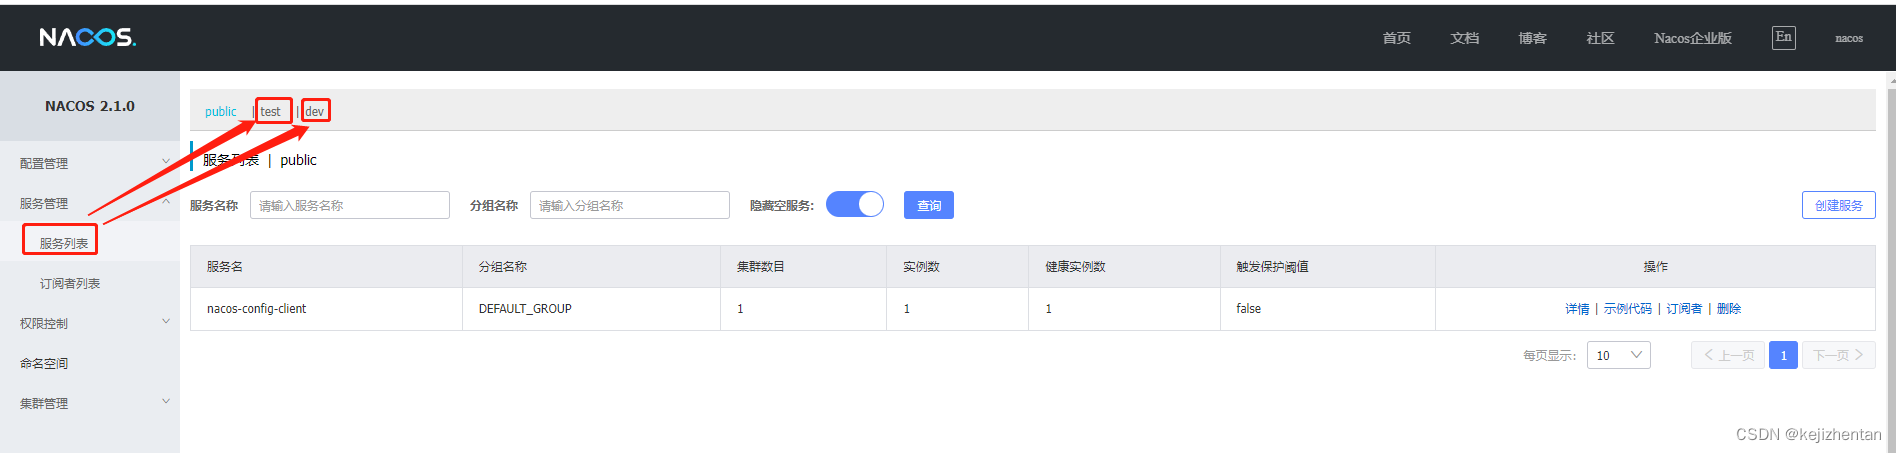
② 回到服务管理-服务列表查看
③ 按照域名配置填写

④ YML
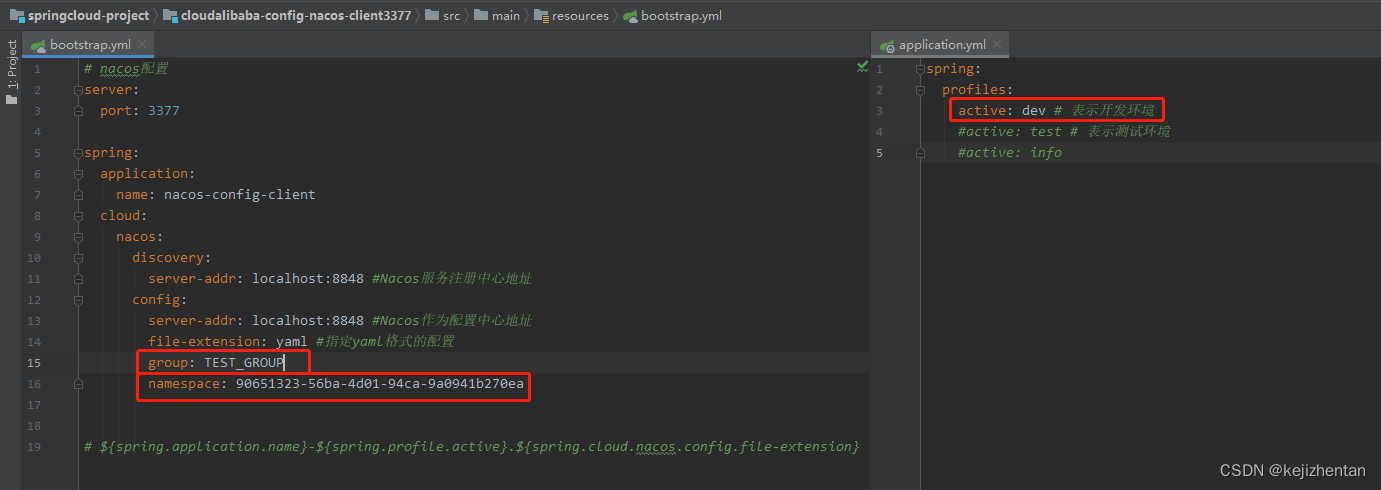
⑤ 测试
访问:http://localhost:3377/config/info

6. Nacos集群和持久化配置(重要)
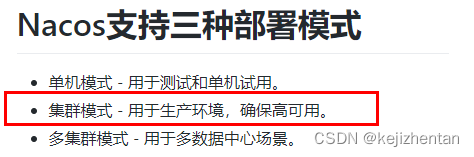
⑴ 官网说明
官网地址:https://nacos.io/zh-cn/docs/cluster-mode-quick-start.html

上图官网翻译,真实情况
⑵ Nacos集群和持久化配置重点内容
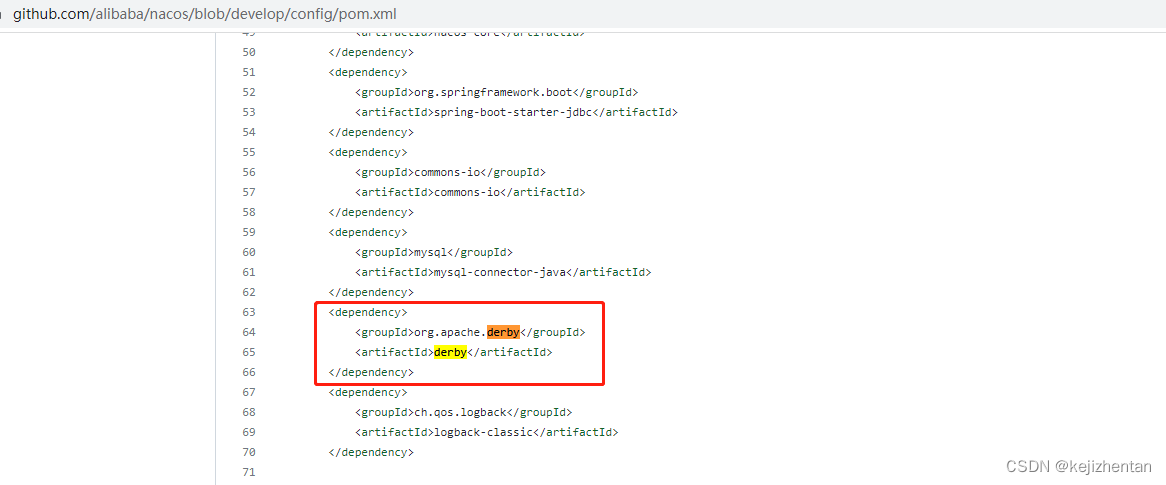
默认Nacos使用嵌入式数据库实现数据的存储。所以,如果启动多个默认配置下的Nacos节点,数据存储是存在一致性问题的。为了解决这个问题,Nacos采用了集中式存储的方式来支持集群化部署,目前只支持MySQL的存储。
官网:https://github.com/alibaba/nacos/blob/develop/config/pom.xml

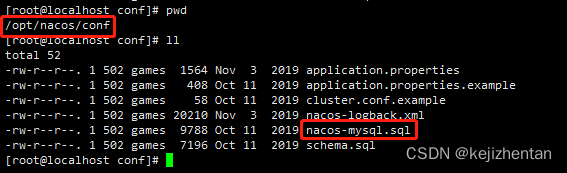
⑶ Nacos持久化配置解释
Nacos默认自带的是嵌入式数据库derby
https://github.com/alibaba/nacos/blob/develop/config/pom.xml
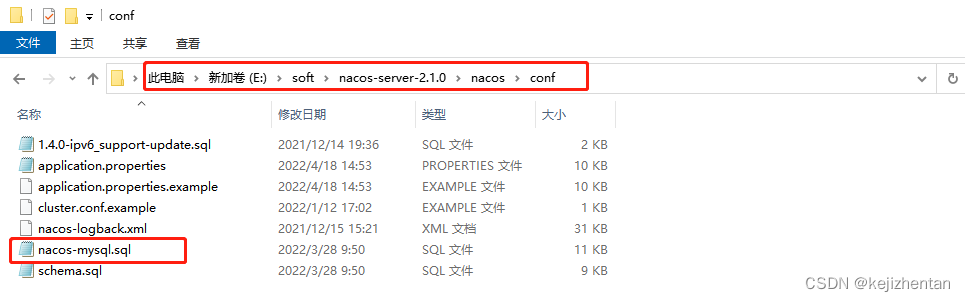
1) derby到mysql切换配置步骤
① E:\soft\nacos-server-2.1.0\nacos\conf目录下找到sql脚本:nacos-mysql.sql
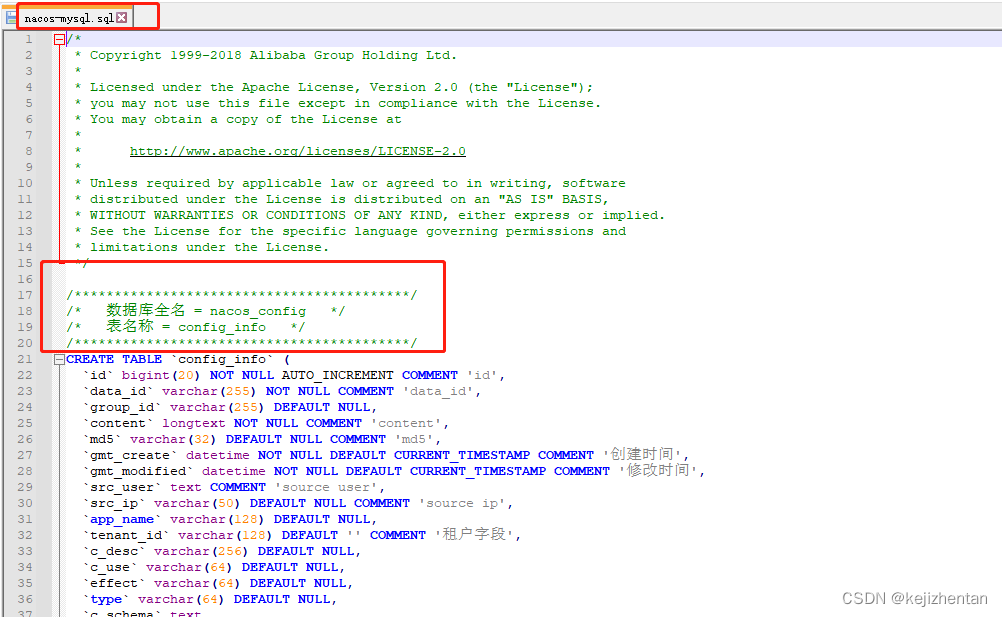
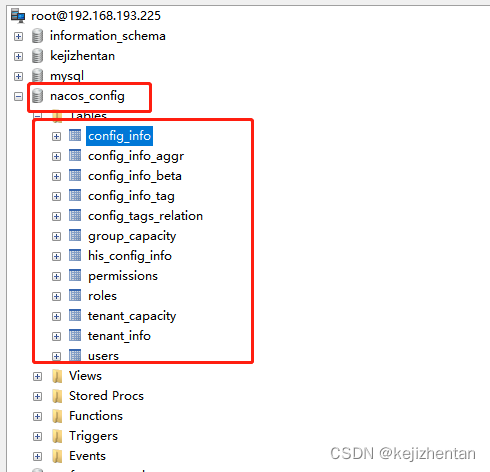
② 在mysql中新建一个nacos_config数据库,执行nacos-mysql.sql脚本
/*
 * Copyright 1999-2018 Alibaba Group Holding Ltd.
 *
 * Licensed under the Apache License, Version 2.0 (the "License");
 * you may not use this file except in compliance with the License.
 * You may obtain a copy of the License at
 *
 *      http://www.apache.org/licenses/LICENSE-2.0
 *
 * Unless required by applicable law or agreed to in writing, software
 * distributed under the License is distributed on an "AS IS" BASIS,
 * WITHOUT WARRANTIES OR CONDITIONS OF ANY KIND, either express or implied.
 * See the License for the specific language governing permissions and
 * limitations under the License.
 */

/******************************************/
/*   数据库全名 = nacos_config   */
/*   表名称 = config_info   */
/******************************************/
CREATE TABLE `config_info` (
  `id` bigint(20) NOT NULL AUTO_INCREMENT COMMENT 'id',
  `data_id` varchar(255) NOT NULL COMMENT 'data_id',
  `group_id` varchar(255) DEFAULT NULL,
  `content` longtext NOT NULL COMMENT 'content',
  `md5` varchar(32) DEFAULT NULL COMMENT 'md5',
  `gmt_create` datetime NOT NULL DEFAULT CURRENT_TIMESTAMP COMMENT '创建时间',
  `gmt_modified` datetime NOT NULL DEFAULT CURRENT_TIMESTAMP COMMENT '修改时间',
  `src_user` text COMMENT 'source user',
  `src_ip` varchar(50) DEFAULT NULL COMMENT 'source ip',
  `app_name` varchar(128) DEFAULT NULL,
  `tenant_id` varchar(128) DEFAULT '' COMMENT '租户字段',
  `c_desc` varchar(256) DEFAULT NULL,
  `c_use` varchar(64) DEFAULT NULL,
  `effect` varchar(64) DEFAULT NULL,
  `type` varchar(64) DEFAULT NULL,
  `c_schema` text,
  `encrypted_data_key` text NOT NULL COMMENT '秘钥',
  PRIMARY KEY (`id`),
  UNIQUE KEY `uk_configinfo_datagrouptenant` (`data_id`,`group_id`,`tenant_id`)
) ENGINE=InnoDB DEFAULT CHARSET=utf8 COLLATE=utf8_bin COMMENT='config_info';

/******************************************/
/*   数据库全名 = nacos_config   */
/*   表名称 = config_info_aggr   */
/******************************************/
CREATE TABLE `config_info_aggr` (
  `id` bigint(20) NOT NULL AUTO_INCREMENT COMMENT 'id',
  `data_id` varchar(255) NOT NULL COMMENT 'data_id',
  `group_id` varchar(255) NOT NULL COMMENT 'group_id',
  `datum_id` varchar(255) NOT NULL COMMENT 'datum_id',
  `content` longtext NOT NULL COMMENT '内容',
  `gmt_modified` datetime NOT NULL COMMENT '修改时间',
  `app_name` varchar(128) DEFAULT NULL,
  `tenant_id` varchar(128) DEFAULT '' COMMENT '租户字段',
  PRIMARY KEY (`id`),
  UNIQUE KEY `uk_configinfoaggr_datagrouptenantdatum` (`data_id`,`group_id`,`tenant_id`,`datum_id`)
) ENGINE=InnoDB DEFAULT CHARSET=utf8 COLLATE=utf8_bin COMMENT='增加租户字段';


/******************************************/
/*   数据库全名 = nacos_config   */
/*   表名称 = config_info_beta   */
/******************************************/
CREATE TABLE `config_info_beta` (
  `id` bigint(20) NOT NULL AUTO_INCREMENT COMMENT 'id',
  `data_id` varchar(255) NOT NULL COMMENT 'data_id',
  `group_id` varchar(128) NOT NULL COMMENT 'group_id',
  `app_name` varchar(128) DEFAULT NULL COMMENT 'app_name',
  `content` longtext NOT NULL COMMENT 'content',
  `beta_ips` varchar(1024) DEFAULT NULL COMMENT 'betaIps',
  `md5` varchar(32) DEFAULT NULL COMMENT 'md5',
  `gmt_create` datetime NOT NULL DEFAULT CURRENT_TIMESTAMP COMMENT '创建时间',
  `gmt_modified` datetime NOT NULL DEFAULT CURRENT_TIMESTAMP COMMENT '修改时间',
  `src_user` text COMMENT 'source user',
  `src_ip` varchar(50) DEFAULT NULL COMMENT 'source ip',
  `tenant_id` varchar(128) DEFAULT '' COMMENT '租户字段',
  `encrypted_data_key` text NOT NULL COMMENT '秘钥',
  PRIMARY KEY (`id`),
  UNIQUE KEY `uk_configinfobeta_datagrouptenant` (`data_id`,`group_id`,`tenant_id`)
) ENGINE=InnoDB DEFAULT CHARSET=utf8 COLLATE=utf8_bin COMMENT='config_info_beta';

/******************************************/
/*   数据库全名 = nacos_config   */
/*   表名称 = config_info_tag   */
/******************************************/
CREATE TABLE `config_info_tag` (
  `id` bigint(20) NOT NULL AUTO_INCREMENT COMMENT 'id',
  `data_id` varchar(255) NOT NULL COMMENT 'data_id',
  `group_id` varchar(128) NOT NULL COMMENT 'group_id',
  `tenant_id` varchar(128) DEFAULT '' COMMENT 'tenant_id',
  `tag_id` varchar(128) NOT NULL COMMENT 'tag_id',
  `app_name` varchar(128) DEFAULT NULL COMMENT 'app_name',
  `content` longtext NOT NULL COMMENT 'content',
  `md5` varchar(32) DEFAULT NULL COMMENT 'md5',
  `gmt_create` datetime NOT NULL DEFAULT CURRENT_TIMESTAMP COMMENT '创建时间',
  `gmt_modified` datetime NOT NULL DEFAULT CURRENT_TIMESTAMP COMMENT '修改时间',
  `src_user` text COMMENT 'source user',
  `src_ip` varchar(50) DEFAULT NULL COMMENT 'source ip',
  PRIMARY KEY (`id`),
  UNIQUE KEY `uk_configinfotag_datagrouptenanttag` (`data_id`,`group_id`,`tenant_id`,`tag_id`)
) ENGINE=InnoDB DEFAULT CHARSET=utf8 COLLATE=utf8_bin COMMENT='config_info_tag';

/******************************************/
/*   数据库全名 = nacos_config   */
/*   表名称 = config_tags_relation   */
/******************************************/
CREATE TABLE `config_tags_relation` (
  `id` bigint(20) NOT NULL COMMENT 'id',
  `tag_name` varchar(128) NOT NULL COMMENT 'tag_name',
  `tag_type` varchar(64) DEFAULT NULL COMMENT 'tag_type',
  `data_id` varchar(255) NOT NULL COMMENT 'data_id',
  `group_id` varchar(128) NOT NULL COMMENT 'group_id',
  `tenant_id` varchar(128) DEFAULT '' COMMENT 'tenant_id',
  `nid` bigint(20) NOT NULL AUTO_INCREMENT,
  PRIMARY KEY (`nid`),
  UNIQUE KEY `uk_configtagrelation_configidtag` (`id`,`tag_name`,`tag_type`),
  KEY `idx_tenant_id` (`tenant_id`)
) ENGINE=InnoDB DEFAULT CHARSET=utf8 COLLATE=utf8_bin COMMENT='config_tag_relation';

/******************************************/
/*   数据库全名 = nacos_config   */
/*   表名称 = group_capacity   */
/******************************************/
CREATE TABLE `group_capacity` (
  `id` bigint(20) unsigned NOT NULL AUTO_INCREMENT COMMENT '主键ID',
  `group_id` varchar(128) NOT NULL DEFAULT '' COMMENT 'Group ID,空字符表示整个集群',
  `quota` int(10) unsigned NOT NULL DEFAULT '0' COMMENT '配额,0表示使用默认值',
  `usage` int(10) unsigned NOT NULL DEFAULT '0' COMMENT '使用量',
  `max_size` int(10) unsigned NOT NULL DEFAULT '0' COMMENT '单个配置大小上限,单位为字节,0表示使用默认值',
  `max_aggr_count` int(10) unsigned NOT NULL DEFAULT '0' COMMENT '聚合子配置最大个数,,0表示使用默认值',
  `max_aggr_size` int(10) unsigned NOT NULL DEFAULT '0' COMMENT '单个聚合数据的子配置大小上限,单位为字节,0表示使用默认值',
  `max_history_count` int(10) unsigned NOT NULL DEFAULT '0' COMMENT '最大变更历史数量',
  `gmt_create` datetime NOT NULL DEFAULT CURRENT_TIMESTAMP COMMENT '创建时间',
  `gmt_modified` datetime NOT NULL DEFAULT CURRENT_TIMESTAMP COMMENT '修改时间',
  PRIMARY KEY (`id`),
  UNIQUE KEY `uk_group_id` (`group_id`)
) ENGINE=InnoDB DEFAULT CHARSET=utf8 COLLATE=utf8_bin COMMENT='集群、各Group容量信息表';

/******************************************/
/*   数据库全名 = nacos_config   */
/*   表名称 = his_config_info   */
/******************************************/
CREATE TABLE `his_config_info` (
  `id` bigint(64) unsigned NOT NULL,
  `nid` bigint(20) unsigned NOT NULL AUTO_INCREMENT,
  `data_id` varchar(255) NOT NULL,
  `group_id` varchar(128) NOT NULL,
  `app_name` varchar(128) DEFAULT NULL COMMENT 'app_name',
  `content` longtext NOT NULL,
  `md5` varchar(32) DEFAULT NULL,
  `gmt_create` datetime NOT NULL DEFAULT CURRENT_TIMESTAMP,
  `gmt_modified` datetime NOT NULL DEFAULT CURRENT_TIMESTAMP,
  `src_user` text,
  `src_ip` varchar(50) DEFAULT NULL,
  `op_type` char(10) DEFAULT NULL,
  `tenant_id` varchar(128) DEFAULT '' COMMENT '租户字段',
  `encrypted_data_key` text NOT NULL COMMENT '秘钥',
  PRIMARY KEY (`nid`),
  KEY `idx_gmt_create` (`gmt_create`),
  KEY `idx_gmt_modified` (`gmt_modified`),
  KEY `idx_did` (`data_id`)
) ENGINE=InnoDB DEFAULT CHARSET=utf8 COLLATE=utf8_bin COMMENT='多租户改造';


/******************************************/
/*   数据库全名 = nacos_config   */
/*   表名称 = tenant_capacity   */
/******************************************/
CREATE TABLE `tenant_capacity` (
  `id` bigint(20) unsigned NOT NULL AUTO_INCREMENT COMMENT '主键ID',
  `tenant_id` varchar(128) NOT NULL DEFAULT '' COMMENT 'Tenant ID',
  `quota` int(10) unsigned NOT NULL DEFAULT '0' COMMENT '配额,0表示使用默认值',
  `usage` int(10) unsigned NOT NULL DEFAULT '0' COMMENT '使用量',
  `max_size` int(10) unsigned NOT NULL DEFAULT '0' COMMENT '单个配置大小上限,单位为字节,0表示使用默认值',
  `max_aggr_count` int(10) unsigned NOT NULL DEFAULT '0' COMMENT '聚合子配置最大个数',
  `max_aggr_size` int(10) unsigned NOT NULL DEFAULT '0' COMMENT '单个聚合数据的子配置大小上限,单位为字节,0表示使用默认值',
  `max_history_count` int(10) unsigned NOT NULL DEFAULT '0' COMMENT '最大变更历史数量',
  `gmt_create` datetime NOT NULL DEFAULT CURRENT_TIMESTAMP COMMENT '创建时间',
  `gmt_modified` datetime NOT NULL DEFAULT CURRENT_TIMESTAMP COMMENT '修改时间',
  PRIMARY KEY (`id`),
  UNIQUE KEY `uk_tenant_id` (`tenant_id`)
) ENGINE=InnoDB DEFAULT CHARSET=utf8 COLLATE=utf8_bin COMMENT='租户容量信息表';


CREATE TABLE `tenant_info` (
  `id` bigint(20) NOT NULL AUTO_INCREMENT COMMENT 'id',
  `kp` varchar(128) NOT NULL COMMENT 'kp',
  `tenant_id` varchar(128) default '' COMMENT 'tenant_id',
  `tenant_name` varchar(128) default '' COMMENT 'tenant_name',
  `tenant_desc` varchar(256) DEFAULT NULL COMMENT 'tenant_desc',
  `create_source` varchar(32) DEFAULT NULL COMMENT 'create_source',
  `gmt_create` bigint(20) NOT NULL COMMENT '创建时间',
  `gmt_modified` bigint(20) NOT NULL COMMENT '修改时间',
  PRIMARY KEY (`id`),
  UNIQUE KEY `uk_tenant_info_kptenantid` (`kp`,`tenant_id`),
  KEY `idx_tenant_id` (`tenant_id`)
) ENGINE=InnoDB DEFAULT CHARSET=utf8 COLLATE=utf8_bin COMMENT='tenant_info';

CREATE TABLE `users` (
	`username` varchar(50) NOT NULL PRIMARY KEY,
	`password` varchar(500) NOT NULL,
	`enabled` boolean NOT NULL
);

CREATE TABLE `roles` (
	`username` varchar(50) NOT NULL,
	`role` varchar(50) NOT NULL,
	UNIQUE INDEX `idx_user_role` (`username` ASC, `role` ASC) USING BTREE
);

CREATE TABLE `permissions` (
    `role` varchar(50) NOT NULL,
    `resource` varchar(255) NOT NULL,
    `action` varchar(8) NOT NULL,
    UNIQUE INDEX `uk_role_permission` (`role`,`resource`,`action`) USING BTREE
);

INSERT INTO users (username, password, enabled) VALUES ('nacos', '$2a$10$EuWPZHzz32dJN7jexM34MOeYirDdFAZm2kuWj7VEOJhhZkDrxfvUu', TRUE);

INSERT INTO roles (username, role) VALUES ('nacos', 'ROLE_ADMIN');
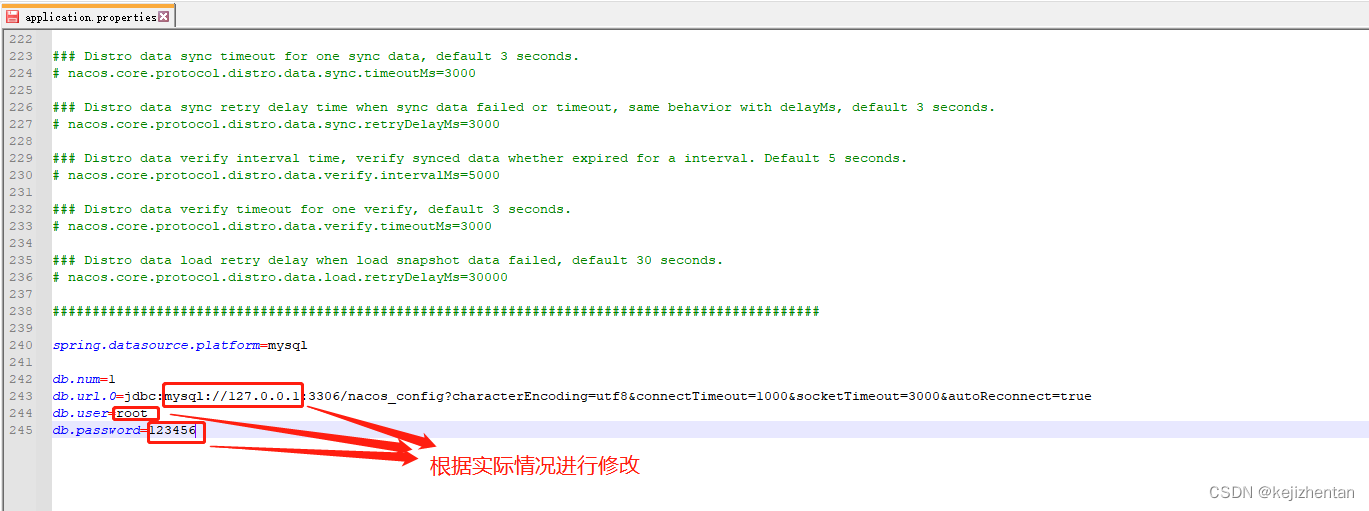
③ E:\soft\nacos-server-2.1.0\nacos\conf目录下找到application.properties
在文件的末尾添加
spring.datasource.platform=mysql

db.num=1
db.url.0=jdbc:mysql://127.0.0.1:3306/nacos_config?characterEncoding=utf8&connectTimeout=1000&socketTimeout=3000&autoReconnect=true&serverTimezone=UTC&useSSL=false
db.user=root
db.password=123456
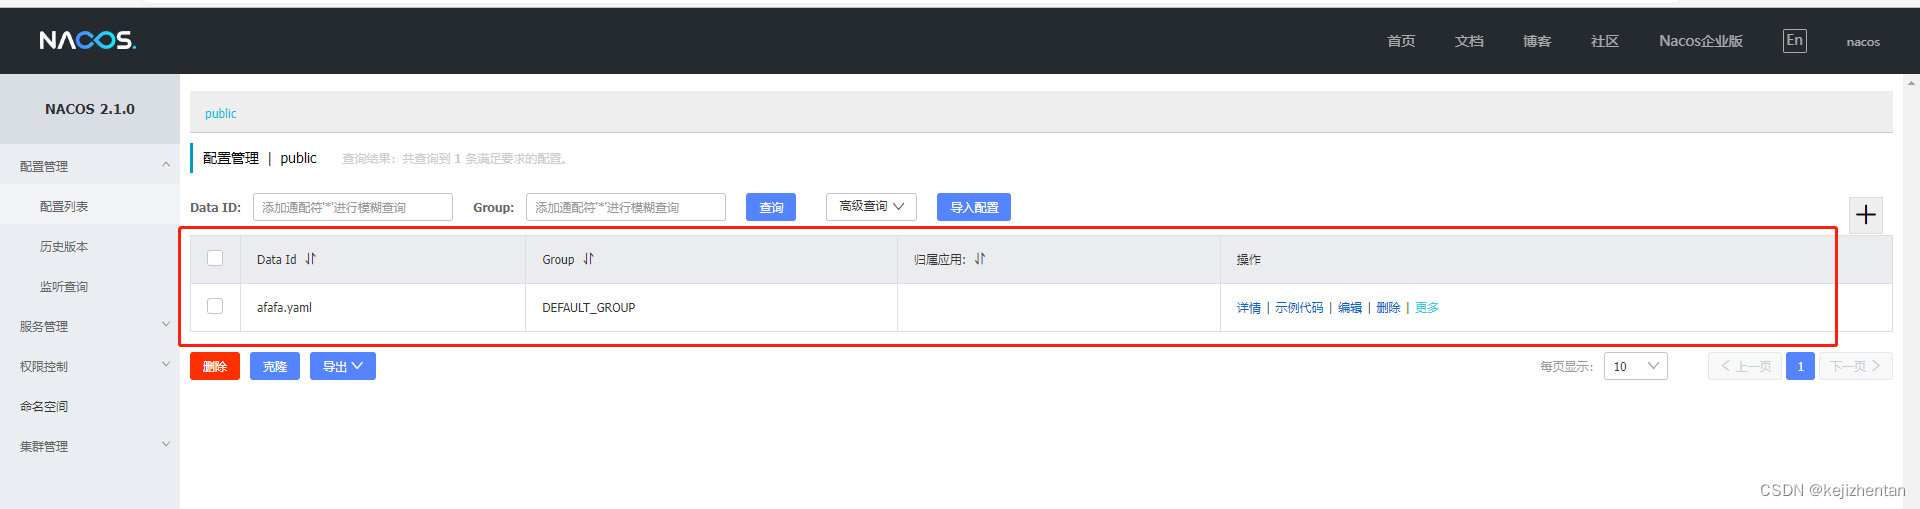
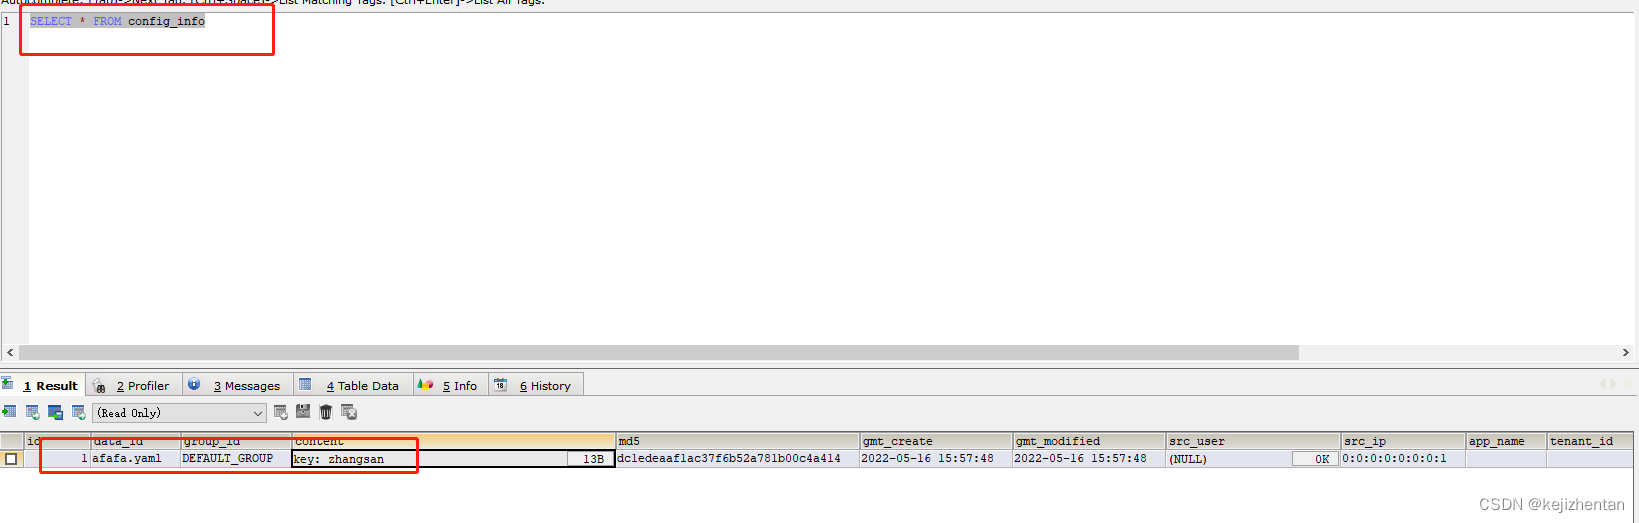
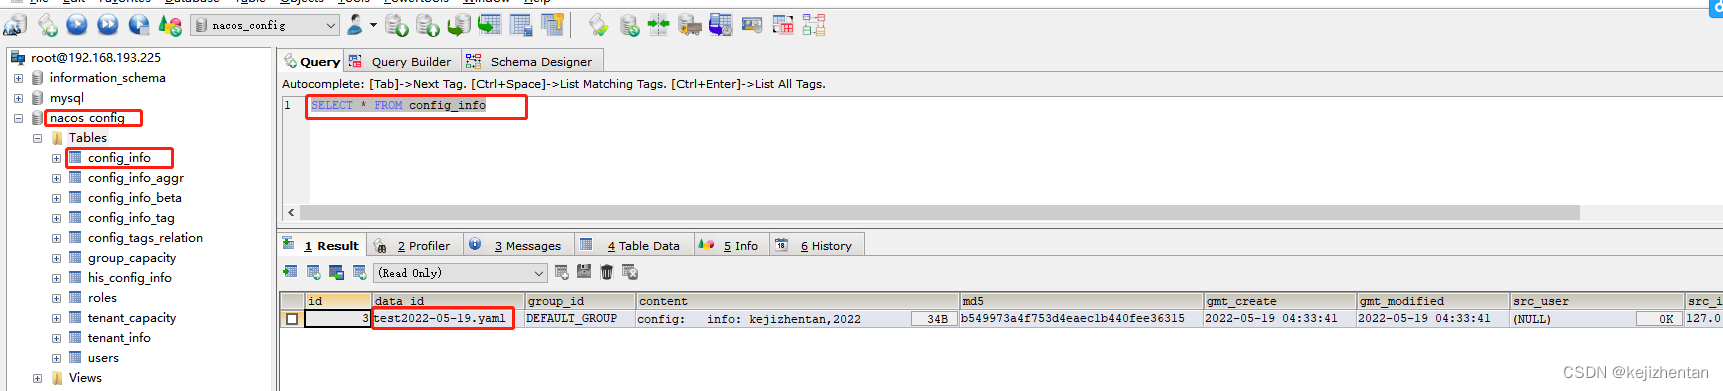
④ 重启Nacos,可以看到是个全新的空记录界面,以前是记录进derby
新添加添加配置文件
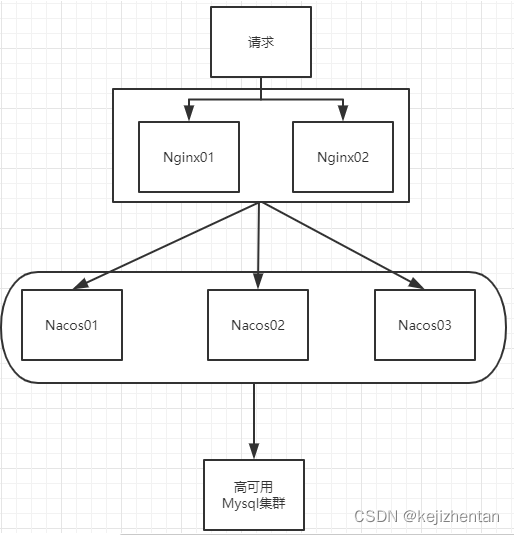
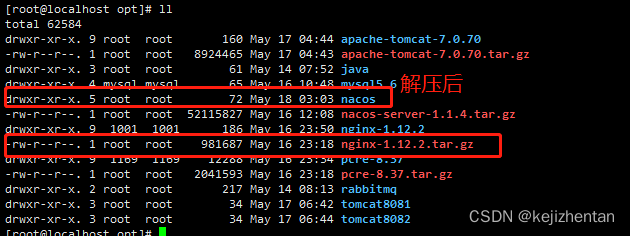
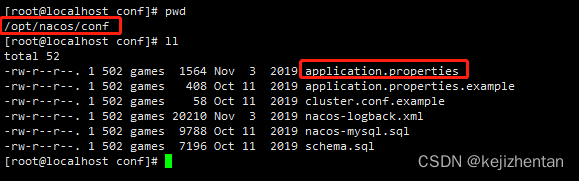
⑷ Linux版Nacos+MySQL生产环境配置
1)nacos集群的准备
预计需要,1个Nginx+3个nacos注册中心+1个mysql
nacos-server-1.1.4.tar.gz下载地址:https://github.com/alibaba/nacos/releases/tag/1.1.4

① 将nacos-server-1.1.4.tar.gz上传到linux系统上并解压
② 在搭建集群服务之前可以先启动单机版的nacos进行测试
[root@localhost bin]# ./startup.sh -m standalone
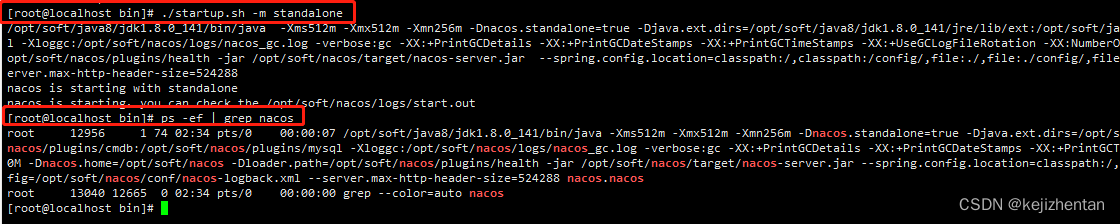
访问http://192.168.193.225:8848/nacos/
2)集群配置步骤(重点)
① Linux服务器上mysql数据库配置
○ SQL脚本在哪里
○ 创建一个nacos_config 库,将sql脚本执行一下

② application.properties 配置
○ application.properties 的位置
○ 给application.properties添加mysql相关信息
spring.datasource.platform=mysql

db.num=1
db.url.0=jdbc:mysql://127.0.0.1:3306/nacos_config?characterEncoding=utf8&connectTimeout=1000&socketTimeout=3000&autoReconnect=true&serverTimezone=UTC&useSSL=false
db.user=root
db.password=123456

③ Linux服务器上nacos的集群配置cluster.conf
○ 梳理出3台nacos集群的不同服务端口号
-
复制出cluster.conf
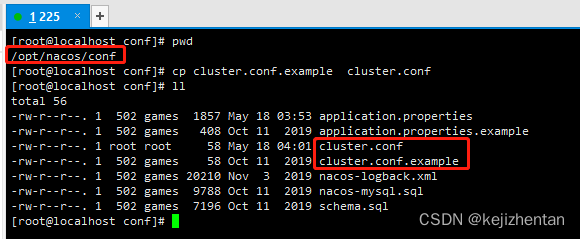
-
通过Linux命令
hostname -i查询能够识别的IP
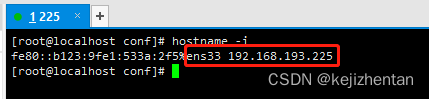
-
在cluster.conf中添加如下内容
192.168.193.225:3333
192.168.193.225:4444
192.168.193.225:5555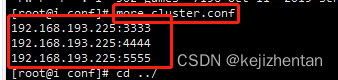
这个IP不能写127.0.0.1,必须是Linux命令
hostname -i能够识别的IP
④ 编辑Nacos的启动脚本startup.sh,使它能够接受不同的启动端口
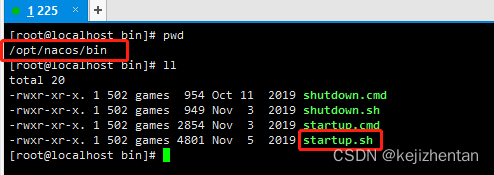
/mynacos/nacos/bin 目录下有startup.sh
平时单机版的启动,都是./startup.sh即可。
但是
集群启动,我们希望可以类似其它软件的shell命令,传递不同的端口号启动不同的nacos实例。
命令:./startup.sh -p 3333 表示启动端口号为3333的nacos服务器实例,和上一步的cluster.conf配置的一致。
○ 修改startup.sh中的内容

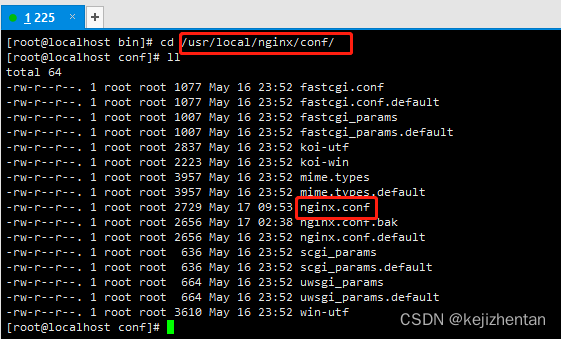
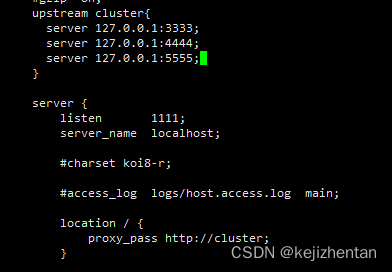
⑤ Nginx的配置,由它作为负载均衡器
○ 修改nginx的配置文件
upstream cluster{
        server 127.0.0.1:3333;
        server 127.0.0.1:4444;
        server 127.0.0.1:5555;
    }

server {
        listen       1111;
        server_name  localhost;
        #charset koi8-r;
        #access_log  logs/host.access.log  main;
        location / {
            #root   html;
            #index  index.html index.htm;
            proxy_pass http://cluster;
        }
.......省略
3) 分别启动 三个nacos 一个nginx
① 通过设置端口号的方式启动三个nacos
[root@localhost bin]# ./startup.sh -p 3333

查看三个集群是不是都正常启动了:
[root@localhost bin]# ps -ef|grep nacos|grep -v grep | wc -l

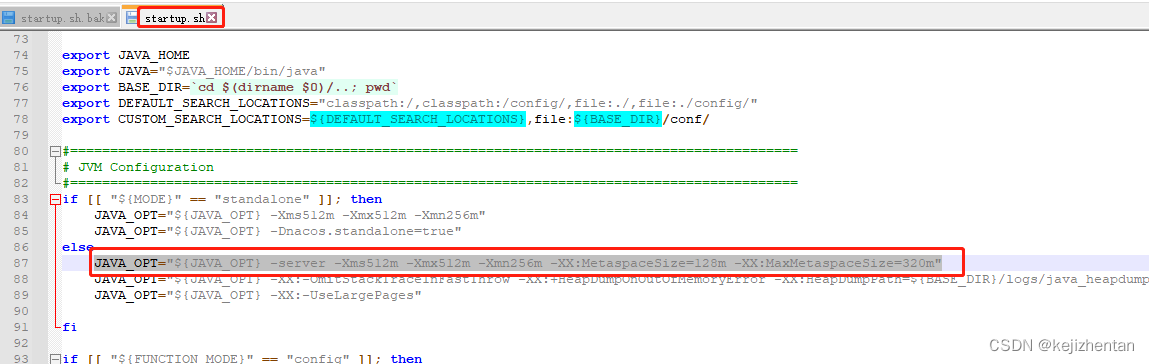
注意:
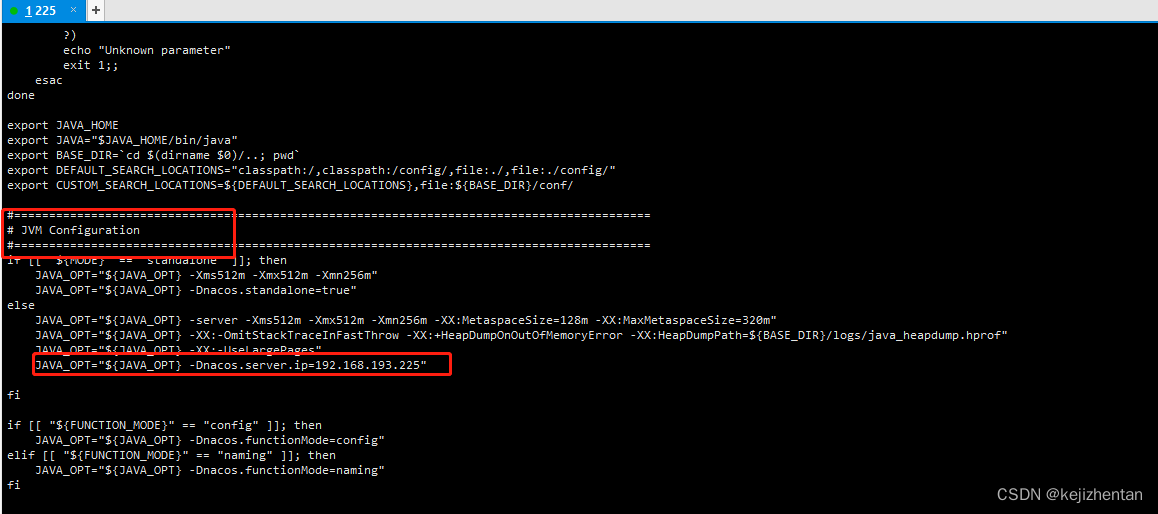
- 如果你只能启动两台,可能是jvm参数问题,请修改
.startup.sh配置文件即可**
修改前:
JAVA_OPT="${JAVA_OPT} -server -Xms2g -Xmx2g -Xmn1g -XX:MetaspaceSize=128m -XX:MaxMetaspaceSize=320m"
修改后:
JAVA_OPT="${JAVA_OPT} -server -Xms512m -Xmx512m -Xmn256m -XX:MetaspaceSize=128m -XX:MaxMetaspaceSize=320m"- 如果报
code:503 msg: server is STARTING now, please try again later!
请修改.startup.sh配置文件添加:
JAVA_OPT="${JAVA_OPT} -Dnacos.server.ip=192.168.193.225"
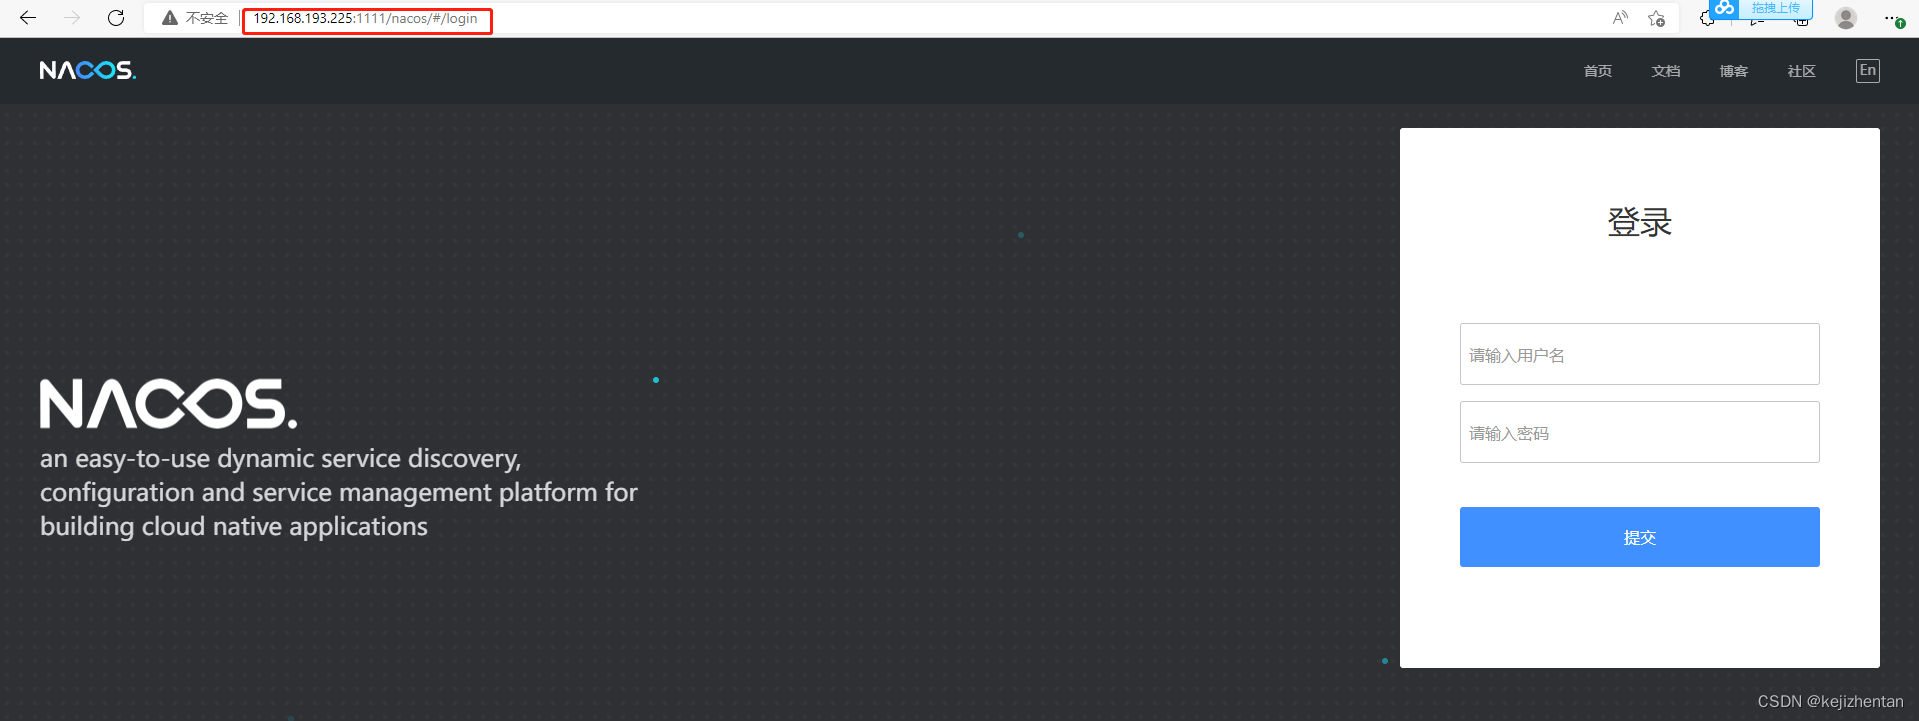
② 启动nginx
[root@localhost sbin]# ./nginx -c /usr/local/nginx/conf/nginx.conf

4)测试
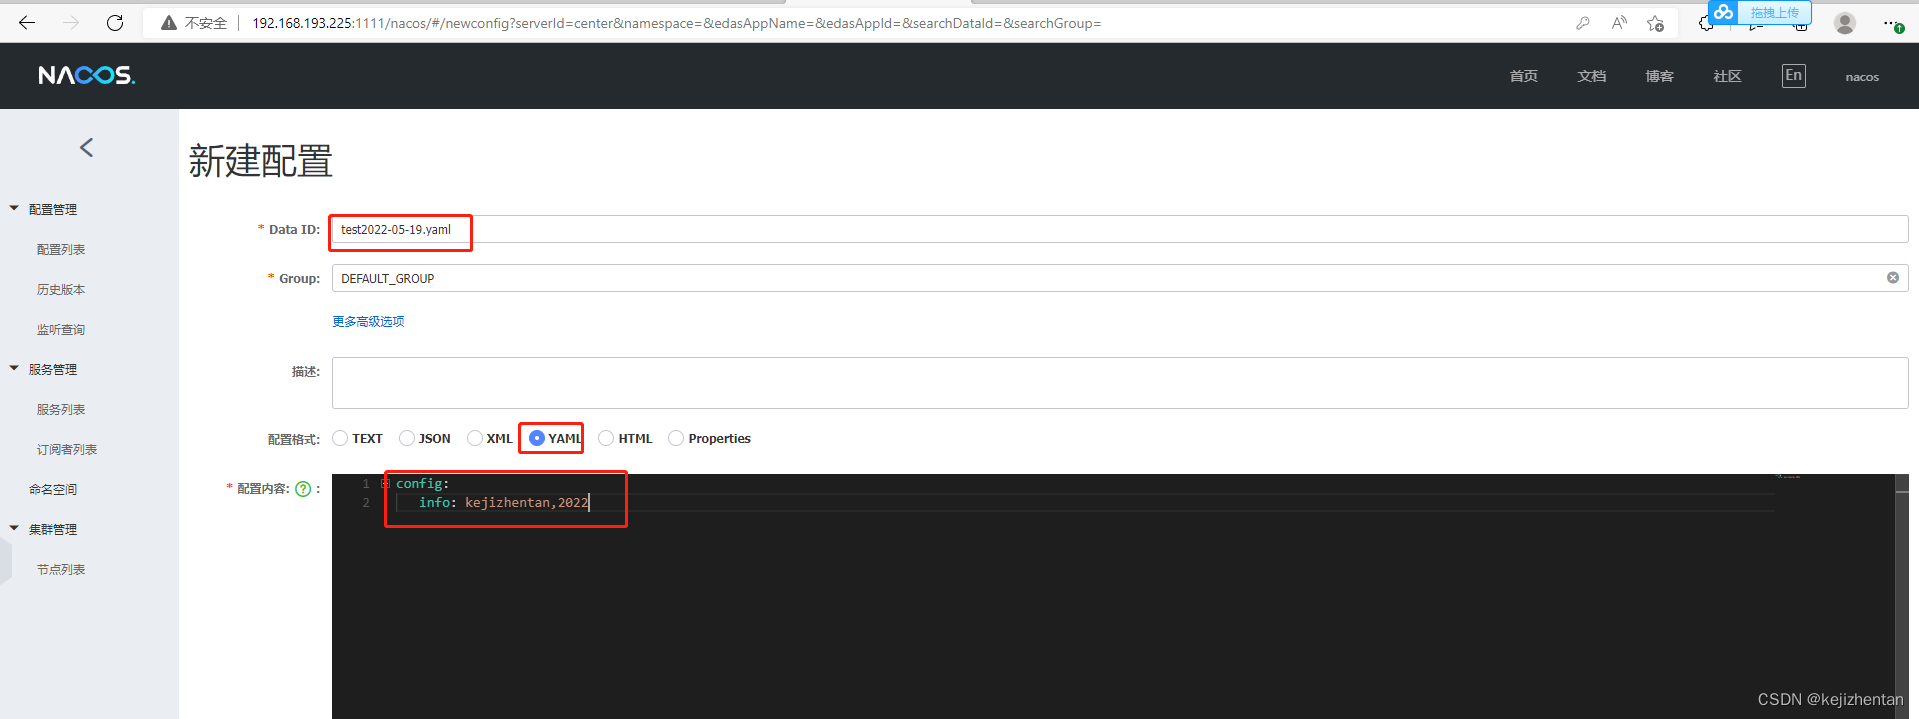
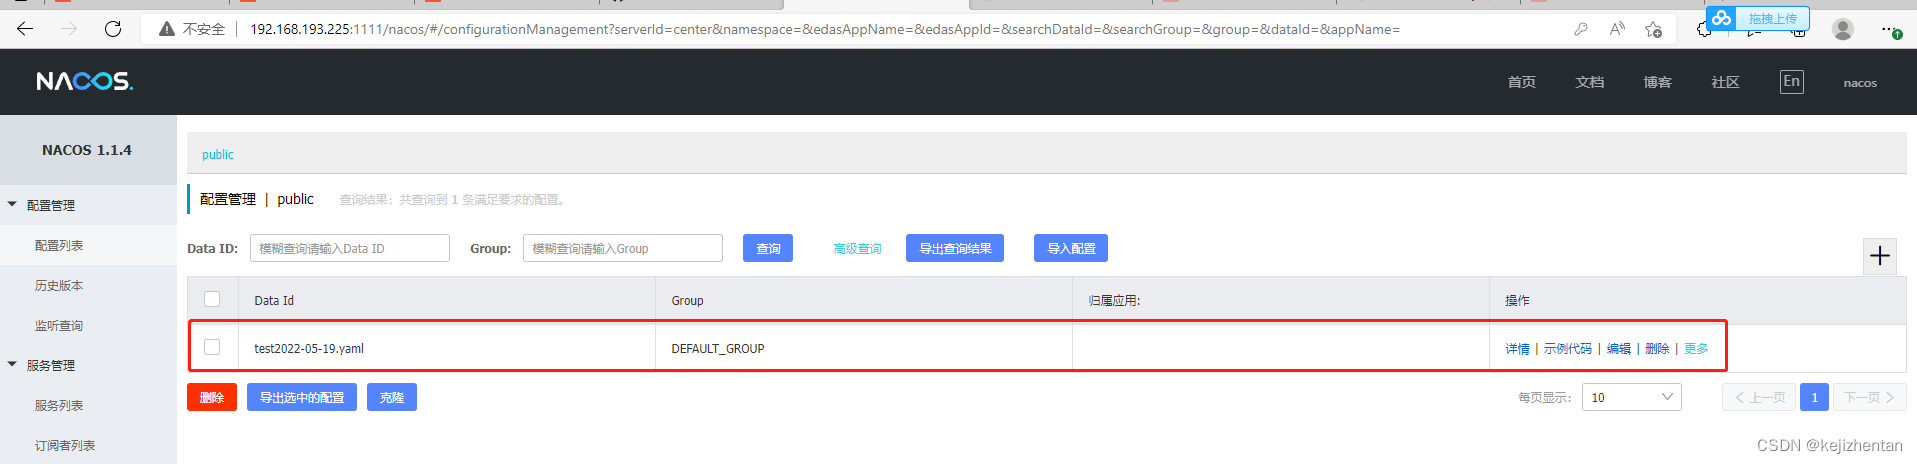
① 访问:http://192.168.193.225:1111/nacos/#/login
② 新建一个配置测试
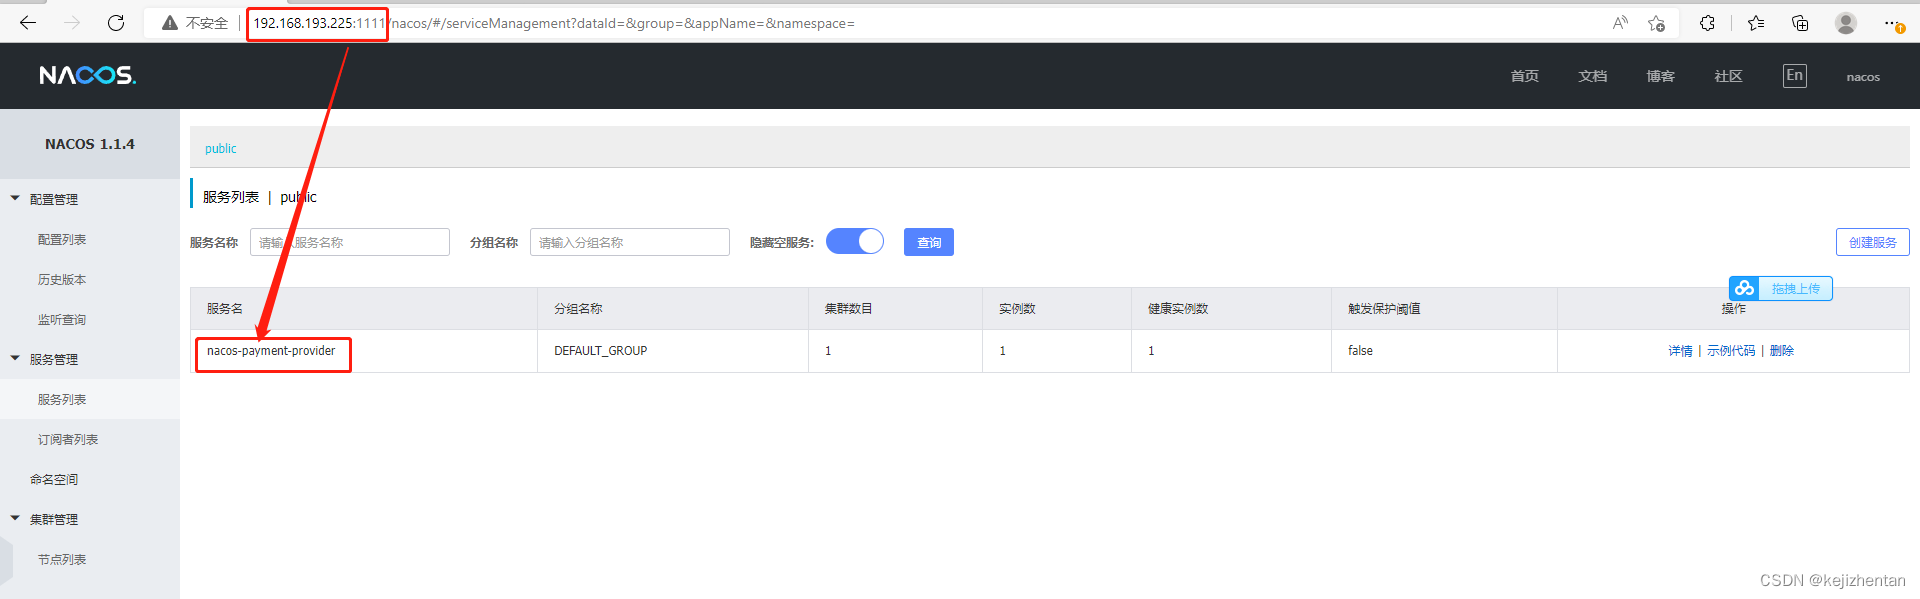
③ 微服务cloudalibaba-provider-payment9002启动注册进nacos集群
修改nacos注册中心的url后启动cloudalibaba-provider-payment9002服务:
server:
  port: 9002

spring:
  application:
    name: nacos-payment-provider
  cloud:
    nacos:
      discovery:
        #server-addr: localhost:8848 #配置Nacos地址
        # 换成nginx的1111端口,做集群
        server-addr: 192.168.111.144:1111

management:
  endpoints:
    web:
      exposure:
        include: '*'
启动9002项目再次访问http://192.168.193.225:1111/nacos/#/login
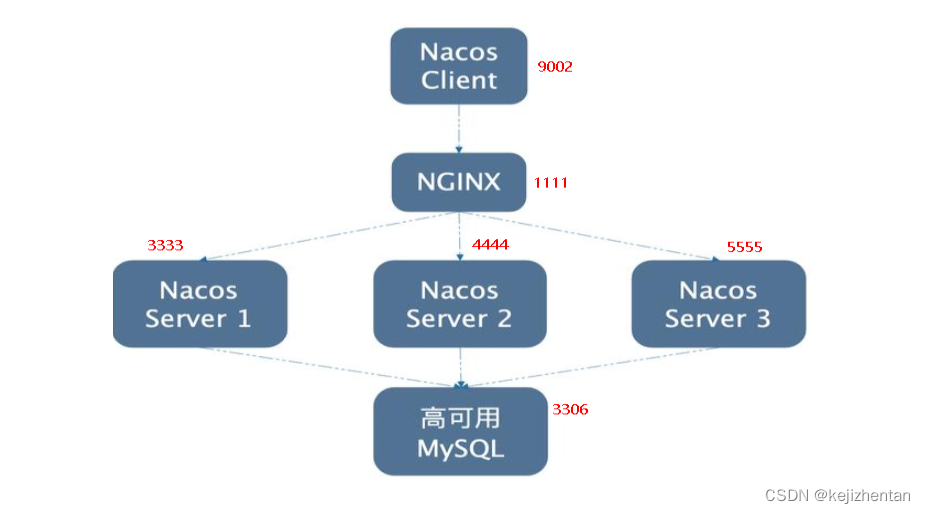
高可用原理图:
十七、SpringCloud Alibaba Sentinel实现熔断与限流
1. Sentinel简介
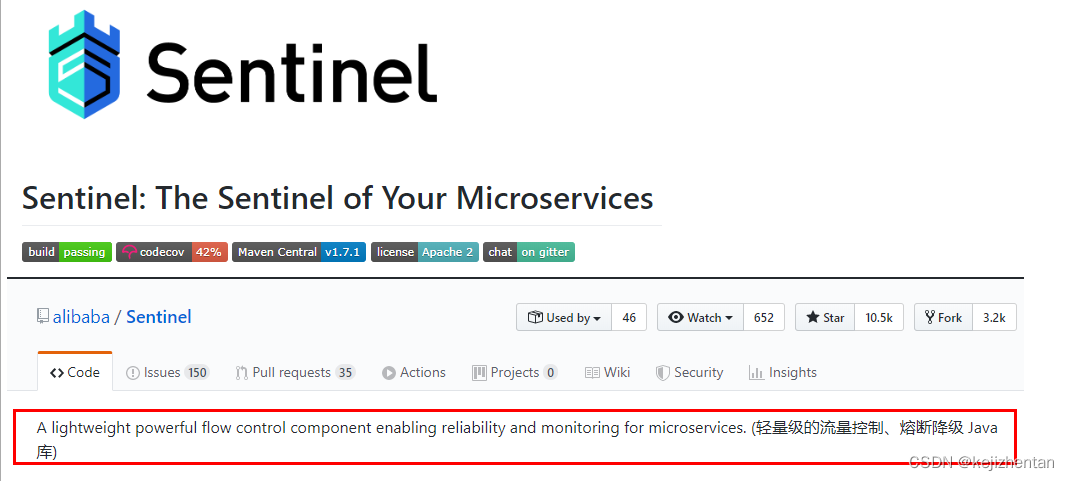
⑴ 官网
GitHub官网:https://github.com/alibaba/Sentinel
中文版的官网内容:https://github.com/alibaba/Sentinel/wiki/%E4%BB%8B%E7%BB%8D
⑵ Sentinel是什么
一句话解释,之前我们讲解过的Hystrix
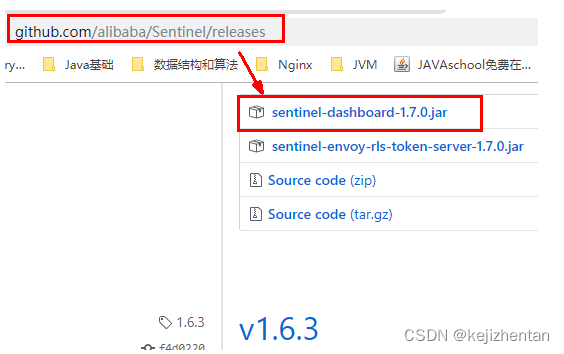
⑶ Sentinel下载地址
https://github.com/alibaba/Sentinel/releases
⑷ Sentinel能干嘛

⑸ Sentinel怎么用
官网教程:https://spring-cloud-alibaba-group.github.io/github-pages/greenwich/spring-cloud-alibaba.html#_spring_cloud_alibaba_sentinel
⑹ 服务使用中的各种问题
- 服务雪崩
- 服务降级
- 服务熔断
- 服务限流
2. 安装Sentinel控制台
⑴ sentinel组件由2部分构成

⑵ sentinel安装
1) 下载
下载地址:https://github.com/alibaba/Sentinel/releases

下载到本地sentinel-dashboard-1.7.0.jar
2) 运行命令
① 前提
- java8环境OK
- 8080端口不能被占用
② 命令
java -jar sentinel-dashboard-1.7.0.jar
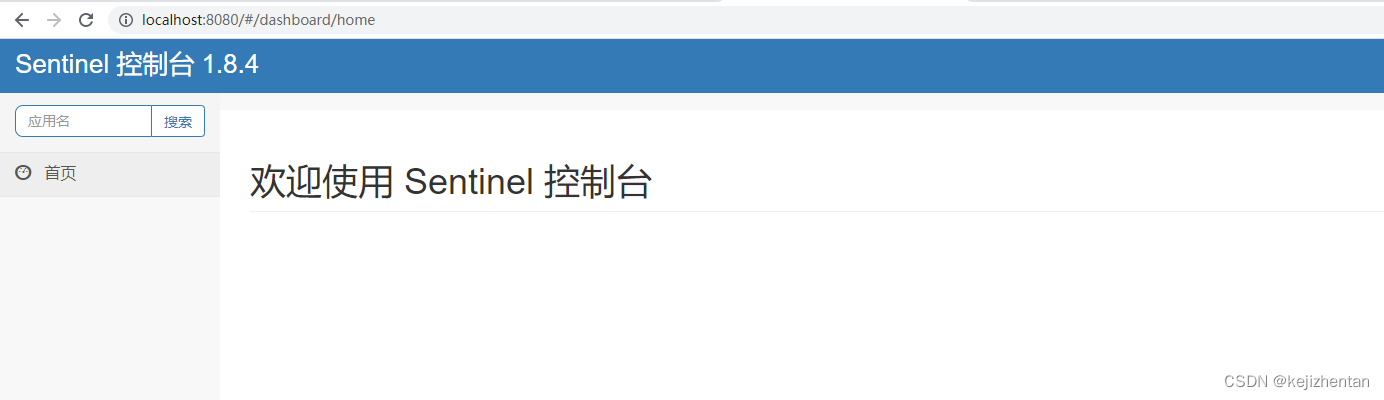
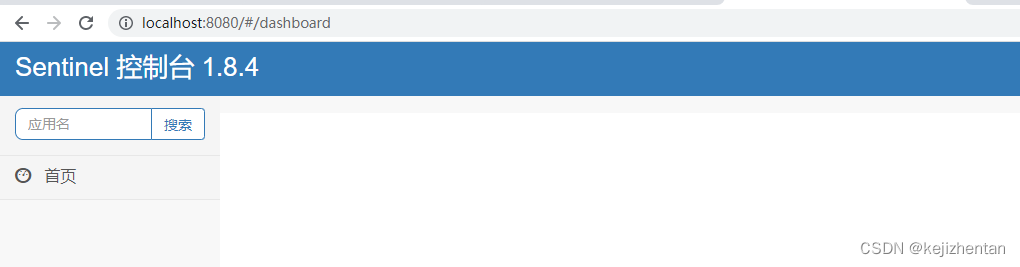
③ 访问sentinel管理界面
访问:http://localhost:8080
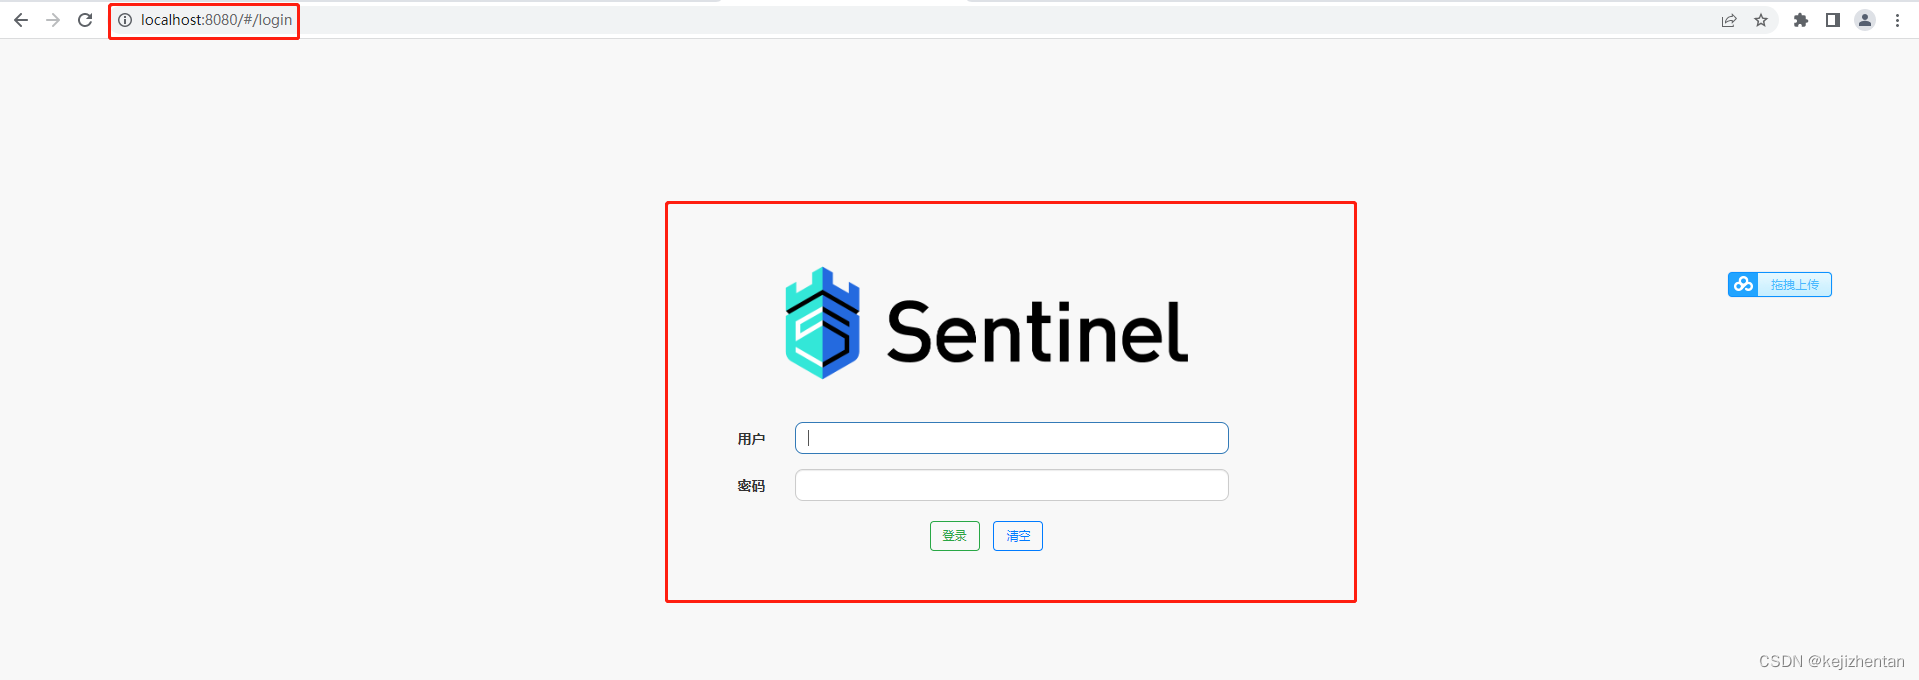
登录账号密码均为sentinel
3. 初始化演示工程cloudalibaba-sentinel-service8401
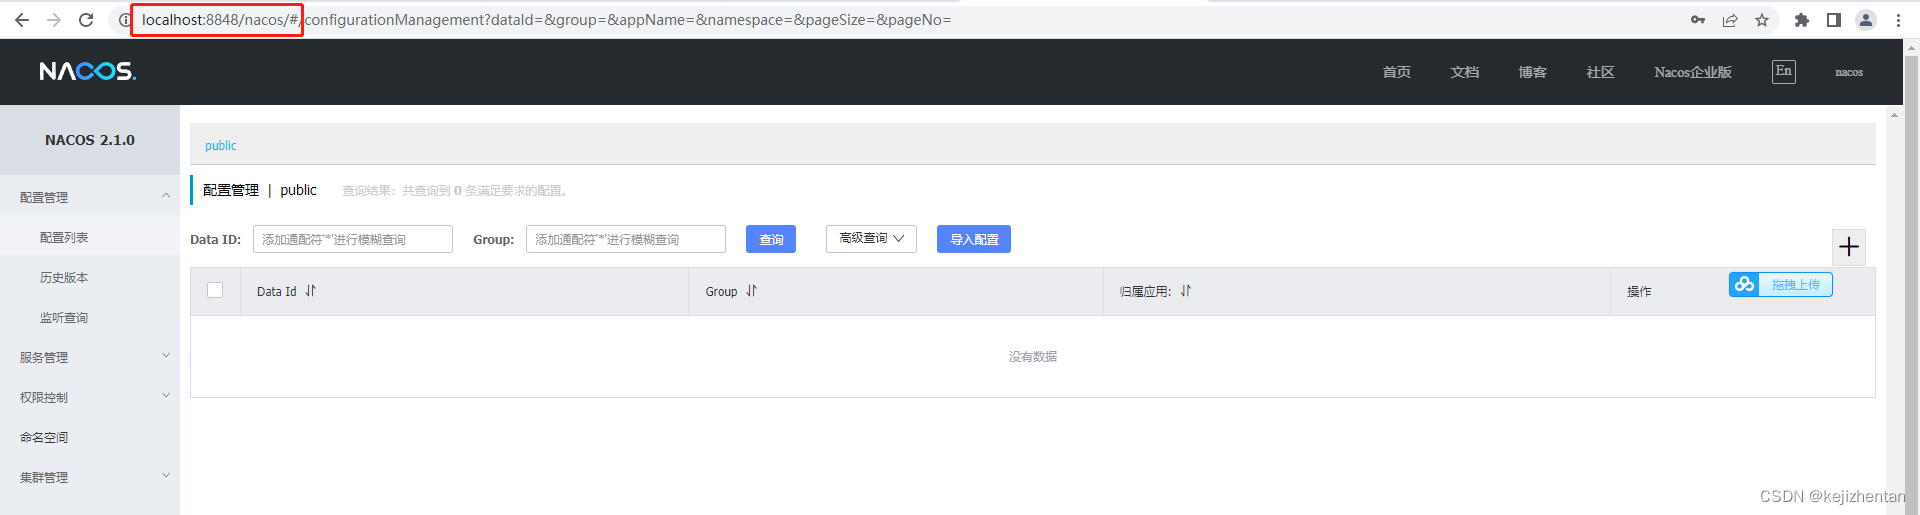
⑴ 启动启动Nacos8848成功
能供正常访问:http://localhost:8848/nacos/#/login
⑵ 创建cloudalibaba-sentinel-service8401工程
1) 创建cloudalibaba-sentinel-service8401项目

2)修改POM文件
<?xml version="1.0" encoding="UTF-8"?>
<project xmlns="http://maven.apache.org/POM/4.0.0"
         xmlns:xsi="http://www.w3.org/2001/XMLSchema-instance"
         xsi:schemaLocation="http://maven.apache.org/POM/4.0.0 http://maven.apache.org/xsd/maven-4.0.0.xsd">
    <parent>
        <artifactId>springcloud-project</artifactId>
        <groupId>com.kejizhentan.springcloud</groupId>
        <version>1.0-SNAPSHOT</version>
    </parent>
    <modelVersion>4.0.0</modelVersion>

    <artifactId>cloudalibaba-sentinel-service8401</artifactId>


    <dependencies>
        <!--SpringCloud ailibaba nacos -->
        <dependency>
            <groupId>com.alibaba.cloud</groupId>
            <artifactId>spring-cloud-starter-alibaba-nacos-discovery</artifactId>
        </dependency>
        <!--SpringCloud ailibaba sentinel-datasource-nacos 后续做持久化用到-->
        <dependency>
            <groupId>com.alibaba.csp</groupId>
            <artifactId>sentinel-datasource-nacos</artifactId>
        </dependency>
        <!--SpringCloud ailibaba sentinel -->
        <dependency>
            <groupId>com.alibaba.cloud</groupId>
            <artifactId>spring-cloud-starter-alibaba-sentinel</artifactId>
        </dependency>
        <!--openfeign-->
        <dependency>
            <groupId>org.springframework.cloud</groupId>
            <artifactId>spring-cloud-starter-openfeign</artifactId>
        </dependency>
        <!-- SpringBoot整合Web组件+actuator -->
        <dependency>
            <groupId>org.springframework.boot</groupId>
            <artifactId>spring-boot-starter-web</artifactId>
        </dependency>
        <dependency>
            <groupId>org.springframework.boot</groupId>
            <artifactId>spring-boot-starter-actuator</artifactId>
        </dependency>
        <!--日常通用jar包配置-->
        <dependency>
            <groupId>org.springframework.boot</groupId>
            <artifactId>spring-boot-devtools</artifactId>
            <scope>runtime</scope>
            <optional>true</optional>
        </dependency>
        <dependency>
            <groupId>cn.hutool</groupId>
            <artifactId>hutool-all</artifactId>
            <version>4.6.3</version>
        </dependency>
        <dependency>
            <groupId>org.projectlombok</groupId>
            <artifactId>lombok</artifactId>
            <optional>true</optional>
        </dependency>
        <dependency>
            <groupId>org.springframework.boot</groupId>
            <artifactId>spring-boot-starter-test</artifactId>
            <scope>test</scope>
        </dependency>

    </dependencies>
</project>
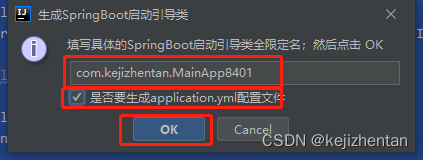
3)创建cloudalibaba-sentinel-service8401的YML和主启动:可以通过JBLSpringBootAppGen插件生成
3) 修改YML文件
server:
  port: 8401

spring:
  application:
    name: cloudalibaba-sentinel-service
  cloud:
    nacos:
      discovery:
        #Nacos服务注册中心地址
        server-addr: localhost:8848
    sentinel:
      transport:
        #配置Sentinel dashboard地址
        dashboard: localhost:8080
        #默认8719端口,假如被占用会自动从8719开始依次+1扫描,直至找到未被占用的端口
        port: 8719

management:
  endpoints:
    web:
      exposure:
        include: '*'
4)修改MainApp8401启动类
@EnableDiscoveryClient
@SpringBootApplication
public class MainApp8401 {
    public static void main(String[] args) {
        SpringApplication.run(MainApp8401.class, args);
    }
}
5) 编写业务类FlowLimitController
@RestController
public class FlowLimitController {

    @GetMapping("/testA")
    public String testA() {
        return "------testA";
    }

    @GetMapping("/testB")
    public String testB() {
        return "------testB";
    }
}
5)测试
① 启动Sentinel8080和微服务8401,查看sentienl控制台
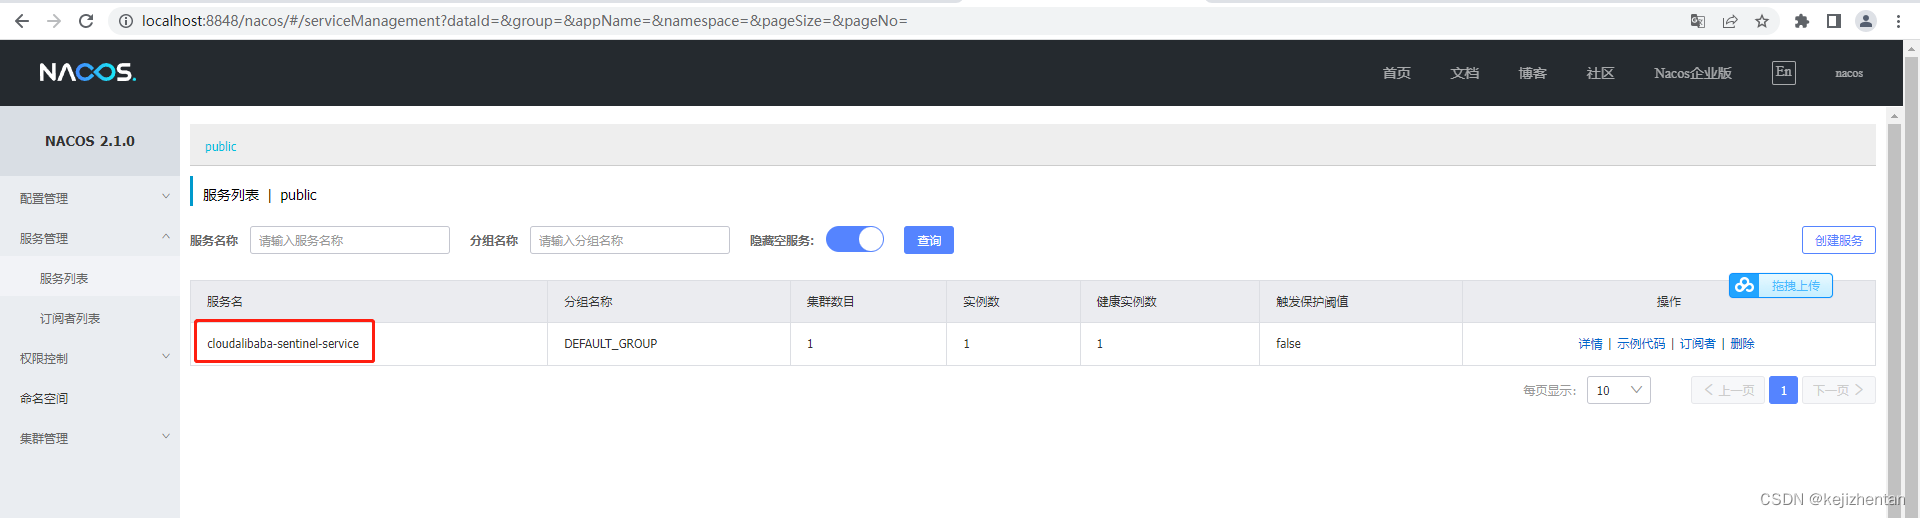
sentienl控制台空空如也,啥都没有?
Sentinel采用的懒加载说明:
执行访问一次:http://localhost:8401/testA或者http://localhost:8401/testB即可
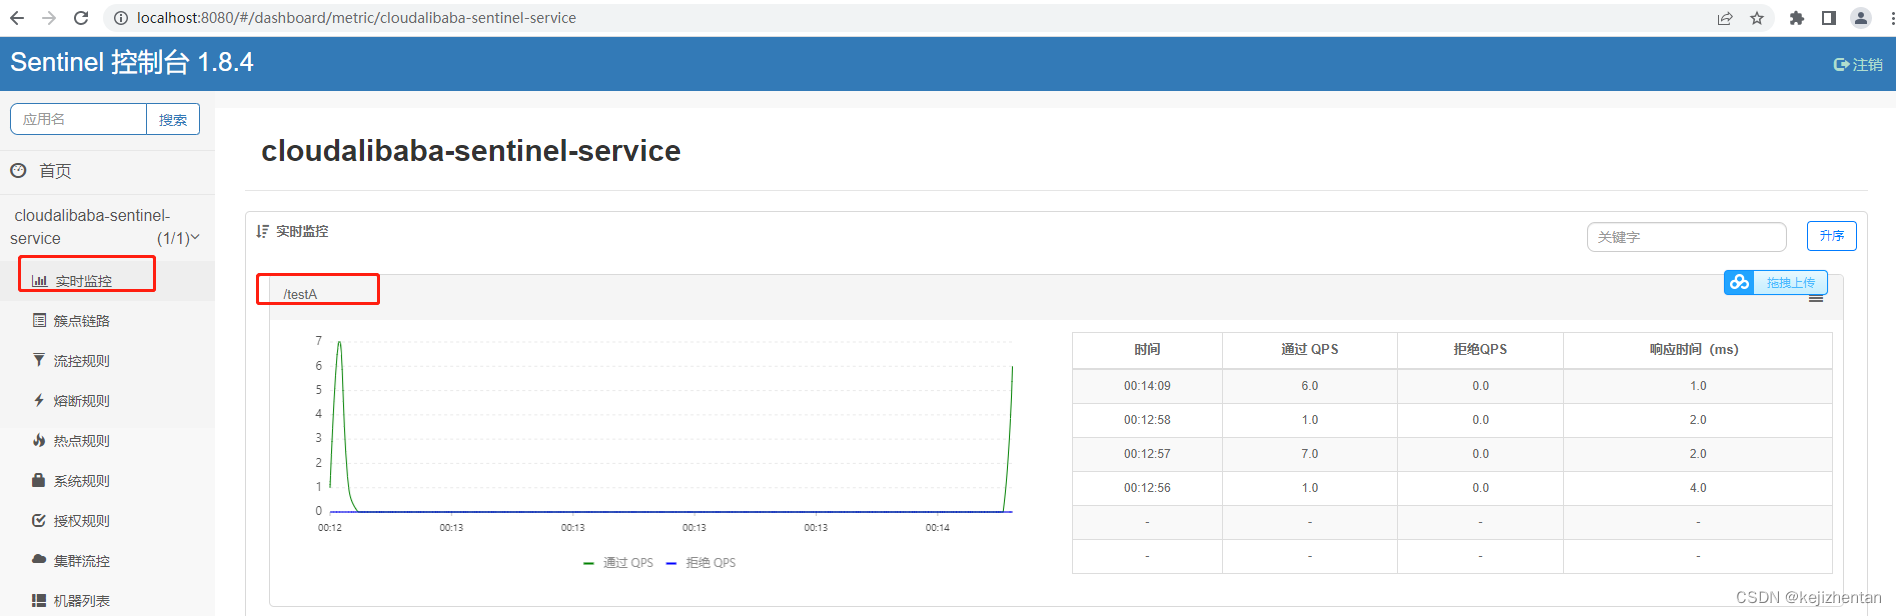
可以看出sentinel8080正在监控微服务8401服务
4. Sentinel流控规则
⑴ Sentinel流控规则基本介绍
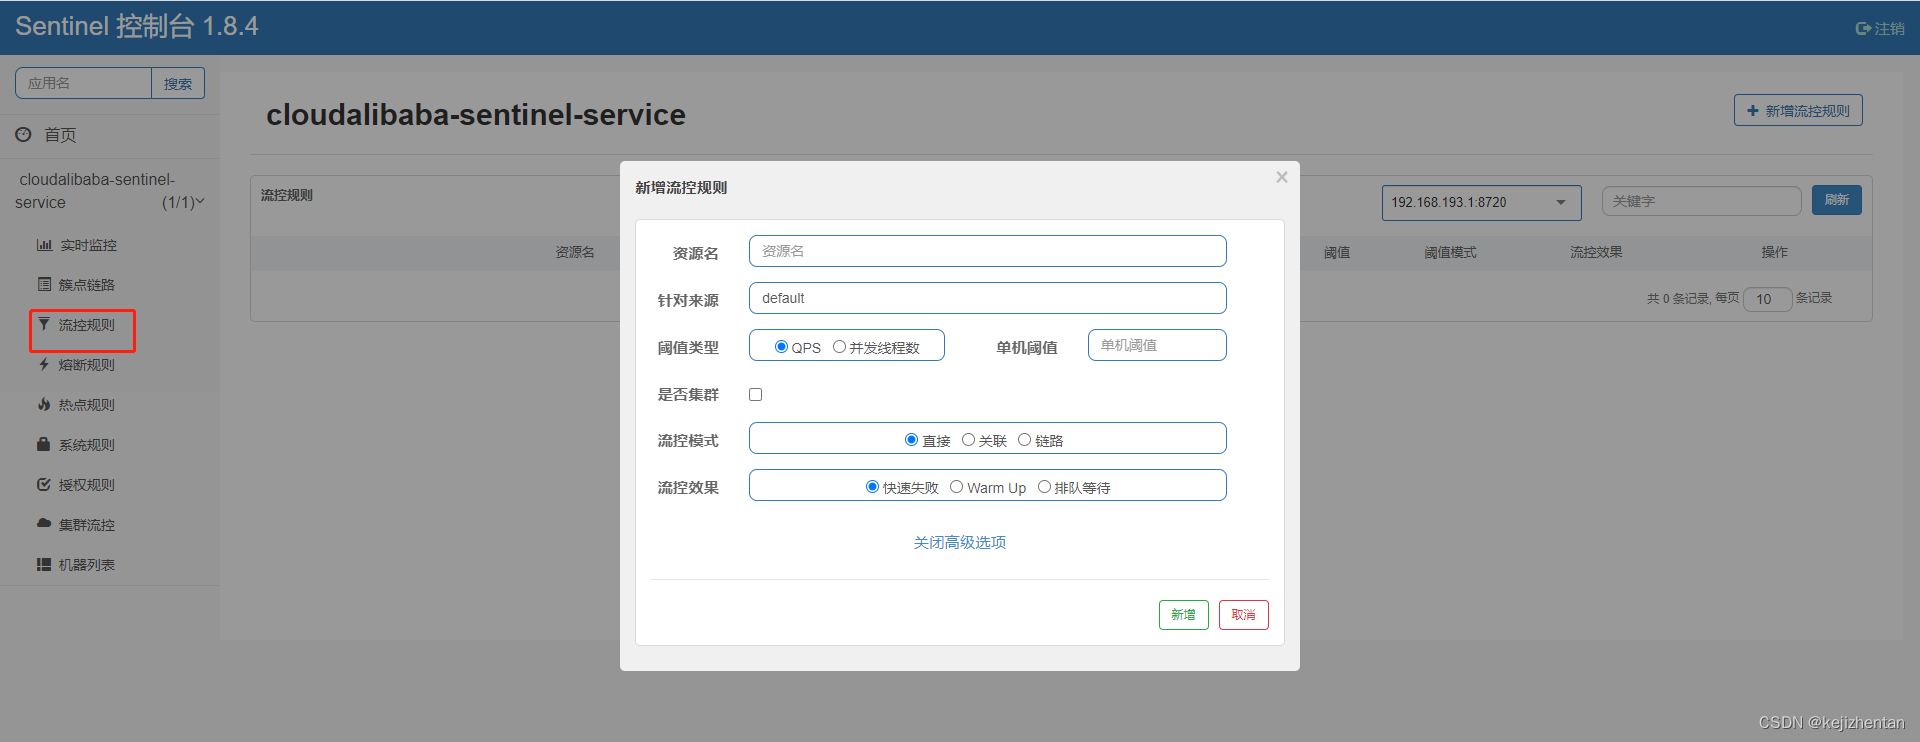

⑵ 流控模式
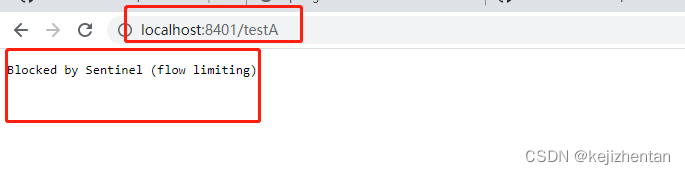
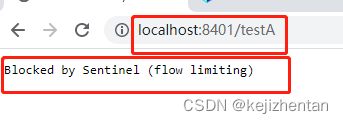
1) 直接模式(默认):api达到限流条件时直接限流
表示1秒钟内查询1次就是OK,若超过次数1,就直接-快速失败,报默认错误
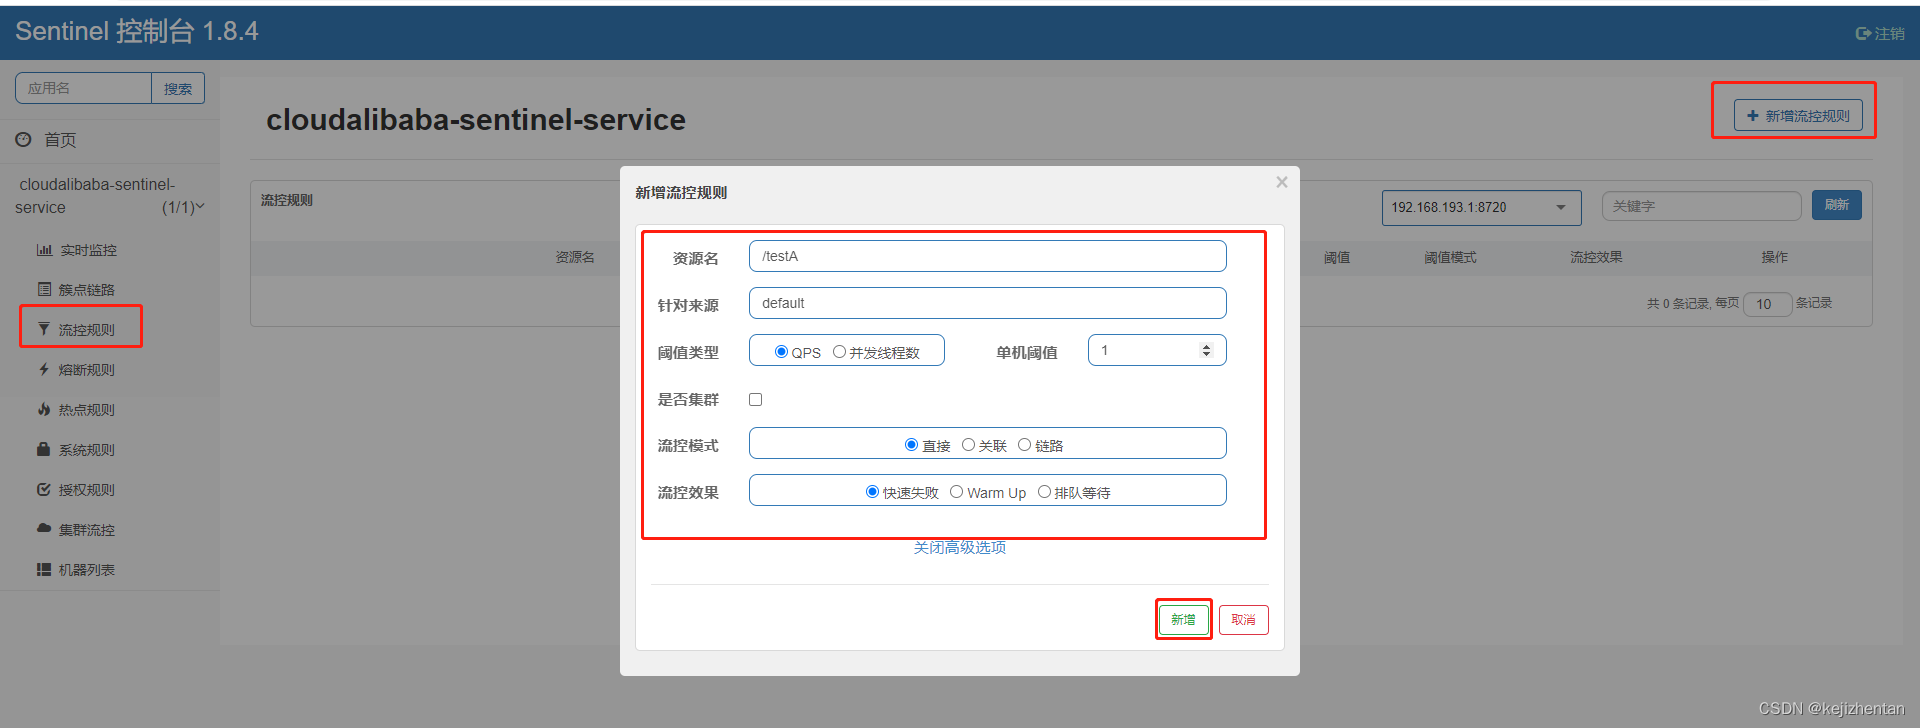
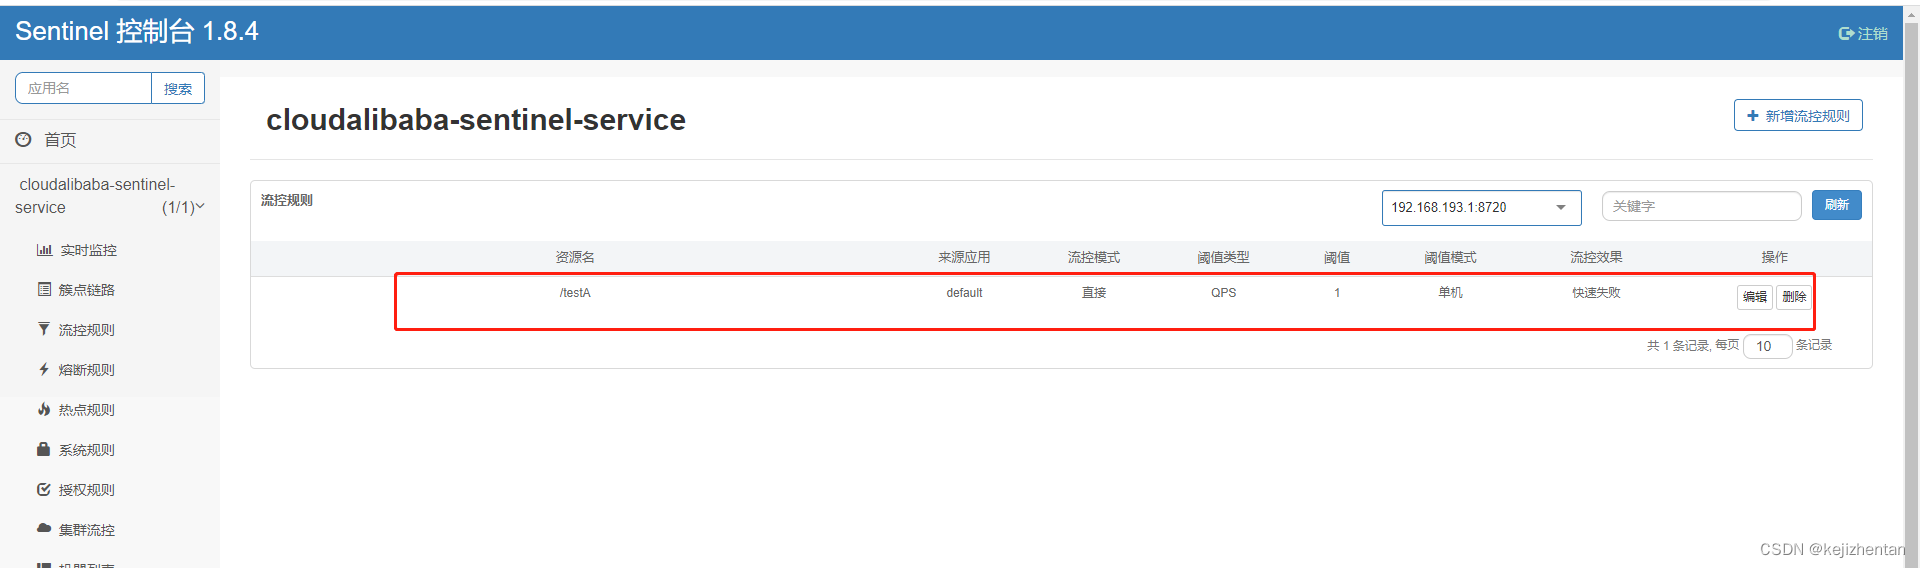
访问http://localhost:8401/testA效果如下:

一秒钟内请求超过一次就报Blocked by Sentinel (flow limiting)异常
直接调用默认报错信息,技术方面OK,but,是否应该有我们自己的后续处理?
类似有个fallback的兜底方法?
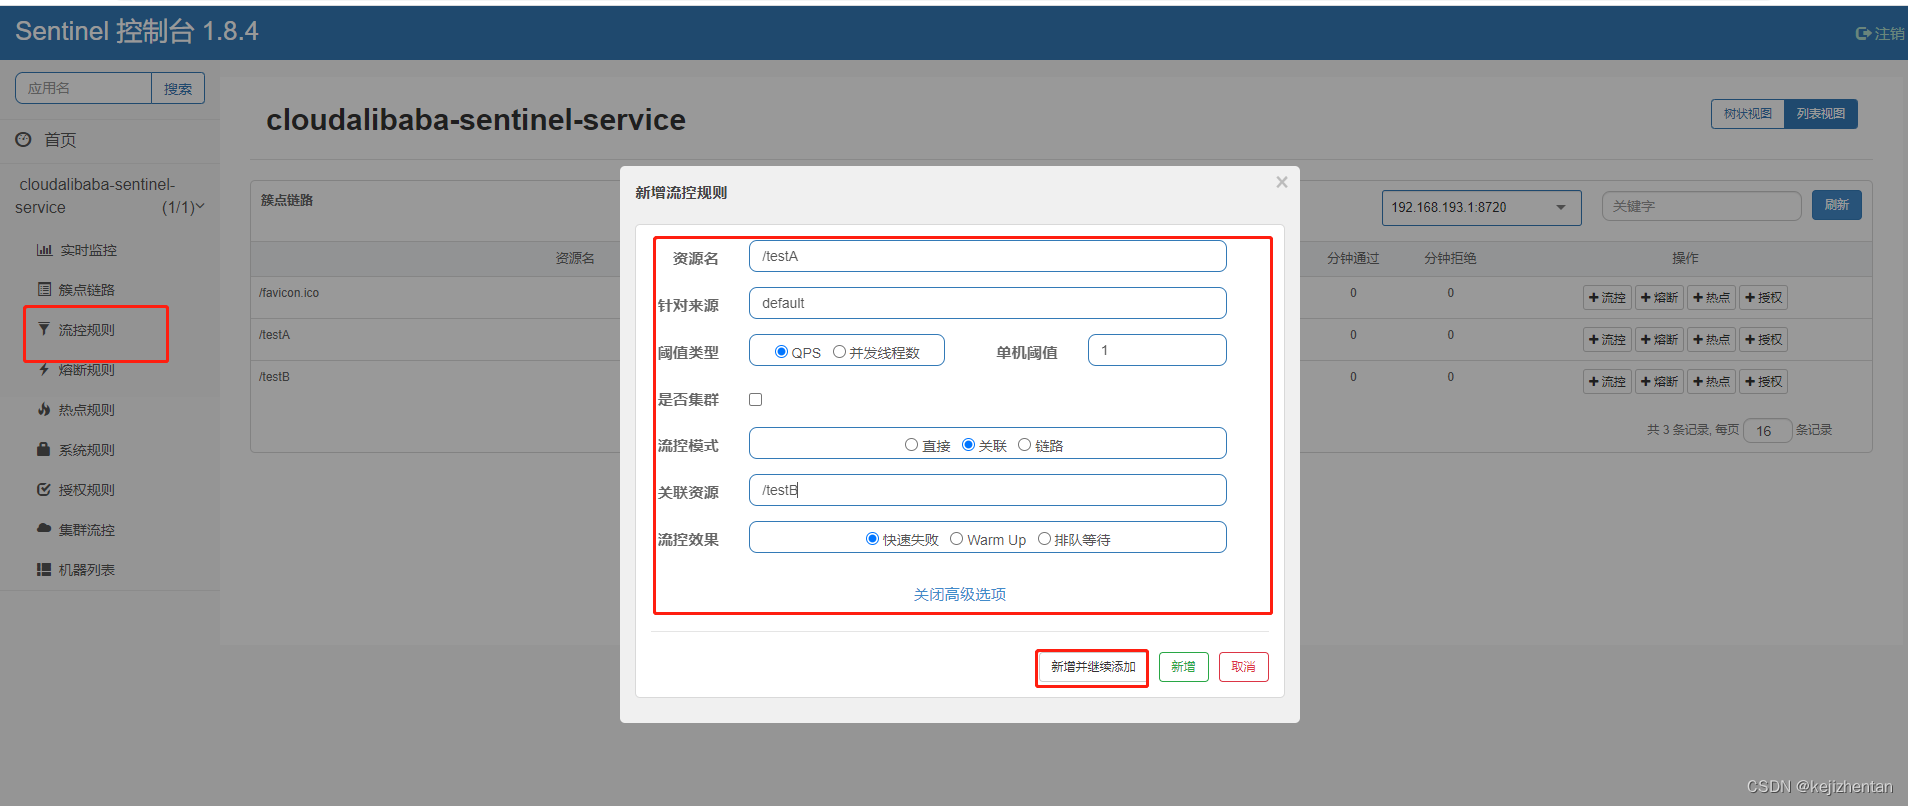
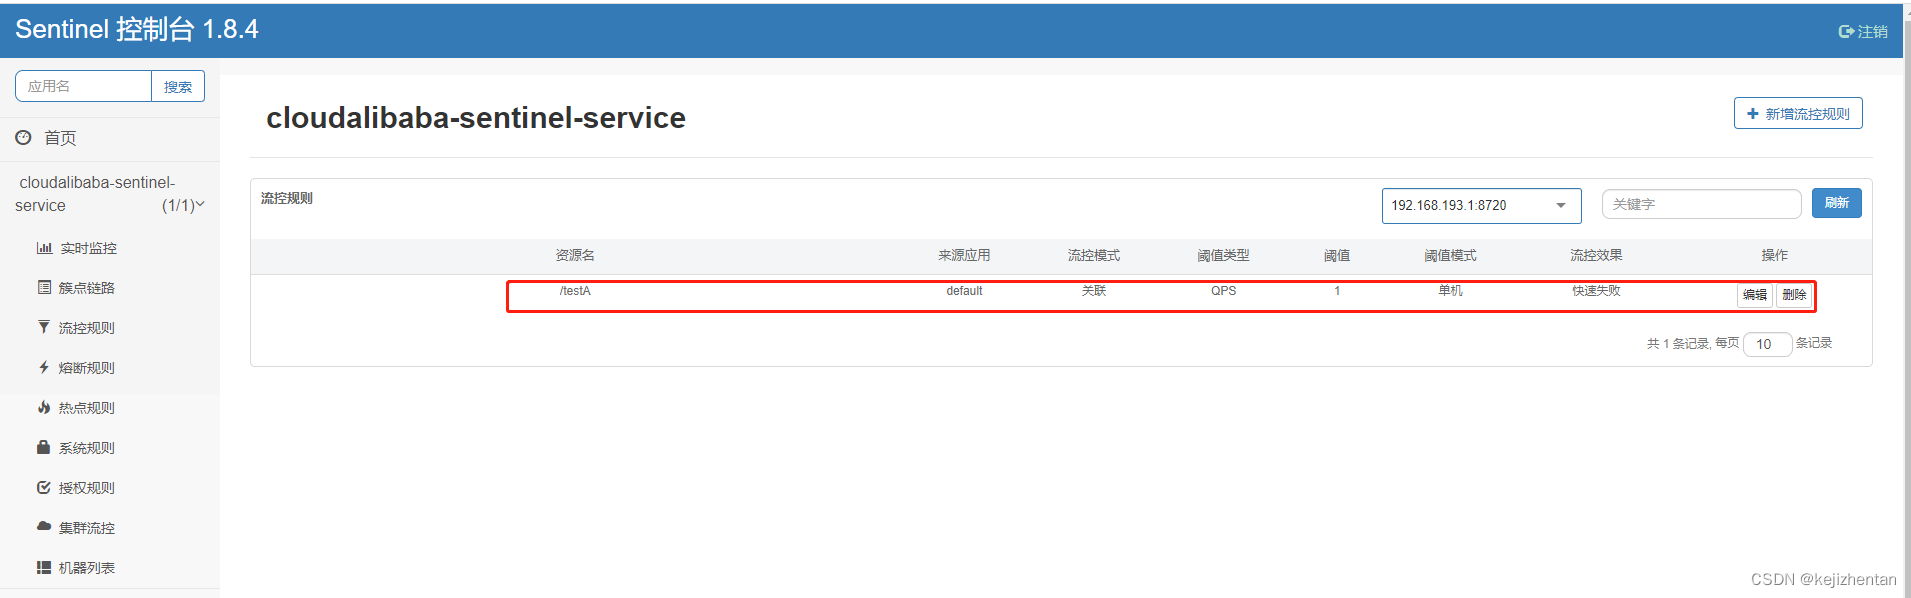
2)关联模式:当关联的资源达到阈值时,就限流自己
当与A关联的资源B达到阀值后,就限流A自己(B惹事,A挂了)
设置效果
当关联资源/testB的qps阀值超过1时,就限流/testA的Rest访问地址,当关联资源到阈值后限制配置好的资源名
postman模拟并发密集访问testB
-
访问testB成功
-
postman里新建多线程集合组
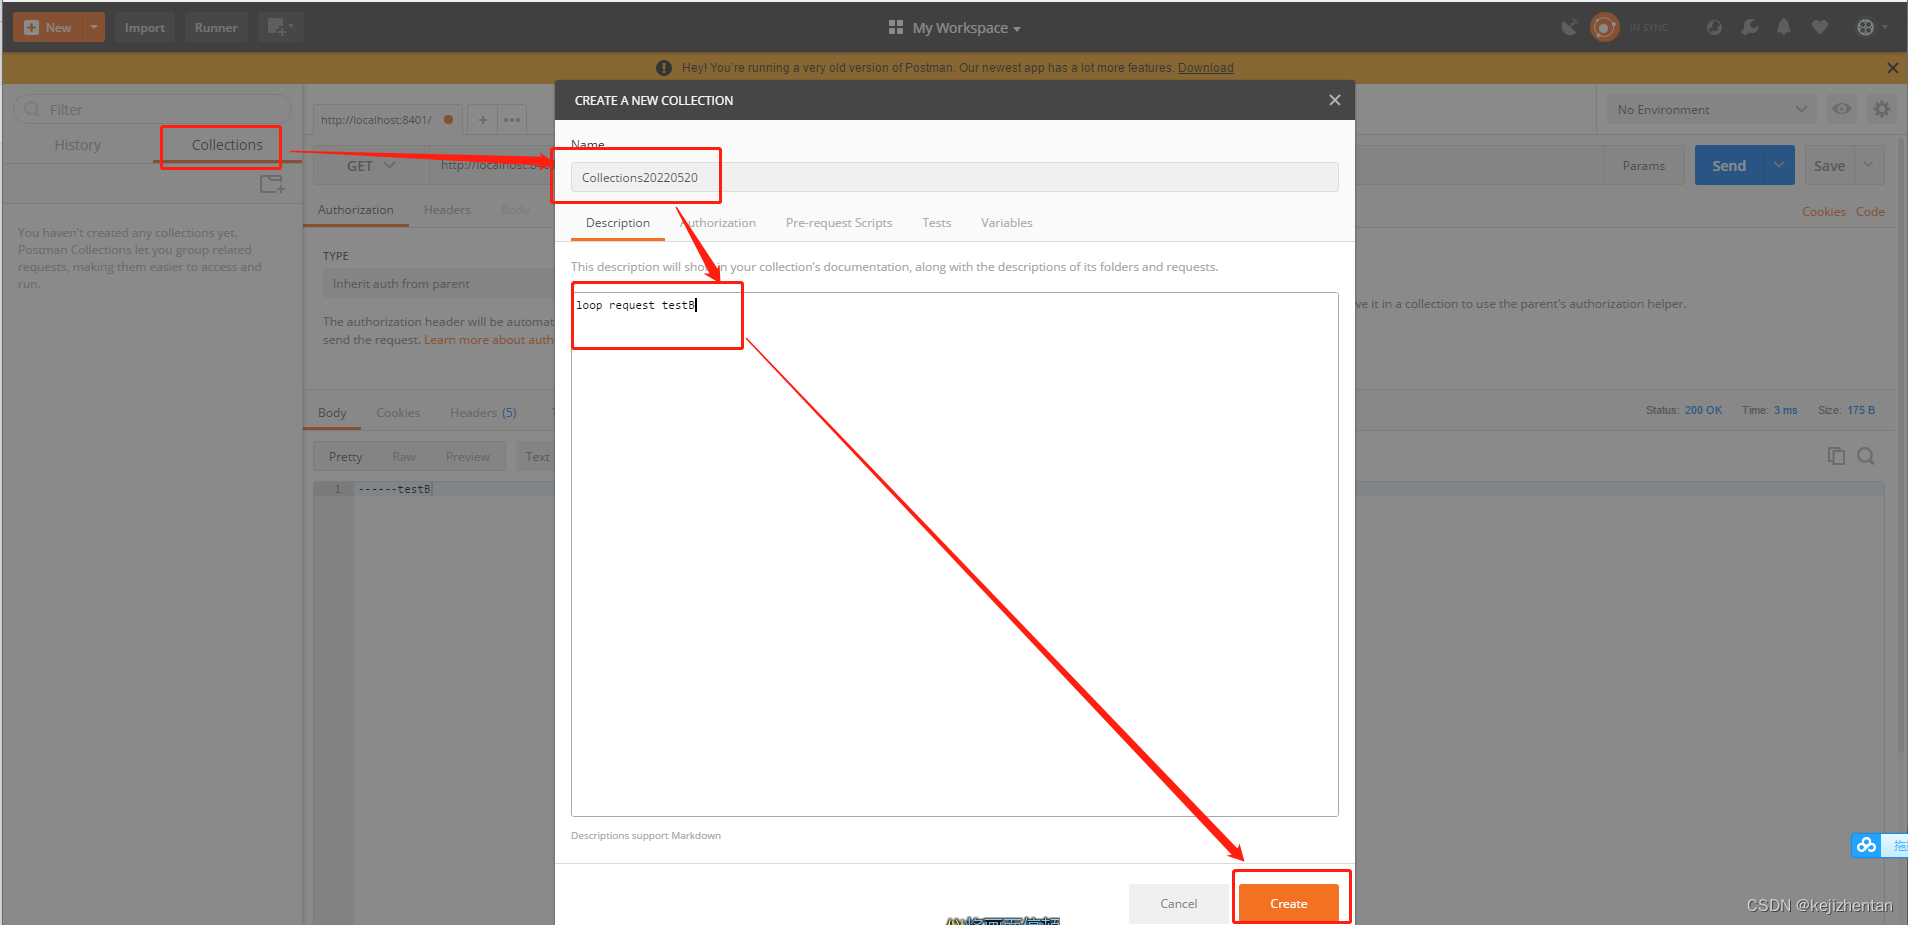
-
将访问地址添加进新新线程组
-
大批量线程高并发访问B,导致A失效了


大批量线程高并发访问B,导致A失效了
3) 链路模式
多个请求调用了同一个微服务
⑶ 流控效果
1) 直接->快速失败(默认的流控处理)
表示1秒钟内查询1次就是OK,若超过次数1,就直接-快速失败,报默认错误
访问http://localhost:8401/testA效果如下:
一秒钟内请求超过一次就报Blocked by Sentinel (flow limiting)异常
直接调用默认报错信息,技术方面OK,but,是否应该有我们自己的后续处理?
类似有个fallback的兜底方法?
2)预热

公式:
阈值除以coldFactor(默认值为3),经过预热时长后才会达到阈值
默认coldFactor为3,即请求 QPS 从 threshold / 3 开始,经预热时长逐渐升至设定的 QPS 阈值。
① WarmUp配置
默认 coldFactor 为 3,即请求QPS从(threshold / 3) 开始,经多少预热时长才逐渐升至设定的 QPS 阈值。
案例: 阀值为10+预热时长设置5秒。
系统初始化的阀值为10 / 3 约等于3,即阀值刚开始为3;然后过了5秒后阀值才慢慢升高恢复到10
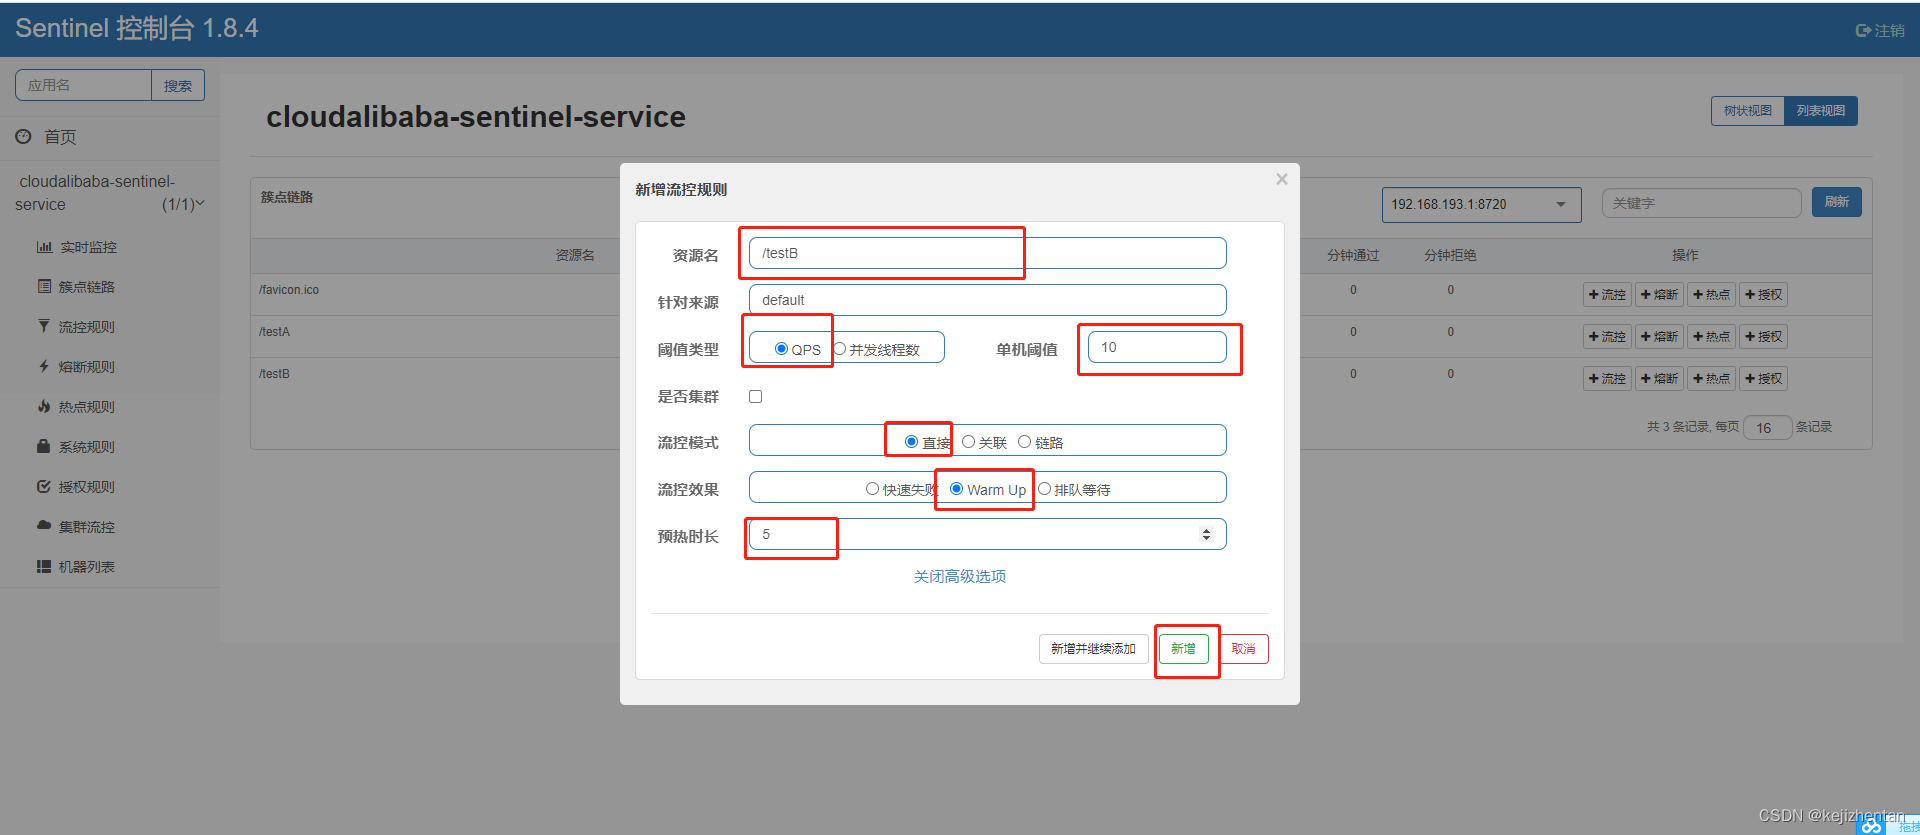
② 测试效果如下:
前五秒一秒钟访问超过3次(threshold / 3)会报Blocked by Sentinel (flow limiting)异常,五秒之后每秒钟访问不超过10次都不会报Blocked by Sentinel (flow limiting)异常

刚开始不行,后续慢慢OK
③ 应用场景
如: 秒杀系统在开启的瞬间,会有很多流量上来,很有可能把系统打死,预热方式就是把为了保护系统,可慢慢的把流量放进来,慢慢的把阀值增长到设置的阀值。
3)排队等待:匀速排队,阈值必须设置为QPS
官网解释:https://github.com/alibaba/Sentinel/wiki/%E6%B5%81%E9%87%8F%E6%8E%A7%E5%88%B6

① 排队等待配置
匀速排队,让请求以均匀的速度通过,阀值类型必须设成QPS,否则无效。
设置含义:/testB每秒1次请求,超过的话就排队等待,等待的超时时间为20000毫秒。

② 测试效果如下:
为了演示效果,我们可以把之前的业务层代码修改一下,添加日志的打印:
@RestController
@Slf4j
public class FlowLimitController {

    @GetMapping("/testA")
    public String testA() {
        return "------testA";
    }

    @GetMapping("/testB")
    public String testB() {
        log.info(Thread.currentThread().getName()+"\t"+"....testB");
        return "------testB";
    }
}
大批量线程高并发访问B:


虽然我们设置的是0.1秒发一次请求,但是sentinel设置了排队等待流控规则,后台还是每秒接收一次
5. Sentinel降级规则
官网解释:https://github.com/alibaba/Sentinel/wiki/%E7%86%94%E6%96%AD%E9%99%8D%E7%BA%A7
⑴ 基本介绍

Sentinel 熔断降级会在调用链路中某个资源出现不稳定状态时(例如调用超时或异常比例升高),对这个资源的调用进行限制,让请求快速失败,避免影响到其它的资源而导致级联错误。
当资源被降级后,在接下来的降级时间窗口之内,对该资源的调用都自动熔断(默认行为是抛出 DegradeException)。
⑵ Sentinel的断路器是没有半开状态的
半开的状态系统自动去检测是否请求有异常,没有异常就关闭断路器恢复使用,有异常则继续打开断路器不可用。具体可以参考Hystrix

⑶ 降级策略实战
1) 慢调用比例
① 慢调用相关概念
慢调用比例 (SLOW_REQUEST_RATIO):选择以慢调用比例作为阈值,需要设置允许的慢调用 RT(即最大的响应时间),请求的响应时间大于该值则统计为慢调用。当单位统计时长(statIntervalMs)内请求数目大于设置的最小请求数目,并且慢调用的比例大于阈值,则接下来的熔断时长内请求会自动被熔断。经过熔断时长后熔断器会进入探测恢复状态(HALF-OPEN 状态),若接下来的一个请求响应时间小于设置的慢调用 RT 则结束熔断,若大于设置的慢调用 RT 则会再次被熔断。
-
调用: 一个请求发送到服务器,服务器给与响应,一个响应就是一个调用。
-
RT的概念:响应时间,指系统对请求作出响应的时间。
-
慢调用: 当调用的时间(响应的实际时间)>设置的RT的时,这个调用叫做慢调用。
-
慢调用比例:在所有调用中,慢调用占实际调用的比例,= 慢调用次数 / 调用次数
-
比例阈值:自己设定的 , 慢调用次数 / 调用次数=比例阈值
-
统计时长:时间的判断依据
-
最小请求数:设置的调用最小请求数
② 状态转换
进入熔断状态判断依据:当统计时常内,实际请求数目大于最小请求数目,慢调用比例> 比例阈值 ,进入熔断状态
-
熔断状态:在接下来的熔断时长内请求会自动被熔断
-
探测恢复状态:熔断时长结束后进入探测恢复状态
-
结束熔断:在探测恢复状态,如果接下来的一个请求响应时间小于设置的慢调用 RT,则结束熔断
否则继续熔断。
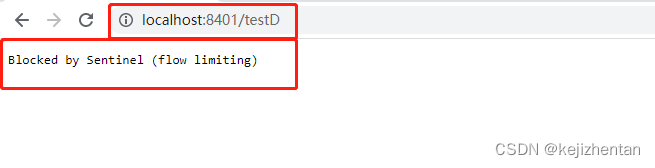
③ 慢调用代码测试
-
在FlowLimitController中添加代码
@GetMapping("/testD") public String testD() { //暂停几秒钟线程 try { TimeUnit.SECONDS.sleep(1); } catch (InterruptedException e) { e.printStackTrace(); } log.info("testD 测试RT"); return "------testD"; } -
配置sentinel

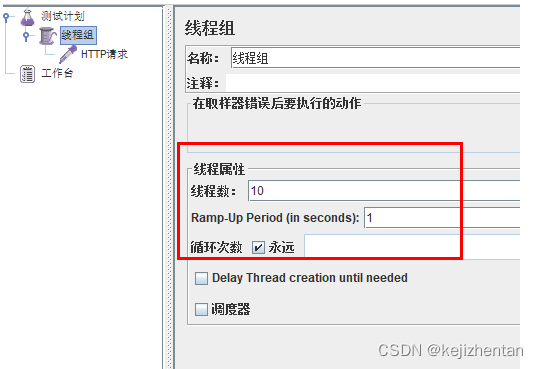
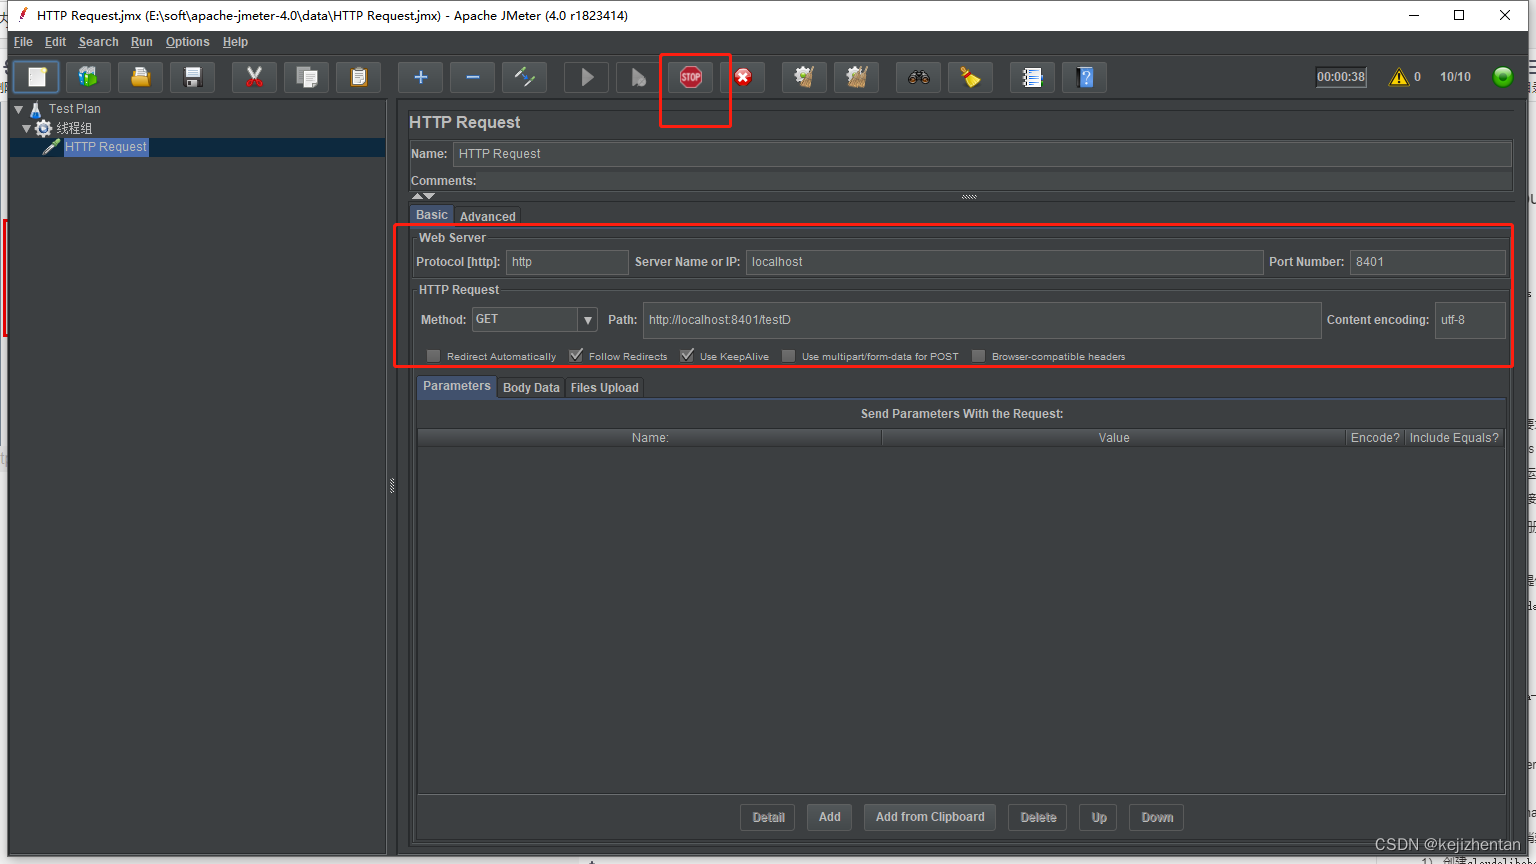
在1000毫秒,也就是1秒内,如果发送到/testD 的请求数数量大于5,并且在这些请求中,所有请求的响应时长(因为比例阈值为1,所以是所有的请求响应时长)都大于500毫秒,也就是都大于0.5秒的时候,进入熔断状态。当熔断时长1秒后进入探测恢复状态,在探测恢复状态,如果接下来的一个请求响应时间小于设置的慢调用 RT,则结束熔断否则继续熔断。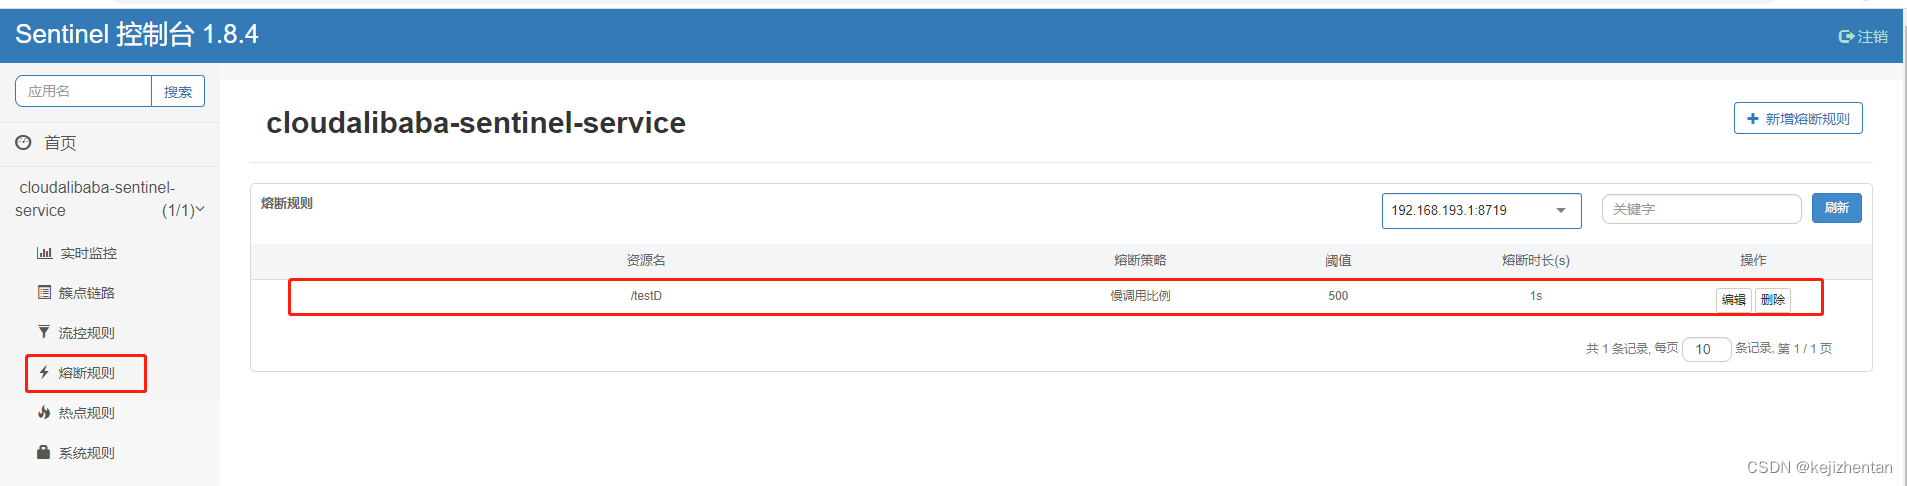
-
通过jmeter进行压测


2) 异常比例
① 异常比例相关概念
异常比例 (ERROR_RATIO):当单位统计时长(statIntervalMs)内请求数目大于设置的最小请求数目,并且异常的比例大于阈值,则接下来的熔断时长内请求会自动被熔断。经过熔断时长后熔断器会进入探测恢复状态(HALF-OPEN 状态),若接下来的一个请求成功完成(没有错误)则结束熔断,否则会再次被熔断。异常比率的阈值范围是 [0.0, 1.0],代表 0% - 100%。
② 异常比例代码测试
-
在FlowLimitController中添加代码
@GetMapping("/testD") public String testD() { log.info("testD 测试异常比例"); int age = 10 / 0; return "------testD"; } -
配置sentinel

在1000毫秒,也就是1秒内,如果发送到/testD 的请求数数量大于5,并且在这些请求中,出现异常的请求占总请求的0.2以上,进入熔断状态。当熔断时长1秒后进入探测恢复状态,在探测恢复状态,若接下来的一个请求成功完成(没有错误)则结束熔断,否则会再次被熔断。 -
通过jmeter进行压测
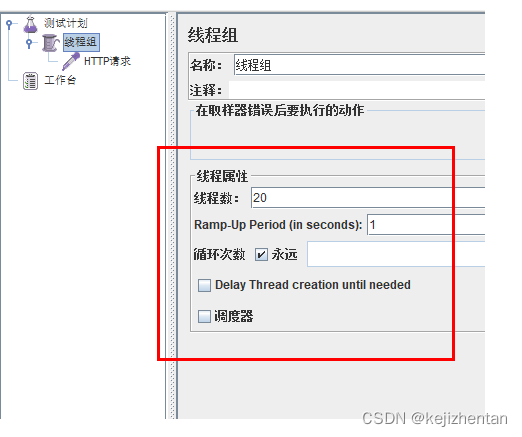
按照上述配置,单独访问一次,必然来一次报错一次(int age = 10/0),调一次错一次;开启jmeter后,直接高并发发送请求,多次调用达到我们的配置条件了。断路器开启(保险丝跳闸),微服务不可用了,不再报错error而是服务降级了。
3) 异常数
异常数 (ERROR_COUNT):当单位统计时长内的异常数目超过阈值之后会自动进行熔断。经过熔断时长后熔断器会进入探测恢复状态(HALF-OPEN 状态),若接下来的一个请求成功完成(没有错误)则结束熔断,否则会再次被熔断。
① 异常数相关概念
异常数 (ERROR_COUNT):当单位统计时长内的异常数目超过阈值之后会自动进行熔断。经过熔断时长后熔断器会进入探测恢复状态(HALF-OPEN 状态),若接下来的一个请求成功完成(没有错误)则结束熔断,否则会再次被熔断。
② 异常数代码测试
- 在FlowLimitController中添加代码
@GetMapping("/testD") public String testD() { log.info("testD 测试异常数"); int age = 10 / 0; return "------testD"; } - 配置sentinel
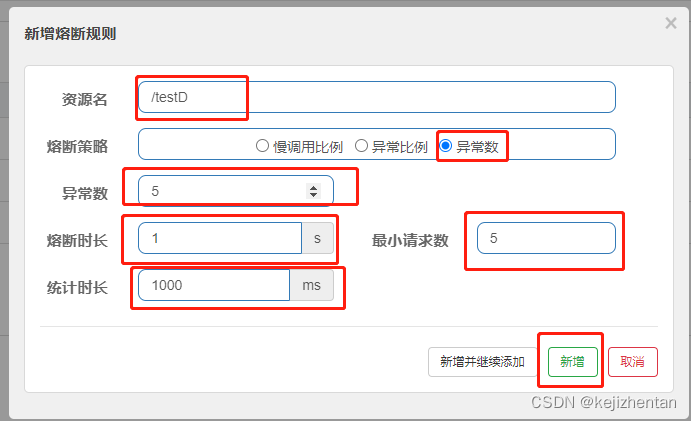
在1000毫秒,也就是1秒内,如果发送到/testD 的请求数数量大于5,并且在这些请求中,出现5个以上异常,进入熔断状态。当熔断时长1秒后进入探测恢复状态,在探测恢复状态,若接下来的一个请求成功完成(没有错误)则结束熔断,否则会再次被熔断。
- 通过jmeter进行压测
6. Sentinel热点key限流
⑴ 基本介绍
何为热点
热点即经常访问的数据,很多时候我们希望统计或者限制某个热点数据中访问频次最高的TopN数据,并对其访问进行限流或者其它操作
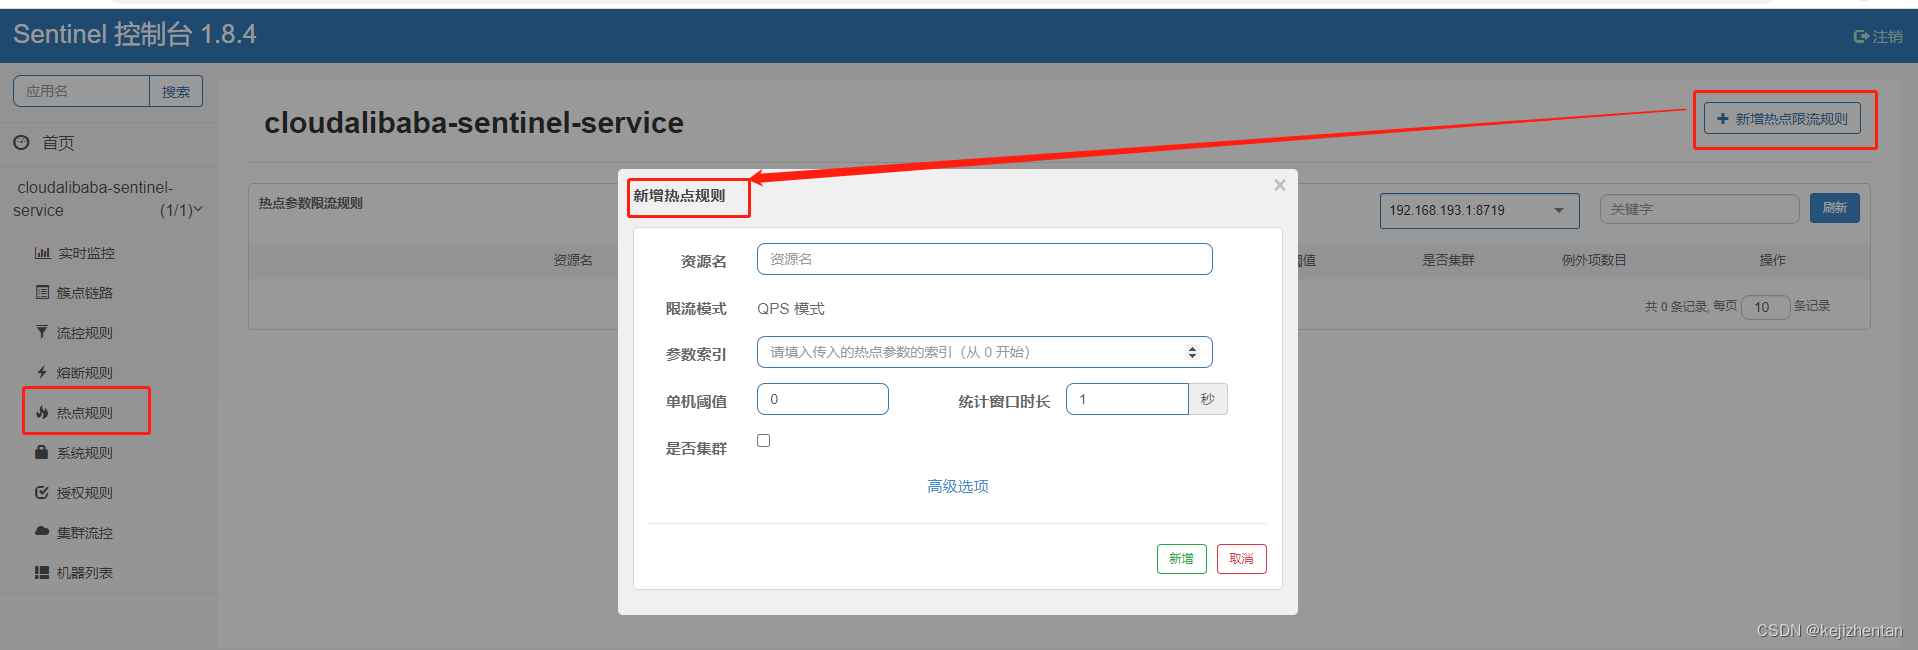
官网介绍:https://github.com/alibaba/Sentinel/wiki/%E7%83%AD%E7%82%B9%E5%8F%82%E6%95%B0%E9%99%90%E6%B5%81
⑵ 与Hystrix进行比较
兜底方法
分为系统默认和客户自定义,两种。之前的demo,限流出问题后,都是用sentinel系统默认的提示:Blocked by Sentinel (flow limiting)。我们能不能自定?类似hystrix,某个方法出问题了,就找对应的兜底降级方法?
结论
从@HystrixCommand到@SentinelResource
⑶ key限流简单代码测试
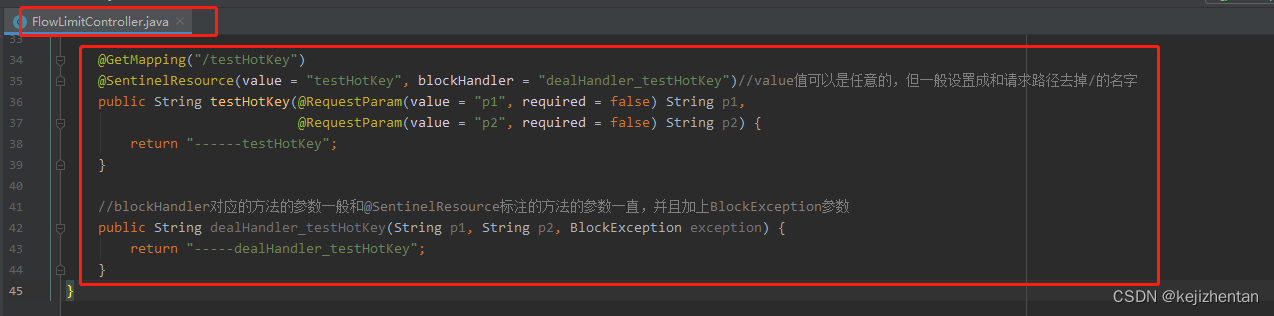
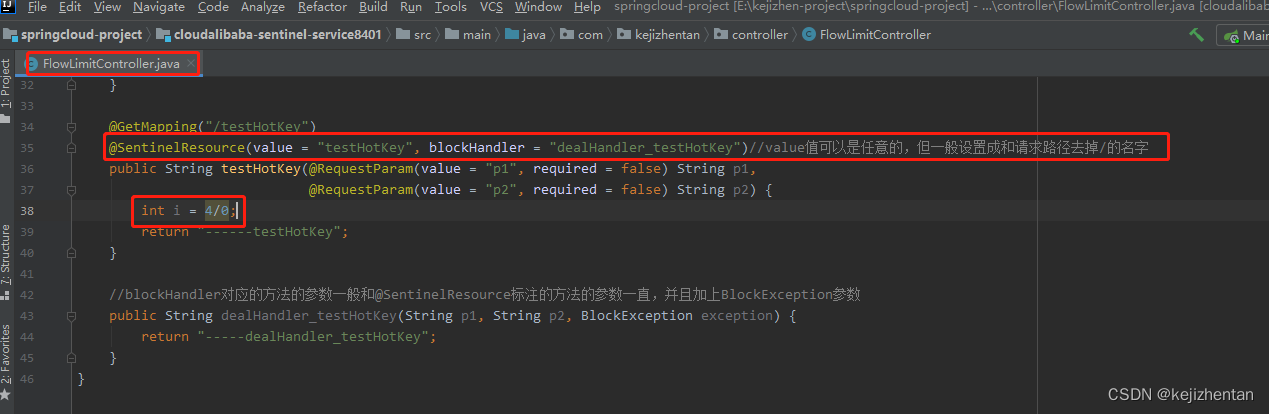
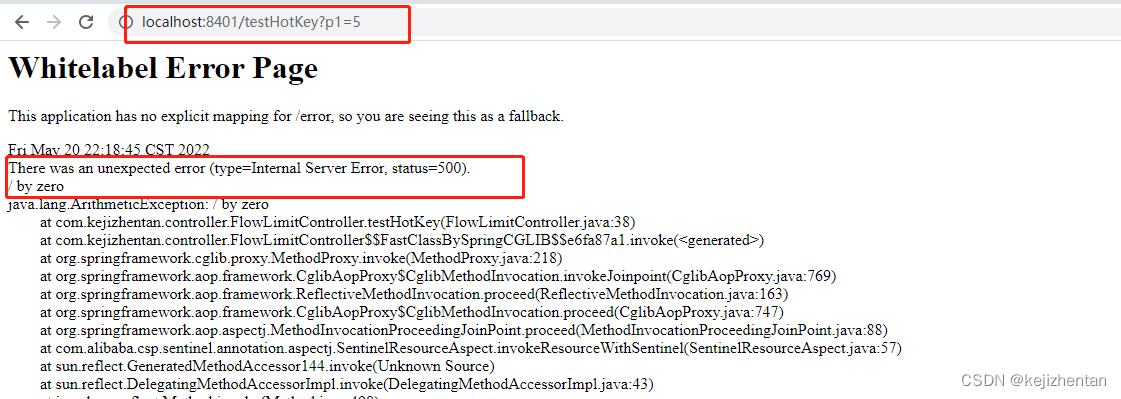
1)在FlowLimitController中添加代码
 @GetMapping("/testHotKey")
 @SentinelResource(value = "testHotKey", blockHandler = "dealHandler_testHotKey")//value值可以是任意的,但一般设置成和请求路径去掉/的名字
  public String testHotKey(@RequestParam(value = "p1", required = false) String p1,
                           @RequestParam(value = "p2", required = false) String p2) {
      return "------testHotKey";
  }

  //blockHandler对应的方法的参数一般和@SentinelResource标注的方法的参数一直,并且加上BlockException参数
  public String dealHandler_testHotKey(String p1, String p2, BlockException exception) {
      return "-----dealHandler_testHotKey";
  }
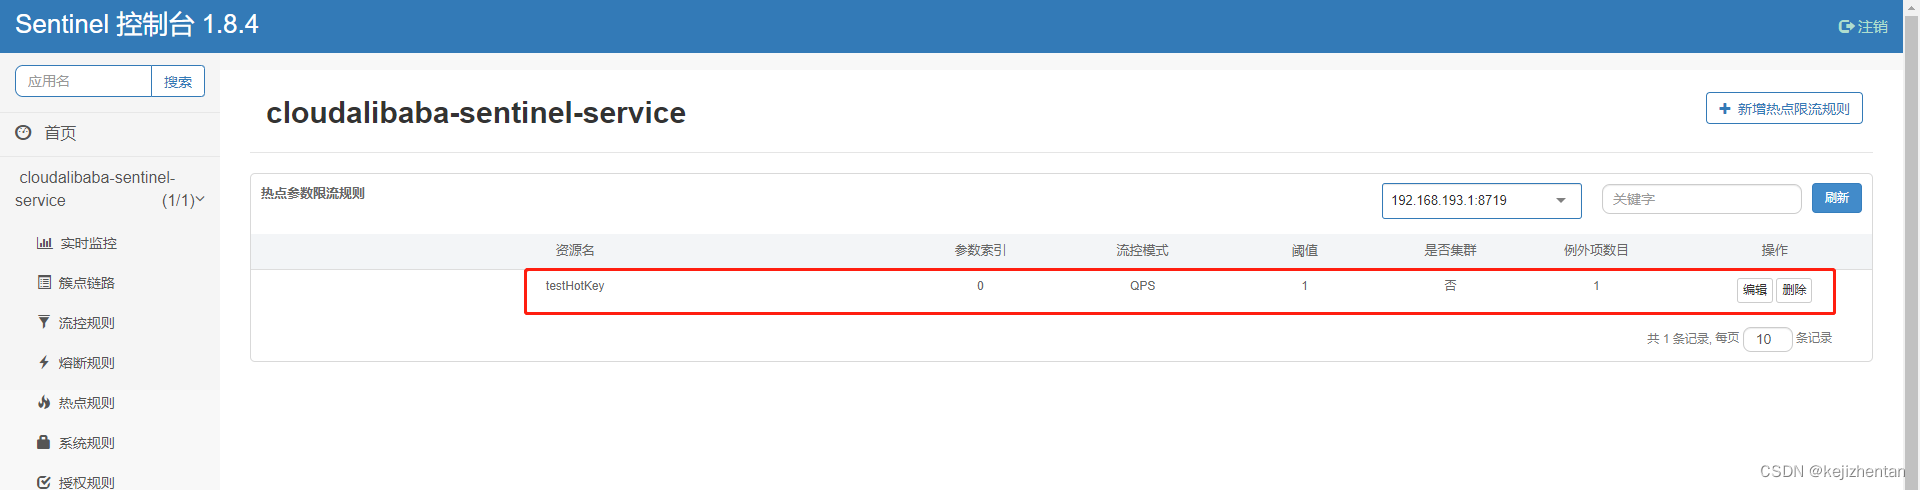
2)配置sentinel


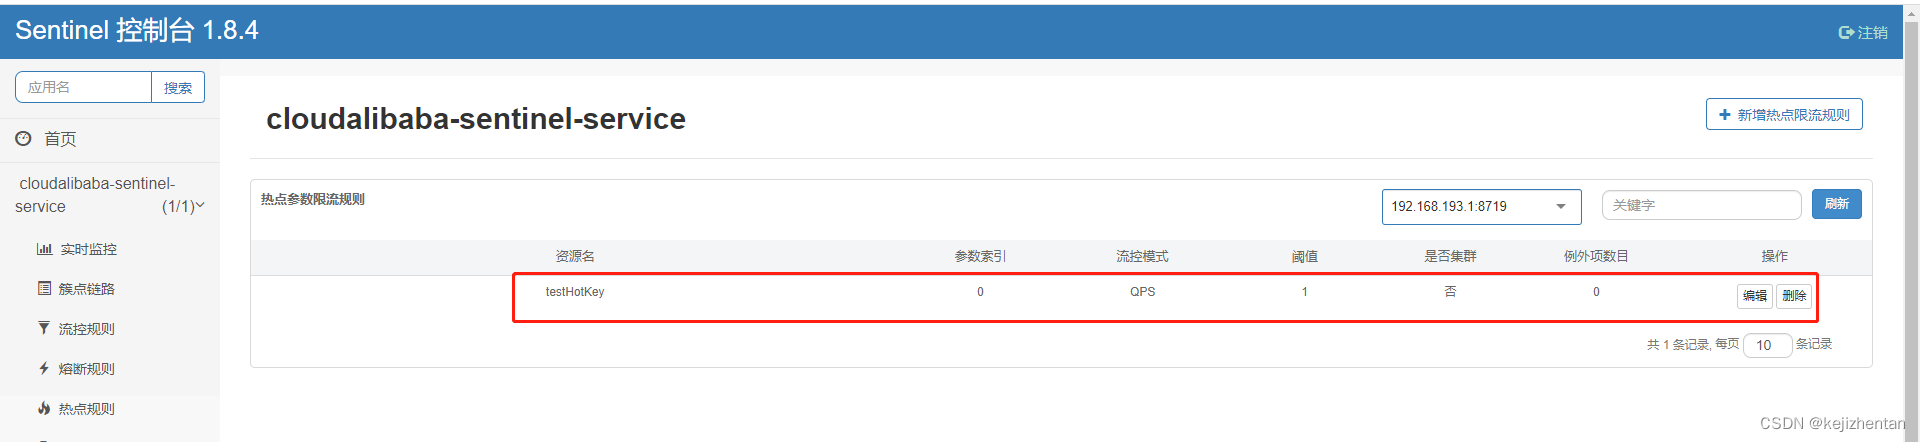
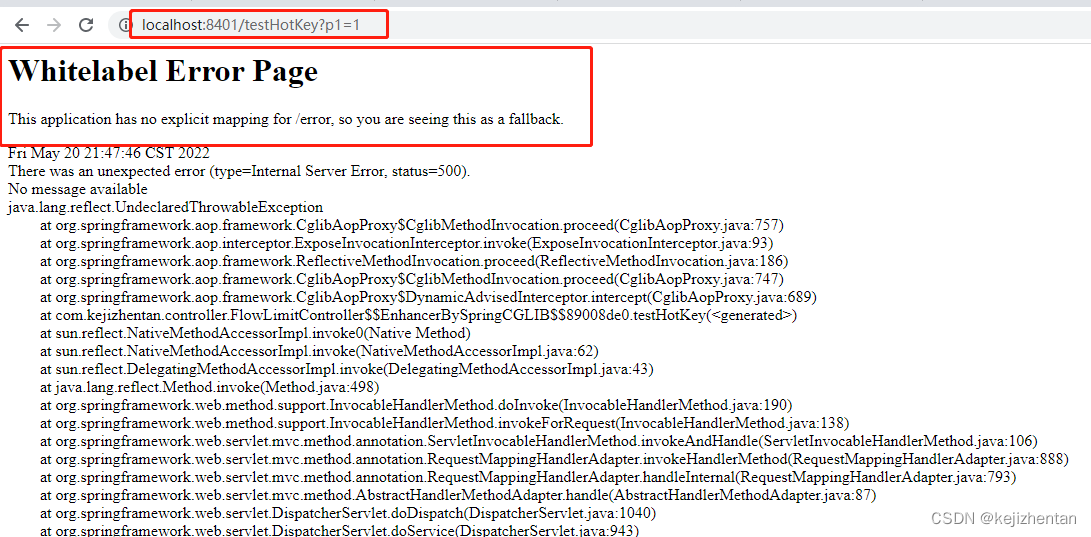
3)测试:
方法testHotKey里面第一个参数只要QPS超过每秒1次,马上降级处理
正常页面:

降级后的页面:

4)@SentinelResource(value = "testHotKey")和@SentinelResource(value = "testHotKey",blockHandler = "dealHandler_testHotKey")的区别
-
@SentinelResource(value = "testHotKey")@GetMapping("/testHotKey") @SentinelResource(value = "testHotKey")//value值可以是任意的,但一般设置成和请求路径去掉/的名字 public String testHotKey(@RequestParam(value = "p1", required = false) String p1, @RequestParam(value = "p2", required = false) String p2) { return "------testHotKey"; }异常打到了前台用户界面看到,不友好
-
@SentinelResource(value = "testHotKey",blockHandler = "dealHandler_testHotKey")@GetMapping("/testHotKey") @SentinelResource(value = "testHotKey", blockHandler = "dealHandler_testHotKey")//value值可以是任意的,但一般设置成和请求路径去掉/的名字 public String testHotKey(@RequestParam(value = "p1", required = false) String p1, @RequestParam(value = "p2", required = false) String p2) { return "------testHotKey"; } //blockHandler对应的方法的参数一般和@SentinelResource标注的方法的参数一直,并且加上BlockException参数 public String dealHandler_testHotKey(String p1, String p2, BlockException exception) { return "-----dealHandler_testHotKey"; }
通过@SentinelResource(value = "testHotKey",blockHandler = "dealHandler_testHotKey")用了我们自己定义的错误页面效果
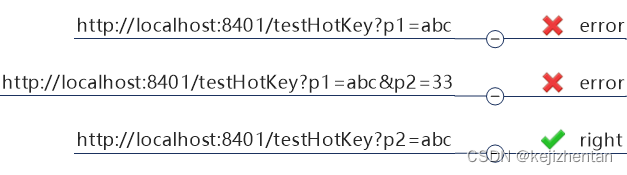
5)不同参数的测试比较
⑷ Sentinel热点key限流中的参数例外项
1) 特例情况介绍
上述案例演示了第一个参数p1,当QPS超过1秒1次点击后马上被限流
现在我们期望p1参数当它是某个特殊值时,它的限流值和平时不一样,例如 :假如当p1的值等于5时,它的阈值可以达到200。这样怎么实现呢?
2) 参数例外项配置
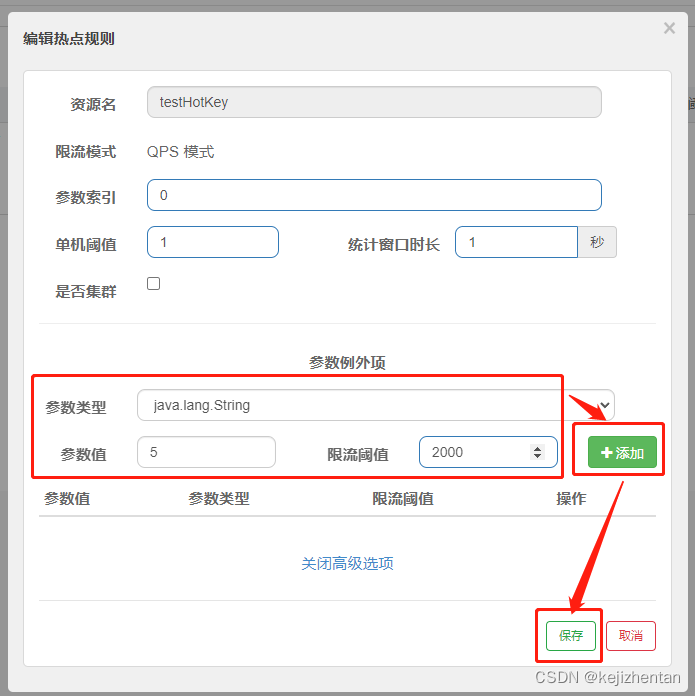
添加按钮一定要记得点击

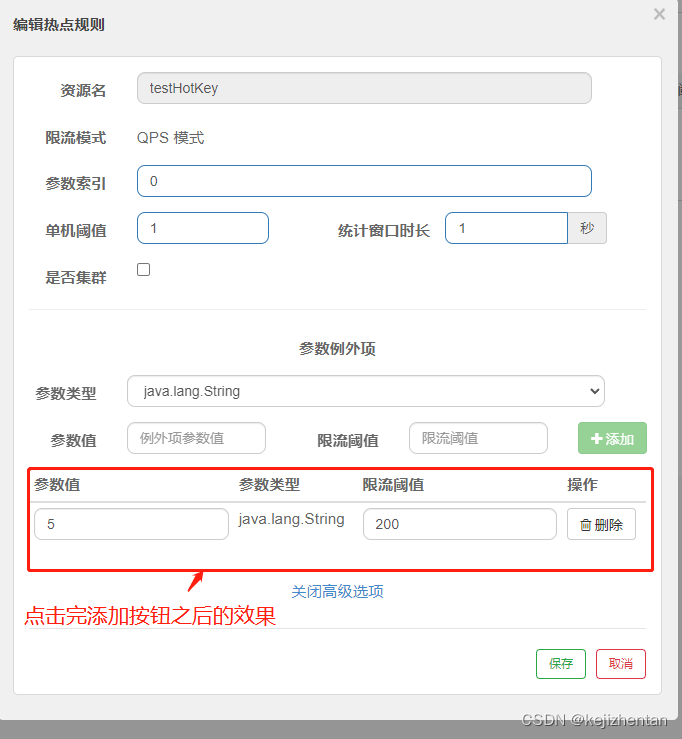
3) 测试
分别访问:http://localhost:8401/testHotKey?p1=5和http://localhost:8401/testHotKey?p1=3
结果:
当p1等于5的时候,阈值变为200
当p1不等于5的时候,阈值就是平常的1
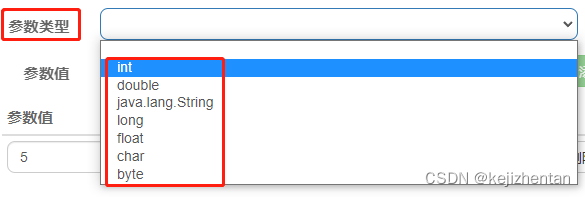
前提条件:热点参数的注意点,参数必须是基本类型或者String
⑸ @SentinelResource主管配置出错,运行出错该走异常走异常
@SentinelResource
处理的是Sentinel控制台配置的违规情况,有blockHandler方法配置的兜底处理;
RuntimeException
int age = 10/0,这个是java运行时报出的运行时异常RunTimeException,@SentinelResource不管
总结
@SentinelResource主管配置出错,运行出错该走异常走异常
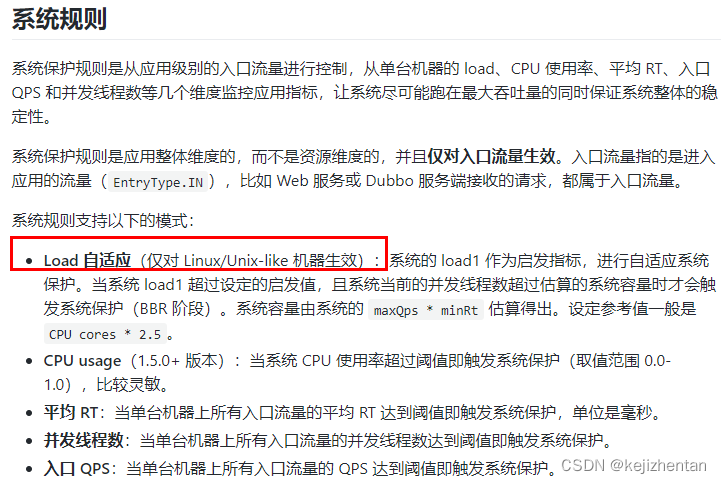
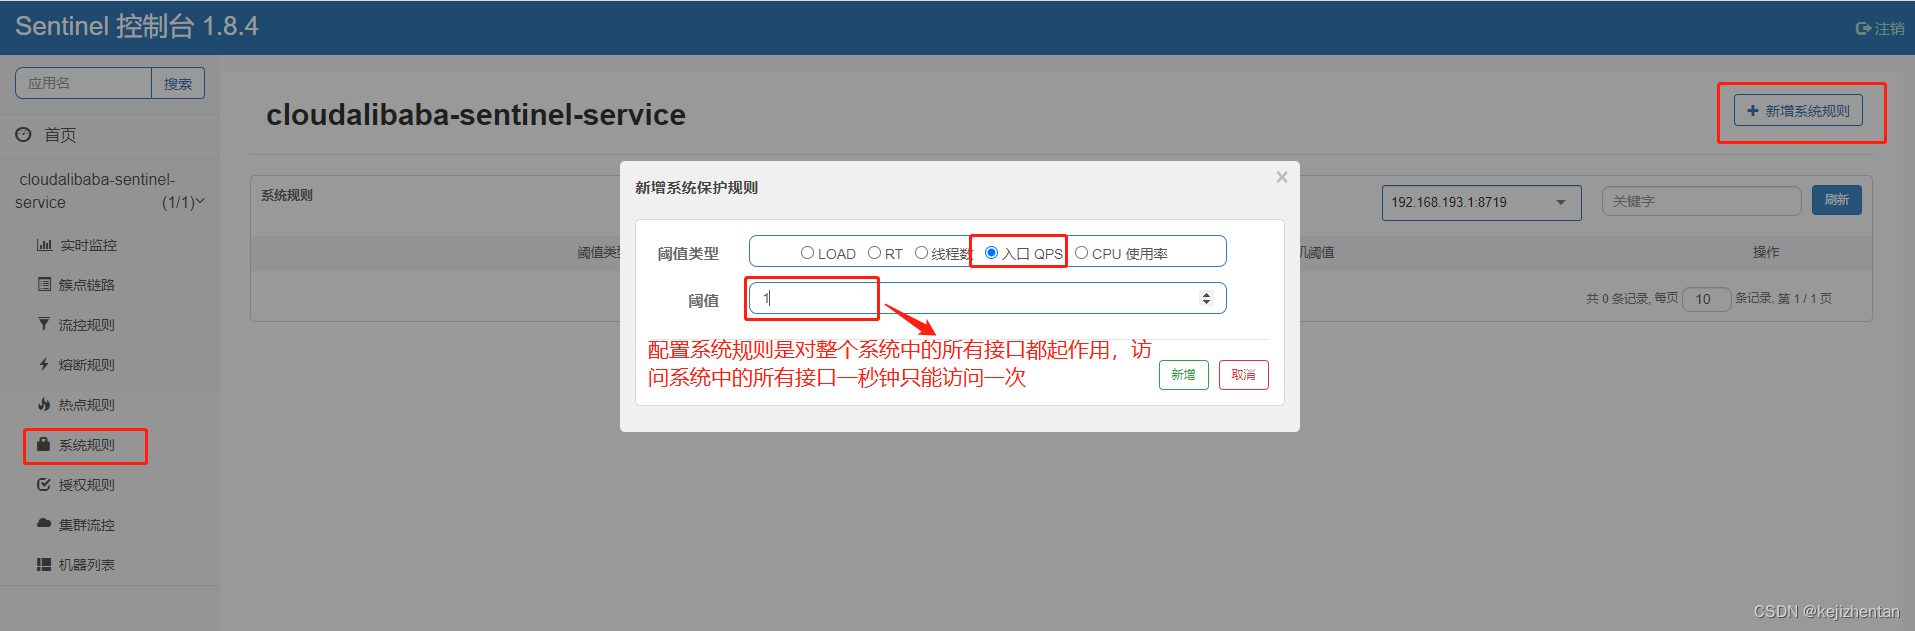
7. Sentinel系统规则
⑴ Sentinel系统规则基本介绍
官网介绍:https://github.com/alibaba/Sentinel/wiki/%E7%B3%BB%E7%BB%9F%E8%87%AA%E9%80%82%E5%BA%94%E9%99%90%E6%B5%81
⑵ Sentinel系统规则简单演示
8. @SentinelResource注解功能详解
⑴ 前期准备
① 启动Nacos成功:能正常访问http://localhost:8848/nacos/#/login
② 启动Sentinel成功:能正常访问:http://localhost:8080/#/dashboard/home
③ 创建cloudalibaba-sentinel-service8401项目
○ 给cloudalibaba-sentinel-service8401项目的pom文件添加自定义依赖
<!-- 引入自己定义的api通用包,可以使用Payment支付bean -->
<dependency>
    <groupId>com.kejizhentan.springcloud</groupId>
    <artifactId>cloud-api-commons</artifactId>
    <version>${project.version}</version>
</dependency>

○ 新建了RateLimitController业务类
@RestController
public class RateLimitController {
    @GetMapping("/byResource")
    @SentinelResource(value = "byResource", blockHandler = "handleException")
    public CommonResult byResource() {
        return new CommonResult(200, "按资源名称限流测试OK", new Payment(2020L, "serial001"));
    }

    public CommonResult handleException(BlockException exception) {
        return new CommonResult(444, exception.getClass().getCanonicalName() + "\t 服务不可用");
    }
}
⑵ 按资源名称限流+后续处理
1) 配置流控规则
① 配置步骤
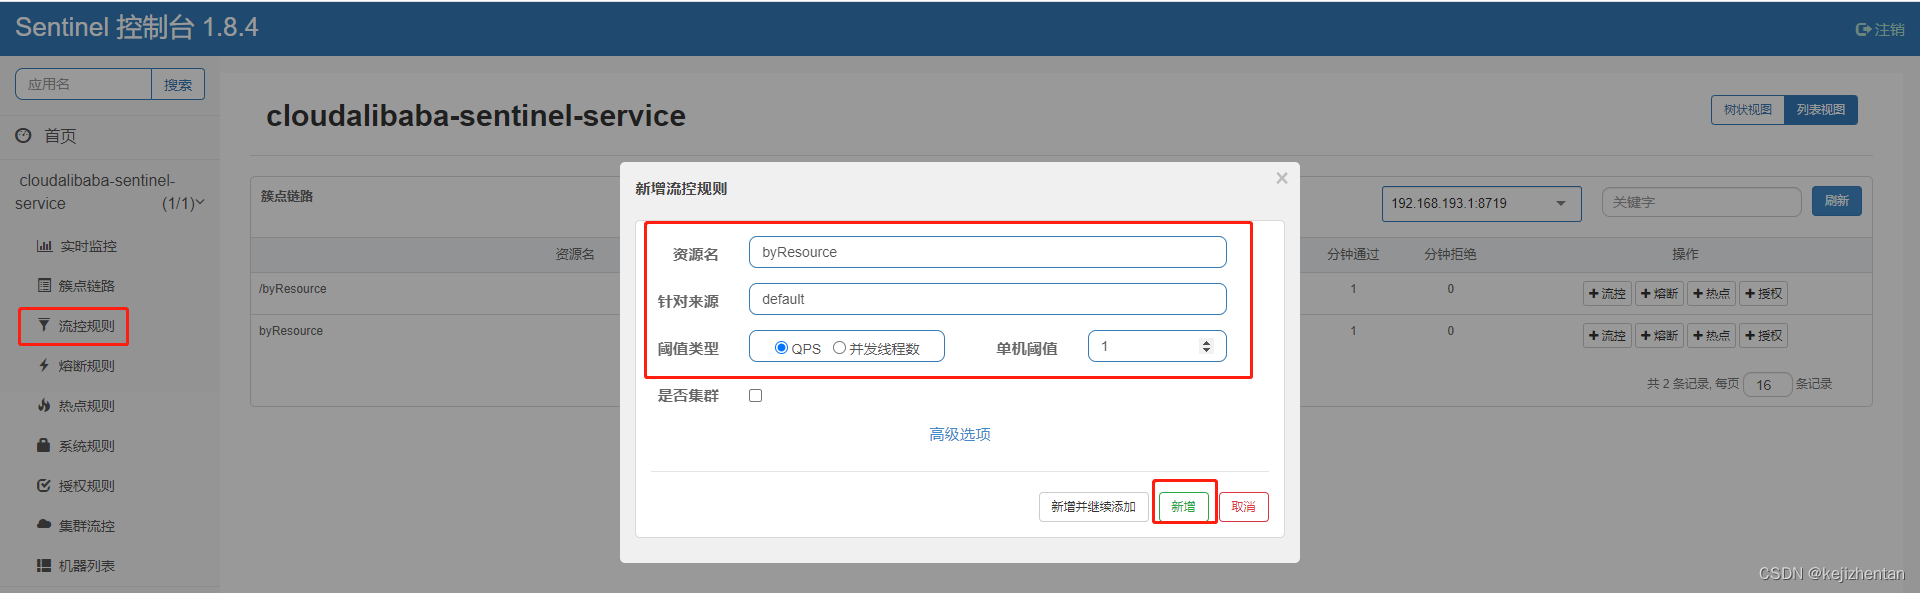
② 图形配置和代码关系

表示1秒钟内查询次数大于1,就跑到我们自定义的异常处理方法中,限流
③ 测试
1秒钟点击1下,OK
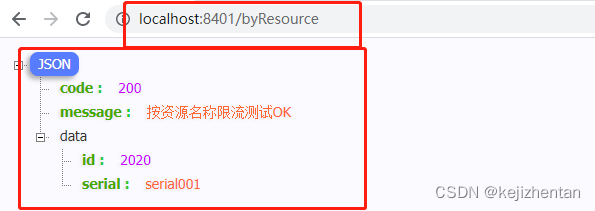
超过上述,疯狂点击,返回了自己定义的限流处理信息,限流发生
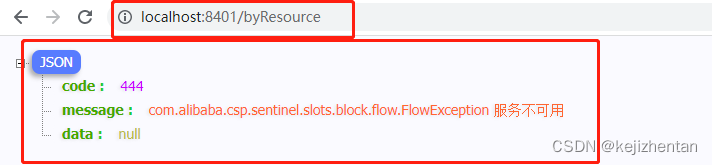
④ 额外问题:此时关闭问服务8401看看,发现Sentinel控制台,流控规则消失了。说明Sentinel控制台,流控规则是临时的。
⑶ 按照Url地址限流+后续处理
1) 业务类RateLimitController添加接口方法
@RestController
public class RateLimitController {
    @GetMapping("/byResource")
    @SentinelResource(value = "byResource", blockHandler = "handleException")
    public CommonResult byResource() {
        return new CommonResult(200, "按资源名称限流测试OK", new Payment(2020L, "serial001"));
    }

    public CommonResult handleException(BlockException exception) {
        return new CommonResult(444, exception.getClass().getCanonicalName() + "\t 服务不可用");
    }


    @GetMapping("/rateLimit/byUrl")
    @SentinelResource(value = "byUrl")
    public CommonResult byUrl() {
        return new CommonResult(200, "按url限流测试OK", new Payment(2020L, "serial002"));
    }

}
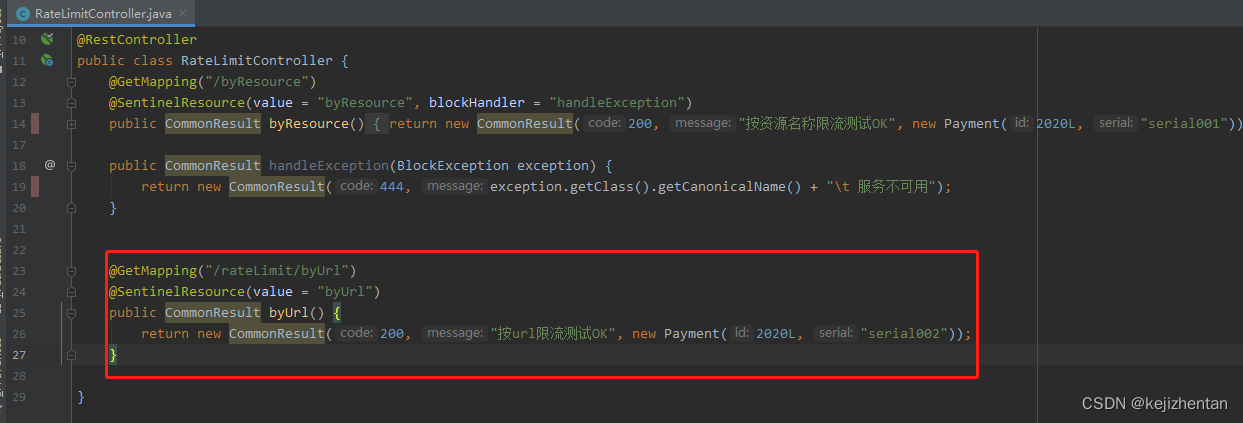
2) 通过访问的URL来限流,会返回Sentinel自带默认的限流处理信息的控制台配置

3)测试
每秒访问一次:http://localhost:8401/rateLimit/byUrl
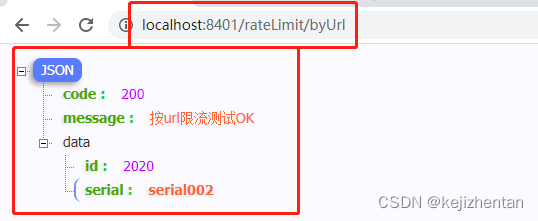
疯狂点击:http://localhost:8401/rateLimit/byUrl
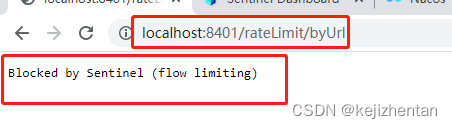
会返回Sentinel自带的限流处理结果
⑷ 上面兜底方案面临的问题
1)系统默认的,没有体现我们自己的业务要求。
2)依照现有条件,我们自定义的处理方法又和业务代码耦合在一块,不直观。
3)每个业务方法都添加一个兜底的,那代码膨胀加剧。
4)全局统一的处理方法没有体现。
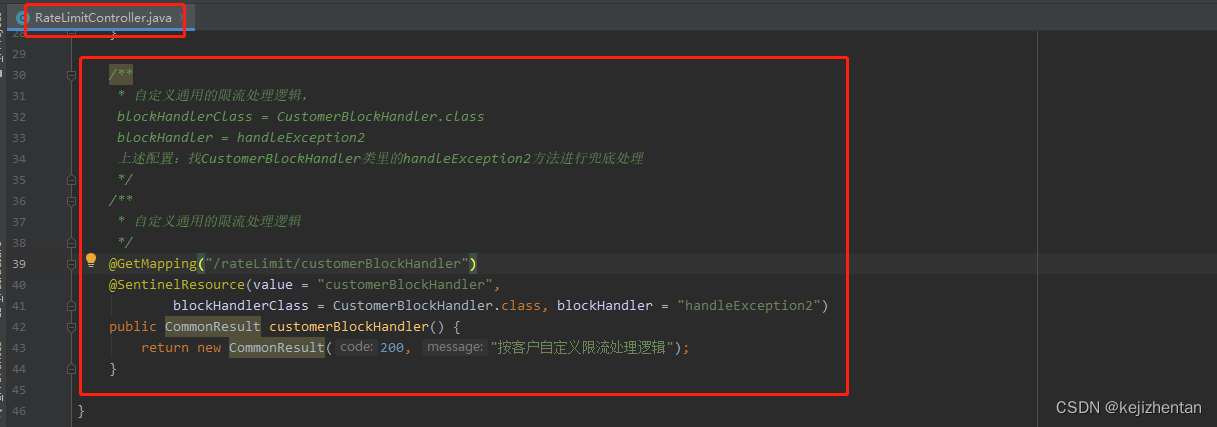
⑸ 客户自定义限流处理逻辑:创建CustomerBlockHandler类用于自定义限流处理逻辑
1) 自定义限流处理类CustomerBlockHandler
public class CustomerBlockHandler {
    public static CommonResult handleException(BlockException exception) {
        return new CommonResult(2020, "自定义的限流处理信息......CustomerBlockHandler");
    }

    public static CommonResult handleException2(BlockException exception) {
        return new CommonResult(2020, "自定义的限流处理信息2......CustomerBlockHandler");
    }
}

2)RateLimitController业务类修改
@RestController
public class RateLimitController {
    @GetMapping("/byResource")
    @SentinelResource(value = "byResource", blockHandler = "handleException")
    public CommonResult byResource() {
        return new CommonResult(200, "按资源名称限流测试OK", new Payment(2020L, "serial001"));
    }

    public CommonResult handleException(BlockException exception) {
        return new CommonResult(444, exception.getClass().getCanonicalName() + "\t 服务不可用");
    }


    @GetMapping("/rateLimit/byUrl")
    @SentinelResource(value = "byUrl")
    public CommonResult byUrl() {
        return new CommonResult(200, "按url限流测试OK", new Payment(2020L, "serial002"));
    }

    /**
     * 自定义通用的限流处理逻辑,
     blockHandlerClass = CustomerBlockHandler.class
     blockHandler = handleException2
     上述配置:找CustomerBlockHandler类里的handleException2方法进行兜底处理
     */
    /**
     * 自定义通用的限流处理逻辑
     */
    @GetMapping("/rateLimit/customerBlockHandler")
    @SentinelResource(value = "customerBlockHandler",
            blockHandlerClass = CustomerBlockHandler.class, blockHandler = "handleException2")
    public CommonResult customerBlockHandler() {
        return new CommonResult(200, "按客户自定义限流处理逻辑");
    }

}
3)启动微服务后先调用一次:http://localhost:8401/rateLimit/customerBlockHandler
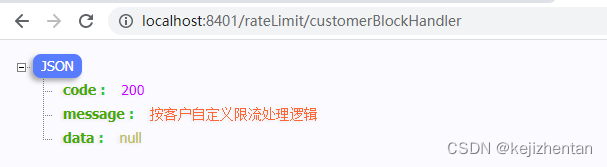
4) Sentinel控制台配置

5)测试后我们自定义的出来了

6)进一步说明


9. 服务熔断功能:sentinel整合ribbon+openFeign+fallback
⑴ Ribbon系列
1) 新建cloudalibaba-provider-payment9003/9004两个一样的做法,以cloudalibaba-provider-payment9003为例
① 新建cloudalibaba-provider-payment9003项目

② 修改POM文件
<?xml version="1.0" encoding="UTF-8"?>
<project xmlns="http://maven.apache.org/POM/4.0.0"
         xmlns:xsi="http://www.w3.org/2001/XMLSchema-instance"
         xsi:schemaLocation="http://maven.apache.org/POM/4.0.0 http://maven.apache.org/xsd/maven-4.0.0.xsd">
    <parent>
        <artifactId>springcloud-project</artifactId>
        <groupId>com.kejizhentan.springcloud</groupId>
        <version>1.0-SNAPSHOT</version>
    </parent>
    <modelVersion>4.0.0</modelVersion>

    <artifactId>cloudalibaba-provider-payment9003</artifactId>

    <dependencies>
        <!--SpringCloud ailibaba nacos -->
        <dependency>
            <groupId>com.alibaba.cloud</groupId>
            <artifactId>spring-cloud-starter-alibaba-nacos-discovery</artifactId>
        </dependency>
        <!-- 引入自己定义的api通用包,可以使用Payment支付bean -->
        <dependency>
            <groupId>com.kejizhentan.springcloud</groupId>
            <artifactId>cloud-api-commons</artifactId>
            <version>${project.version}</version>
        </dependency>
        <!-- SpringBoot整合Web组件 -->
        <dependency>
            <groupId>org.springframework.boot</groupId>
            <artifactId>spring-boot-starter-web</artifactId>
        </dependency>
        <dependency>
            <groupId>org.springframework.boot</groupId>
            <artifactId>spring-boot-starter-actuator</artifactId>
        </dependency>
        <!--日常通用jar包配置-->
        <dependency>
            <groupId>org.springframework.boot</groupId>
            <artifactId>spring-boot-devtools</artifactId>
            <scope>runtime</scope>
            <optional>true</optional>
        </dependency>
        <dependency>
            <groupId>org.projectlombok</groupId>
            <artifactId>lombok</artifactId>
            <optional>true</optional>
        </dependency>
        <dependency>
            <groupId>org.springframework.boot</groupId>
            <artifactId>spring-boot-starter-test</artifactId>
            <scope>test</scope>
        </dependency>
    </dependencies>
</project>
③创建cloudalibaba-provider-payment9003的YML和主启动:可以通过JBLSpringBootAppGen插件生成
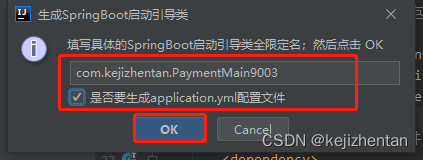
④修改YML
server:
  port: 9003

spring:
  application:
    name: nacos-payment-provider
  cloud:
    nacos:
      discovery:
        server-addr: localhost:8848 #配置Nacos地址

management:
  endpoints:
    web:
      exposure:
        include: '*'
⑤ 修改主启动类
@SpringBootApplication
@EnableDiscoveryClient
public class PaymentMain9003 {
    public static void main(String[] args) {
        SpringApplication.run(PaymentMain9003.class, args);
    }
}
⑥ 编写业务类PaymentController
@RestController
public class PaymentController {
@Value("${server.port}")
private String serverPort;
public static HashMap<Long, Payment> hashMap = new HashMap<>();
//模拟数据库中的数据
static {
hashMap.put(1L, new Payment(1L, "28a8c1e3bc2742d8848569891fb42181"));
hashMap.put(2L, new Payment(2L, "bba8c1e3bc2742d8848569891ac32182"));
hashMap.put(3L, new Payment(3L, "6ua8c1e3bc2742d8848569891xt92183"));
}
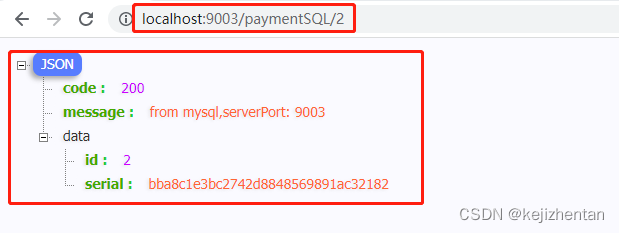
@GetMapping(value = "/paymentSQL/{id}")
public CommonResult<Payment> paymentSQL(@PathVariable("id") Long id) {
Payment payment = hashMap.get(id);
CommonResult<Payment> result = new CommonResult(200, "from mysql,serverPort: " + serverPort, payment);
return result;
}
}
7)测试地址:http://localhost:9003/paymentSQL/1
2) 消费者84
① 新建cloudalibaba-consumer-nacos-order84工程

② 修改POM文件
<?xml version="1.0" encoding="UTF-8"?>
<project xmlns="http://maven.apache.org/POM/4.0.0"
         xmlns:xsi="http://www.w3.org/2001/XMLSchema-instance"
         xsi:schemaLocation="http://maven.apache.org/POM/4.0.0 http://maven.apache.org/xsd/maven-4.0.0.xsd">
    <parent>
        <artifactId>springcloud-project</artifactId>
        <groupId>com.kejizhentan.springcloud</groupId>
        <version>1.0-SNAPSHOT</version>
    </parent>
    <modelVersion>4.0.0</modelVersion>

    <artifactId>cloudalibaba-consumer-nacos-order84</artifactId>
    <dependencies>
        <!--SpringCloud ailibaba nacos -->
        <dependency>
            <groupId>com.alibaba.cloud</groupId>
            <artifactId>spring-cloud-starter-alibaba-nacos-discovery</artifactId>
        </dependency>
        <!--SpringCloud ailibaba sentinel -->
        <dependency>
            <groupId>com.alibaba.cloud</groupId>
            <artifactId>spring-cloud-starter-alibaba-sentinel</artifactId>
        </dependency>
        <!-- 引入自己定义的api通用包,可以使用Payment支付Entity -->
        <dependency>
            <groupId>com.kejizhentan.springcloud</groupId>
            <artifactId>cloud-api-commons</artifactId>
            <version>${project.version}</version>
        </dependency>
        <!-- SpringBoot整合Web组件 -->
        <dependency>
            <groupId>org.springframework.boot</groupId>
            <artifactId>spring-boot-starter-web</artifactId>
        </dependency>
        <dependency>
            <groupId>org.springframework.boot</groupId>
            <artifactId>spring-boot-starter-actuator</artifactId>
        </dependency>
        <!--日常通用jar包配置-->
        <dependency>
            <groupId>org.springframework.boot</groupId>
            <artifactId>spring-boot-devtools</artifactId>
            <scope>runtime</scope>
            <optional>true</optional>
        </dependency>
        <dependency>
            <groupId>org.projectlombok</groupId>
            <artifactId>lombok</artifactId>
            <optional>true</optional>
        </dependency>
        <dependency>
            <groupId>org.springframework.boot</groupId>
            <artifactId>spring-boot-starter-test</artifactId>
            <scope>test</scope>
        </dependency>
    </dependencies>

</project>
③ 创建cloudalibaba-consumer-nacos-order84的YML和主启动:可以通过JBLSpringBootAppGen插件生成
④修改YML
server:
  port: 84


spring:
  application:
    name: nacos-order-consumer
  cloud:
    nacos:
      discovery:
        server-addr: localhost:8848
    sentinel:
      transport:
        #配置Sentinel dashboard地址
        dashboard: localhost:8080
        #默认8719端口,假如被占用会自动从8719开始依次+1扫描,直至找到未被占用的端口
        port: 8719


#消费者将要去访问的微服务名称(注册成功进nacos的微服务提供者)
service-url:
  nacos-user-service: http://nacos-payment-provider
⑤ 修改主启动类
@EnableDiscoveryClient
@SpringBootApplication
public class OrderNacosMain84 {
    public static void main(String[] args) {
        SpringApplication.run(OrderNacosMain84.class, args);
    }
}
⑥ 负载均衡配置类ApplicationContextConfig
@Configuration
public class ApplicationContextConfig {
    @Bean
    @LoadBalanced
    public RestTemplate getRestTemplate() {
        return new RestTemplate();
    }
}
⑦ 业务类CircleBreakerController
@RestController
@Slf4j
public class CircleBreakerController {
public static final String SERVICE_URL = "http://nacos-payment-provider";
@Resource
private RestTemplate restTemplate;
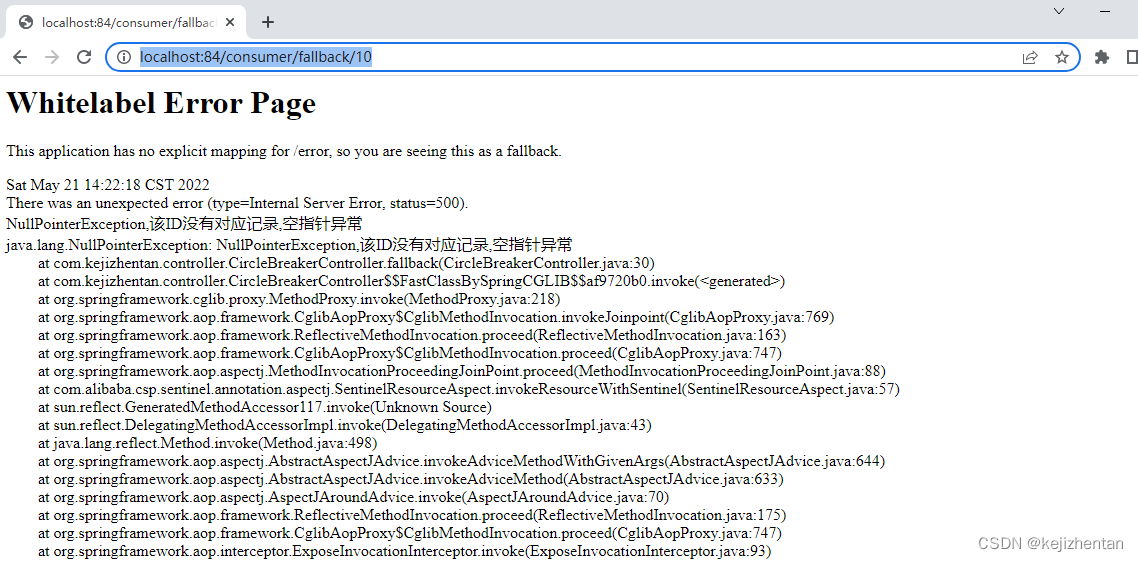
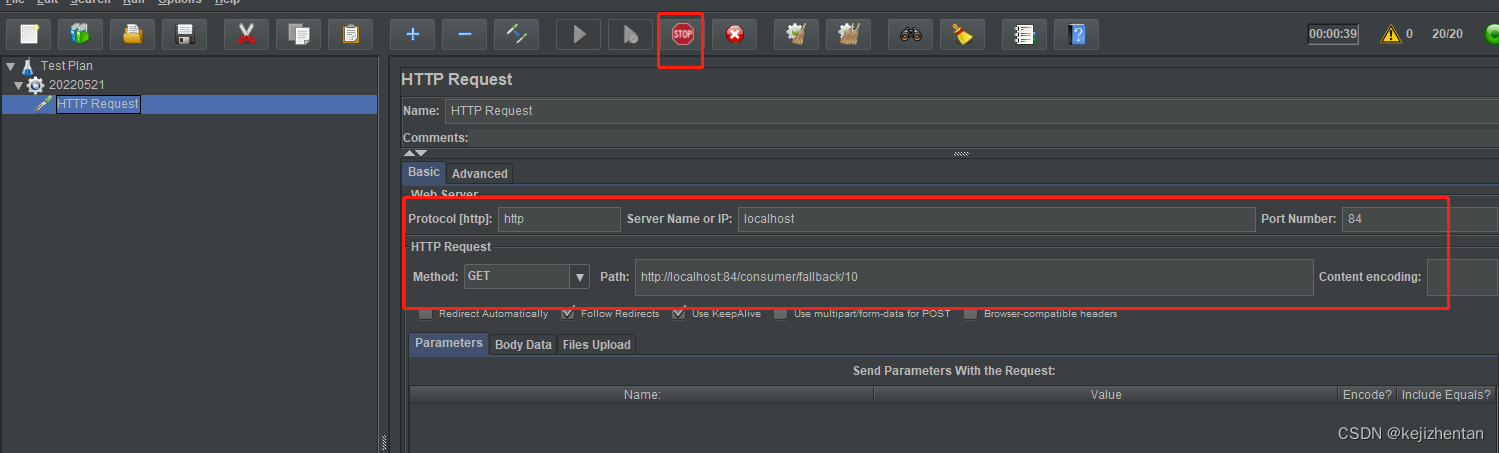
@RequestMapping("/consumer/fallback/{id}")
@SentinelResource(value = "fallback")
public CommonResult<Payment> fallback(@PathVariable Long id) {
CommonResult<Payment> result = restTemplate.getForObject(SERVICE_URL + "/paymentSQL/" + id, CommonResult.class, id);
if (id == 4) {
throw new IllegalArgumentException("IllegalArgumentException,非法参数异常....");
} else if (result.getData() == null) {
throw new NullPointerException("NullPointerException,该ID没有对应记录,空指针异常");
}
return result;
}
}
3) 测试
启动nacos、cloudalibaba-provider-payment9003、cloudalibaba-provider-payment9004、cloudalibaba-consumer-nacos-order84
访问:http://localhost:84/consumer/fallback/1

由图可知,9003和9004来回切换,实现了负载均衡的效果
如果我们访问一个不存在的数据会报异常,给客户error页面,这样不友好
http://localhost:84/consumer/fallback/10
4) 只配置fallback,管运行异常
① 修改CircleBreakerController业务类
@RestController
@Slf4j
public class CircleBreakerController {
    public static final String SERVICE_URL = "http://nacos-payment-provider";

    @Resource
    private RestTemplate restTemplate;

    @RequestMapping("/consumer/fallback/{id}")
    @SentinelResource(value = "fallback",fallback = "handlerFallback")//fallback负责业务异常
    public CommonResult<Payment> fallback(@PathVariable Long id) {
        CommonResult<Payment> result = restTemplate.getForObject(SERVICE_URL + "/paymentSQL/" + id, CommonResult.class, id);

        if (id == 4) {
            throw new IllegalArgumentException("IllegalArgumentException,非法参数异常....");
        } else if (result.getData() == null) {
            throw new NullPointerException("NullPointerException,该ID没有对应记录,空指针异常");
        }

        return result;
    }

    public CommonResult handlerFallback(@PathVariable  Long id,Throwable e) {
        Payment payment = new Payment(id,"null");
        return new CommonResult<>(444,"兜底异常handlerFallback,exception内容  "+e.getMessage(),payment);
    }

}
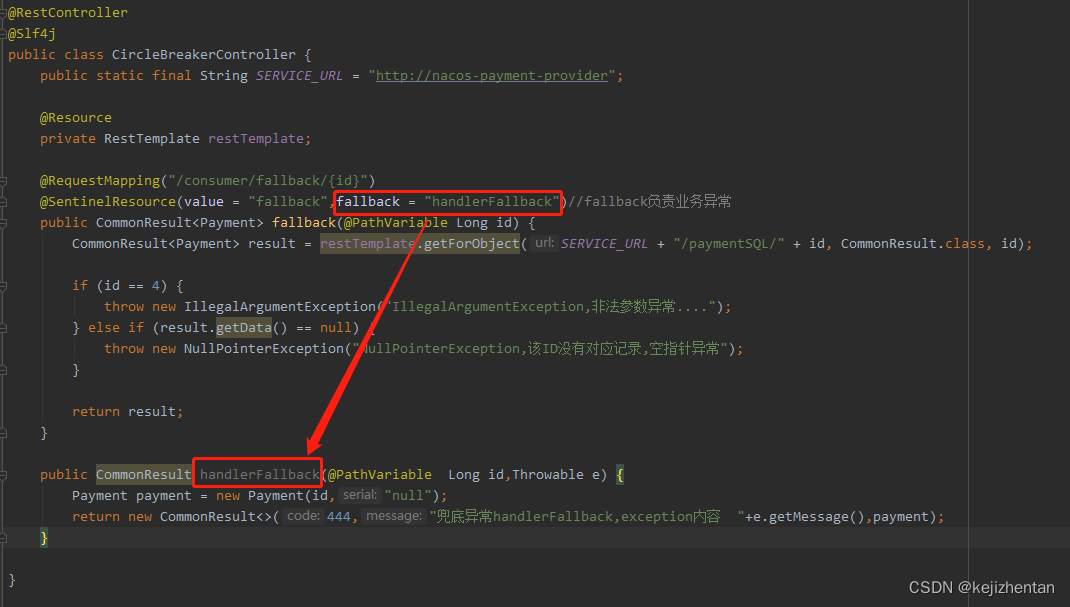
注意:配置fallback,管运行异常,无需配sentinel
② 测试
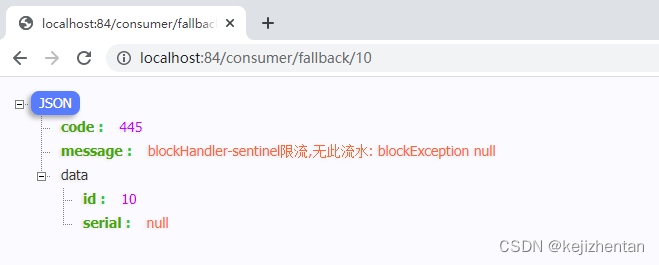
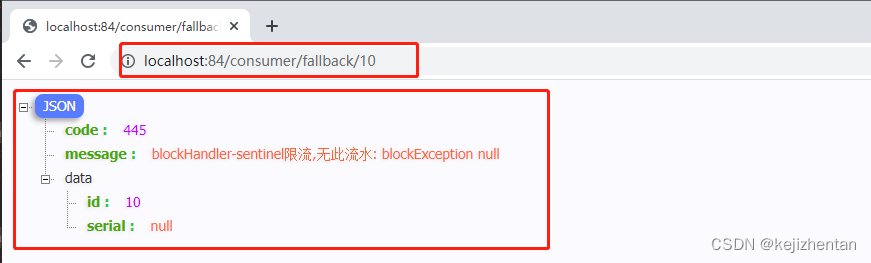
访问不存在的数据:http://localhost:84/consumer/fallback/10
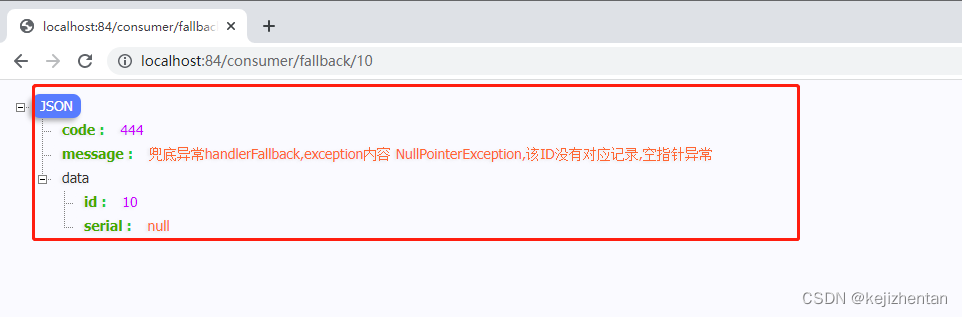
系统出现运行时异常就走自定义的 handlerFallback方法
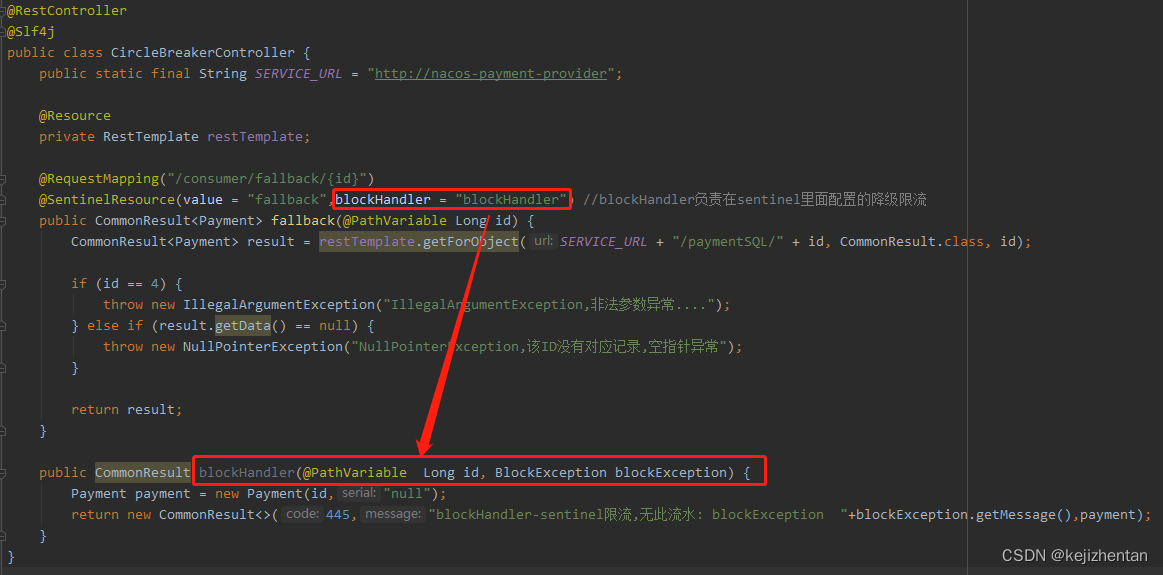
5) 只配置blockHandler,管配置违规
① 修改CircleBreakerController业务类
@RestController
@Slf4j
public class CircleBreakerController {
    public static final String SERVICE_URL = "http://nacos-payment-provider";

    @Resource
    private RestTemplate restTemplate;

    @RequestMapping("/consumer/fallback/{id}")
    @SentinelResource(value = "fallback",blockHandler = "blockHandler") //blockHandler负责在sentinel里面配置的降级限流
    public CommonResult<Payment> fallback(@PathVariable Long id) {
        CommonResult<Payment> result = restTemplate.getForObject(SERVICE_URL + "/paymentSQL/" + id, CommonResult.class, id);

        if (id == 4) {
            throw new IllegalArgumentException("IllegalArgumentException,非法参数异常....");
        } else if (result.getData() == null) {
            throw new NullPointerException("NullPointerException,该ID没有对应记录,空指针异常");
        }

        return result;
    }

    public CommonResult blockHandler(@PathVariable  Long id, BlockException blockException) {
        Payment payment = new Payment(id,"null");
        return new CommonResult<>(445,"blockHandler-sentinel限流,无此流水: blockException  "+blockException.getMessage(),payment);
    }
}
② 配置blockHandler,管配置违规时sentinel也需配置
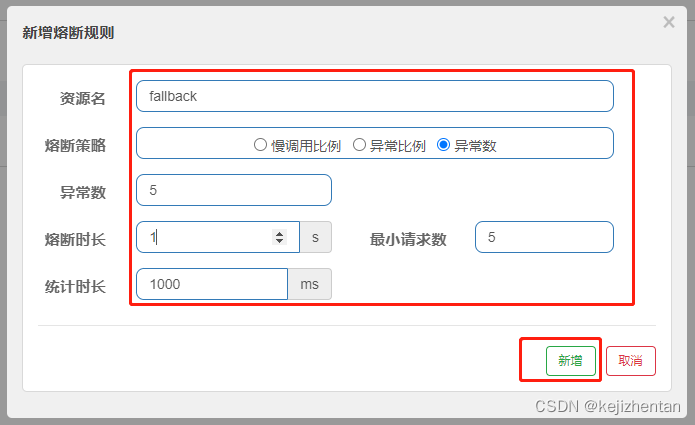
在1000毫秒,也就是1秒内,如果发送到/consumer/fallback/{id} 的请求数数量大于5,并且在这些请求中,出现5个以上异常,进入熔断状态。当熔断时长1秒后进入探测恢复状态,在探测恢复状态,若接下来的一个请求成功完成(没有错误)则结束熔断,否则会再次被熔断。
③ 测试
通过jmeter进行压测:http://localhost:84/consumer/fallback/10
结果如下:
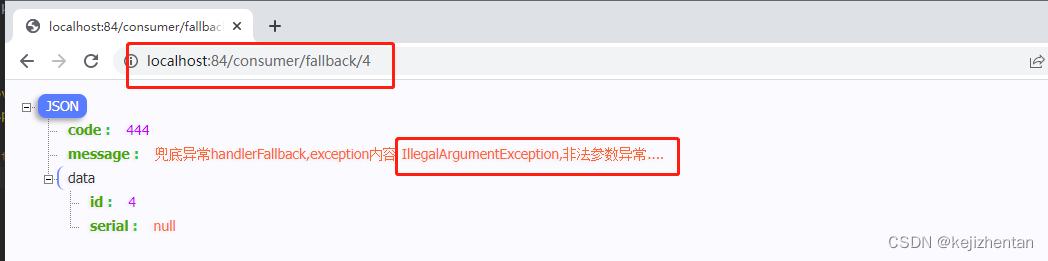
6) fallback和blockHandler都配置:如果既有配置违规问题,又有java运行时异常,则走配置违规问题的提示
① 修改CircleBreakerController业务类
@RestController
@Slf4j
public class CircleBreakerController {
    public static final String SERVICE_URL = "http://nacos-payment-provider";

    @Resource
    private RestTemplate restTemplate;

    @RequestMapping("/consumer/fallback/{id}")
    @SentinelResource(value = "fallback", fallback = "handlerFallback", blockHandler = "blockHandler")
    public CommonResult<Payment> fallback(@PathVariable Long id) {
        CommonResult<Payment> result = restTemplate.getForObject(SERVICE_URL + "/paymentSQL/" + id, CommonResult.class, id);
        if (id == 4) {
            throw new IllegalArgumentException("非法参数异常....");
        } else if (result.getData() == null) {
            throw new NullPointerException("NullPointerException,该ID没有对应记录");
        }
        return result;
    }

    public CommonResult handlerFallback(@PathVariable Long id, Throwable e) {
        Payment payment = new Payment(id, "null");
        return new CommonResult<>(444, "fallback,无此流水,exception  " + e.getMessage(), payment);
    }

    public CommonResult blockHandler(@PathVariable Long id, BlockException blockException) {
        Payment payment = new Payment(id, "null");
        return new CommonResult<>(445, "blockHandler-sentinel限流,无此流水: blockException  " + blockException.getMessage(), payment);
    }
}

② 配置blockHandler,管配置违规时sentinel也需配置
在1000毫秒,也就是1秒内,如果发送到/consumer/fallback/{id} 的请求数数量大于5,并且在这些请求中,出现5个以上异常,进入熔断状态。当熔断时长1秒后进入探测恢复状态,在探测恢复状态,若接下来的一个请求成功完成(没有错误)则结束熔断,否则会再次被熔断。
③ 测试
通过jmeter进行压测:http://localhost:84/consumer/fallback/10
若 blockHandler 和 fallback 都进行了配置,则被限流降级而抛出 BlockException 时只会进入 blockHandler 处理逻辑。
7) 忽略属性…
① 忽略属性配置之前的效果
@RestController
@Slf4j
public class CircleBreakerController {
    public static final String SERVICE_URL = "http://nacos-payment-provider";

    @Resource
    private RestTemplate restTemplate;

    @RequestMapping("/consumer/fallback/{id}")
    @SentinelResource(value = "fallback",fallback = "handlerFallback")//fallback负责业务异常
    public CommonResult<Payment> fallback(@PathVariable Long id) {
        CommonResult<Payment> result = restTemplate.getForObject(SERVICE_URL + "/paymentSQL/" + id, CommonResult.class, id);

        if (id == 4) {
            throw new IllegalArgumentException("IllegalArgumentException,非法参数异常....");
        } else if (result.getData() == null) {
            throw new NullPointerException("NullPointerException,该ID没有对应记录,空指针异常");
        }

        return result;
    }

    public CommonResult handlerFallback(@PathVariable  Long id,Throwable e) {
        Payment payment = new Payment(id,"null");
        return new CommonResult<>(444,"兜底异常handlerFallback,exception内容  "+e.getMessage(),payment);
    }

}
② 编码配置忽略属性
@RestController
@Slf4j
public class CircleBreakerController {
    public static final String SERVICE_URL = "http://nacos-payment-provider";

    @Resource
    private RestTemplate restTemplate;

    @RequestMapping("/consumer/fallback/{id}")
    @SentinelResource(value = "fallback",fallback = "handlerFallback",exceptionsToIgnore = {IllegalArgumentException.class})//fallback负责业务异常
    public CommonResult<Payment> fallback(@PathVariable Long id) {
        CommonResult<Payment> result = restTemplate.getForObject(SERVICE_URL + "/paymentSQL/" + id, CommonResult.class, id);

        if (id == 4) {
            throw new IllegalArgumentException("IllegalArgumentException,非法参数异常....");
        } else if (result.getData() == null) {
            throw new NullPointerException("NullPointerException,该ID没有对应记录,空指针异常");
        }

        return result;
    }

    public CommonResult handlerFallback(@PathVariable  Long id,Throwable e) {
        Payment payment = new Payment(id,"null");
        return new CommonResult<>(444,"兜底异常handlerFallback,exception内容  "+e.getMessage(),payment);
    }

}
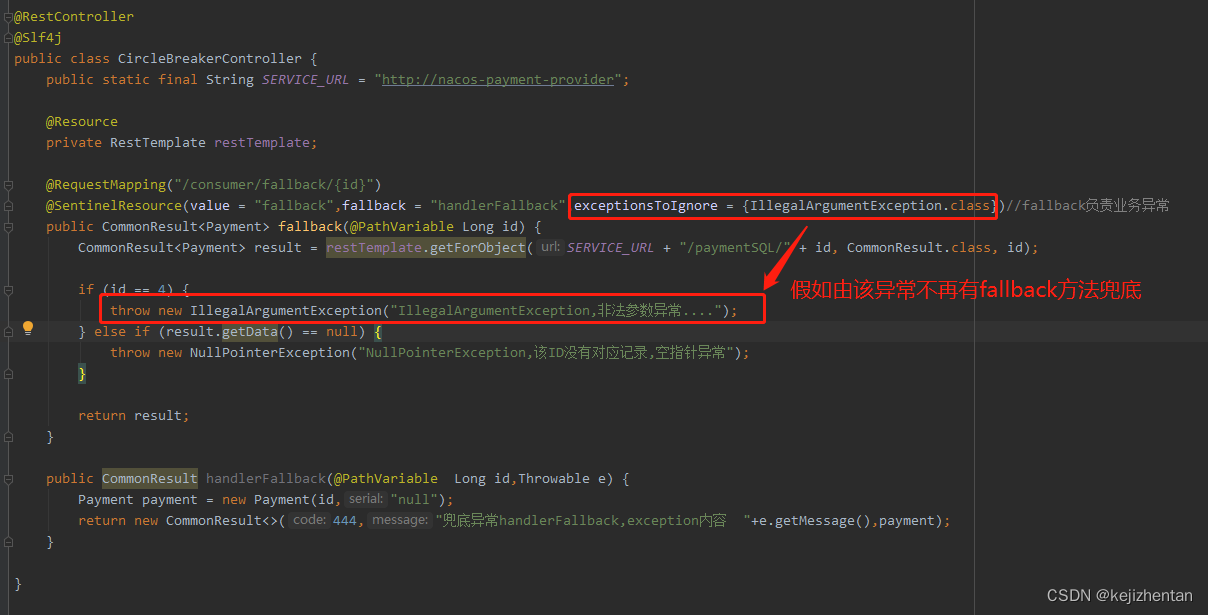
③ 测试效果如下:
访问:http://localhost:84/consumer/fallback/4
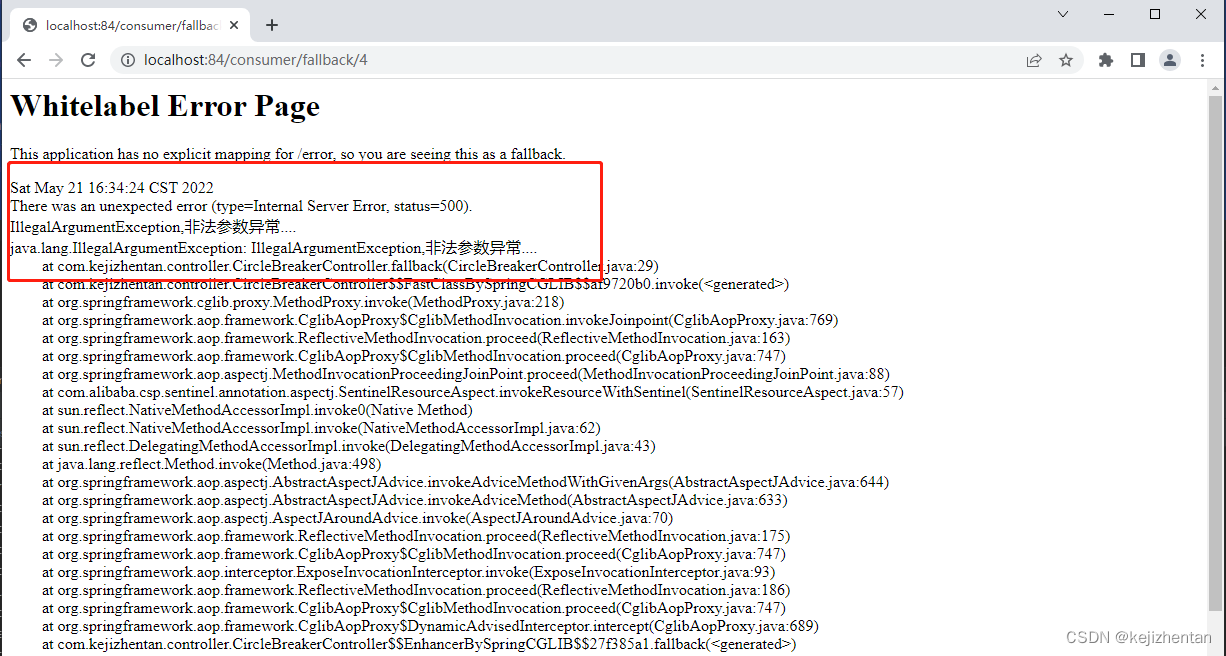
程序异常打到前台了,对用户不友好
⑵ Feign系列
1) 修改84模块:84消费者调用提供者9003(Feign组件一般是消费侧)
① 修改POM文件,添加feign依赖
<?xml version="1.0" encoding="UTF-8"?>
<project xmlns="http://maven.apache.org/POM/4.0.0"
         xmlns:xsi="http://www.w3.org/2001/XMLSchema-instance"
         xsi:schemaLocation="http://maven.apache.org/POM/4.0.0 http://maven.apache.org/xsd/maven-4.0.0.xsd">
    <parent>
        <artifactId>springcloud-project</artifactId>
        <groupId>com.kejizhentan.springcloud</groupId>
        <version>1.0-SNAPSHOT</version>
    </parent>
    <modelVersion>4.0.0</modelVersion>

    <artifactId>cloudalibaba-consumer-nacos-order84</artifactId>
    <dependencies>
        <!--SpringCloud openfeign -->
        <dependency>
            <groupId>org.springframework.cloud</groupId>
            <artifactId>spring-cloud-starter-openfeign</artifactId>
        </dependency>
        <!--SpringCloud ailibaba nacos -->
        <dependency>
            <groupId>com.alibaba.cloud</groupId>
            <artifactId>spring-cloud-starter-alibaba-nacos-discovery</artifactId>
        </dependency>
        <!--SpringCloud ailibaba sentinel -->
        <dependency>
            <groupId>com.alibaba.cloud</groupId>
            <artifactId>spring-cloud-starter-alibaba-sentinel</artifactId>
        </dependency>
        <!-- 引入自己定义的api通用包,可以使用Payment支付Entity -->
        <dependency>
            <groupId>com.kejizhentan.springcloud</groupId>
            <artifactId>cloud-api-commons</artifactId>
            <version>${project.version}</version>
        </dependency>
        <!-- SpringBoot整合Web组件 -->
        <dependency>
            <groupId>org.springframework.boot</groupId>
            <artifactId>spring-boot-starter-web</artifactId>
        </dependency>
        <dependency>
            <groupId>org.springframework.boot</groupId>
            <artifactId>spring-boot-starter-actuator</artifactId>
        </dependency>
        <!--日常通用jar包配置-->
        <dependency>
            <groupId>org.springframework.boot</groupId>
            <artifactId>spring-boot-devtools</artifactId>
            <scope>runtime</scope>
            <optional>true</optional>
        </dependency>
        <dependency>
            <groupId>org.projectlombok</groupId>
            <artifactId>lombok</artifactId>
            <optional>true</optional>
        </dependency>
        <dependency>
            <groupId>org.springframework.boot</groupId>
            <artifactId>spring-boot-starter-test</artifactId>
            <scope>test</scope>
        </dependency>
        <dependency>
            <groupId>org.projectlombok</groupId>
            <artifactId>lombok</artifactId>
            <version>1.18.16</version>
            <scope>compile</scope>
        </dependency>
    </dependencies>
</project>
② 修改YML文件:激活Sentinel对Feign的支持
server:
  port: 84


spring:
  application:
    name: nacos-order-consumer
  cloud:
    nacos:
      discovery:
        server-addr: localhost:8848
    sentinel:
      transport:
        #配置Sentinel dashboard地址
        dashboard: localhost:8080
        #默认8719端口,假如被占用会自动从8719开始依次+1扫描,直至找到未被占用的端口
        port: 8719

#消费者将要去访问的微服务名称(注册成功进nacos的微服务提供者)
service-url:
  nacos-user-service: http://nacos-payment-provider

# 激活Sentinel对Feign的支持
feign:
  sentinel:
    enabled: true
③ 业务类添加
○ 添加带@FeignClient注解的业务接口PaymentService
@FeignClient(value = "nacos-payment-provider", fallback = PaymentFallbackService.class)//调用中关闭9003服务提供者
public interface PaymentService {
    @GetMapping(value = "/paymentSQL/{id}")
    public CommonResult<Payment> paymentSQL(@PathVariable("id") Long id);
}
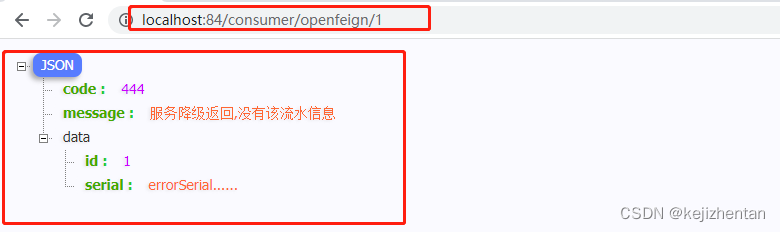
○ fallback = PaymentFallbackService.class指定的实现类PaymentFallbackService 类
@Component
public class PaymentFallbackService implements PaymentService {
    @Override
    public CommonResult<Payment> paymentSQL(Long id) {
        return new CommonResult<>(444, "服务降级返回,没有该流水信息", new Payment(id, "errorSerial......"));
    }
}
○ controller层的CircleBreakerController
@RestController
@Slf4j
public class CircleBreakerController {

    //==================OpenFeign
    @Resource
    private PaymentService paymentService;

    @GetMapping(value = "/consumer/openfeign/{id}")
    public CommonResult<Payment> paymentSQL(@PathVariable("id") Long id) {
        if (id == 4) {
            throw new RuntimeException("没有该id");
        }
        return paymentService.paymentSQL(id);
    }

}
○ 修改主启动类:添加@EnableFeignClients启动Feign的功能
@EnableDiscoveryClient
@SpringBootApplication
@EnableFeignClients
public class OrderNacosMain84 {
    public static void main(String[] args) {
        SpringApplication.run(OrderNacosMain84.class, args);
    }
}
④ 测试
启动nacos、9003、84
访问:http://localhost:84/consumer/openfeign/1
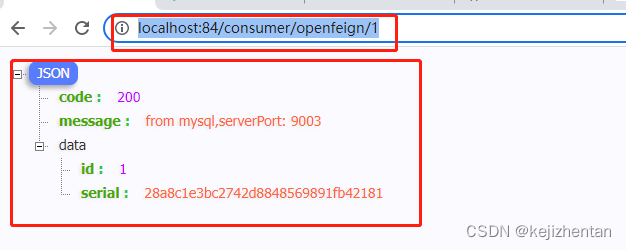
测试84调用9003,此时故意关闭9003微服务提供者,看84消费侧自动降级,不会被耗死
10. 熔断框架比较

11. 规则持久化
⑴ 规则持久化是什么
一旦我们重启应用,sentinel规则将消失,生产环境需要将配置规则进行持久化
⑵ 规则持久化怎么实现
将限流配置规则持久化进Nacos保存,只要刷新8401某个rest地址,sentinel控制台的流控规则就能看到,只要Nacos里面的配置不删除,针对8401上sentinel上的流控规则持续有效
⑶ 规则持久化步骤:修改cloudalibaba-sentinel-service8401
1) POM修改:添加nacos依赖
<!--SpringCloud ailibaba sentinel-datasource-nacos -->
<dependency>
    <groupId>com.alibaba.csp</groupId>
    <artifactId>sentinel-datasource-nacos</artifactId>
</dependency>
2)修改yml:添加Nacos数据源配置
server:
  port: 8401

spring:
  application:
    name: cloudalibaba-sentinel-service
  cloud:
    nacos:
      discovery:
        #Nacos服务注册中心地址
        server-addr: localhost:8848
    sentinel:
      transport:
        #配置Sentinel dashboard地址
        dashboard: localhost:8080
        #默认8719端口,假如被占用会自动从8719开始依次+1扫描,直至找到未被占用的端口
        port: 8719
      #添加Nacos数据源配置
      datasource:
        ds1:
          nacos:
            server-addr: localhost:8848
            dataId: cloudalibaba-sentinel-service
            groupId: DEFAULT_GROUP
            data-type: json
            rule-type: flow
management:
  endpoints:
    web:
      exposure:
        include: '*'
3) 添加Nacos业务规则配置
[
    {
        "resource": "/rateLimit/byUrl",
        "limitApp": "default",
        "grade": 1,
        "count": 1,
        "strategy": 0,
        "controlBehavior": 0,
        "clusterMode": false
    }
]

resource:资源名称;
limitApp:来源应用;
grade:阈值类型,0表示线程数,1表示QPS;
count:单机阈值;
strategy:流控模式,0表示直接,1表示关联,2表示链路;
controlBehavior:流控效果,0表示快速失败,1表示Warm Up,2表示排队等待;
clusterMode:是否集群。
4) 启动8401后访问http://localhost:8401/rateLimit/byUrl并刷新sentinel发现业务规则有了
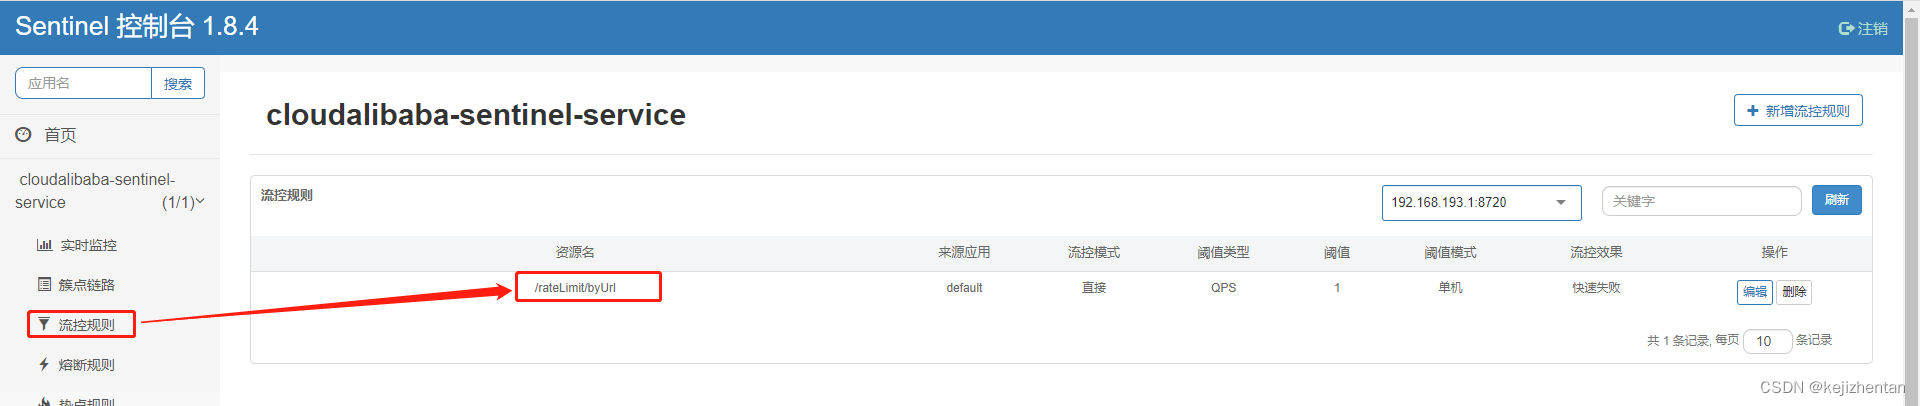
5) 测试
快速多次访问测试接口:http://localhost:8401/rateLimit/byUrl
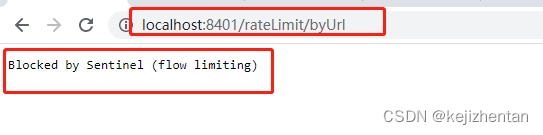
流控规则起作用了
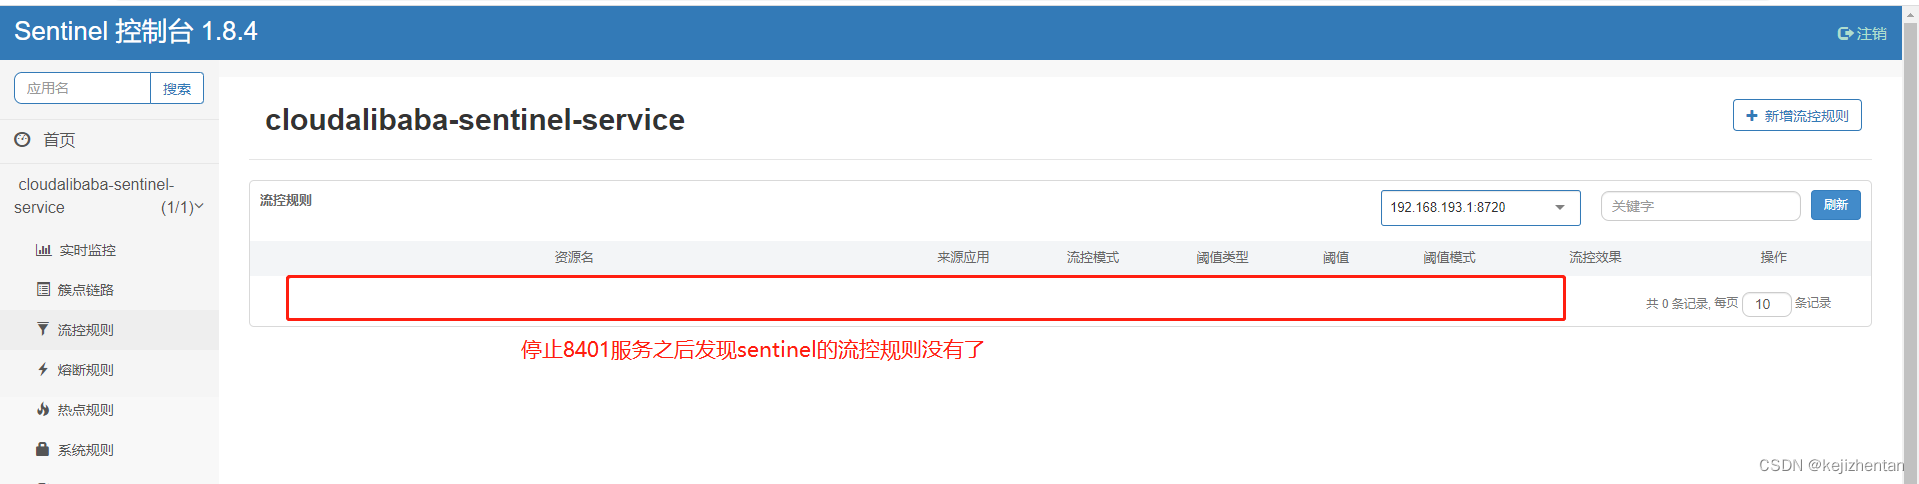
停止8401再看sentinel
重新启动8401后访问http://localhost:8401/rateLimit/byUrl并刷新sentinel发现业务规则有了

快速多次访问测试接口:http://localhost:8401/rateLimit/byUrl
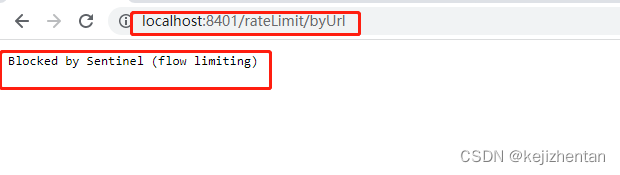
sentinel配置重新出现了,持久化验证通过,流控又起作用了
十八、SpringCloud Alibaba Seata处理分布式事务
1. 分布式事务问题
⑴ 分布式前:单机单库没这个问题(从一个系统一个数据库 1:1 -> 一个系统多个数据库 1:N -> 多个系统多个数据库 N:N)
⑵ 分布式之后
单体应用被拆分成微服务应用,原来的三个模块被拆分成三个独立的应用,分别使用三个独立的数据源,业务操作需要调用三个服务来完成。此时每个服务内部的数据一致性由本地事务来保证,但是全局的数据一致性问题没法保证。

一次业务操作需要跨多个数据源或需要跨多个系统进行远程调用,就会产生分布式事务问题
2. SpringCloud Alibaba Seata简介
⑴ SpringCloud Alibaba Seata是什么
Seata是一款开源的分布式事务解决方案,致力于在微服务架构下提供高性能和简单易用的分布式事务服务。
官网地址:http://seata.io/zh-cn/
⑵ SpringCloud Alibaba Seata能干嘛
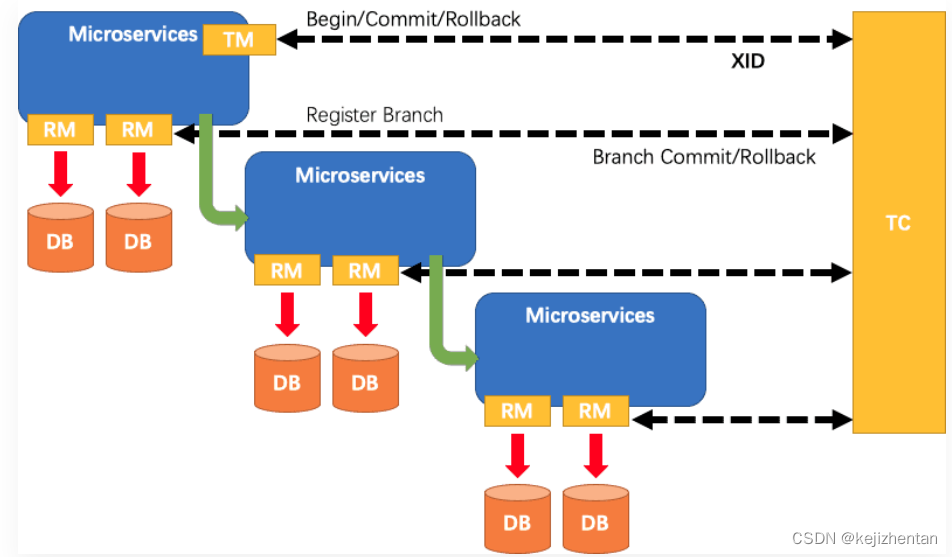
1) 一个典型的分布式事务过程:分布式事务处理过程的一ID+三组件模型
- Transaction ID XID:全局唯一的事务ID
- 3组件概念
Transaction Coordinator (TC):事务协调器,维护全局事务的运行状态,负责协调并驱动全局事务的提交或回滚;
Transaction Manager (TM): 控制全局事务的边界,负责开启一个全局事务,并最终发起全局提交或全局回滚的决议;
Resource Manager (RM):控制分支事务,负责分支注册、状态汇报,并接收事务协调器的指令,驱动分支(本地)事务的提交和回滚
2) SpringCloud Alibaba Seata处理过程
- TM 向 TC 申请开启一个全局事务,全局事务创建成功并生成一个全局唯一的 XID;
- XID 在微服务调用链路的上下文中传播;
- RM 向 TC 注册分支事务,将其纳入 XID 对应全局事务的管辖;
- TM 向 TC 发起针对 XID 的全局提交或回滚决议;
- TC 调度 XID 下管辖的全部分支事务完成提交或回滚请求。
⑶ SpringCloud Alibaba Seata 去哪下
发布说明: https://github.com/seata/seata/releases
⑷ SpringCloud Alibaba Seata 怎么用

本地
@Transactional,全局@GlobalTransactional
3. Seata-Server安装
⑴ 官网地址:http://seata.io/zh-cn/
⑵ 下载版本
github版本下载地址https://github.com/seata/seata/releases

官网已经1.5.1了,版本差异较大,我就用v0.9.0吧
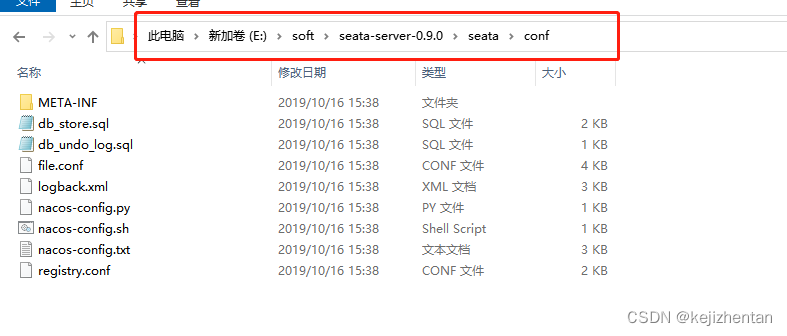
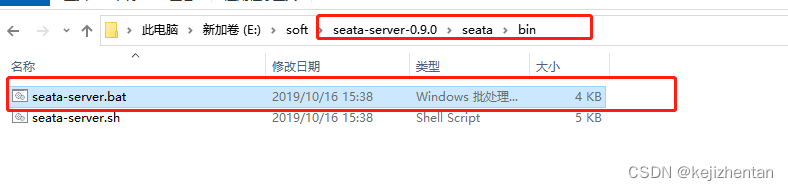
⑶seata-server-0.9.0.zip解压到指定目录并修改conf目录下的file.conf配置文件
主要修改:自定义事务组名称+事务日志存储模式为db+数据库连接信息
1) service模块修改
service {

  vgroup_mapping.my_test_tx_group = "fsp_tx_group"

  default.grouplist = "127.0.0.1:8091"
  enableDegrade = false
  disable = false
  max.commit.retry.timeout = "-1"
  max.rollback.retry.timeout = "-1"
}
2) store模块修改
## transaction log store
store {
  ## store mode: file、db
  mode = "db"

  ## file store
  file {
    dir = "sessionStore"

    # branch session size , if exceeded first try compress lockkey, still exceeded throws exceptions
    max-branch-session-size = 16384
    # globe session size , if exceeded throws exceptions
    max-global-session-size = 512
    # file buffer size , if exceeded allocate new buffer
    file-write-buffer-cache-size = 16384
    # when recover batch read size
    session.reload.read_size = 100
    # async, sync
    flush-disk-mode = async
  }

  ## database store
  db {
    ## the implement of javax.sql.DataSource, such as DruidDataSource(druid)/BasicDataSource(dbcp) etc.
    datasource = "dbcp"
    ## mysql/oracle/h2/oceanbase etc.
    db-type = "mysql"
    driver-class-name = "com.mysql.jdbc.Driver"
    url = "jdbc:mysql://127.0.0.1:3306/seata"
    user = "root"
    password = "你自己密码"
    min-conn = 1
    max-conn = 3
    global.table = "global_table"
    branch.table = "branch_table"
    lock-table = "lock_table"
    query-limit = 100
  }
}

⑷ mysql5.7数据库新建库seata
⑸ 在seata库里建表
1) 建表db_store.sql在\seata-server-0.9.0\seata\conf目录里面
-- the table to store GlobalSession data
DROP TABLE IF EXISTS `global_table`;
CREATE TABLE `global_table` (
  `xid` VARCHAR(128)  NOT NULL,
  `transaction_id` BIGINT,
  `status` TINYINT NOT NULL,
  `application_id` VARCHAR(32),
  `transaction_service_group` VARCHAR(32),
  `transaction_name` VARCHAR(128),
  `timeout` INT,
  `begin_time` BIGINT,
  `application_data` VARCHAR(2000),
  `gmt_create` DATETIME,
  `gmt_modified` DATETIME,
  PRIMARY KEY (`xid`),
  KEY `idx_gmt_modified_status` (`gmt_modified`, `status`),
  KEY `idx_transaction_id` (`transaction_id`)
);

-- the table to store BranchSession data
DROP TABLE IF EXISTS `branch_table`;
CREATE TABLE `branch_table` (
  `branch_id` BIGINT NOT NULL,
  `xid` VARCHAR(128) NOT NULL,
  `transaction_id` BIGINT ,
  `resource_group_id` VARCHAR(32),
  `resource_id` VARCHAR(256) ,
  `lock_key` VARCHAR(128) ,
  `branch_type` VARCHAR(8) ,
  `status` TINYINT,
  `client_id` VARCHAR(64),
  `application_data` VARCHAR(2000),
  `gmt_create` DATETIME,
  `gmt_modified` DATETIME,
  PRIMARY KEY (`branch_id`),
  KEY `idx_xid` (`xid`)
);

-- the table to store lock data
DROP TABLE IF EXISTS `lock_table`;
CREATE TABLE `lock_table` (
  `row_key` VARCHAR(128) NOT NULL,
  `xid` VARCHAR(96),
  `transaction_id` LONG ,
  `branch_id` LONG,
  `resource_id` VARCHAR(256) ,
  `table_name` VARCHAR(32) ,
  `pk` VARCHAR(36) ,
  `gmt_create` DATETIME ,
  `gmt_modified` DATETIME,
  PRIMARY KEY(`row_key`)
);
2) 把建表语句粘到mysql中执行即可
⑹ 修改seata-server-0.9.0\seata\conf目录下的registry.conf配置文件
registry {
  # file 、nacos 、eureka、redis、zk、consul、etcd3、sofa
  type = "nacos"

  nacos {
    serverAddr = "localhost:8848"
    namespace = ""
    cluster = "default"
  }
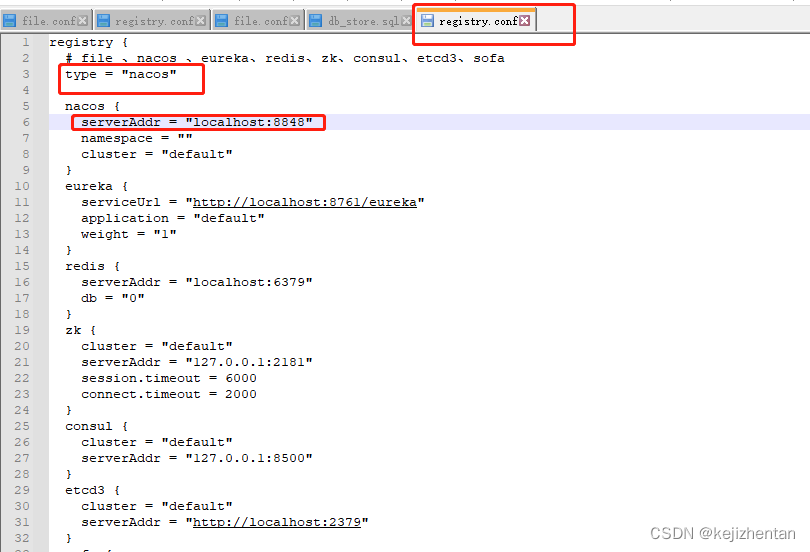
目的是:指明注册中心为nacos,及修改nacos连接信息
⑺ 先启动Nacos端口号8848,再启动再启动seata-server
startup.cmd -m standalone
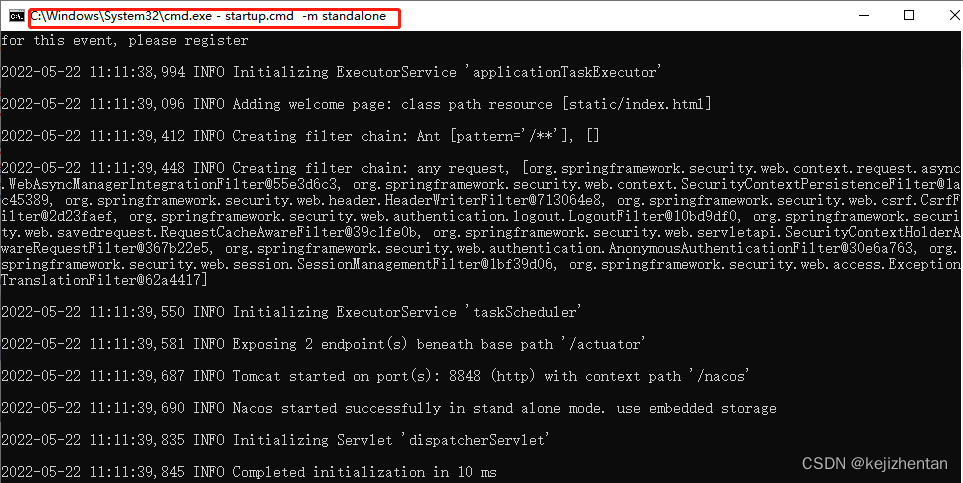
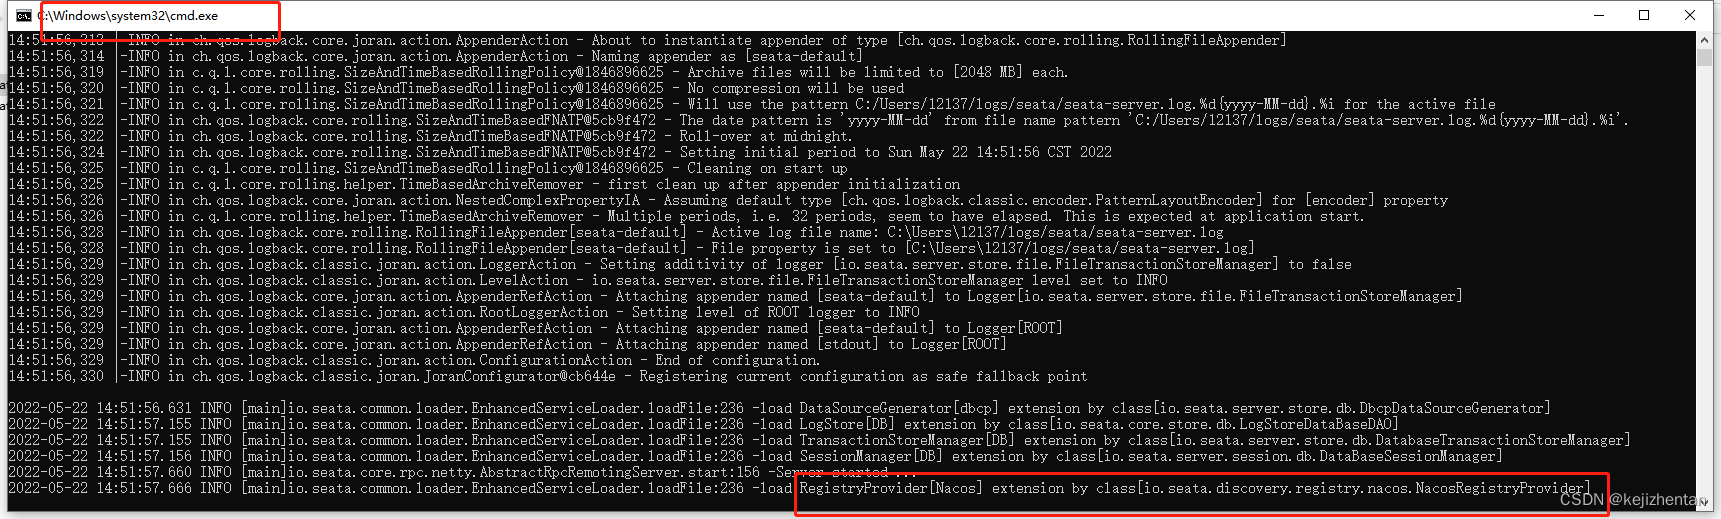
如果提示了加载注册等信息说明seata启动成功
4. 订单/库存/账户业务数据库准备
先启动Nacos后启动Seata,保证两个都OK。Seata没启动报错no available server to connect
⑴ 分布式事务业务说明
这里我们会创建三个服务,一个订单服务,一个库存服务,一个账户服务。
当用户下单时,会在订单服务中创建一个订单,然后通过远程调用库存服务来扣减下单商品的库存,
再通过远程调用账户服务来扣减用户账户里面的余额,最后在订单服务中修改订单状态为已完成。
该操作跨越三个数据库,有两次远程调用,很明显会有分布式事务问题。
下订单—>扣库存—>减账户(余额)
⑵ 创建业务数据库
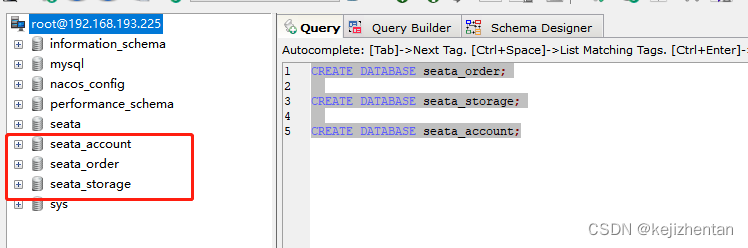
- seata_order:存储订单的数据库;
- seata_storage:存储库存的数据库;
- seata_account:存储账户信息的数据库。
建库语句:
CREATE DATABASE seata_order;

CREATE DATABASE seata_storage;

CREATE DATABASE seata_account;
⑶ 按照上述3库分别建对应业务表
-
seata_order库下建t_order表
CREATE TABLE t_order (
  `id` BIGINT(11) NOT NULL AUTO_INCREMENT PRIMARY KEY,
  `user_id` BIGINT(11) DEFAULT NULL COMMENT '用户id',
  `product_id` BIGINT(11) DEFAULT NULL COMMENT '产品id',
  `count` INT(11) DEFAULT NULL COMMENT '数量',
  `money` DECIMAL(11,0) DEFAULT NULL COMMENT '金额',
  `status` INT(1) DEFAULT NULL COMMENT '订单状态:0:创建中;1:已完结'
) ENGINE=INNODB AUTO_INCREMENT=7 DEFAULT CHARSET=utf8;

SELECT * FROM t_order;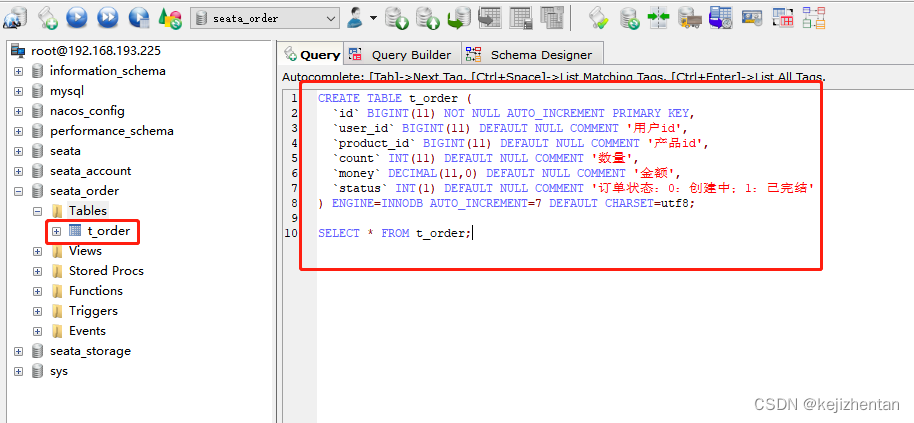
-
seata_storage库下建t_storage 表
CREATE TABLE t_storage (
 `id` BIGINT(11) NOT NULL AUTO_INCREMENT PRIMARY KEY,
 `product_id` BIGINT(11) DEFAULT NULL COMMENT '产品id',
 `total` INT(11) DEFAULT NULL COMMENT '总库存',
 `used` INT(11) DEFAULT NULL COMMENT '已用库存',
 `residue` INT(11) DEFAULT NULL COMMENT '剩余库存'
) ENGINE=INNODB AUTO_INCREMENT=2 DEFAULT CHARSET=utf8;


INSERT INTO seata_storage.t_storage(`id`, `product_id`, `total`, `used`, `residue`)
VALUES ('1', '1', '100', '0', '100');

SELECT * FROM t_storage;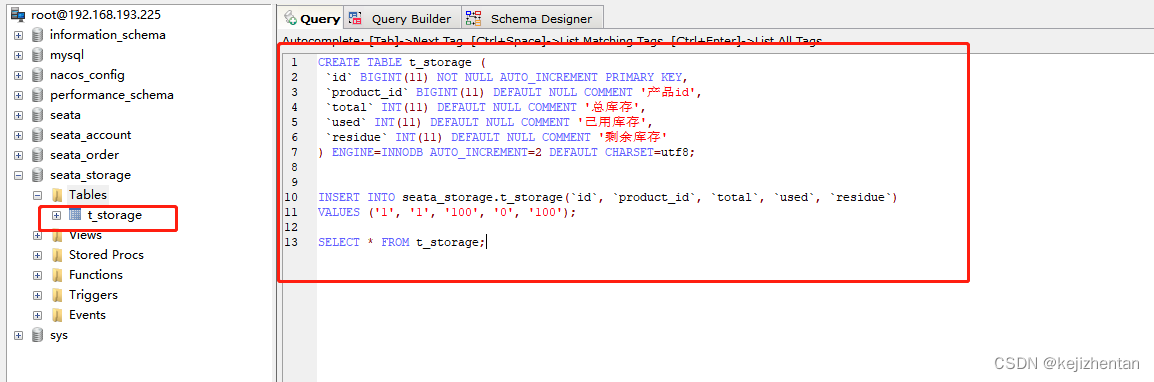
-
seata_account库下建t_account 表
CREATE TABLE t_account (
  `id` BIGINT(11) NOT NULL AUTO_INCREMENT PRIMARY KEY COMMENT 'id',
  `user_id` BIGINT(11) DEFAULT NULL COMMENT '用户id',
  `total` DECIMAL(10,0) DEFAULT NULL COMMENT '总额度',
  `used` DECIMAL(10,0) DEFAULT NULL COMMENT '已用余额',
  `residue` DECIMAL(10,0) DEFAULT '0' COMMENT '剩余可用额度'
) ENGINE=INNODB AUTO_INCREMENT=2 DEFAULT CHARSET=utf8;

INSERT INTO seata_account.t_account(`id`, `user_id`, `total`, `used`, `residue`)  VALUES ('1', '1', '1000', '0', '1000');

SELECT * FROM t_account;
⑷ 按照上述3库分别建对应的回滚日志表
订单-库存-账户3个库下都需要建各自的回滚日志表
建表语句如下:
-- the table to store seata xid data
-- 0.7.0+ add context
-- you must to init this sql for you business databese. the seata server not need it.
-- 此脚本必须初始化在你当前的业务数据库中,用于AT 模式XID记录。与server端无关(注:业务数据库)
-- 注意此处0.3.0+ 增加唯一索引 ux_undo_log
DROP TABLE `undo_log`;

CREATE TABLE `undo_log` (
  `id` BIGINT(20) NOT NULL AUTO_INCREMENT,
  `branch_id` BIGINT(20) NOT NULL,
  `xid` VARCHAR(100) NOT NULL,
  `context` VARCHAR(128) NOT NULL,
  `rollback_info` LONGBLOB NOT NULL,
  `log_status` INT(11) NOT NULL,
  `log_created` DATETIME NOT NULL,
  `log_modified` DATETIME NOT NULL,
  `ext` VARCHAR(100) DEFAULT NULL,
  PRIMARY KEY (`id`),
  UNIQUE KEY `ux_undo_log` (`xid`,`branch_id`)
) ENGINE=INNODB AUTO_INCREMENT=1 DEFAULT CHARSET=utf8;
最终效果如下:

5. 订单/库存/账户业务微服务准备
业务要求:

order-moduel、stotage-module、account-module中的file.conf和registry.conf是一样的,如果配的有问题记得注意一下
⑴ 新建订单Order-Module
1) 新建项目 seata-order-service2001

2)修改pom文件
<?xml version="1.0" encoding="UTF-8"?>
<project xmlns="http://maven.apache.org/POM/4.0.0"
         xmlns:xsi="http://www.w3.org/2001/XMLSchema-instance"
         xsi:schemaLocation="http://maven.apache.org/POM/4.0.0 http://maven.apache.org/xsd/maven-4.0.0.xsd">
    <parent>
        <artifactId>springcloud-project</artifactId>
        <groupId>com.kejizhentan.springcloud</groupId>
        <version>1.0-SNAPSHOT</version>
    </parent>
    <modelVersion>4.0.0</modelVersion>

    <artifactId>seata-order-service2001</artifactId>

    <dependencies>
        <!--nacos-->
        <dependency>
            <groupId>com.alibaba.cloud</groupId>
            <artifactId>spring-cloud-starter-alibaba-nacos-discovery</artifactId>
        </dependency>
        <!--seata-->
        <dependency>
            <groupId>com.alibaba.cloud</groupId>
            <artifactId>spring-cloud-starter-alibaba-seata</artifactId>
            <exclusions>
                <exclusion>
                    <artifactId>seata-all</artifactId>
                    <groupId>io.seata</groupId>
                </exclusion>
            </exclusions>
        </dependency>
        <dependency>
            <groupId>io.seata</groupId>
            <artifactId>seata-all</artifactId>
            <version>0.9.0</version>
        </dependency>
        <!--feign-->
        <dependency>
            <groupId>org.springframework.cloud</groupId>
            <artifactId>spring-cloud-starter-openfeign</artifactId>
        </dependency>
        <!--web-actuator-->
        <dependency>
            <groupId>org.springframework.boot</groupId>
            <artifactId>spring-boot-starter-web</artifactId>
        </dependency>
        <dependency>
            <groupId>org.springframework.boot</groupId>
            <artifactId>spring-boot-starter-actuator</artifactId>
        </dependency>
        <!--mysql-druid-->
        <dependency>
            <groupId>mysql</groupId>
            <artifactId>mysql-connector-java</artifactId>
            <version>5.1.37</version>
        </dependency>
        <dependency>
            <groupId>com.alibaba</groupId>
            <artifactId>druid-spring-boot-starter</artifactId>
            <version>1.1.10</version>
        </dependency>
        <dependency>
            <groupId>org.mybatis.spring.boot</groupId>
            <artifactId>mybatis-spring-boot-starter</artifactId>
            <version>2.0.0</version>
        </dependency>
        <dependency>
            <groupId>org.springframework.boot</groupId>
            <artifactId>spring-boot-starter-test</artifactId>
            <scope>test</scope>
        </dependency>
        <dependency>
            <groupId>org.projectlombok</groupId>
            <artifactId>lombok</artifactId>
            <optional>true</optional>
        </dependency>
    </dependencies>

</project>
3)创建seata-order-service2001的YML和主启动:可以通过JBLSpringBootAppGen插件生成

4)修改application.yml
server:
  port: 2001

spring:
  application:
    name: seata-order-service
  cloud:
    alibaba:
      seata:
        #自定义事务组名称需要与seata-server中的对应
        tx-service-group: fsp_tx_group
    nacos:
      discovery:
        server-addr: localhost:8848
  datasource:
    driver-class-name: com.mysql.jdbc.Driver
    jdbc: jdbc:mysql://192.168.193.225:3306/seata_order?useUnicode=true&characterEncoding=utf-8&useSSL=false
    username: root
    password: 123456

feign:
  hystrix:
    enabled: false

logging:
  level:
    io:
      seata: info

mybatis:
  mapperLocations: classpath:mapper/*.xml
5)在 resources文件夹下新建file.conf和registry.conf
① file.conf
transport {
  # tcp udt unix-domain-socket
  type = "TCP"
  #NIO NATIVE
  server = "NIO"
  #enable heartbeat
  heartbeat = true
  #thread factory for netty
  thread-factory {
    boss-thread-prefix = "NettyBoss"
    worker-thread-prefix = "NettyServerNIOWorker"
    server-executor-thread-prefix = "NettyServerBizHandler"
    share-boss-worker = false
    client-selector-thread-prefix = "NettyClientSelector"
    client-selector-thread-size = 1
    client-worker-thread-prefix = "NettyClientWorkerThread"
    # netty boss thread size,will not be used for UDT
    boss-thread-size = 1
    #auto default pin or 8
    worker-thread-size = 8
  }
  shutdown {
    # when destroy server, wait seconds
    wait = 3
  }
  serialization = "seata"
  compressor = "none"
}

service {

  vgroup_mapping.fsp_tx_group = "default" #修改自定义事务组名称

  default.grouplist = "127.0.0.1:8091"
  enableDegrade = false
  disable = false
  max.commit.retry.timeout = "-1"
  max.rollback.retry.timeout = "-1"
  disableGlobalTransaction = false
}


client {
  async.commit.buffer.limit = 10000
  lock {
    retry.internal = 10
    retry.times = 30
  }
  report.retry.count = 5
  tm.commit.retry.count = 1
  tm.rollback.retry.count = 1
}

## transaction log store
store {
  ## store mode: file、db
  mode = "db"

  ## file store
  file {
    dir = "sessionStore"

    # branch session size , if exceeded first try compress lockkey, still exceeded throws exceptions
    max-branch-session-size = 16384
    # globe session size , if exceeded throws exceptions
    max-global-session-size = 512
    # file buffer size , if exceeded allocate new buffer
    file-write-buffer-cache-size = 16384
    # when recover batch read size
    session.reload.read_size = 100
    # async, sync
    flush-disk-mode = async
  }

  ## database store
  db {
    ## the implement of javax.sql.DataSource, such as DruidDataSource(druid)/BasicDataSource(dbcp) etc.
    datasource = "dbcp"
    ## mysql/oracle/h2/oceanbase etc.
    db-type = "mysql"
    driver-class-name = "com.mysql.jdbc.Driver"
    url = "jdbc:mysql://127.0.0.1:3306/seata"
    user = "root"
    password = "123456"
    min-conn = 1
    max-conn = 3
    global.table = "global_table"
    branch.table = "branch_table"
    lock-table = "lock_table"
    query-limit = 100
  }
}
lock {
  ## the lock store mode: local、remote
  mode = "remote"

  local {
    ## store locks in user's database
  }

  remote {
    ## store locks in the seata's server
  }
}
recovery {
  #schedule committing retry period in milliseconds
  committing-retry-period = 1000
  #schedule asyn committing retry period in milliseconds
  asyn-committing-retry-period = 1000
  #schedule rollbacking retry period in milliseconds
  rollbacking-retry-period = 1000
  #schedule timeout retry period in milliseconds
  timeout-retry-period = 1000
}

transaction {
  undo.data.validation = true
  undo.log.serialization = "jackson"
  undo.log.save.days = 7
  #schedule delete expired undo_log in milliseconds
  undo.log.delete.period = 86400000
  undo.log.table = "undo_log"
}

## metrics settings
metrics {
  enabled = false
  registry-type = "compact"
  # multi exporters use comma divided
  exporter-list = "prometheus"
  exporter-prometheus-port = 9898
}

support {
  ## spring
  spring {
    # auto proxy the DataSource bean
    datasource.autoproxy = false
  }
}

② registry.conf
registry {
  # file 、nacos 、eureka、redis、zk、consul、etcd3、sofa
  type = "nacos"

  nacos {
    serverAddr = "localhost:8848"
    namespace = ""
    cluster = "default"
  }
  eureka {
    serviceUrl = "http://localhost:8761/eureka"
    application = "default"
    weight = "1"
  }
  redis {
    serverAddr = "localhost:6379"
    db = "0"
  }
  zk {
    cluster = "default"
    serverAddr = "127.0.0.1:2181"
    session.timeout = 6000
    connect.timeout = 2000
  }
  consul {
    cluster = "default"
    serverAddr = "127.0.0.1:8500"
  }
  etcd3 {
    cluster = "default"
    serverAddr = "http://localhost:2379"
  }
  sofa {
    serverAddr = "127.0.0.1:9603"
    application = "default"
    region = "DEFAULT_ZONE"
    datacenter = "DefaultDataCenter"
    cluster = "default"
    group = "SEATA_GROUP"
    addressWaitTime = "3000"
  }
  file {
    name = "file.conf"
  }
}

config {
  # file、nacos 、apollo、zk、consul、etcd3
  type = "file"

  nacos {
    serverAddr = "localhost"
    namespace = ""
  }
  consul {
    serverAddr = "127.0.0.1:8500"
  }
  apollo {
    app.id = "seata-server"
    apollo.meta = "http://192.168.1.204:8801"
  }
  zk {
    serverAddr = "127.0.0.1:2181"
    session.timeout = 6000
    connect.timeout = 2000
  }
  etcd3 {
    serverAddr = "http://localhost:2379"
  }
  file {
    name = "file.conf"
  }
}

6)实体类
CommonResult.java
@Data
@AllArgsConstructor
@NoArgsConstructor
public class CommonResult<T> {
    private Integer code;
    private String message;
    private T data;

    public CommonResult(Integer code, String message) {
        this(code, message, null);
    }
}
Order.java
@Data
@AllArgsConstructor
@NoArgsConstructor
public class Order {
    private Long id;

    private Long userId;

    private Long productId;

    private Integer count;

    private BigDecimal money;

    /**
     * 订单状态:0:创建中;1:已完结
     */
    private Integer status;
}
7)Dao接口及配置文件
① OrderDao.java
@Mapper
public interface OrderDao {

    /**
     * 创建订单
     */
    void create(Order order);

    /**
     * 修改订单金额
     */
    void update(@Param("userId") Long userId, @Param("status") Integer status);
}
② resources文件夹下新建mapper文件夹后添加OrderMapper.xml
<?xml version="1.0" encoding="UTF-8" ?>
<!DOCTYPE mapper PUBLIC "-//mybatis.org//DTD Mapper 3.0//EN" "http://mybatis.org/dtd/mybatis-3-mapper.dtd" >

<mapper namespace="com.kejizhentan.dao.OrderDao">

    <resultMap id="BaseResultMap" type="com.kejizhentan.bean.Order">
        <id column="id" property="id" jdbcType="BIGINT"/>
        <result column="user_id" property="userId" jdbcType="BIGINT"/>
        <result column="product_id" property="productId" jdbcType="BIGINT"/>
        <result column="count" property="count" jdbcType="INTEGER"/>
        <result column="money" property="money" jdbcType="DECIMAL"/>
        <result column="status" property="status" jdbcType="INTEGER"/>
    </resultMap>

    <insert id="create">
        INSERT INTO `t_order` (`id`, `user_id`, `product_id`, `count`, `money`, `status`)
        VALUES (NULL, #{userId}, #{productId}, #{count}, #{money}, 0);
    </insert>

    <update id="update">
        UPDATE `t_order`
        SET status = 1
        WHERE user_id = #{userId} AND status = #{status};
    </update>
</mapper>
8)Service接口及实现
① OrderService和实现类OrderServiceImpl
OrderService.java
public interface OrderService {

    /**
     * 创建订单
     */
    void create(Order order);
}
OrderServiceImpl.java
@Service
@Slf4j
public class OrderServiceImpl implements OrderService {
    @Resource
    private OrderDao orderDao;

    @Resource
    private StorageService storageService;

    @Resource
    private AccountService accountService;

    /**
     * 创建订单->调用库存服务扣减库存->调用账户服务扣减账户余额->修改订单状态
     * 简单说:
     * 下订单->减库存->减余额->改状态
     */
    @Override
    @GlobalTransactional(name = "fsp-create-order", rollbackFor = Exception.class)
    public void create(Order order) {
        log.info("------->下单开始");
        //本应用创建订单
        orderDao.create(order);

        //远程调用库存服务扣减库存
        log.info("------->order-service中扣减库存开始");
        storageService.decrease(order.getProductId(), order.getCount());
        log.info("------->order-service中扣减库存结束");

        //远程调用账户服务扣减余额
        log.info("------->order-service中扣减余额开始");
        accountService.decrease(order.getUserId(), order.getMoney());
        log.info("------->order-service中扣减余额结束");

        //修改订单状态为已完成
        log.info("------->order-service中修改订单状态开始");
        orderDao.update(order.getUserId(), 0);
        log.info("------->order-service中修改订单状态结束");

        log.info("------->下单结束");
    }
}
② StorageService
@FeignClient(value = "seata-storage-service")
public interface StorageService {

    /**
     * 扣减库存
     */
    @PostMapping(value = "/storage/decrease")
    CommonResult decrease(@RequestParam("productId") Long productId, @RequestParam("count") Integer count);
}
③ AccountService
@FeignClient(value = "seata-account-service")
public interface AccountService {

    /**
     * 扣减账户余额
     */
    //@RequestMapping(value = "/account/decrease", method = RequestMethod.POST, produces = "application/json; charset=UTF-8")
    @PostMapping("/account/decrease")
    CommonResult decrease(@RequestParam("userId") Long userId, @RequestParam("money") BigDecimal money);
}
9)Controller
@RestController
public class OrderController {

    @Autowired
    private OrderService orderService;

    /**
     * 创建订单
     */
    @GetMapping("/order/create")
    public CommonResult create(Order order) {
        orderService.create(order);
        return new CommonResult(200, "订单创建成功!");
    }
}
10)Config配置
① MyBatisConfig
@Configuration
@MapperScan({"com.kejizhentan.dao"})
public class MyBatisConfig {
}
② DataSourceProxyConfig
@Configuration
public class DataSourceProxyConfig {

    @Value("${mybatis.mapperLocations}")
    private String mapperLocations;

    @Bean
    @ConfigurationProperties(prefix = "spring.datasource")
    public DataSource druidDataSource() {
        return new DruidDataSource();
    }

    @Bean
    public DataSourceProxy dataSourceProxy(DataSource dataSource) {
        return new DataSourceProxy(dataSource);
    }

    @Bean
    public SqlSessionFactory sqlSessionFactoryBean(DataSourceProxy dataSourceProxy) throws Exception {
        SqlSessionFactoryBean sqlSessionFactoryBean = new SqlSessionFactoryBean();
        sqlSessionFactoryBean.setDataSource(dataSourceProxy);
        sqlSessionFactoryBean.setMapperLocations(new PathMatchingResourcePatternResolver().getResources(mapperLocations));
        sqlSessionFactoryBean.setTransactionFactory(new SpringManagedTransactionFactory());
        return sqlSessionFactoryBean.getObject();
    }

}
11)修改主启动类
@EnableDiscoveryClient
@EnableFeignClients
@SpringBootApplication(exclude = DataSourceAutoConfiguration.class)//取消数据源的自动创建
public class SeataOrderMainApp2001 {

    public static void main(String[] args) {
        SpringApplication.run(SeataOrderMainApp2001.class, args);
    }
}
⑵ 新建库存Storage-Module
1) 新建seata-storage-service2002项目

2) 修改POM文件
<?xml version="1.0" encoding="UTF-8"?>
<project xmlns="http://maven.apache.org/POM/4.0.0"
         xmlns:xsi="http://www.w3.org/2001/XMLSchema-instance"
         xsi:schemaLocation="http://maven.apache.org/POM/4.0.0 http://maven.apache.org/xsd/maven-4.0.0.xsd">
    <parent>
        <artifactId>springcloud-project</artifactId>
        <groupId>com.kejizhentan.springcloud</groupId>
        <version>1.0-SNAPSHOT</version>
    </parent>
    <modelVersion>4.0.0</modelVersion>

    <artifactId>seata-storage-service2002</artifactId>
    <dependencies>
        <!--nacos-->
        <dependency>
            <groupId>com.alibaba.cloud</groupId>
            <artifactId>spring-cloud-starter-alibaba-nacos-discovery</artifactId>
        </dependency>
        <!--seata-->
        <dependency>
            <groupId>com.alibaba.cloud</groupId>
            <artifactId>spring-cloud-starter-alibaba-seata</artifactId>
            <exclusions>
                <exclusion>
                    <artifactId>seata-all</artifactId>
                    <groupId>io.seata</groupId>
                </exclusion>
            </exclusions>
        </dependency>
        <dependency>
            <groupId>io.seata</groupId>
            <artifactId>seata-all</artifactId>
            <version>0.9.0</version>
        </dependency>
        <!--feign-->
        <dependency>
            <groupId>org.springframework.cloud</groupId>
            <artifactId>spring-cloud-starter-openfeign</artifactId>
        </dependency>
        <dependency>
            <groupId>org.springframework.boot</groupId>
            <artifactId>spring-boot-starter-web</artifactId>
        </dependency>
        <dependency>
            <groupId>org.springframework.boot</groupId>
            <artifactId>spring-boot-starter-test</artifactId>
            <scope>test</scope>
        </dependency>
        <dependency>
            <groupId>org.mybatis.spring.boot</groupId>
            <artifactId>mybatis-spring-boot-starter</artifactId>
            <version>2.0.0</version>
        </dependency>
        <dependency>
            <groupId>mysql</groupId>
            <artifactId>mysql-connector-java</artifactId>
            <version>5.1.37</version>
        </dependency>
        <dependency>
            <groupId>com.alibaba</groupId>
            <artifactId>druid-spring-boot-starter</artifactId>
            <version>1.1.10</version>
        </dependency>
        <dependency>
            <groupId>org.projectlombok</groupId>
            <artifactId>lombok</artifactId>
            <optional>true</optional>
        </dependency>
    </dependencies>

</project>
3)创建seata-storage-service2002的YML和主启动:可以通过JBLSpringBootAppGen插件生成
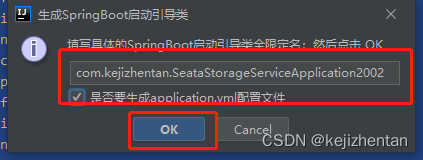
4) 修改YML
server:
  port: 2002

spring:
  application:
    name: seata-storage-service
  cloud:
    alibaba:
      seata:
        tx-service-group: fsp_tx_group
    nacos:
      discovery:
        server-addr: localhost:8848
  datasource:
    driver-class-name: com.mysql.jdbc.Driver
    url: jdbc:mysql://192.168.193.225:3306/seata_storage?useUnicode=true&characterEncoding=utf-8&useSSL=false
    username: root
    password: 123456

logging:
  level:
    io:
      seata: info

mybatis:
  mapperLocations: classpath:mapper/*.xml
5)在 resources文件夹下新建file.conf和registry.conf
① file.conf
transport {
  # tcp udt unix-domain-socket
  type = "TCP"
  #NIO NATIVE
  server = "NIO"
  #enable heartbeat
  heartbeat = true
  #thread factory for netty
  thread-factory {
    boss-thread-prefix = "NettyBoss"
    worker-thread-prefix = "NettyServerNIOWorker"
    server-executor-thread-prefix = "NettyServerBizHandler"
    share-boss-worker = false
    client-selector-thread-prefix = "NettyClientSelector"
    client-selector-thread-size = 1
    client-worker-thread-prefix = "NettyClientWorkerThread"
    # netty boss thread size,will not be used for UDT
    boss-thread-size = 1
    #auto default pin or 8
    worker-thread-size = 8
  }
  shutdown {
    # when destroy server, wait seconds
    wait = 3
  }
  serialization = "seata"
  compressor = "none"
}

service {

  vgroup_mapping.fsp_tx_group = "default" #修改自定义事务组名称

  default.grouplist = "127.0.0.1:8091"
  enableDegrade = false
  disable = false
  max.commit.retry.timeout = "-1"
  max.rollback.retry.timeout = "-1"
  disableGlobalTransaction = false
}


client {
  async.commit.buffer.limit = 10000
  lock {
    retry.internal = 10
    retry.times = 30
  }
  report.retry.count = 5
  tm.commit.retry.count = 1
  tm.rollback.retry.count = 1
}

## transaction log store
store {
  ## store mode: file、db
  mode = "db"

  ## file store
  file {
    dir = "sessionStore"

    # branch session size , if exceeded first try compress lockkey, still exceeded throws exceptions
    max-branch-session-size = 16384
    # globe session size , if exceeded throws exceptions
    max-global-session-size = 512
    # file buffer size , if exceeded allocate new buffer
    file-write-buffer-cache-size = 16384
    # when recover batch read size
    session.reload.read_size = 100
    # async, sync
    flush-disk-mode = async
  }

  ## database store
  db {
    ## the implement of javax.sql.DataSource, such as DruidDataSource(druid)/BasicDataSource(dbcp) etc.
    datasource = "dbcp"
    ## mysql/oracle/h2/oceanbase etc.
    db-type = "mysql"
    driver-class-name = "com.mysql.jdbc.Driver"
    url = "jdbc:mysql://192.168.193.225:3306/seata?useUnicode=true&characterEncoding=utf-8&useSSL=false"
    user = "root"
    password = "123456"
    min-conn = 1
    max-conn = 3
    global.table = "global_table"
    branch.table = "branch_table"
    lock-table = "lock_table"
    query-limit = 100
  }
}
lock {
  ## the lock store mode: local、remote
  mode = "remote"

  local {
    ## store locks in user's database
  }

  remote {
    ## store locks in the seata's server
  }
}
recovery {
  #schedule committing retry period in milliseconds
  committing-retry-period = 1000
  #schedule asyn committing retry period in milliseconds
  asyn-committing-retry-period = 1000
  #schedule rollbacking retry period in milliseconds
  rollbacking-retry-period = 1000
  #schedule timeout retry period in milliseconds
  timeout-retry-period = 1000
}

transaction {
  undo.data.validation = true
  undo.log.serialization = "jackson"
  undo.log.save.days = 7
  #schedule delete expired undo_log in milliseconds
  undo.log.delete.period = 86400000
  undo.log.table = "undo_log"
}

## metrics settings
metrics {
  enabled = false
  registry-type = "compact"
  # multi exporters use comma divided
  exporter-list = "prometheus"
  exporter-prometheus-port = 9898
}

support {
  ## spring
  spring {
    # auto proxy the DataSource bean
    datasource.autoproxy = false
  }
}

② registry.conf
registry {
  # file 、nacos 、eureka、redis、zk
  type = "nacos"

  nacos {
    serverAddr = "localhost:8848"
    namespace = ""
    cluster = "default"
  }
  eureka {
    serviceUrl = "http://localhost:8761/eureka"
    application = "default"
    weight = "1"
  }
  redis {
    serverAddr = "localhost:6381"
    db = "0"
  }
  zk {
    cluster = "default"
    serverAddr = "127.0.0.1:2181"
    session.timeout = 6000
    connect.timeout = 2000
  }
  file {
    name = "file.conf"
  }
}

config {
  # file、nacos 、apollo、zk
  type = "file"

  nacos {
    serverAddr = "localhost"
    namespace = ""
    cluster = "default"
  }
  apollo {
    app.id = "fescar-server"
    apollo.meta = "http://192.168.1.204:8801"
  }
  zk {
    serverAddr = "127.0.0.1:2181"
    session.timeout = 6000
    connect.timeout = 2000
  }
  file {
    name = "file.conf"
  }
}

6) 实体类
① CommonResult.java
@Data
@AllArgsConstructor
@NoArgsConstructor
public class CommonResult<T> {
    private Integer code;
    private String message;
    private T data;

    public CommonResult(Integer code, String message) {
        this(code, message, null);
    }
}
② Storage.java
@Data
public class Storage {

    private Long id;

    /**
     * 产品id
     */
    private Long productId;

    /**
     * 总库存
     */
    private Integer total;

    /**
     * 已用库存
     */
    private Integer used;

    /**
     * 剩余库存
     */
    private Integer residue;
}
7) Dao接口及实现
StorageDao.java
@Mapper
public interface StorageDao {

    /**
     * 扣减库存
     */
    void decrease(@Param("productId") Long productId, @Param("count") Integer count);
}
resources文件夹下新建mapper文件夹后添加StorageMapper.xml
<?xml version="1.0" encoding="UTF-8" ?>
<!DOCTYPE mapper PUBLIC "-//mybatis.org//DTD Mapper 3.0//EN" "http://mybatis.org/dtd/mybatis-3-mapper.dtd" >


<mapper namespace="com.kejizhentan.dao.StorageDao">

    <resultMap id="BaseResultMap" type="com.kejizhentan.bean.Storage">
        <id column="id" property="id" jdbcType="BIGINT"/>
        <result column="product_id" property="productId" jdbcType="BIGINT"/>
        <result column="total" property="total" jdbcType="INTEGER"/>
        <result column="used" property="used" jdbcType="INTEGER"/>
        <result column="residue" property="residue" jdbcType="INTEGER"/>
    </resultMap>

    <update id="decrease">
        UPDATE t_storage
        SET used    = used + #{count},
            residue = residue - #{count}
        WHERE product_id = #{productId}
    </update>

</mapper>
8) Service接口及实现
① StorageService
public interface StorageService {
    /**
     * 扣减库存
     */
    void decrease(Long productId, Integer count);
}
② StorageServiceImpl
@Service
public class StorageServiceImpl implements StorageService {

    private static final Logger LOGGER = LoggerFactory.getLogger(StorageServiceImpl.class);

    @Resource
    private StorageDao storageDao;

    /**
     * 扣减库存
     */
    @Override
    public void decrease(Long productId, Integer count) {
        LOGGER.info("------->storage-service中扣减库存开始");
        storageDao.decrease(productId, count);
        LOGGER.info("------->storage-service中扣减库存结束");
    }
}
9) Controller
@RestController
public class StorageController {

    @Autowired
    private StorageService storageService;

    /**
     * 扣减库存
     */
    @RequestMapping("/storage/decrease")
    public CommonResult decrease(Long productId, Integer count) {
        storageService.decrease(productId, count);
        return new CommonResult(200, "扣减库存成功!");
    }
}
10) Config配置
① MyBatisConfig
@Configuration
@MapperScan({"com.kejizhentan.dao"})
public class MyBatisConfig {
}
② DataSourceProxyConfig
@Configuration
public class DataSourceProxyConfig {

    @Value("${mybatis.mapperLocations}")
    private String mapperLocations;

    @Bean
    @ConfigurationProperties(prefix = "spring.datasource")
    public DataSource druidDataSource() {
        return new DruidDataSource();
    }

    @Bean
    public DataSourceProxy dataSourceProxy(DataSource dataSource) {
        return new DataSourceProxy(dataSource);
    }

    @Bean
    public SqlSessionFactory sqlSessionFactoryBean(DataSourceProxy dataSourceProxy) throws Exception {
        SqlSessionFactoryBean sqlSessionFactoryBean = new SqlSessionFactoryBean();
        sqlSessionFactoryBean.setDataSource(dataSourceProxy);
        sqlSessionFactoryBean.setMapperLocations(new PathMatchingResourcePatternResolver().getResources(mapperLocations));
        sqlSessionFactoryBean.setTransactionFactory(new SpringManagedTransactionFactory());
        return sqlSessionFactoryBean.getObject();
    }

}
11) 修改主启动类
@SpringBootApplication(exclude = DataSourceAutoConfiguration.class)
@EnableDiscoveryClient
@EnableFeignClients
public class SeataStorageServiceApplication2002 {

    public static void main(String[] args) {
        SpringApplication.run(SeataStorageServiceApplication2002.class, args);
    }

}
⑶ 新建账户Account-Module
1) 新建seata-account-service2003项目

2) 修改POM
<?xml version="1.0" encoding="UTF-8"?>
<project xmlns="http://maven.apache.org/POM/4.0.0"
         xmlns:xsi="http://www.w3.org/2001/XMLSchema-instance"
         xsi:schemaLocation="http://maven.apache.org/POM/4.0.0 http://maven.apache.org/xsd/maven-4.0.0.xsd">
    <parent>
        <artifactId>springcloud-project</artifactId>
        <groupId>com.kejizhentan.springcloud</groupId>
        <version>1.0-SNAPSHOT</version>
    </parent>
    <modelVersion>4.0.0</modelVersion>

    <artifactId>seata-account-service2003</artifactId>
    <dependencies>
        <!--nacos-->
        <dependency>
            <groupId>com.alibaba.cloud</groupId>
            <artifactId>spring-cloud-starter-alibaba-nacos-discovery</artifactId>
        </dependency>
        <!--seata-->
        <dependency>
            <groupId>com.alibaba.cloud</groupId>
            <artifactId>spring-cloud-starter-alibaba-seata</artifactId>
            <exclusions>
                <exclusion>
                    <artifactId>seata-all</artifactId>
                    <groupId>io.seata</groupId>
                </exclusion>
            </exclusions>
        </dependency>
        <dependency>
            <groupId>io.seata</groupId>
            <artifactId>seata-all</artifactId>
            <version>0.9.0</version>
        </dependency>
        <!--feign-->
        <dependency>
            <groupId>org.springframework.cloud</groupId>
            <artifactId>spring-cloud-starter-openfeign</artifactId>
        </dependency>
        <dependency>
            <groupId>org.springframework.boot</groupId>
            <artifactId>spring-boot-starter-web</artifactId>
        </dependency>
        <dependency>
            <groupId>org.springframework.boot</groupId>
            <artifactId>spring-boot-starter-test</artifactId>
            <scope>test</scope>
        </dependency>
        <dependency>
            <groupId>org.mybatis.spring.boot</groupId>
            <artifactId>mybatis-spring-boot-starter</artifactId>
            <version>2.0.0</version>
        </dependency>
        <dependency>
            <groupId>mysql</groupId>
            <artifactId>mysql-connector-java</artifactId>
            <version>5.1.37</version>
        </dependency>
        <dependency>
            <groupId>com.alibaba</groupId>
            <artifactId>druid-spring-boot-starter</artifactId>
            <version>1.1.10</version>
        </dependency>
        <dependency>
            <groupId>org.projectlombok</groupId>
            <artifactId>lombok</artifactId>
            <optional>true</optional>
        </dependency>
    </dependencies>


</project>
3)创建seata-account-service2003的YML和主启动:可以通过JBLSpringBootAppGen插件生成
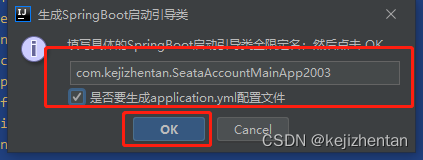
4) 修改YML
server:
  port: 2003

spring:
  application:
    name: seata-account-service
  cloud:
    alibaba:
      seata:
        tx-service-group: fsp_tx_group
    nacos:
      discovery:
        server-addr: localhost:8848
  datasource:
    driver-class-name: com.mysql.jdbc.Driver
    url: jdbc:mysql://192.168.193.225:3306/seata_account?useUnicode=true&characterEncoding=utf-8&useSSL=false
    username: root
    password: Wangren713..

feign:
  hystrix:
    enabled: false

logging:
  level:
    io:
      seata: info

mybatis:
  mapperLocations: classpath:mapper/*.xml
5)在 resources文件夹下新建file.conf和registry.conf
① file.conf
transport {
  # tcp udt unix-domain-socket
  type = "TCP"
  #NIO NATIVE
  server = "NIO"
  #enable heartbeat
  heartbeat = true
  #thread factory for netty
  thread-factory {
    boss-thread-prefix = "NettyBoss"
    worker-thread-prefix = "NettyServerNIOWorker"
    server-executor-thread-prefix = "NettyServerBizHandler"
    share-boss-worker = false
    client-selector-thread-prefix = "NettyClientSelector"
    client-selector-thread-size = 1
    client-worker-thread-prefix = "NettyClientWorkerThread"
    # netty boss thread size,will not be used for UDT
    boss-thread-size = 1
    #auto default pin or 8
    worker-thread-size = 8
  }
  shutdown {
    # when destroy server, wait seconds
    wait = 3
  }
  serialization = "seata"
  compressor = "none"
}

service {

  vgroup_mapping.fsp_tx_group = "default" #修改自定义事务组名称

  default.grouplist = "127.0.0.1:8091"
  enableDegrade = false
  disable = false
  max.commit.retry.timeout = "-1"
  max.rollback.retry.timeout = "-1"
  disableGlobalTransaction = false
}


client {
  async.commit.buffer.limit = 10000
  lock {
    retry.internal = 10
    retry.times = 30
  }
  report.retry.count = 5
  tm.commit.retry.count = 1
  tm.rollback.retry.count = 1
}

## transaction log store
store {
  ## store mode: file、db
  mode = "db"

  ## file store
  file {
    dir = "sessionStore"

    # branch session size , if exceeded first try compress lockkey, still exceeded throws exceptions
    max-branch-session-size = 16384
    # globe session size , if exceeded throws exceptions
    max-global-session-size = 512
    # file buffer size , if exceeded allocate new buffer
    file-write-buffer-cache-size = 16384
    # when recover batch read size
    session.reload.read_size = 100
    # async, sync
    flush-disk-mode = async
  }

  ## database store
  db {
    ## the implement of javax.sql.DataSource, such as DruidDataSource(druid)/BasicDataSource(dbcp) etc.
    datasource = "dbcp"
    ## mysql/oracle/h2/oceanbase etc.
    db-type = "mysql"
    driver-class-name = "com.mysql.jdbc.Driver"
    url = "jdbc:mysql://127.0.0.1:3306/seata"
    user = "root"
    password = "123456"
    min-conn = 1
    max-conn = 3
    global.table = "global_table"
    branch.table = "branch_table"
    lock-table = "lock_table"
    query-limit = 100
  }
}
lock {
  ## the lock store mode: local、remote
  mode = "remote"

  local {
    ## store locks in user's database
  }

  remote {
    ## store locks in the seata's server
  }
}
recovery {
  #schedule committing retry period in milliseconds
  committing-retry-period = 1000
  #schedule asyn committing retry period in milliseconds
  asyn-committing-retry-period = 1000
  #schedule rollbacking retry period in milliseconds
  rollbacking-retry-period = 1000
  #schedule timeout retry period in milliseconds
  timeout-retry-period = 1000
}

transaction {
  undo.data.validation = true
  undo.log.serialization = "jackson"
  undo.log.save.days = 7
  #schedule delete expired undo_log in milliseconds
  undo.log.delete.period = 86400000
  undo.log.table = "undo_log"
}

## metrics settings
metrics {
  enabled = false
  registry-type = "compact"
  # multi exporters use comma divided
  exporter-list = "prometheus"
  exporter-prometheus-port = 9898
}

support {
  ## spring
  spring {
    # auto proxy the DataSource bean
    datasource.autoproxy = false
  }
}
② registry.conf
registry {
  # file 、nacos 、eureka、redis、zk、consul、etcd3、sofa
  type = "nacos"

  nacos {
    serverAddr = "localhost:8848"
    namespace = ""
    cluster = "default"
  }
  eureka {
    serviceUrl = "http://localhost:8761/eureka"
    application = "default"
    weight = "1"
  }
  redis {
    serverAddr = "localhost:6379"
    db = "0"
  }
  zk {
    cluster = "default"
    serverAddr = "127.0.0.1:2181"
    session.timeout = 6000
    connect.timeout = 2000
  }
  consul {
    cluster = "default"
    serverAddr = "127.0.0.1:8500"
  }
  etcd3 {
    cluster = "default"
    serverAddr = "http://localhost:2379"
  }
  sofa {
    serverAddr = "127.0.0.1:9603"
    application = "default"
    region = "DEFAULT_ZONE"
    datacenter = "DefaultDataCenter"
    cluster = "default"
    group = "SEATA_GROUP"
    addressWaitTime = "3000"
  }
  file {
    name = "file.conf"
  }
}

config {
  # file、nacos 、apollo、zk、consul、etcd3
  type = "file"

  nacos {
    serverAddr = "localhost"
    namespace = ""
  }
  consul {
    serverAddr = "127.0.0.1:8500"
  }
  apollo {
    app.id = "seata-server"
    apollo.meta = "http://192.168.1.204:8801"
  }
  zk {
    serverAddr = "127.0.0.1:2181"
    session.timeout = 6000
    connect.timeout = 2000
  }
  etcd3 {
    serverAddr = "http://localhost:2379"
  }
  file {
    name = "file.conf"
  }
}

6) 实体类
① CommonResult
@Data
@AllArgsConstructor
@NoArgsConstructor
public class CommonResult<T> {
    private Integer code;
    private String message;
    private T data;

    public CommonResult(Integer code, String message) {
        this(code, message, null);
    }
}
② Account
@Data
@AllArgsConstructor
@NoArgsConstructor
public class Account {

    private Long id;

    /**
     * 用户id
     */
    private Long userId;

    /**
     * 总额度
     */
    private BigDecimal total;

    /**
     * 已用额度
     */
    private BigDecimal used;

    /**
     * 剩余额度
     */
    private BigDecimal residue;
}
7) Dao接口及实现
AccountDao
@Mapper
public interface AccountDao {

    /**
     * 扣减账户余额
     */
    void decrease(@Param("userId") Long userId, @Param("money") BigDecimal money);
}
resources文件夹下新建mapper文件夹后添加AccountMapper.xmlAccountMapper.xml
<?xml version="1.0" encoding="UTF-8" ?>
<!DOCTYPE mapper PUBLIC "-//mybatis.org//DTD Mapper 3.0//EN" "http://mybatis.org/dtd/mybatis-3-mapper.dtd" >

<mapper namespace="com.kejizhentan.dao.AccountDao">

    <resultMap id="BaseResultMap" type="com.kejizhentan.bean.Account">
        <id column="id" property="id" jdbcType="BIGINT"/>
        <result column="user_id" property="userId" jdbcType="BIGINT"/>
        <result column="total" property="total" jdbcType="DECIMAL"/>
        <result column="used" property="used" jdbcType="DECIMAL"/>
        <result column="residue" property="residue" jdbcType="DECIMAL"/>
    </resultMap>

    <update id="decrease">
        UPDATE t_account
        SET
          residue = residue - #{money},used = used + #{money}
        WHERE
          user_id = #{userId};
    </update>

</mapper>
8) Service接口及实现
① AccountService
public interface AccountService {

    /**
     * 扣减账户余额
     * @param userId 用户id
     * @param money 金额
     */
    void decrease(@RequestParam("userId") Long userId, @RequestParam("money") BigDecimal money);
}
② AccountServiceImpl
@Service
public class AccountServiceImpl implements AccountService {

    private static final Logger LOGGER = LoggerFactory.getLogger(AccountServiceImpl.class);


    @Resource
    AccountDao accountDao;

    /**
     * 扣减账户余额
     */
    @Override
    public void decrease(Long userId, BigDecimal money) {
        LOGGER.info("------->account-service中扣减账户余额开始");
        //模拟超时异常,全局事务回滚
        //暂停几秒钟线程
        //try { TimeUnit.SECONDS.sleep(30); } catch (InterruptedException e) { e.printStackTrace(); }
        accountDao.decrease(userId,money);
        LOGGER.info("------->account-service中扣减账户余额结束");
    }
}
9) Controller
@RestController
public class AccountController {

    @Resource
    AccountService accountService;

    /**
     * 扣减账户余额
     */
    @RequestMapping("/account/decrease")
    public CommonResult decrease(@RequestParam("userId") Long userId, @RequestParam("money") BigDecimal money){
        accountService.decrease(userId,money);
        return new CommonResult(200,"扣减账户余额成功!");
    }
}
10) Config配置
① MyBatisConfig
@Configuration
@MapperScan({"com.kejizhentan.dao"})
public class MyBatisConfig {
}
② DataSourceProxyConfig
@Configuration
public class DataSourceProxyConfig {

    @Value("${mybatis.mapperLocations}")
    private String mapperLocations;

    @Bean
    @ConfigurationProperties(prefix = "spring.datasource")
    public DataSource druidDataSource() {
        return new DruidDataSource();
    }

    @Bean
    public DataSourceProxy dataSourceProxy(DataSource dataSource) {
        return new DataSourceProxy(dataSource);
    }

    @Bean
    public SqlSessionFactory sqlSessionFactoryBean(DataSourceProxy dataSourceProxy) throws Exception {
        SqlSessionFactoryBean sqlSessionFactoryBean = new SqlSessionFactoryBean();
        sqlSessionFactoryBean.setDataSource(dataSourceProxy);
        sqlSessionFactoryBean.setMapperLocations(new PathMatchingResourcePatternResolver().getResources(mapperLocations));
        sqlSessionFactoryBean.setTransactionFactory(new SpringManagedTransactionFactory());
        return sqlSessionFactoryBean.getObject();
    }

}
11)修改主启动类
@SpringBootApplication(exclude = DataSourceAutoConfiguration.class)
@EnableDiscoveryClient
@EnableFeignClients
public class SeataAccountMainApp2003 {
    public static void main(String[] args) {
        SpringApplication.run(SeataAccountMainApp2003.class, args);
    }
}
order-moduel、stotage-module、account-module中的file.conf和registry.conf是一样的,如果配的有问题记得注意一下
6. 测试
⑴ 需求:下订单->减库存->扣余额->改(订单)状态

⑵ 数据库初始情况
SELECT *  FROM  `seata_order`.`t_order`
SELECT * FROM `seata_storage`.`t_storage`
SELECT *  FROM  `seata_account`.`t_account`;
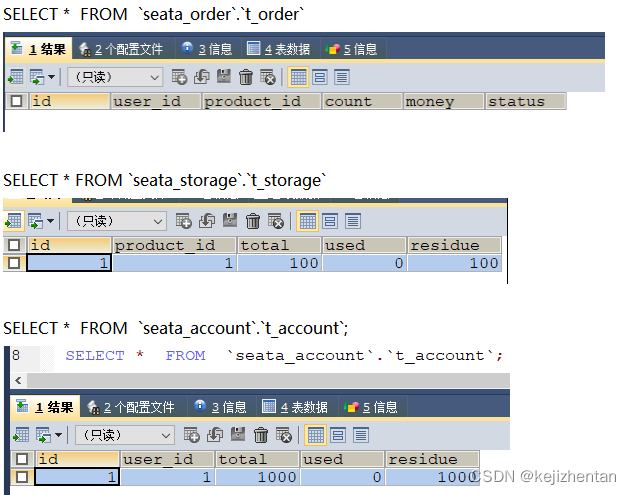
⑶ 正常下单:
访问:http://localhost:2001/order/create?userId=1&productId=1&count=10&money=100
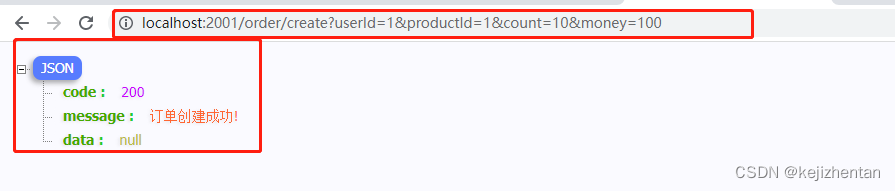
SELECT *  FROM  `seata_order`.`t_order`
SELECT * FROM `seata_storage`.`t_storage`
SELECT *  FROM  `seata_account`.`t_account`;
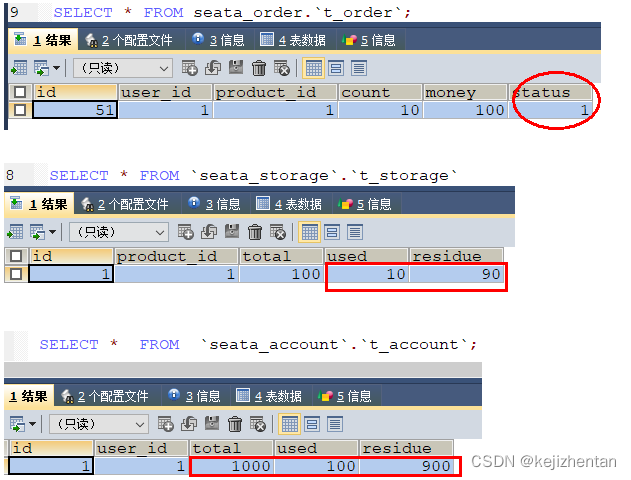
⑷ 超时异常,没加@GlobalTransactional
AccountServiceImpl添加超时,让它睡个三十秒,是系统出异常
@Service
public class AccountServiceImpl implements AccountService {

    private static final Logger LOGGER = LoggerFactory.getLogger(AccountServiceImpl.class);


    @Resource
    AccountDao accountDao;

    /**
     * 扣减账户余额
     */
    @Override
    public void decrease(Long userId, BigDecimal money) {
        LOGGER.info("------->account-service中扣减账户余额开始");
        //模拟超时异常,全局事务回滚
        //暂停几秒钟线程
        try { TimeUnit.SECONDS.sleep(30); } catch (InterruptedException e) { e.printStackTrace(); }
        accountDao.decrease(userId,money);
        LOGGER.info("------->account-service中扣减账户余额结束");
    }
}
再次访问:http://localhost:2001/order/create?userId=1&productId=1&count=10&money=100
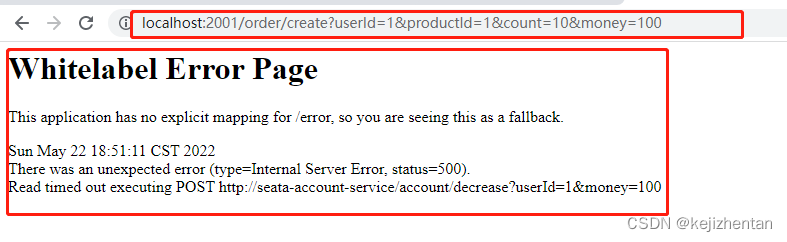
系统出问题了,我们看一下数据库情况
SELECT *  FROM  `seata_order`.`t_order`
SELECT * FROM `seata_storage`.`t_storage`
SELECT *  FROM  `seata_account`.`t_account`;
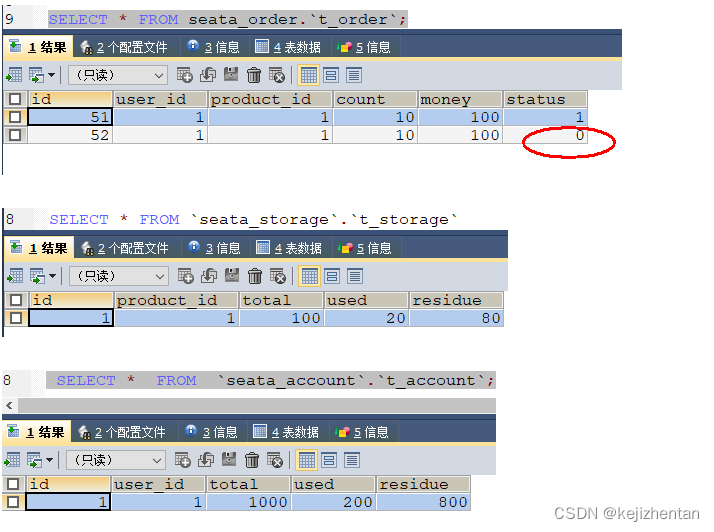
故障情况:
当库存和账户金额扣减后,订单状态并没有设置为已经完成,没有从零改为1
但账户和库存都改变了
而且由于feign的重试机制,账户余额还有可能被多次扣减
⑸ 超时异常,添加@GlobalTransactional实现分布式事务
AccountServiceImpl添加超时,让它睡个三十秒,是系统出异常
@Service
public class AccountServiceImpl implements AccountService {

    private static final Logger LOGGER = LoggerFactory.getLogger(AccountServiceImpl.class);


    @Resource
    AccountDao accountDao;

    /**
     * 扣减账户余额
     */
    @Override
    public void decrease(Long userId, BigDecimal money) {
        LOGGER.info("------->account-service中扣减账户余额开始");
        //模拟超时异常,全局事务回滚
        //暂停几秒钟线程
        try { TimeUnit.SECONDS.sleep(30); } catch (InterruptedException e) { e.printStackTrace(); }
        accountDao.decrease(userId,money);
        LOGGER.info("------->account-service中扣减账户余额结束");
    }
}
OrderServiceImpl添加@GlobalTransactional
@Service
@Slf4j
public class OrderServiceImpl implements OrderService {
    @Resource
    private OrderDao orderDao;

    @Resource
    private StorageService storageService;

    @Resource
    private AccountService accountService;

    /**
     * 创建订单->调用库存服务扣减库存->调用账户服务扣减账户余额->修改订单状态
     * 简单说:
     * 下订单->减库存->减余额->改状态
     */
    @Override
    @GlobalTransactional(name = "fsp-create-order", rollbackFor = Exception.class)
    public void create(Order order) {
        log.info("------->下单开始");
        //本应用创建订单
        orderDao.create(order);

        //远程调用库存服务扣减库存
        log.info("------->order-service中扣减库存开始");
        storageService.decrease(order.getProductId(), order.getCount());
        log.info("------->order-service中扣减库存结束");

        //远程调用账户服务扣减余额
        log.info("------->order-service中扣减余额开始");
        accountService.decrease(order.getUserId(), order.getMoney());
        log.info("------->order-service中扣减余额结束");

        //修改订单状态为已完成
        log.info("------->order-service中修改订单状态开始");
        orderDao.update(order.getUserId(), 0);
        log.info("------->order-service中修改订单状态结束");

        log.info("------->下单结束");
    }
}

再次访问:http://localhost:2001/order/create?userId=1&productId=1&count=10&money=100
系统出问题了,我们看一下数据库情况
SELECT *  FROM  `seata_order`.`t_order`
SELECT * FROM `seata_storage`.`t_storage`
SELECT *  FROM  `seata_account`.`t_account`;
下单后数据库数据并没有任何改变,记录都添加不进来。实现了事务的一致性。
7. seata总结
⑴ 分布式事务的执行流程

TM 开启分布式事务(TM 向 TC 注册全局事务记录);
按业务场景,编排数据库、服务等事务内资源(RM 向 TC 汇报资源准备状态 );
TM 结束分布式事务,事务一阶段结束(TM 通知 TC 提交/回滚分布式事务);
TC 汇总事务信息,决定分布式事务是提交还是回滚;
TC 通知所有 RM 提交/回滚 资源,事务二阶段结束。
⑵ AT模式如何做到对业务的无侵入
1) AT模式是什么
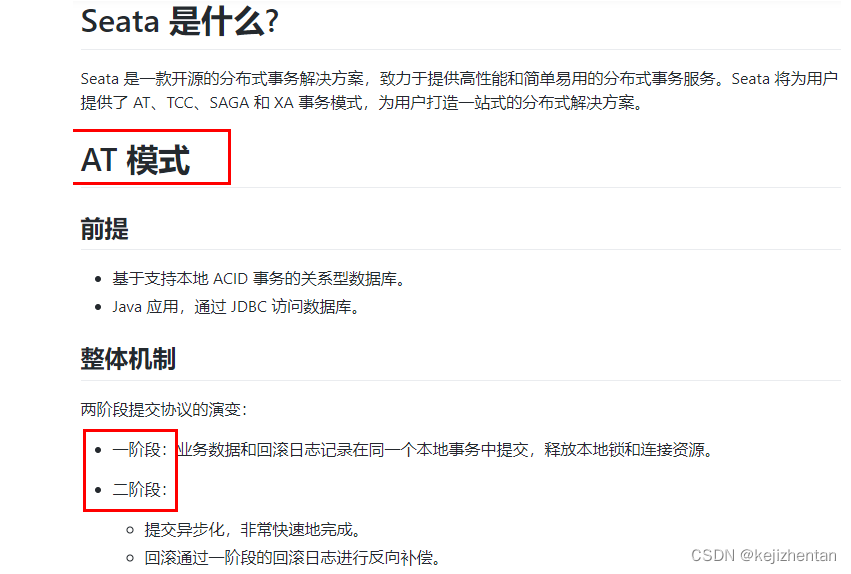
2) AT模式执行过程
① 一阶段加载
在一阶段,Seata 会拦截“业务 SQL”,
- 解析 SQL 语义,找到“业务 SQL”要更新的业务数据,在业务数据被更新前,将其保存成“before image”,
- 执行“业务 SQL”更新业务数据,在业务数据更新之后,
- 其保存成“after image”,最后生成行锁。
以上操作全部在一个数据库事务内完成,这样保证了一阶段操作的原子性。
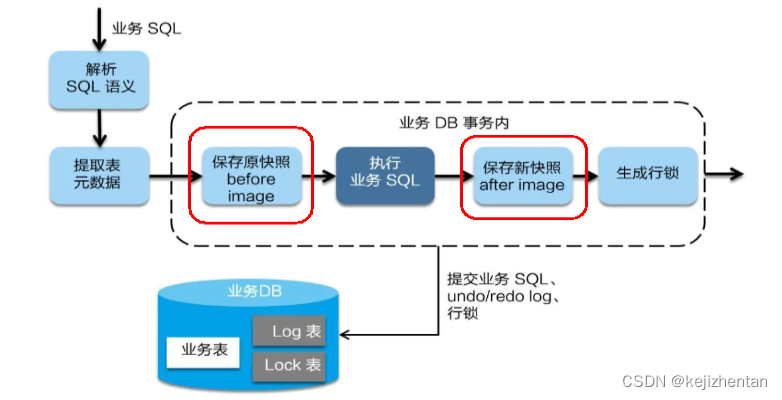
② 二阶段提交
二阶段如是顺利提交的话,
因为“业务 SQL”在一阶段已经提交至数据库,所以Seata框架只需将一阶段保存的快照数据和行锁删掉,完成数据清理即可。
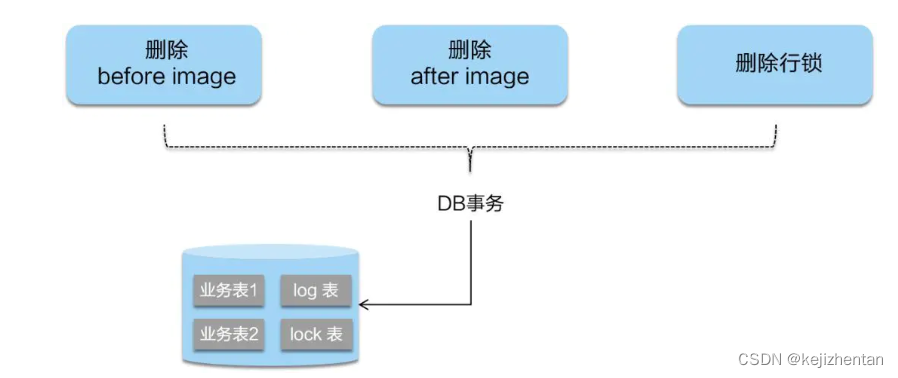
③ 二阶段回滚
二阶段回滚:
二阶段如果是回滚的话,Seata 就需要回滚一阶段已经执行的“业务 SQL”,还原业务数据。
回滚方式便是用“before image”还原业务数据;但在还原前要首先要校验脏写,对比“数据库当前业务数据”和 “after image”,
如果两份数据完全一致就说明没有脏写,可以还原业务数据,如果不一致就说明有脏写,出现脏写就需要转人工处理。
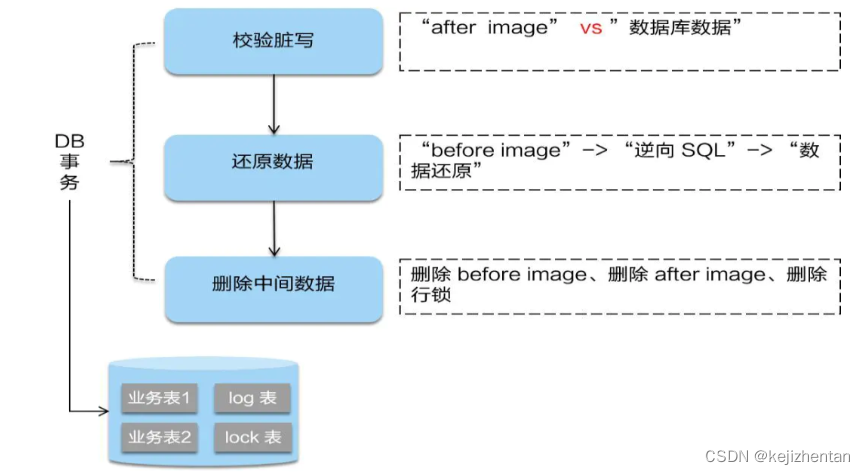
⑶ seata执行流程图


 1077
1077


 被折叠的 条评论
为什么被折叠?
被折叠的 条评论
为什么被折叠?
 到【灌水乐园】发言


