


 本文详细介绍了如何在Linux系统中使用fsck命令进行文件系统检查和修复,包括何时使用、基本语法、步骤示例以及各种选项的用法。确保掌握这些技巧以维护系统的数据完整性。
Fsck Command in Linux (Repair File System) https://linuxize.com/post/fsck-command-in-linux/
How to Use fsck Command to Check and Repair Filesystem https://phoenixnap.com/kb/fsck-command-linux
How to Use the fsck Command on Linux https://www.howtogeek.com/745921/how-to-use-the-fsck-command-on-linux/
lost+found directory https://tldp.org/LDP/Linux-Filesystem-Hierarchy/html/lostfound.html
如何使用“fsck”修复Linux文件系统错误 https://zhuanlan.zhihu.com/p/620706837
=====================================
How to Use fsck Command to Check and Repair Filesystem
https://phoenixnap.com/kb/fsck-command-linux
Introduction
The fsck (File System Consistency Check) Linux utility checks filesystems for errors or outstanding issues. The tool is used to fix potential errors and generate reports.
This utility comes by default with Linux distributions. No specific steps or an installation procedure is required to use fsck. Once you load the terminal, you are ready to exploit the functionalities of the tool.
Follow this guide to learn how to use fsck to check and repair filesystem on a Linux machine. The tutorial will list examples of how to use the tool and for which use cases.
Prerequisites
- Linux or UNIX-like system
- Access to a terminal or command line
- A user with root permissions to run the tool
When to Use fsck in Linux
The fsck tool can be used in various situations:
- Use fsck to run a filesystem check as preventive maintenance or when there is an issue with your system.
- One common problem fsck can diagnose is when the system fails to boot.
- Another one is when you get an input/output error when the files on your system become corrupt.
- You can also use the fsck utility to check the health of external drives, such as SD cards or USB flash drives.
Note: Another useful tool for addressing a boot failure is GRUB rescue. Learn more in our post How to Use Grub Rescue to Fix Linux Boot Failure.
Basic fsck Syntax
The basic syntax for the fsck utility follows this pattern:
fsck <options> <filesystem>In the above example, filesystem can be a device, a partition, a mount point, etc. You can also use filesystem-specific options at the end of the command.
How to Check and Repair Filesystem
There are a few steps to do before you check and repair your file system. You need to locate a device and unmount.
View Mounted Disks and Partitions
To view all mounted devices on your system and check disk location, use one of the available tools in Linux.
One method to locate the disk you want to scan is to list the filesystem disks with the df command:
df -h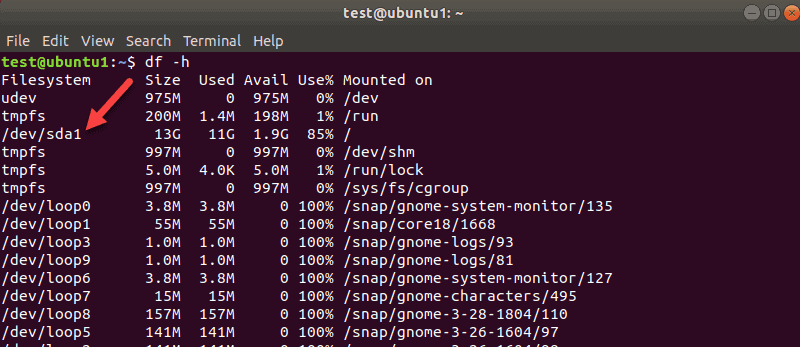
The tool prints the data usage on your system and filesystems. Take note of the disk you want to check with the fsck command.
To view partitions for your first disk, for example, use the following command:
sudo parted /dev/sda 'print'sda is how Linux refers to your first SCSI disk. If you have two, the second would be sdb, and so on.
In our example, we got one result since there was only one partition on this virtual machine. You will get more results if you have more partitions.
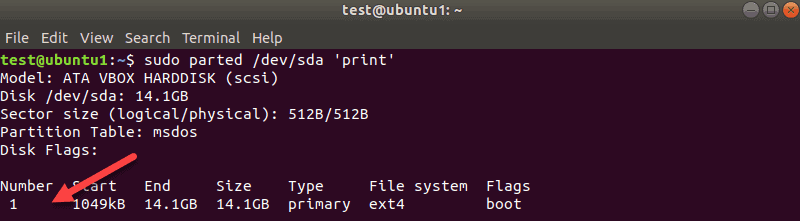
The disk name here is /dev/sda and then the number of partitions is shown in the Number column. In our case, it is one: sda1.
Unmount the Disk
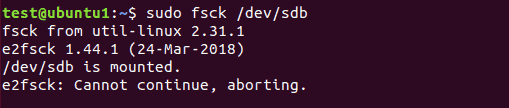
Before you can run a disk check with fsck, you need to unmount a disk or partition. If you try to run fsck on a mounted disk or partition, you will get a warning:
Make sure to run the unmount command:
sudo umount /dev/sdbReplace /dev/sdb with the device you want to unmount.
Note that you cannot unmount root filesystems. Hence, now fsck can’t be used on a running machine. More on that towards the end of the guide.
Run fsck to Check for Errors
Now that you unmounted the disk, you can run fsck. To check the second disk, enter:
sudo fsck /dev/sdb
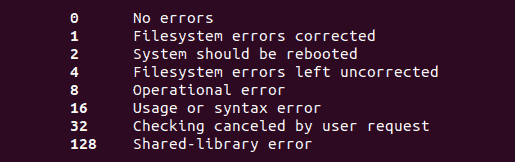
The above example shows the output for a clean disk. If there are multiple issues on your disk, a prompt appears for each one where you have to confirm the action.
The exit code the fsck utility returns is the sum of these states:
Mount the Disk
When you finish checking and repairing a device, mount the disk so you can use it again.
In our case, we will remount the sdb disk:
mount /dev/sdbDo a Dry Run with fsck
Before you perform a live check, you can do a test run with fsck. Pass the -N option to the fsck command to perform a test:
sudo fsck -N /dev/sdbThe output prints what would happen but does not perform any actions.
Fix Detected Errors Automatically with fsck
To try to fix potential problems without getting any prompts, pass the -y option to fsck.
sudo fsck -y /dev/sdbThis way, you say “yes, try to fix all detected errors” without being prompted every time.
If no errors are found, the output looks the same as without the -y option.
Skip Repair but Print fsck Errors in the Output
Use the -n option if you want to check potential error on a file system without repairing them.
We have a second drive sdb with some journaling errors. The -n flag prints the error without fixing it:
sudo fsck -n /dev/sdb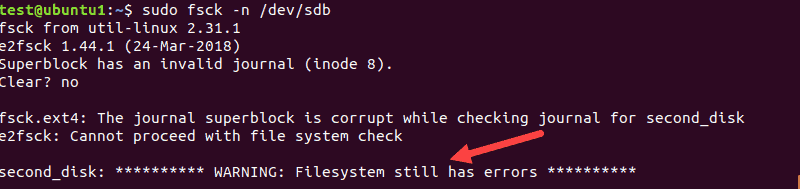
Force fsck to Do a Filesystem Check
When you perform a fsck on a clean device, the tool skips the filesystem check. If you want to force the filesystem check, use the -f option.
For example:
sudo fsck -f /dev/sdb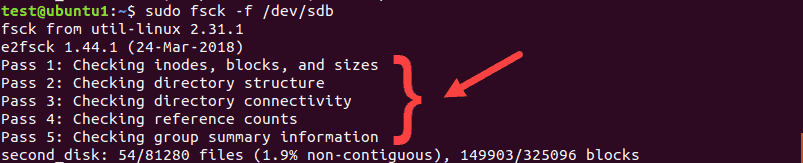
The scan will perform all five checks to search for corruptions even when it thinks there are no issues.
Run fsck on All Filesystems at Once
If you want to perform a check on all filesystems with fsck in one go, pass the -A flag. This option will go through the etc/fstab file in one run.
Since root filesystems can’t be unmounted on a running machine, add the -R option to skip them:
fsck -ARTo avoid the prompts, add the -y option we talked about.
Skip fsck on a Specific Filesystem
If you want fsck to skip checking a filesystem, you need to add -t and “no” before a filesystem.
For example, to skip ext3 filesystem, run this command:
sudo fsck -AR -t noext3 -yWe added -y to skip the prompts.
Skip Fsck on Mounted Filesystems
To make sure you do not try to run fsck on a mounted filesystem, add the -M option. This flag tells the fsck tool to skip any mounted filesystems.
To show you the difference, we will run fsck on sdb while it is mounted, and then when we unmount it.
sudo fsck -M /dev/sdb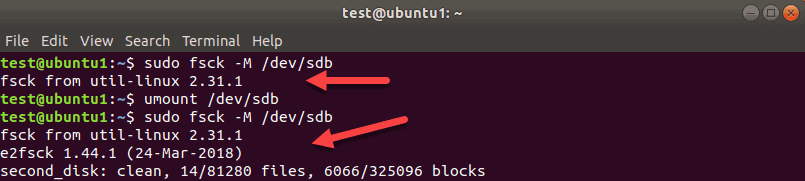
While sdb is mounted, the tool exits without running a check. Then, we unmount sdb and run the same command again. This time, fsck checks the disk and reports it as clean, or with errors.
Note: To remove the first title line of the fsck tool “fsck from util-linux 2.31.1” use the -T option.
Run fsck on Linux Root Partition
As we already mentioned, fsck cannot check root partitions on a running machine since they are mounted and in use. However, even Linux root partitions can be checked if you boot into recovery mode and run the fsck check:
1. To do so, power on or reboot your machine through the GUI or by using the terminal:
sudo reboot2. Press and hold the shift key during boot-up. The GNU GRUB menu appears.
3. Select Advanced options for Ubuntu.
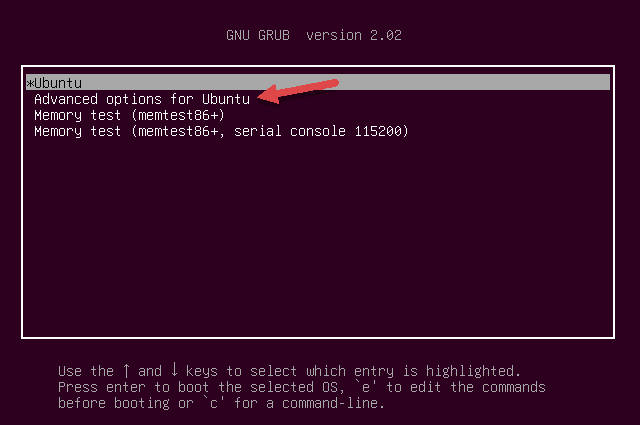
4. Then, select the entry with (recovery mode) at the end. Let the system load into the Recovery Menu.
5. Select fsck from the menu.
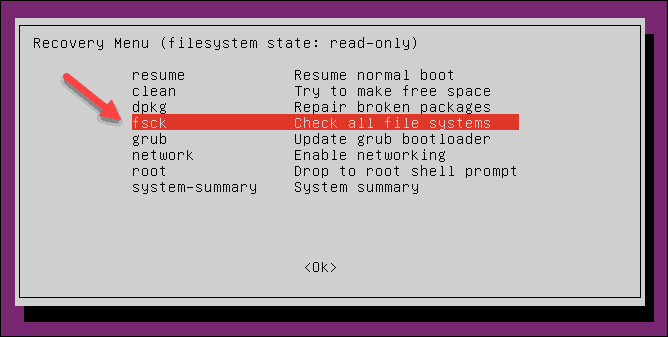
6. Confirm by selecting <Yes> at the prompt.

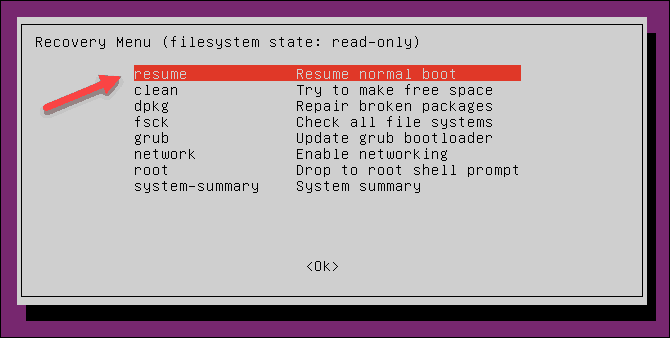
7. Once finished, select resume at the recovery menu to boot up the machine.
What if fsck is Interrupted?
You should not interrupt the fsck tool while it is in progress. However, if the process is interrupted, fsck will finish the ongoing check and then stop.
In case the utility found an error while the check was in process, it will not try to fix anything if interrupted. You can rerun the check next time and let it finish.
fsck Linux Command Options Summary
To wrap up, below is the list of the options you can use with the fsck Linux utility.
| Option | Description |
|---|---|
-a | Try to repair filesystem errors automatically. There will be no prompts, so use it with caution. |
-A | Check all filesystems listed in /etc/fstab. |
-C | Show progress for ext2 and ext3 filesystems. |
-f | Force fsck to check a filesystem. The tool checks even when the filesystem appears to be clean. |
-l | Lock the device to prevent other programs from using the partition during the scan and repair. |
-M | Do not check mounted filesystems. The tool returns an exit code 0 when a filesystem is mounted. |
-N | Do a dry run. The output prints what the fsck would do without executing any actions. The warning or error messages are printed as well. |
-P | Use to run a scan on multiple filesystems in parallel. It can cause issues, depending on your setup. Use with caution. |
-R | Tell the fsck tool not to check the root filesystems when you use the -A option. |
-r | Print device statistics. |
-t | Specify which filesystems type(s) to check with fsck. Consult the man page for detailed information. |
-T | Hide the title when the tool starts. |
-y | Try to repair filesystem errors automatically during the check. |
-V | Verbose output. |
Note: Learn about the error code SIGSEGV (signal segmentation violation) and how to troubleshoot it.
Conclusion
Now you know how to use fsck Linux command to check and repair filesystems. The guide provided examples of the tool’s functionalities and features.
Make sure you have root permissions before running the listed commands. For a detailed description of all options, you can consult the man file of the tool or visit the fsck Linux man page.


 621
621

 被折叠的 条评论
为什么被折叠?
被折叠的 条评论
为什么被折叠?
 到【灌水乐园】发言


