


Django 4.1.3 安装
pip install Django==4.1.3
查看版本
python -m django --version
4.1.3
Django使用技巧
建立项目django-admin startproject demosite
运行服务
python manage.py runserver系统提示需要配置
 python manage.py runserver
Watching for file changes with StatReloader
Performing system checks...

System check identified no issues (0 silenced).

You have 18 unapplied migration(s). Your project may not work properly until you apply the migrations for app(s): admin, auth, contenttypes, sessions.
Run 'python manage.py migrate' to apply them.
November 23, 2022 - 03:35:57
Django version 4.1.3, using settings 'demosite.settings'
Starting development server at http://127.0.0.1:8000/
界面
如果是外网需要配置python manage.py runserver 0.0.0.0:8000 启动服务是8000
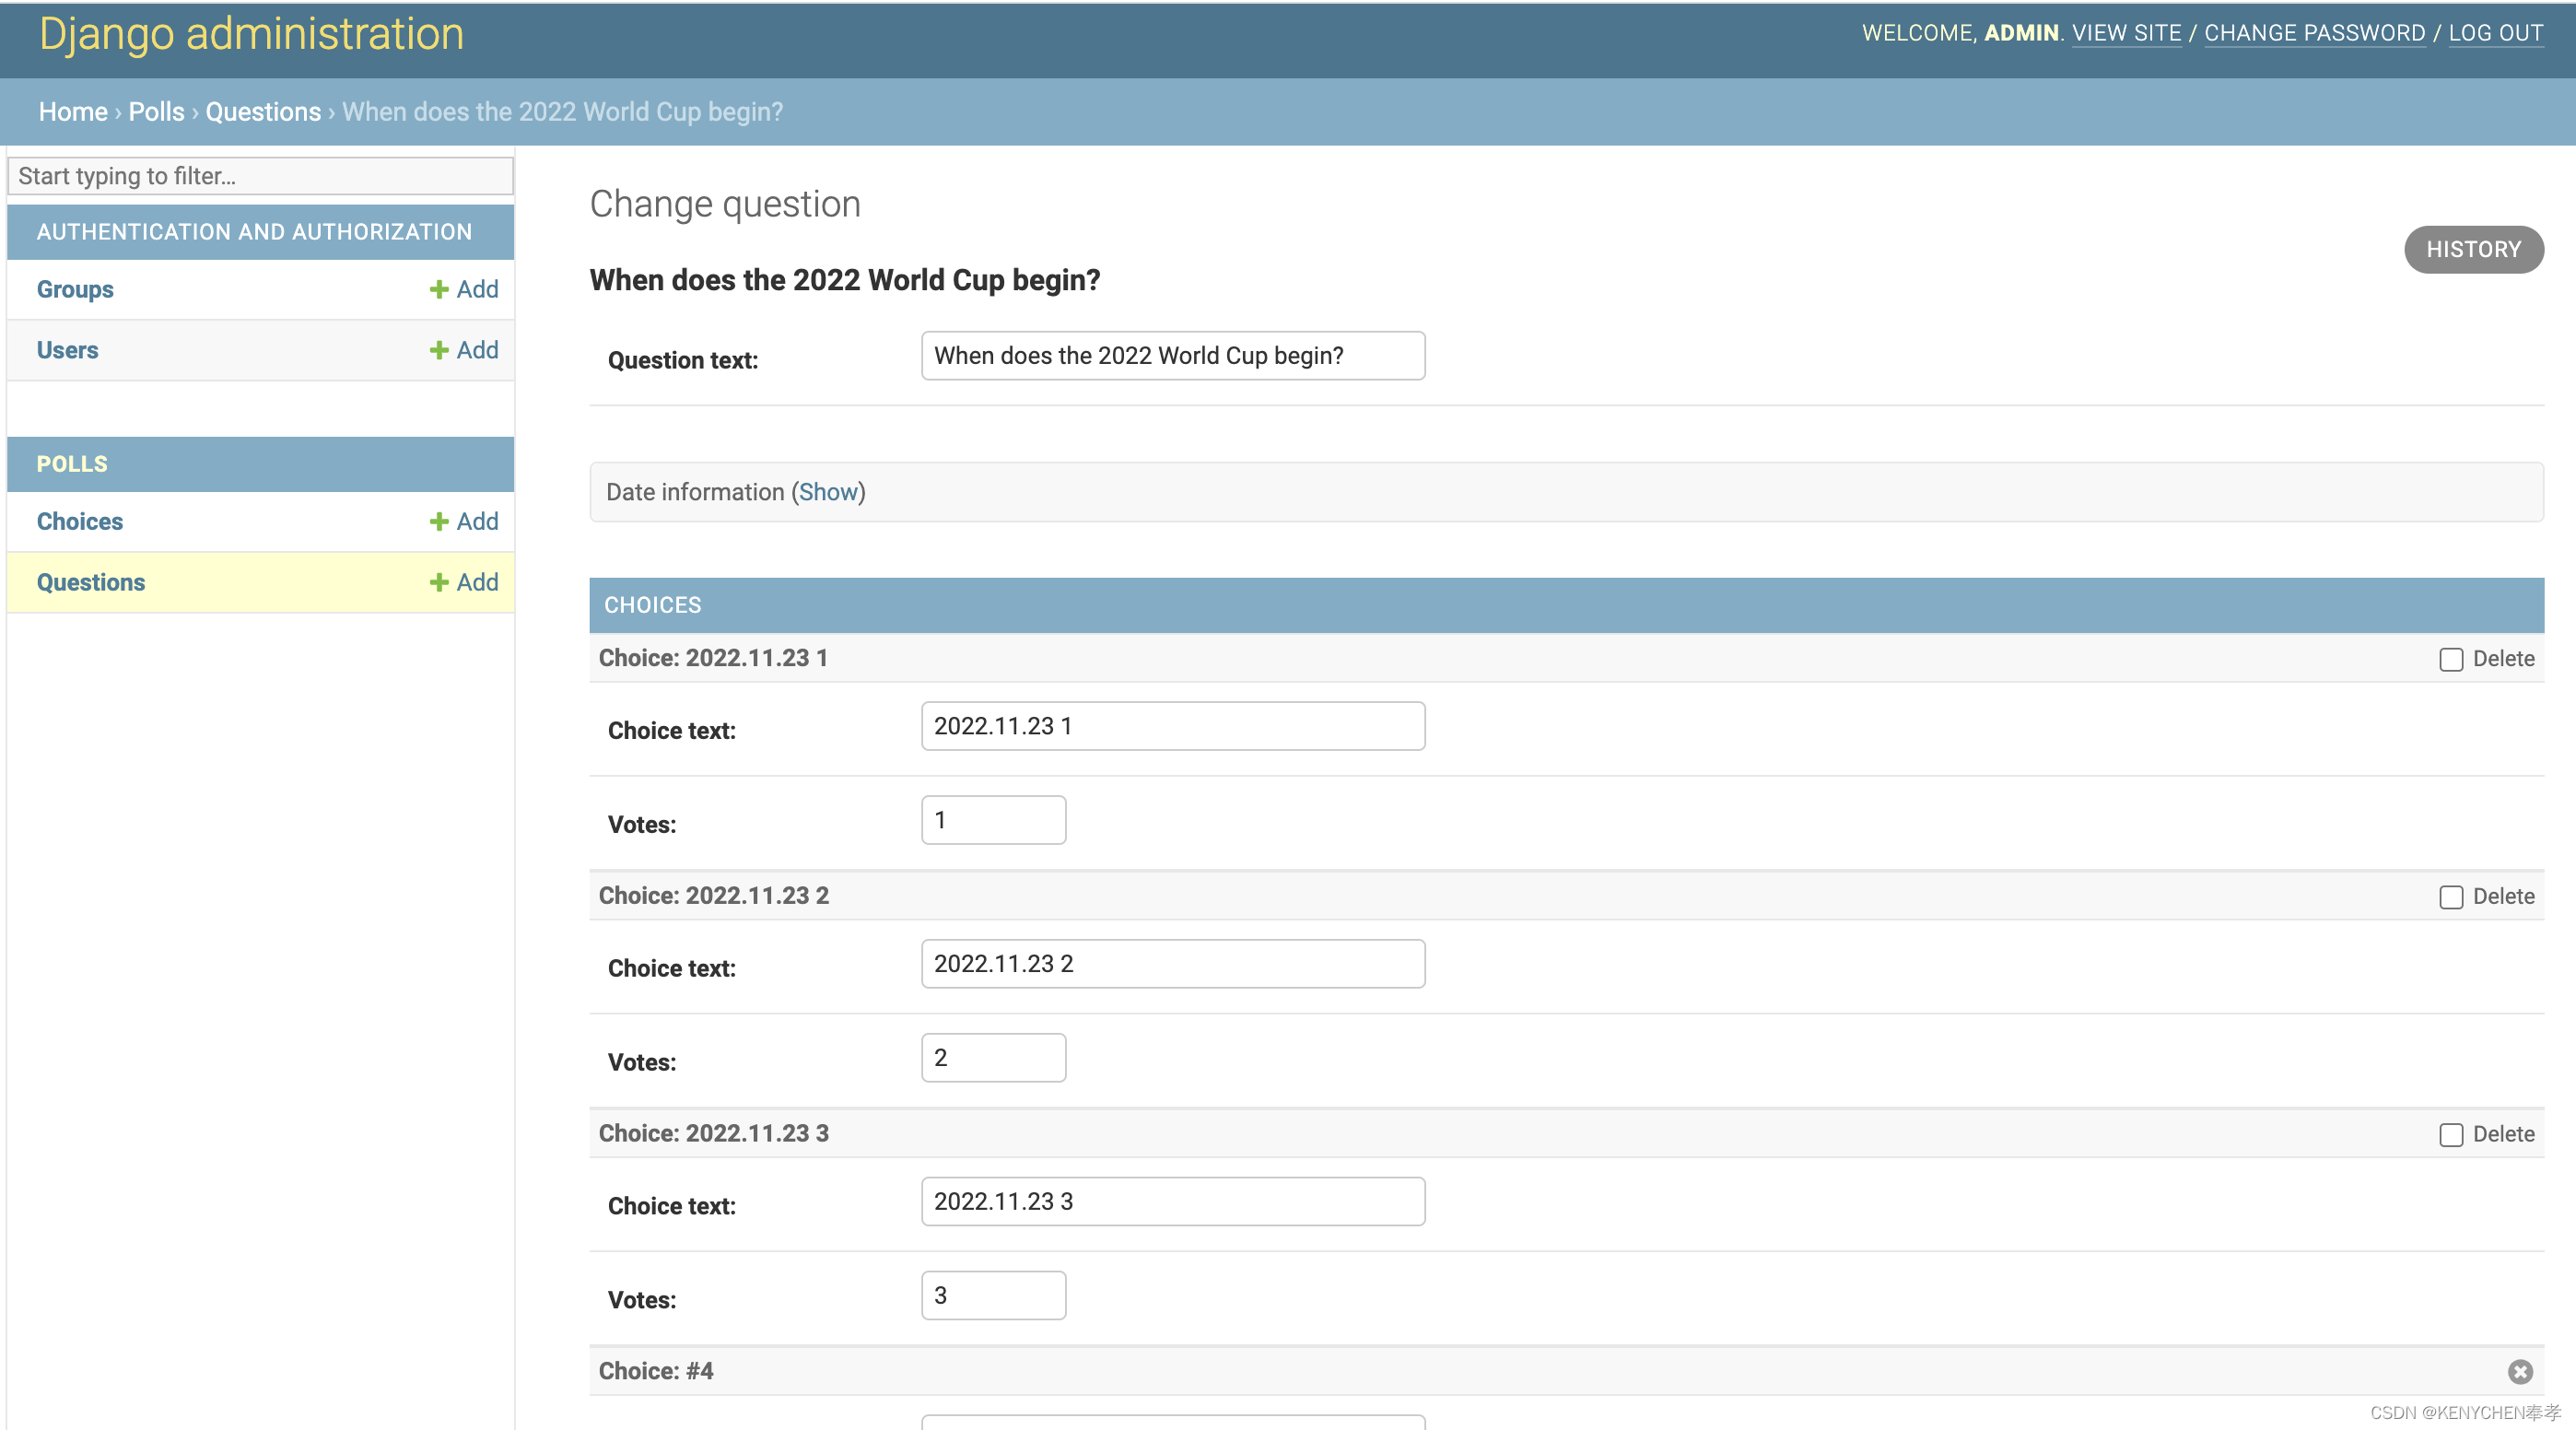
在demosite 添加一个投票的polls
python manage.py startapp polls界面为:
编写第一个View展示
from django.http import HttpResponse


def index(request):
    return HttpResponse("Hello, world. You're at the polls index.")
需要配置index的地址
from django.urls import path
from . import views
urlpatterns = [
path('', views.index, name='index'),
]
运行后看看浏览器
数据库配置
现在,打开 demosite/settings.py 。这是个包含了 Django 项目设置的 Python 模块。
通常,这个配置文件使用 SQLite 作为默认数据库。如果你不熟悉数据库,或者只是想尝试下 Django,这是最简单的选择。Python 内置 SQLite,所以你无需安装额外东西来使用它。当你开始一个真正的项目时,你可能更倾向使用一个更具扩展性的数据库,例如 PostgreSQL,避免中途切换数据库这个令人头疼的问题。
如果你想使用其他数据库,你需要安装合适的 database bindings ,然后改变设置文件中 DATABASES 'default' 项目中的一些键值:
- ENGINE -- 可选值有 'django.db.backends.sqlite3','django.db.backends.postgresql','django.db.backends.mysql',或 'django.db.backends.oracle'。其它 可用后端。
- NAME -- 数据库的名称。如果你使用 SQLite,数据库将是你电脑上的一个文件,在这种情况下,NAME 应该是此文件完整的绝对路径,包括文件名。默认值 BASE_DIR / 'db.sqlite3' 将把数据库文件储存在项目的根目录。
如果你不使用 SQLite,则必须添加一些额外设置,比如 USER 、 PASSWORD 、 HOST 等等。想了解更多数据库设置方面的内容。代码例子
在polls 创建一个模型
from django.db import models


class Question(models.Model):
    question_text = models.CharField(max_length=200)
    pub_date = models.DateTimeField('date published')


class Choice(models.Model):
    question = models.ForeignKey(Question, on_delete=models.CASCADE)
    choice_text = models.CharField(max_length=200)
    votes = models.IntegerField(default=0)
用命令创建一些表
python manage.py migrate

Operations to perform:
  Apply all migrations: admin, auth, contenttypes, sessions
Running migrations:
  Applying contenttypes.0001_initial... OK
  Applying auth.0001_initial... OK
  Applying admin.0001_initial... OK
  Applying admin.0002_logentry_remove_auto_add... OK
  Applying admin.0003_logentry_add_action_flag_choices... OK
  Applying contenttypes.0002_remove_content_type_name... OK
  Applying auth.0002_alter_permission_name_max_length... OK
  Applying auth.0003_alter_user_email_max_length... OK
  Applying auth.0004_alter_user_username_opts... OK
  Applying auth.0005_alter_user_last_login_null... OK
  Applying auth.0006_require_contenttypes_0002... OK
  Applying auth.0007_alter_validators_add_error_messages... OK
  Applying auth.0008_alter_user_username_max_length... OK
  Applying auth.0009_alter_user_last_name_max_length... OK
  Applying auth.0010_alter_group_name_max_length... OK
  Applying auth.0011_update_proxy_permissions... OK
  Applying auth.0012_alter_user_first_name_max_length... OK
  Applying sessions.0001_initial... OK
polls.apps.PollsConfig
为了在我们的工程中包含这个应用,我们需要在配置类 INSTALLED_APPS 中添加设置。因为 PollsConfig 类写在文件 polls/apps.py 中,所以它的点式路径是 'polls.apps.PollsConfig'。在文件 demosite/settings.py 中 INSTALLED_APPS 子项添加点式路径后,它看起来像这样:如下:
INSTALLED_APPS = [
    'polls.apps.PollsConfig',
    'django.contrib.admin',
    'django.contrib.auth',
    'django.contrib.contenttypes',
    'django.contrib.sessions',
    'django.contrib.messages',
    'django.contrib.staticfiles',
]
有修改需要用python manage.py makemigrations polls
 python manage.py makemigrations polls
Migrations for 'polls':
  polls/migrations/0001_initial.py
    - Create model Question
    - Create model Choice
现在,你只需要记住,改变模型需要这三步:
- 编辑 models.py 文件,改变模型。
- 运行 python manage.py makemigrations 为模型的改变生成迁移文件。
- 运行 python manage.py migrate 来应用数据库迁移。
初试API
>>> from polls.models import Choice, Question
>>> Question.objects.all()   # 可以看出没有记录集
<QuerySet []>
保存记录进去到问题集合
>>> from django.utils import timezone
>>> q = Question(question_text="What's 2022 World FootBall New?", pub_date=timezone.now())
>>> q.save()
>>> Question.objects.all()
<QuerySet [<Question: Question object (1)>]>
应该q还是原先保存的记录可以直接看q的model里面的值
q.id
1
>>> q.question_text
"What's 2022 World FootBall New?"
>>> q.pub_date
datetime.datetime(2022, 11, 23, 7, 23, 29, 551159, tzinfo=datetime.timezone.utc)
建立管理账号
python manage.py createsuperuser输入admin账号名称,密码和邮箱,重新启动服务进入后
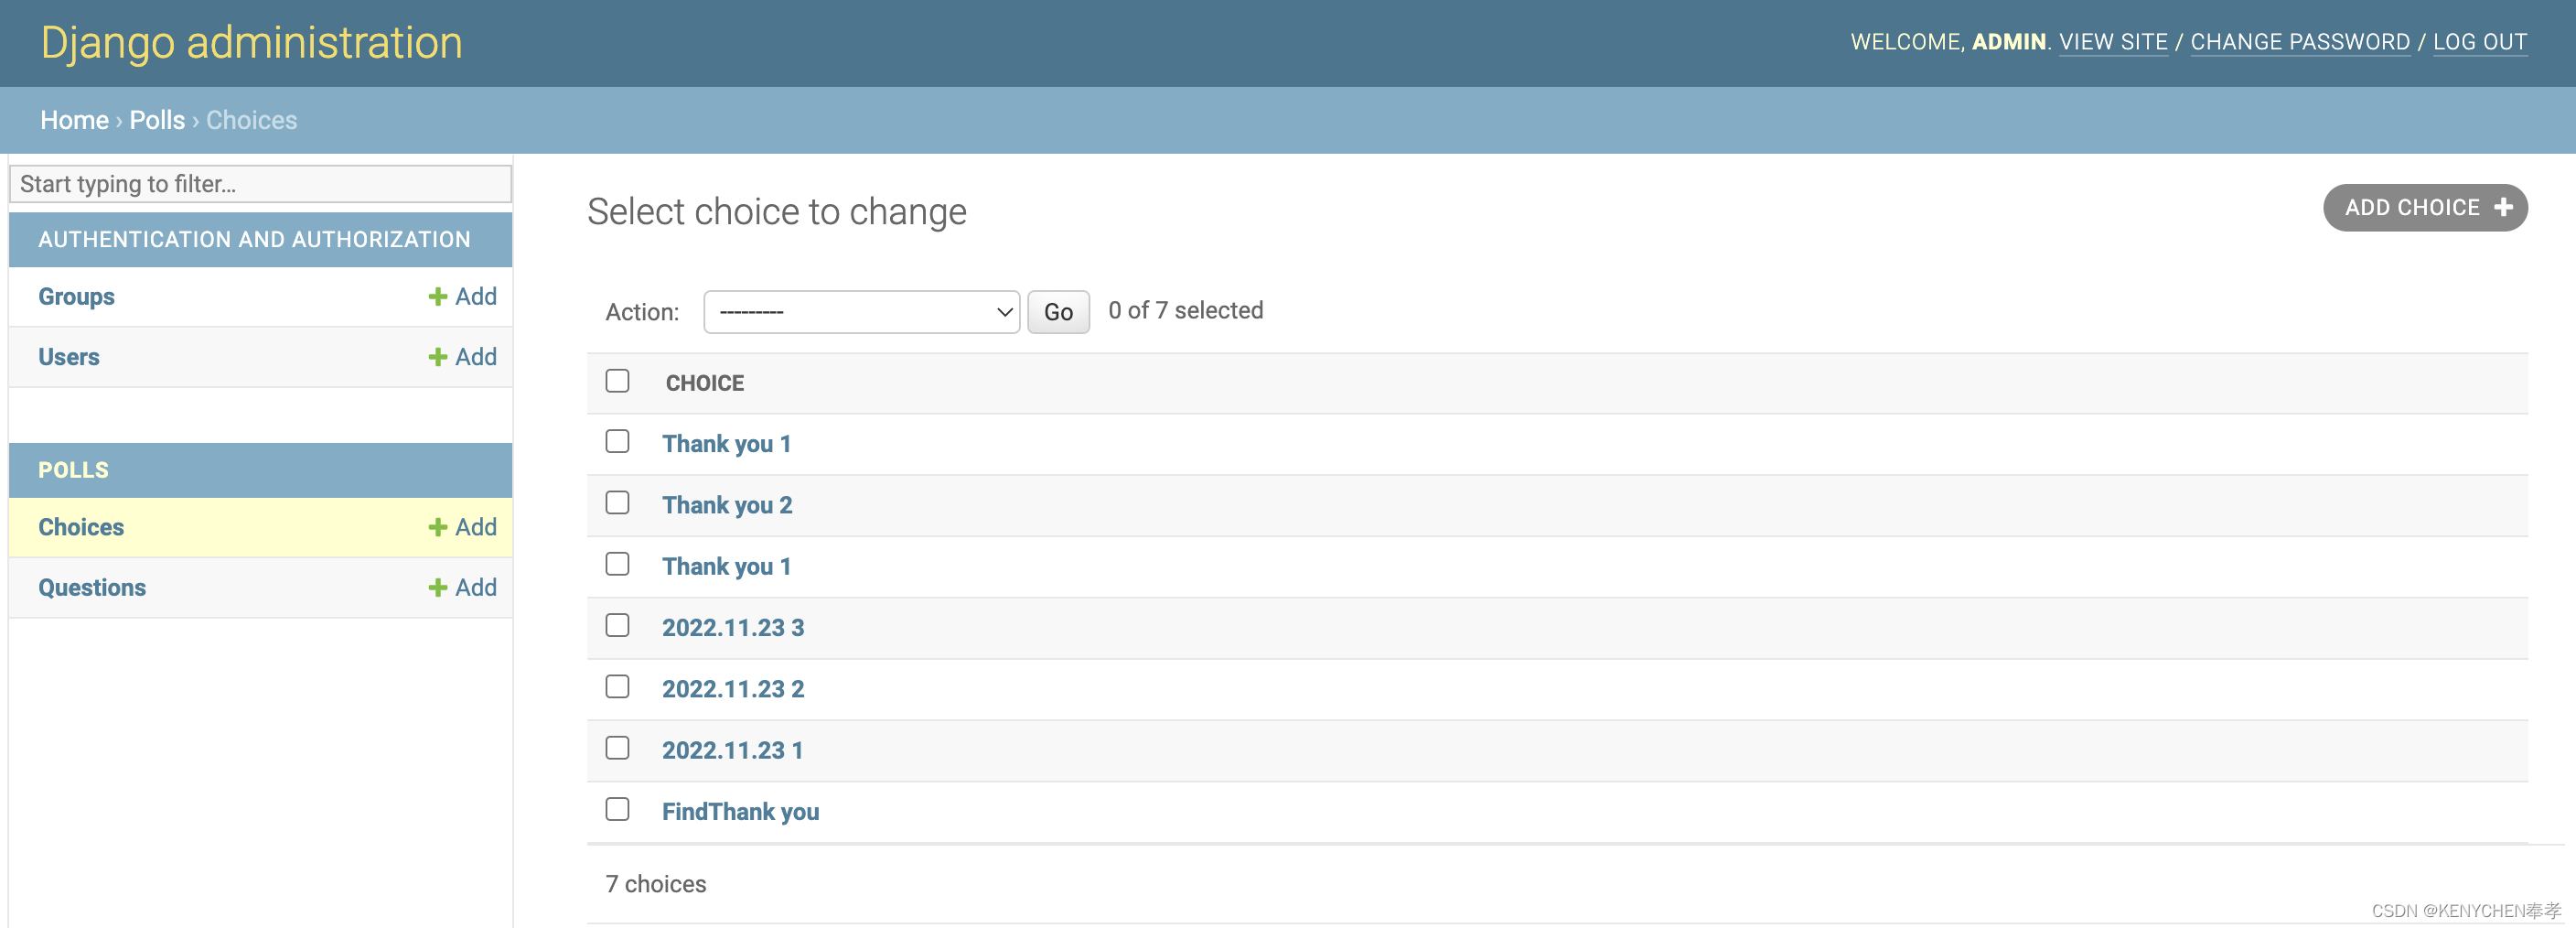
向管理页面中加入投票应用
但是我们的投票应用在哪呢?它没在索引页面里显示。
只需要再做一件事:我们得告诉管理,问题 Question 对象需要一个后台接口。打开 polls/admin.py 文件,把它编辑成下面这样:
from django.contrib import admin

# Register your models here.

from django.contrib import admin

from .models import Question

admin.site.register(Question)
页面刷新后可以看到polls的投票系统
编写更多的视图
def detail(request, question_id):
    return HttpResponse("You're looking at question %s." % question_id)

def results(request, question_id):
    response = "You're looking at the results of question %s."
    return HttpResponse(response % question_id)

def vote(request, question_id):
    return HttpResponse("You're voting on question %s." % question_id)
写一个真正有用的视图
每个视图必须要做的只有两件事:返回一个包含被请求页面内容的 HttpResponse 对象,或者抛出一个异常,比如 Http404 。至于你还想干些什么,随便你。
你的视图可以从数据库里读取记录,可以使用一个模板引擎(比如 Django 自带的,或者其他第三方的),可以生成一个 PDF 文件,可以输出一个 XML,创建一个 ZIP 文件,你可以做任何你想做的事,使用任何你想用的 Python 库。
Django 只要求返回的是一个 HttpResponse ,或者抛出一个异常。
from django.http import HttpResponse

from .models import Question


def index(request):
    latest_question_list = Question.objects.order_by('-pub_date')[:5]
    output = ', '.join([q.question_text for q in latest_question_list])
    return HttpResponse(output)

# Leave the rest of the views (detail, results, vote) unchanged
建立html模板
页面的设计写死在视图函数的代码里的。如果你想改变页面的样子,你需要编辑 Python 代码。所以让我们使用 Django 的模板系统,只要创建一个视图,就可以将页面的设计从代码中分离出来。
首先,在你的 polls 目录里创建一个 templates 目录。Django 将会在这个目录里查找模板文件。
你项目的 TEMPLATES 配置项描述了 Django 如何载入和渲染模板。默认的设置文件设置了 DjangoTemplates 后端,并将 APP_DIRS 设置成了 True。这一选项将会让 DjangoTemplates 在每个 INSTALLED_APPS 文件夹中寻找 "templates" 子目录。这就是为什么尽管我们没有像在第二部分中那样修改 DIRS 设置,Django 也能正确找到 polls 的模板位置的原因。
在你刚刚创建的 templates 目录里,再创建一个目录 polls,然后在其中新建一个文件 index.html 。换句话说,你的模板文件的路径应该是 polls/templates/polls/index.html 。因为``app_directories`` 模板加载器是通过上述描述的方法运行的,所以 Django 可以引用到 polls/index.html 这一模板了。
自动化测试简介
自动化测试是什么?
测试代码,是用来检查你的代码能否正常运行的程序。
测试在不同的层次中都存在。有些测试只关注某个很小的细节(某个模型的某个方法的返回值是否满足预期?),而另一些测试可能检查对某个软件的一系列操作(某一用户输入序列是否造成了预期的结果?)。其实这和我们在 教程第 2 部分,里做的并没有什么不同,我们使用 shell 来测试某一方法的功能,或者运行某个应用并输入数据来检查它的行为。
真正不同的地方在于,自动化 测试是由某个系统帮你自动完成的。当你创建好了一系列测试,每次修改应用代码后,就可以自动检查出修改后的代码是否还像你曾经预期的那样正常工作。你不需要花费大量时间来进行手动测试。
为什么你需要写测试
但是,为什么需要测试呢?又为什么是现在呢?
你可能觉得学 Python/Django 对你来说已经很满足了,再学一些新东西的话看起来有点负担过重并且没什么必要。毕竟,我们的投票应用看起来已经完美工作了。写一些自动测试并不能让它工作的更好。如果写一个投票应用是你想用 Django 完成的唯一工作,那你确实没必要学写测试。但是如果你还想写更复杂的项目,现在就是学习测试写法的最好时机了。
测试将节约你的时间
在某种程度上,能够「判断出代码是否正常工作」的测试,就称得上是个令人满意的了。在更复杂的应用程序中,组件之间可能会有数十个复杂的交互。
对其中某一组件的改变,也有可能会造成意想不到的结果。判断「代码是否正常工作」意味着你需要用大量的数据来完整的测试全部代码的功能,以确保你的小修改没有对应用整体造成破坏——这太费时间了。
尤其是当你发现自动化测试能在几秒钟之内帮你完成这件事时,就更会觉得手动测试实在是太浪费时间了。当某人写出错误的代码时,自动化测试还能帮助你定位错误代码的位置。
有时候你会觉得,和富有创造性和生产力的业务代码比起来,编写枯燥的测试代码实在是太无聊了,特别是当你知道你的代码完全没有问题的时候。
然而,编写测试还是要比花费几个小时手动测试你的应用,或者为了找到某个小错误而胡乱翻看代码要有意义的多。
测试不仅能发现错误,而且能预防错误
「测试是开发的对立面」,这种思想是不对的。
如果没有测试,整个应用的行为意图会变得更加的不清晰。甚至当你在看自己写的代码时也是这样,有时候你需要仔细研读一段代码才能搞清楚它有什么用。
而测试的出现改变了这种情况。测试就好像是从内部仔细检查你的代码,当有些地方出错时,这些地方将会变得很显眼——就算你自己没有意识到那里写错了。
测试使你的代码更有吸引力
你也许遇到过这种情况:你编写了一个绝赞的软件,但是其他开发者看都不看它一眼,因为它缺少测试。没有测试的代码不值得信任。 Django 最初开发者之一的 Jacob Kaplan-Moss 说过:“项目规划时没有包含测试是不科学的。”
其他的开发者希望在正式使用你的代码前看到它通过了测试,这是你需要写测试的另一个重要原因。
创建一个测试来暴露这个 bug
import datetime

from django.test import TestCase
from django.urls import reverse
from django.utils import timezone

from .models import Question


class QuestionModelTests(TestCase):

    def test_was_published_recently_with_old_question(self):
        """
        was_published_recently() returns False for questions whose pub_date
        is older than 1 day.
        """
        time = timezone.now() - datetime.timedelta(days=1, seconds=1)
        old_question = Question(pub_date=time)
        self.assertIs(old_question.was_published_recently(), False)

    def test_was_published_recently_with_recent_question(self):
        """
        was_published_recently() returns True for questions whose pub_date
        is within the last day.
        """
        time = timezone.now() - datetime.timedelta(hours=23, minutes=59, seconds=59)
        recent_question = Question(pub_date=time)
        self.assertIs(recent_question.was_published_recently(), True)


def create_question(question_text, days):

    time = timezone.now() + datetime.timedelta(days=days)
    return Question.objects.create(question_text=question_text, pub_date=time)


class QuestionIndexViewTests(TestCase):
    def test_no_questions(self):
        """
        If no questions exist, an appropriate message is displayed.
        """
        response = self.client.get(reverse('polls:index'))
        self.assertEqual(response.status_code, 200)
        self.assertContains(response, "No polls are available.")
        self.assertQuerysetEqual(response.context['latest_question_list'], [])

    def test_past_question(self):
        """
        Questions with a pub_date in the past are displayed on the
        index page.
        """
        question = create_question(question_text="Past question.", days=-30)
        response = self.client.get(reverse('polls:index'))
        self.assertQuerysetEqual(
            response.context['latest_question_list'],
            [question],
        )

    def test_future_question(self):
        """
        Questions with a pub_date in the future aren't displayed on
        the index page.
        """
        create_question(question_text="Future question.", days=30)
        response = self.client.get(reverse('polls:index'))
        self.assertContains(response, "No polls are available.")
        self.assertQuerysetEqual(response.context['latest_question_list'], [])

    def test_future_question_and_past_question(self):
        """
        Even if both past and future questions exist, only past questions
        are displayed.
        """
        question = create_question(question_text="Past question.", days=-30)
        create_question(question_text="Future question.", days=30)
        response = self.client.get(reverse('polls:index'))
        self.assertQuerysetEqual(
            response.context['latest_question_list'],
            [question],
        )

    def test_two_past_questions(self):
        """
        The questions index page may display multiple questions.
        """
        question1 = create_question(question_text="Past question 1.", days=-30)
        question2 = create_question(question_text="Past question 2.", days=-5)
        response = self.client.get(reverse('polls:index'))
        self.assertQuerysetEqual(
            response.context['latest_question_list'],
            [question2, question1],
        )

class QuestionDetailViewTests(TestCase):
    def test_future_question(self):
        """
        The detail view of a question with a pub_date in the future
        returns a 404 not found.
        """
        future_question = create_question(question_text='Future question.', days=5)
        url = reverse('polls:detail', args=(future_question.id,))
        response = self.client.get(url)
        self.assertEqual(response.status_code, 404)

    def test_past_question(self):
        """
        The detail view of a question with a pub_date in the past
        displays the question's text.
        """
        past_question = create_question(question_text='Past Question.', days=-5)
        url = reverse('polls:detail', args=(past_question.id,))
        response = self.client.get(url)
        self.assertContains(response, past_question.question_text)
修复这个 bug
我们早已知道,当 pub_date 为未来某天时, Question.was_published_recently() 应该返回 False。我们修改 models.py 里的方法,让它只在日期是过去式的时候才返回 True
   def was_published_recently(self):
        now = timezone.now()
        return now - datetime.timedelta(days=1) <= self.pub_date <= now


 239
239


 被折叠的 条评论
为什么被折叠?
被折叠的 条评论
为什么被折叠?
 到【灌水乐园】发言


