


系列文章目录
前言
我看网上好多8266的应用开发都是用arduino开的,开发比较简单方便,资料也比较全面,所以我也尝试使用arduino来开发看看
提示:以下是本篇文章正文内容,下面案例可供参考
一、准备
1.Arduino1.8.13版本
2.windows10
3.模块硬件:esp826612f

二、使用步骤
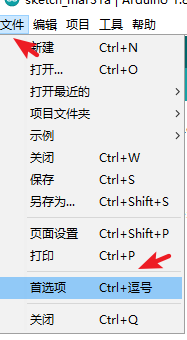
1.安装好Arduino,点击文件->首选项->在附加开发版管理器网址输入http://arduino.esp8266.com/stable/package_esp8266com_index.json

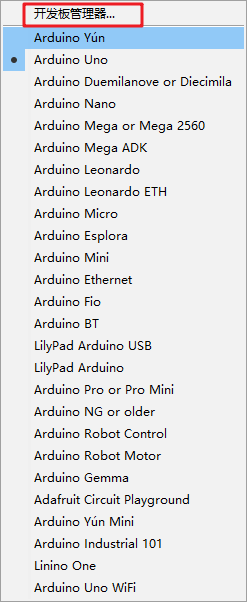
2.点击工具->开发板->开发板管理,添加需要的开发板

输入8266啥也没有(正常情况下会后对应的安装包,点击安装就行了)

我上网查了一下原因:在国内访问外网被网络限制了所以刷不出来或者加载很慢,而且我公司的电脑各种限制,所以只能手动安装下载好的包,参考网络上给的方法
1.先到git上下载 https://github.com/esp8266/Arduino
2.参考Arduino IDE安装esp8266 SDK(Windows10)-Arduino中文社区 - Powered by Discuz!
3.也可以在IoT-Project (lanzous.com)下载 8266_package_2.7.4.exe
下载8266_package_2.7.4.exe 完后双击安装(路径不用管),重新打开Arduino就出现了ESP8266相关包

4.好了,接下来可以打开一个示例,编译和下载到板子上了,点亮一个LED
1.打开示例

2.因为这块板子的 GPIO12、GPIO13、GPIO15接RGB上

所以可以把程序的LED_BUILTIN 改成 12、13、或者15 我这里改成13 是蓝灯
void setup() {
  pinMode(13, OUTPUT);     // Initialize the LED_BUILTIN pin as an output
}

// the loop function runs over and over again forever
void loop() {
  digitalWrite(13, LOW);   // Turn the LED on (Note that LOW is the voltage level
  // but actually the LED is on; this is because
  // it is active low on the ESP-01)
  delay(1000);                      // Wait for a second
  digitalWrite(13, HIGH);  // Turn the LED off by making the voltage HIGH
  delay(2000);                      // Wait for two seconds (to demonstrate the active low LED)
}
选择号端口和配置参数

编译

下载

下载完成,可以看到板子的蓝灯在闪速


 7308
7308


 被折叠的 条评论
为什么被折叠?
被折叠的 条评论
为什么被折叠?
 到【灌水乐园】发言


