


在原游戏中离子炮是这个样子的,
先聚焦,

再发射
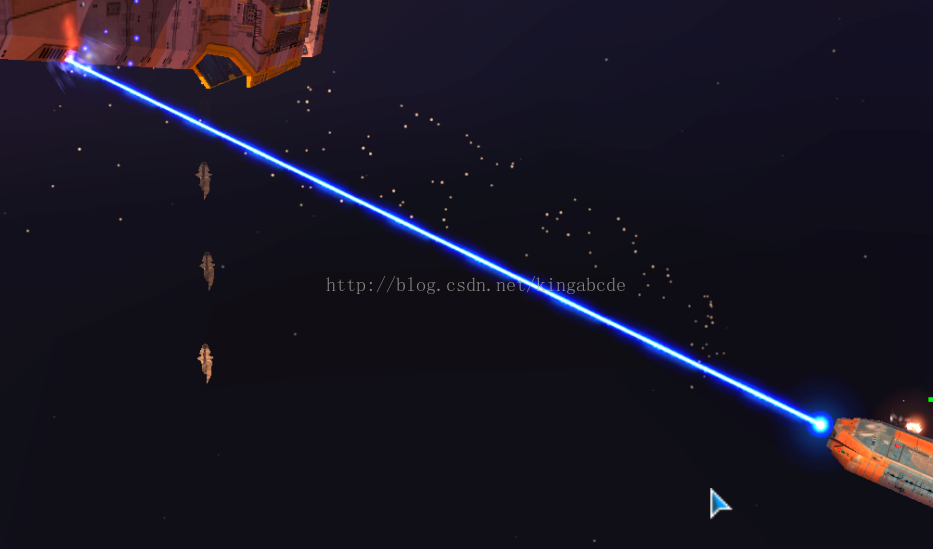
其过程是发射一条无线长的离子(可以看做一条直线),当离子碰得敌人后在敌人的碰撞处产生聚焦离子,即伤害,当敌人被击毁后穿透敌机,重复以上过程。接下来就来模拟这个效果
首先是聚焦。这个过程很适合用动画帧来实现。

离子由小变大切换
void Ion::createIonAnimation() {
	//离子炮动画
	unsigned int ionCount = ION_COUNT;
	CCArray* ionFrames = CCArray::createWithCapacity(ionCount);
	char ionChar[20] = {0};
	for(unsigned int i = 1; i <= ionCount; i++){
		sprintf(ionChar, "ion_anim_%d.png", i);
		CCSpriteFrame* spriteFrame = CCSpriteFrameCache::sharedSpriteFrameCache()->spriteFrameByName(ionChar);
		ionFrames->addObject(spriteFrame);
	}
	CCAnimation* ionAnimation = CCAnimation::createWithSpriteFrames(ionFrames);
	CCAnimationCache::sharedAnimationCache()->addAnimation(ionAnimation, ION_ANIMATION);
}
其次是发射。其发射的过程如下代码所示
		CCAnimation* ionAnimation = CCAnimationCache::sharedAnimationCache()->animationByName(ION_ANIMATION);
		ionAnimation->setDelayPerUnit(this->_focusTime);
		_ionAnimate = CCAnimate::create(ionAnimation);
		CCActionInterval* action = CCRepeatForever::create(CCSequence::create(_ionAnimate, CCCallFunc::create(this, callfunc_selector(Ion::ionAnimateFisished)),
			CCDelayTime::create(this->_ionLimitTime), CCCallFunc::create(this, callfunc_selector(Ion::ionLimitEnd)), CCDelayTime::create(0.2f), _ionAnimate->reverse(),
			CCCallFunc::create(this, callfunc_selector(Ion::doAddLimitTime)), CCDelayTime::create(this->_shootTime), NULL));
		this->runAction(action);
第一个动作就是聚焦的动作,第二个动作是把离子图片切换成发射的图片,代码很简单

void Ion::ionAnimateFisished() {
	this->_isShoot = true;
	this->setTexture(CCTextureCache::sharedTextureCache()->textureForKey(ion_anim_start_png));
	this->setTextureRect(CCRectMake(0, 0, this->_ionWidth, this->_ionHeight));
}
第三个动作是离子炮的持续时间,如8秒。第四个动作是离子炮发射结束动作

void Ion::ionLimitEnd() {
	this->setTexture(CCTextureCache::sharedTextureCache()->textureForKey(ion_anim_end_png));//切换粒子炮的发射结束图片
	this->setTextureRect(CCRectMake(0, 0, this->_distance, this->_ionHeight));//设置离子炮的结束长度
	this->_isShoot = false;//没有发射
	this->_target = NULL;//将目标重置为NULL
	this->_hasTarget = false;//没有目标
	this->_ionCollision->stopSystem();//将聚焦粒子停止
	this->_flag = true;//将聚焦粒子重置为可重启状态
}
发射过程后肯定是要与敌人进行判断,这里了就要用到线与线之间的交叉检查算法,先说一下思路
首先把离子看做是一条直线,把敌人的矩形的每条边看成是独立的边。
其次把检测这条直线和矩形的四条边是否有交叉,如果没有交叉则不做任何动作,如果有交叉,则算出交叉点,每条边都要算。
然后算出交叉点与直线的出发点的距离,取最短的距离的那个交叉点,这个交叉点就是要碰撞聚焦的点。
最后在这个碰撞交叉点启动聚焦粒子。
说得有点模糊,直接看代码。(注:下面的检测过程可以不每条边都检测,那么这时需要判断敌人的坐标相对于自己的坐标是坐落在那个象限中,在根据象限判断哪两条边需要检测,哪两条边不需要检测)
CCPoint Ion::getStartPoint(void) {//离子炮的发射起点
	return this->getParent()->convertToWorldSpace(this->getPosition());
}
CCPoint Ion::getEndPoint(void) {//离子炮的结束点
	CCPoint worldPoint = this->getParent()->convertToWorldSpace(this->getPosition());
	float endX = cos(this->_angle) * this->_ionWidth + worldPoint.x;
	float endY = sin(-this->_angle) * this->_ionWidth + worldPoint.y;
	return CCPointMake(endX, endY);
}
void Ion::checkCollision() {
	if(this->_target != NULL && (this->_target->getIsShootByIon(this->_id) == true || this->_hasTarget == false)) {
		CCPoint collisionPoint = CCPointZero;
		//计算离子炮的起点和终点,确立一条直线
		CCPoint start = this->getStartPoint();
		CCPoint end = this->getEndPoint();
		//获取矩形的四条边
		CCRect enemyRect = this->_target->boundingBox();
		CCPoint collisionPoint1 = CCPointZero;
		CCPoint collisionPoint2 = CCPointZero;
		CCPoint collisionPoint3 = CCPointZero;
		CCPoint collisionPoint4 = CCPointZero;
		//判断直线与这四条边是否有交叉
		bool isCollision1 = this->checkRectLineH(start, end, enemyRect.getMaxY(), enemyRect.getMinX(), enemyRect.getMaxX(), collisionPoint1);
		bool isCollision2 = this->checkRectLineH(start, end, enemyRect.getMinY(), enemyRect.getMinX(), enemyRect.getMaxX(), collisionPoint2);
		bool isCollision3 = this->checkRectLineV(start, end, enemyRect.getMaxX(), enemyRect.getMinY(), enemyRect.getMaxY(), collisionPoint3);
		bool isCollision4 = this->checkRectLineV(start, end, enemyRect.getMinX(), enemyRect.getMinY(), enemyRect.getMaxY(), collisionPoint4);
		//如果与其中的任何一条边有交叉,则进行碰撞检测
		if(isCollision1 || isCollision2 || isCollision3 || isCollision4) {
			this->_hasTarget = true;//找到目标
			this->_target->setIsShootByIon(this->_id, false);//将敌人绑定为已被射击状态
			//将交叉点与离子炮的起点距离初始化为离子炮的长度(即上面说的那条直线的长度)
			float distance1 = this->_ionWidth;
			float distance2 = this->_ionWidth;
			float distance3 = this->_ionWidth;
			float distance4 = this->_ionWidth;
			float distances[4] = {distance1, distance2, distance3, distance4};
			CCPoint collisionPoints[4] = {collisionPoint1, collisionPoint2, collisionPoint3, collisionPoint4};
			//逐个检测直线与哪条边有交叉,如果有交叉,则将直线的起点与交叉点的距离保存到上面的变量中
			if(isCollision1) {
				distance1 = ccpDistance(start, collisionPoint1);
				distances[0] = distance1;
			}
			if (isCollision2) {
				distance2 = ccpDistance(start, collisionPoint2);
				distances[1] = distance2;
			}
			if (isCollision3) {
				distance3 = ccpDistance(start, collisionPoint3);
				distances[2] = distance3;
			}
			if (isCollision4) {
				distance4 = ccpDistance(start, collisionPoint4);
				distances[3] = distance4;
			}
			//取距离最短的那条交叉点
			int index = minIndex(distances, 4);
			float distance = distances[index];
			CCPoint collisionPoint = collisionPoints[index];
			//将直线(离子炮)的长度剪成上面的最短距离
			this->setTextureRect(CCRectMake(0, 0, distance, this->_ionHeight));
			this->_distance = distance;
			_ionCollision->setPosition(collisionPoint);//在交叉点重置粒子系统的坐标
			if(_flag) {//粒子系统可以重置
				_ionCollision->resetSystem();//启动碰撞聚焦粒子
				_flag = false;//启动后下一次无需再次启动,将_flag置为false
			}
			_target->hurt(this->_damagePerSec * 0.0016f);//计算伤害

			if(this->_target->getHp() <= 0 || this->_target->getActive() == false) {//敌人被击毁
				this->_hasTarget = false;//没有目标
				this->_target->setIsShootByIon(this->_id, true);//将敌人绑定没有被射击状态
				this->_target = NULL;//将离子炮目标重置为空
			}

		}else {//没有交叉
			this->_hasTarget = false;
			this->_target->setIsShootByIon(this->_id, true);
			this->_target = NULL;
		}
	}
	if(this->_hasTarget == false && this->_target == NULL) {//没有目标,重置离子炮的长度和粒子状态
		_flag = true;
		_ionCollision->stopSystem();
		this->setTextureRect(CCRectMake(0, 0, this->_ionWidth, this->_ionHeight));
		this->_distance = this->_ionWidth;
	}
}这篇文章有详细的分解:http://blog.csdn.net/kfarvid/article/details/6759547
bool Ion::checkRectLineH(CCPoint start, CCPoint end, float y0, float x1, float x2, CCPoint& p) {
//直线在点的上方
if ((y0 < start.y) && (y0 < end.y))
return false;
//直线在点的下方
if ((y0 > start.y) && (y0 > end.y))
return false;
//水平直线
if (start.y == end.y) {
//水平直线与点处于同一水平。
if (y0 == start.y) {
//直线在点的左边
if ((start.x < x1) && (end.x < x1))
return false;
//直线在x2垂直线右边
if ((start.x > x2) && (end.x > x2))
return false;
//直线的部分或者全部处于点与x2垂直线之间
p = CCPointMake(x1, y0);
return true;
}else {//水平直线与点不处于同一水平。
return false;
}
}
//斜线
float x = (end.x - start.x) * (y0 - start.y) / (end.y - start.y) + start.x;
p = CCPointMake(x, y0);
return ((x >= x1) && (x <= x2));
}
bool Ion::checkRectLineV(CCPoint start, CCPoint end, float x0, float y1, float y2, CCPoint& p) {
if ((x0 < start.x) && (x0 < end.x))
return false;
if ((x0 > start.x) && (x0 > end.x))
return false;
if (start.x == end.x) {
if (x0 == start.x) {
if ((start.y < y1) && (end.y < y1))
return false;
if ((start.y > y2) && (end.y > y2))
return false;
p = CCPointMake(x0, y1);
return true;
}else {
return false;
}
}
float y = (end.y - start.y) * (x0 - start.x) / (end.x - start.x) + start.y;
p = CCPointMake(x0, y);
return ((y >= y1) && (y <= y2));
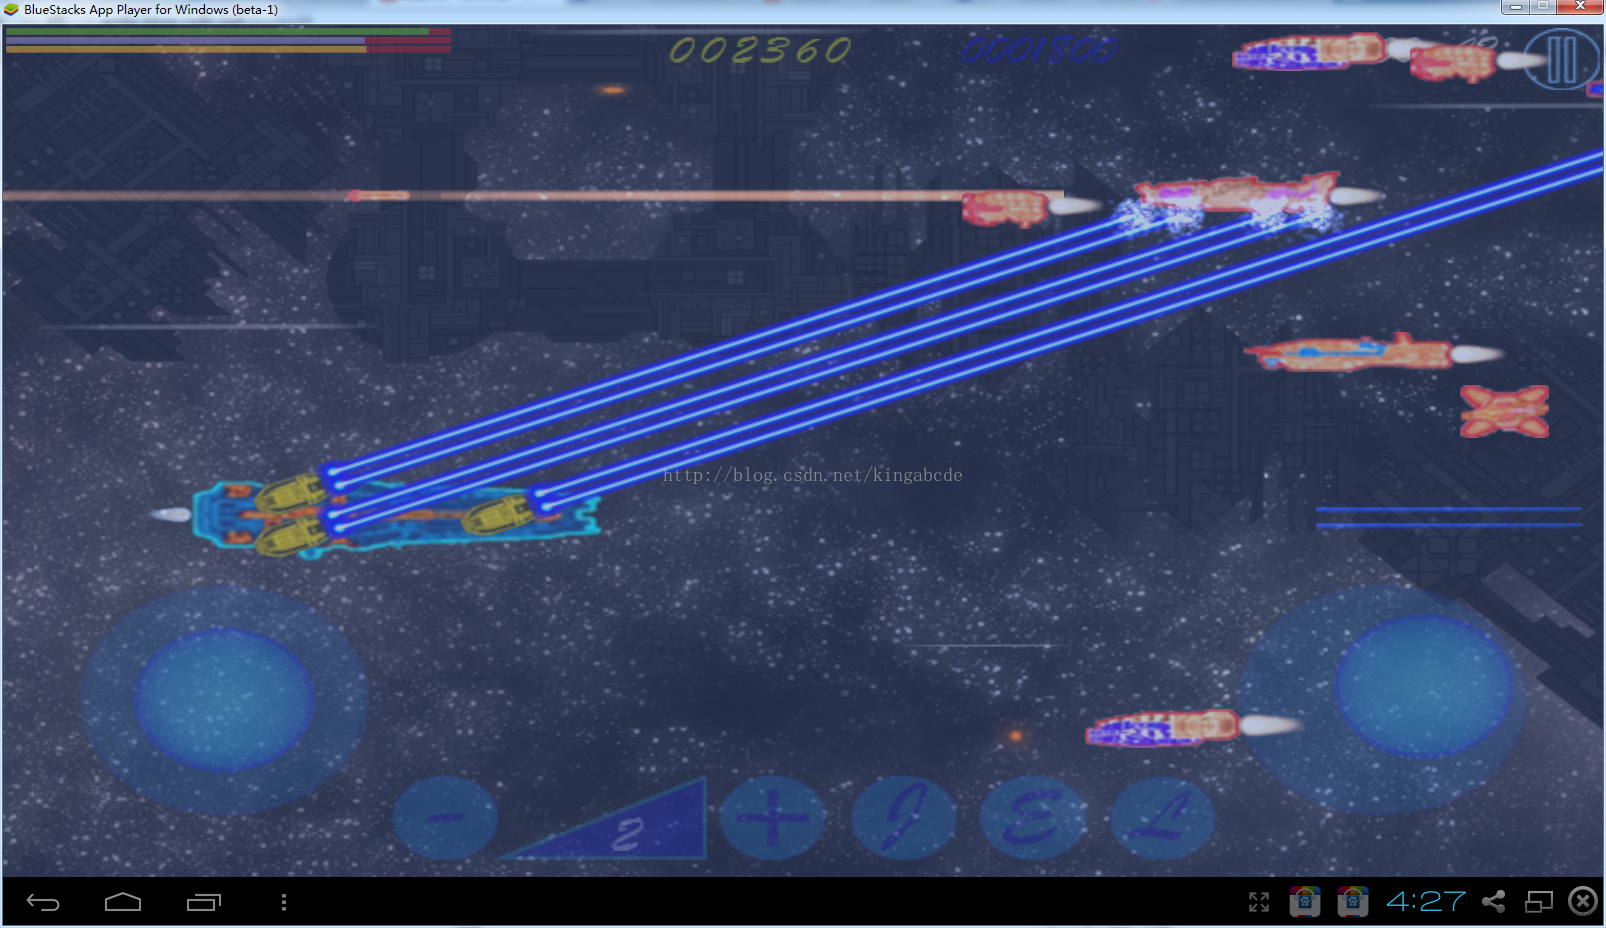
}做完以上工作就可以看到以下的效果了


 3552
3552

 被折叠的 条评论
为什么被折叠?
被折叠的 条评论
为什么被折叠?
 到【灌水乐园】发言


