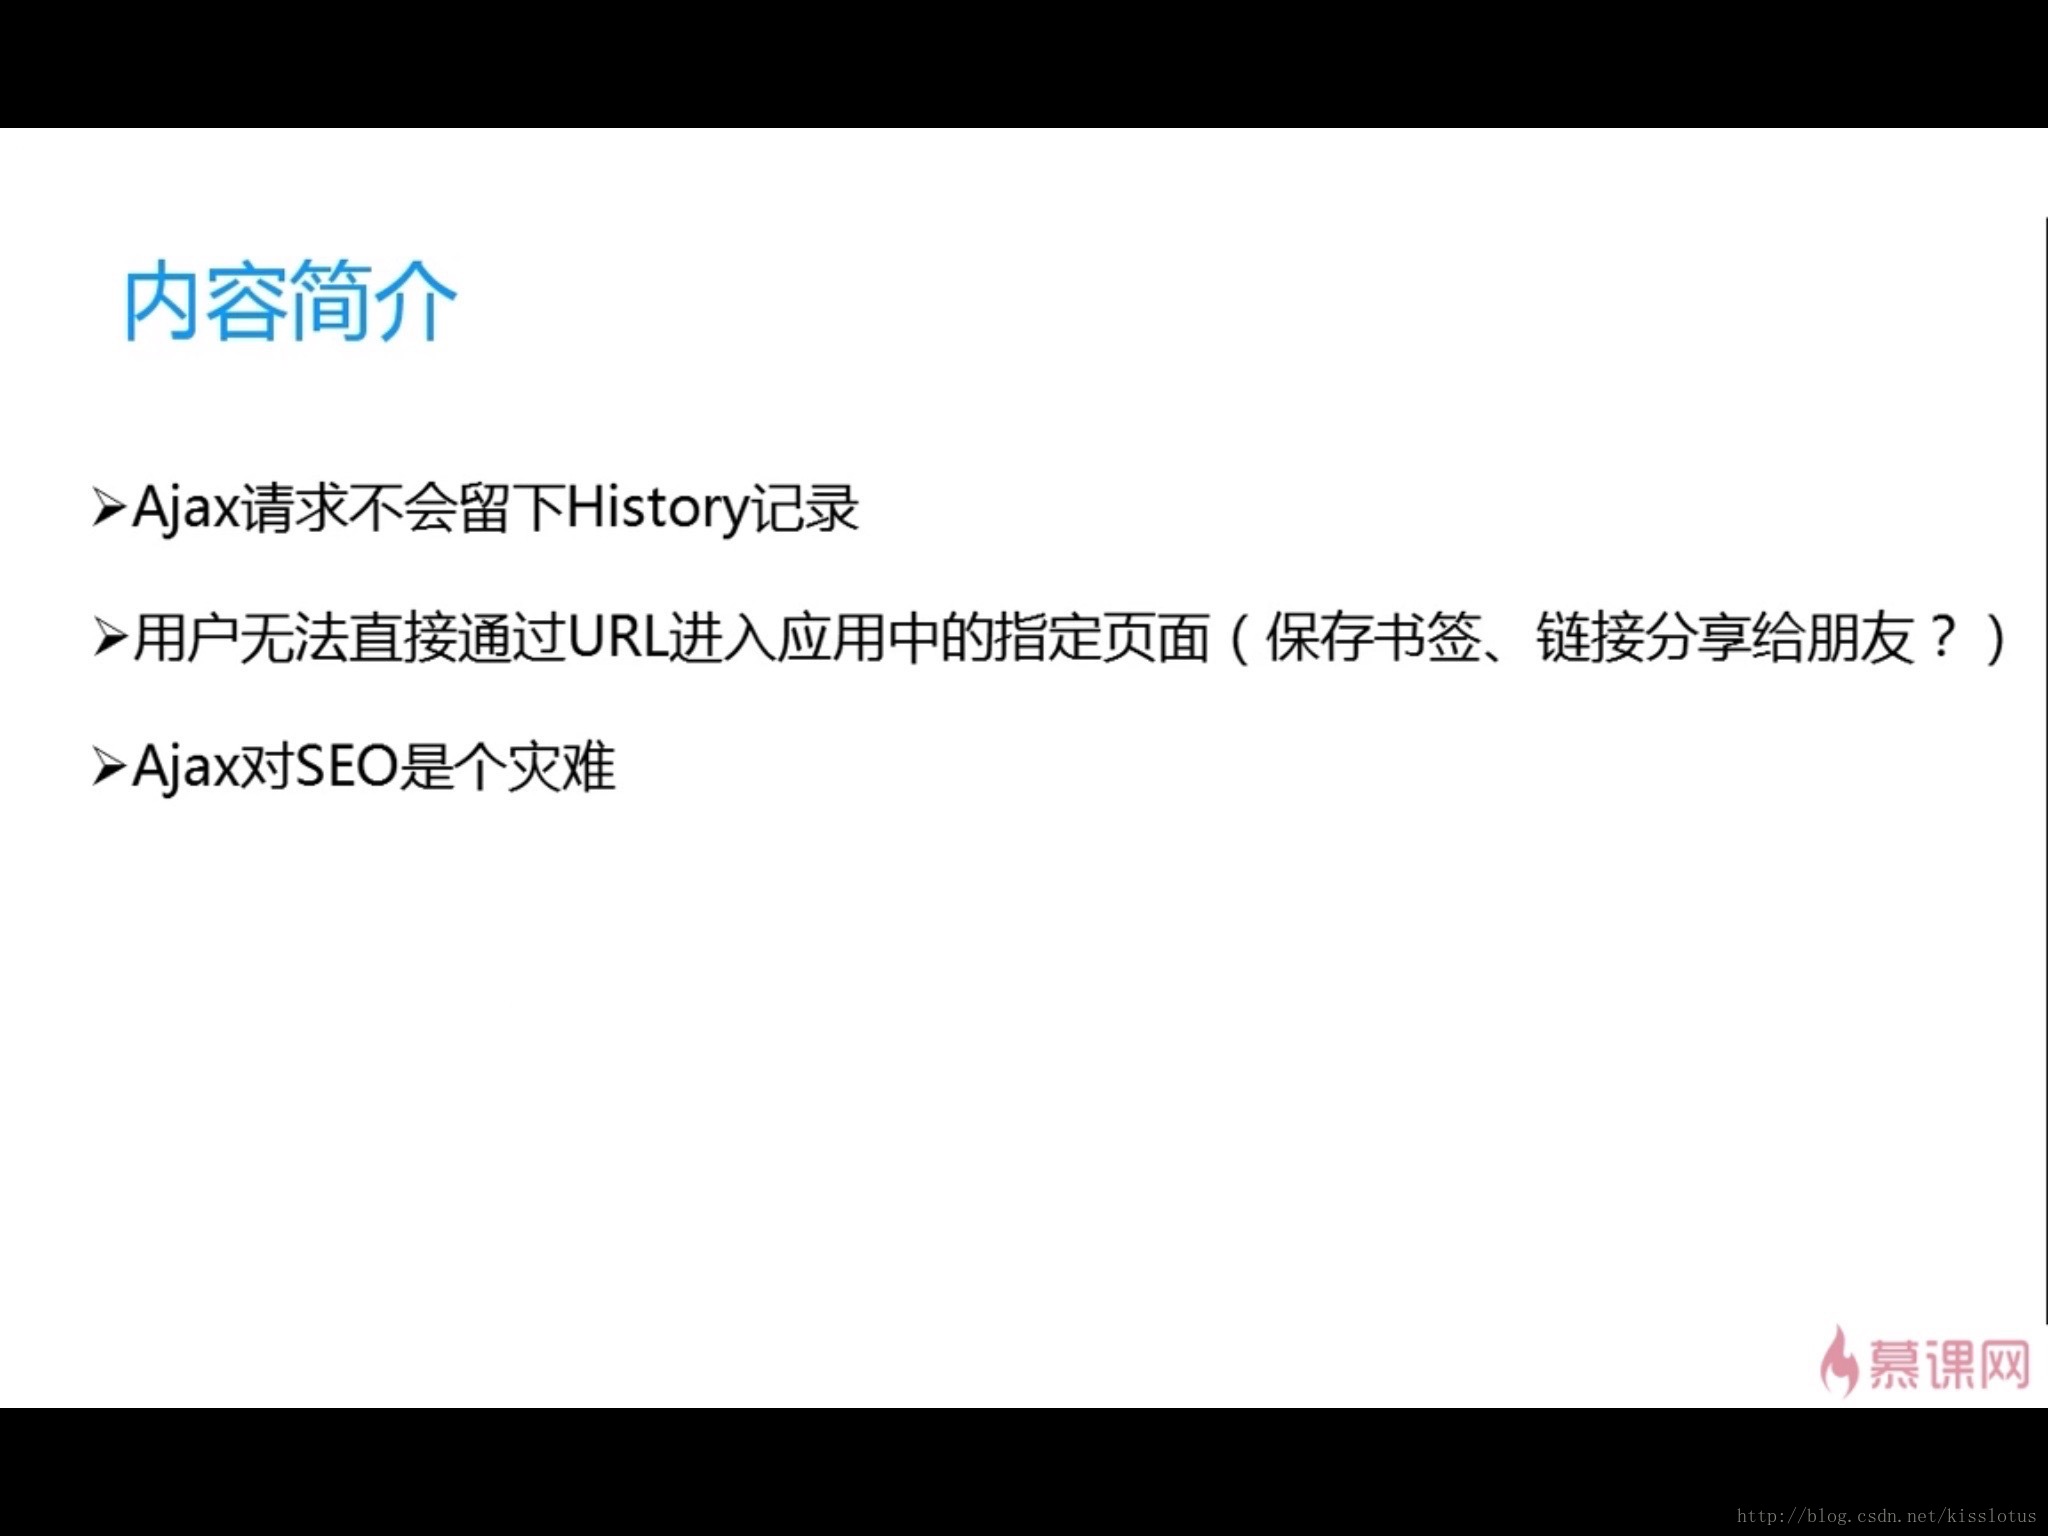
1. AJAX的缺点
2. AJAX的缺点是前端为什么需要路由的重要原因!
3. 深层次嵌套路由:页面的一部分内容变换
    a. 使用angularJS本身的路由实现比较困难,GitHub搜索AngularUI;https://angular-ui.github.io
    b. UIRoute3.js
var routerApp = angular.module('routerApp' , ['ui.router' ]);
routerApp.config(function ($stateProvider , $urlRouterProvider ) {$urlRouterProvider .otherwise('/index' );
$stateProvider
.state('index' , {
url: '/index' ,
views: {
'' : {
templateUrl: 'tpls3/index.html'
},
'topbar@index' : {
templateUrl: 'tpls3/topbar.html'
},
'main@index' : {
templateUrl: 'tpls3/home.html'
}
}
})
.state('index.usermng' , {
url: '/usermng' ,
views: {
'main@index' : {
templateUrl: 'tpls3/usermng.html' ,
controller: function ($scope , $state ) {$scope .addUserType = function () {$state .go("index.usermng.addusertype" );
}
}
}
}
})
.state('index.usermng.highendusers' , {
url: '/highendusers' ,
templateUrl: 'tpls3/highendusers.html'
})
.state('index.usermng.normalusers' , {
url: '/normalusers' ,
templateUrl: 'tpls3/normalusers.html'
})
.state('index.usermng.lowusers' , {
url: '/lowusers' ,
templateUrl: 'tpls3/lowusers.html'
})
.state('index.usermng.addusertype' , {
url: '/addusertype' ,
templateUrl: 'tpls3/addusertypeform.html' ,
controller: function ($scope , $state ) {$scope .backToPrevious = function () {'index.permission' , {
url: '/permission' ,
views: {
'main@index' : {
template: '这里是权限管理'
}
}
})
.state('index.report' , {
url: '/report' ,
views: {
'main@index' : {
template: '这里是报表管理'
}
}
})
.state('index.settings' , {
url: '/settings' ,
views: {
'main@index' : {
template: '这里是系统设置'
}
}
})
}); c. UIRoute3.html
<!doctype html>
<html ng-app ="routerApp" >
<head >
<meta charset ="utf-8" >
<link rel ="stylesheet" href ="css/bootstrap-3.0.0/css/bootstrap.css" >
<link rel ="stylesheet" href ="css/index.css" >
<script src ="js/angular-1.3.0.js" > </script >
<script src ="js/angular-animate.js" > </script >
<script src ="js/angular-ui-router.js" > </script >
<script src ="UIRoute3.js" > </script >
</head >
<body >
<div ui-view > </div >
</body >
</html > d. Tlps3/index.html
<div class ="container" >
<div ui-view="topbar" ></div >
<div ui-view="main" ></div >
</div > e. Topbar.html
<nav class ="navbar navbar-inverse" role ="navigation" >
<div class ="navbar-header" >
<a class ="navbar-brand" ui-sref ="#" > ui-router综合实例</a >
</div >
<ul class ="nav navbar-nav" >
<li >
<a ui-sref ="index" > 首页</a >
</li >
<li >
<a ui-sref ="index.usermng" > 用户管理</a >
</li >
<li >
<a ui-sref ="index.permission" > 权限管理</a >
</li >
<li >
<a ui-sref ="index.report" > 报表管理</a >
</li >
<li >
<a ui-sref ="index.settings" > 系统设置</a >
</li >
</ul >
</nav >
f. Home.html
<div class ="jumbotron text-center" >
<h2 > 首页</h2 >
<p >
首页的形式一般比较<span class ="text-danger" > 灵活</span > ,而且可能随时发生变化。
</p >
</div > g. Addusertypeform.html
<h3 > 新增用户</h3 >
<form class ="form-horizontal" role ="form" >
<div class ="form-group" >
<label class ="col-md-2 control-label" >
邮箱:
</label >
<div class ="col-md-10" >
<input type ="email" class ="form-control" placeholder ="推荐使用126邮箱" >
</div >
</div >
<div class ="form-group" >
<label class ="col-md-2 control-label" >
密码:
</label >
<div class ="col-md-10" >
<input type ="password" class ="form-control" placeholder ="只能是数字、字母、下划线" >
</div >
</div >
<div class ="form-group" >
<div class ="col-md-offset-2 col-md-10" >
<div class ="checkbox" >
<label >
<input type ="checkbox" > 自动登录
</label >
</div >
</div >
</div >
<div class ="form-group" >
<div class ="col-md-offset-2 col-md-10" >
<button class ="btn btn-primary" ng-click ="backToPrevious()" > 返回</button >
</div >
</div >
</form >
h. Highendusers.html
<div class ="row" >
<div class ="col-md-12" >
<h3 > 高端用户列表</h3 >
</div >
</div >
<div class ="row" >
<div class ="col-md-12" >
<table class ="table table-bordered table-hover table-condensed" >
<thead >
<tr >
<th > 序号</th >
<th > 姓名</th >
<th > 年龄</th >
<th > 作品</th >
</tr >
</thead >
<tbody >
<tr >
<td rowspan ="2" > 1</td >
<td > 大漠穷秋</td >
<td > 29</td >
<td > 《用AngularJS开发下一代WEB应用》</td >
</tr >
<tr >
<td > 大漠穷秋</td >
<td > 29</td >
<td > 《用AngularJS开发下一代WEB应用》</td >
</tr >
<tr >
<td > 2</td >
<td > 大漠穷秋</td >
<td > 29</td >
<td > 《Ext江湖》</td >
</tr >
<tr >
<td > 3</td >
<td colspan ="2" > 大漠穷秋</td >
<td > 《ActionScript游戏设计基础(第二版)》</td >
</tr >
</tbody >
</table >
</div >
</div > i. Normalusers.html
<div class ="alert alert-success" role ="alert" >
<strong > Well done!</strong > You successfully read <a href ="#" class ="alert-link" > this important alert message</a > .
</div >
<div class ="alert alert-info" role ="alert" >
<strong > Heads up!</strong > This <a href ="#" class ="alert-link" > alert needs your attention</a > , but it's not super important.
</div >
<div class ="alert alert-warning" role ="alert" >
<strong > Warning!</strong > Better check yourself, you're <a href ="#" class ="alert-link" > not looking too good</a > .
</div >
<div class ="alert alert-danger" role ="alert" >
<strong > Oh snap!</strong > <a href ="#" class ="alert-link" > Change a few things up</a > and try submitting again.
</div > j. Lowusers.html
<div class ="btn-toolbar" role ="toolbar" >
<div class ="btn-group" >
<button type ="button" class ="btn btn-default" >
<span class ="glyphicon glyphicon-align-left" > </span >
</button >
<button type ="button" class ="btn btn-default" >
<span class ="glyphicon glyphicon-align-center" > </span >
</button >
<button type ="button" class ="btn btn-default" >
<span class ="glyphicon glyphicon-align-right" > </span >
</button >
<button type ="button" class ="btn btn-default" >
<span class ="glyphicon glyphicon-align-justify" > </span >
</button >
</div >
</div >
<div class ="btn-toolbar" role ="toolbar" >
<button type ="button" class ="btn btn-default btn-lg" >
<span class ="glyphicon glyphicon-star" > </span > Star</button >
<button type ="button" class ="btn btn-default" >
<span class ="glyphicon glyphicon-star" > </span > Star</button >
<button type ="button" class ="btn btn-default btn-sm" >
<span class ="glyphicon glyphicon-star" > </span > Star</button >
<button type ="button" class ="btn btn-default btn-xs" >
<span class ="glyphicon glyphicon-star" > </span > Star</button >
</div > k. Usermng.html
<div class ="row" >
<div class ="col-md-3" >
<div class ="row" >
<div class ="col-md-12" >
<div class ="list-group" >
<a ui-sref="#" class ="list-group-item active" >用户分类</a>
<a ui-sref="index.usermng.highendusers" class ="list-group-item" >高端用户</a>
<a ui-sref="index.usermng.normalusers" class ="list-group-item" >中端用户</a>
<a ui-sref="index.usermng.lowusers" class ="list-group-item" >低端用户</a>
<a ui-sref="#" class ="list-group-item" >黑名单</a>
</div >
</div >
</div >
<div class ="row" >
<div class ="col-md-12" >
<button class ="btn btn-primary" ng-click="addUserType()" >新增用户</button>
</div >
</div >
</div >
<div class ="col-md-9" >
<div ui-view></div >
</div >
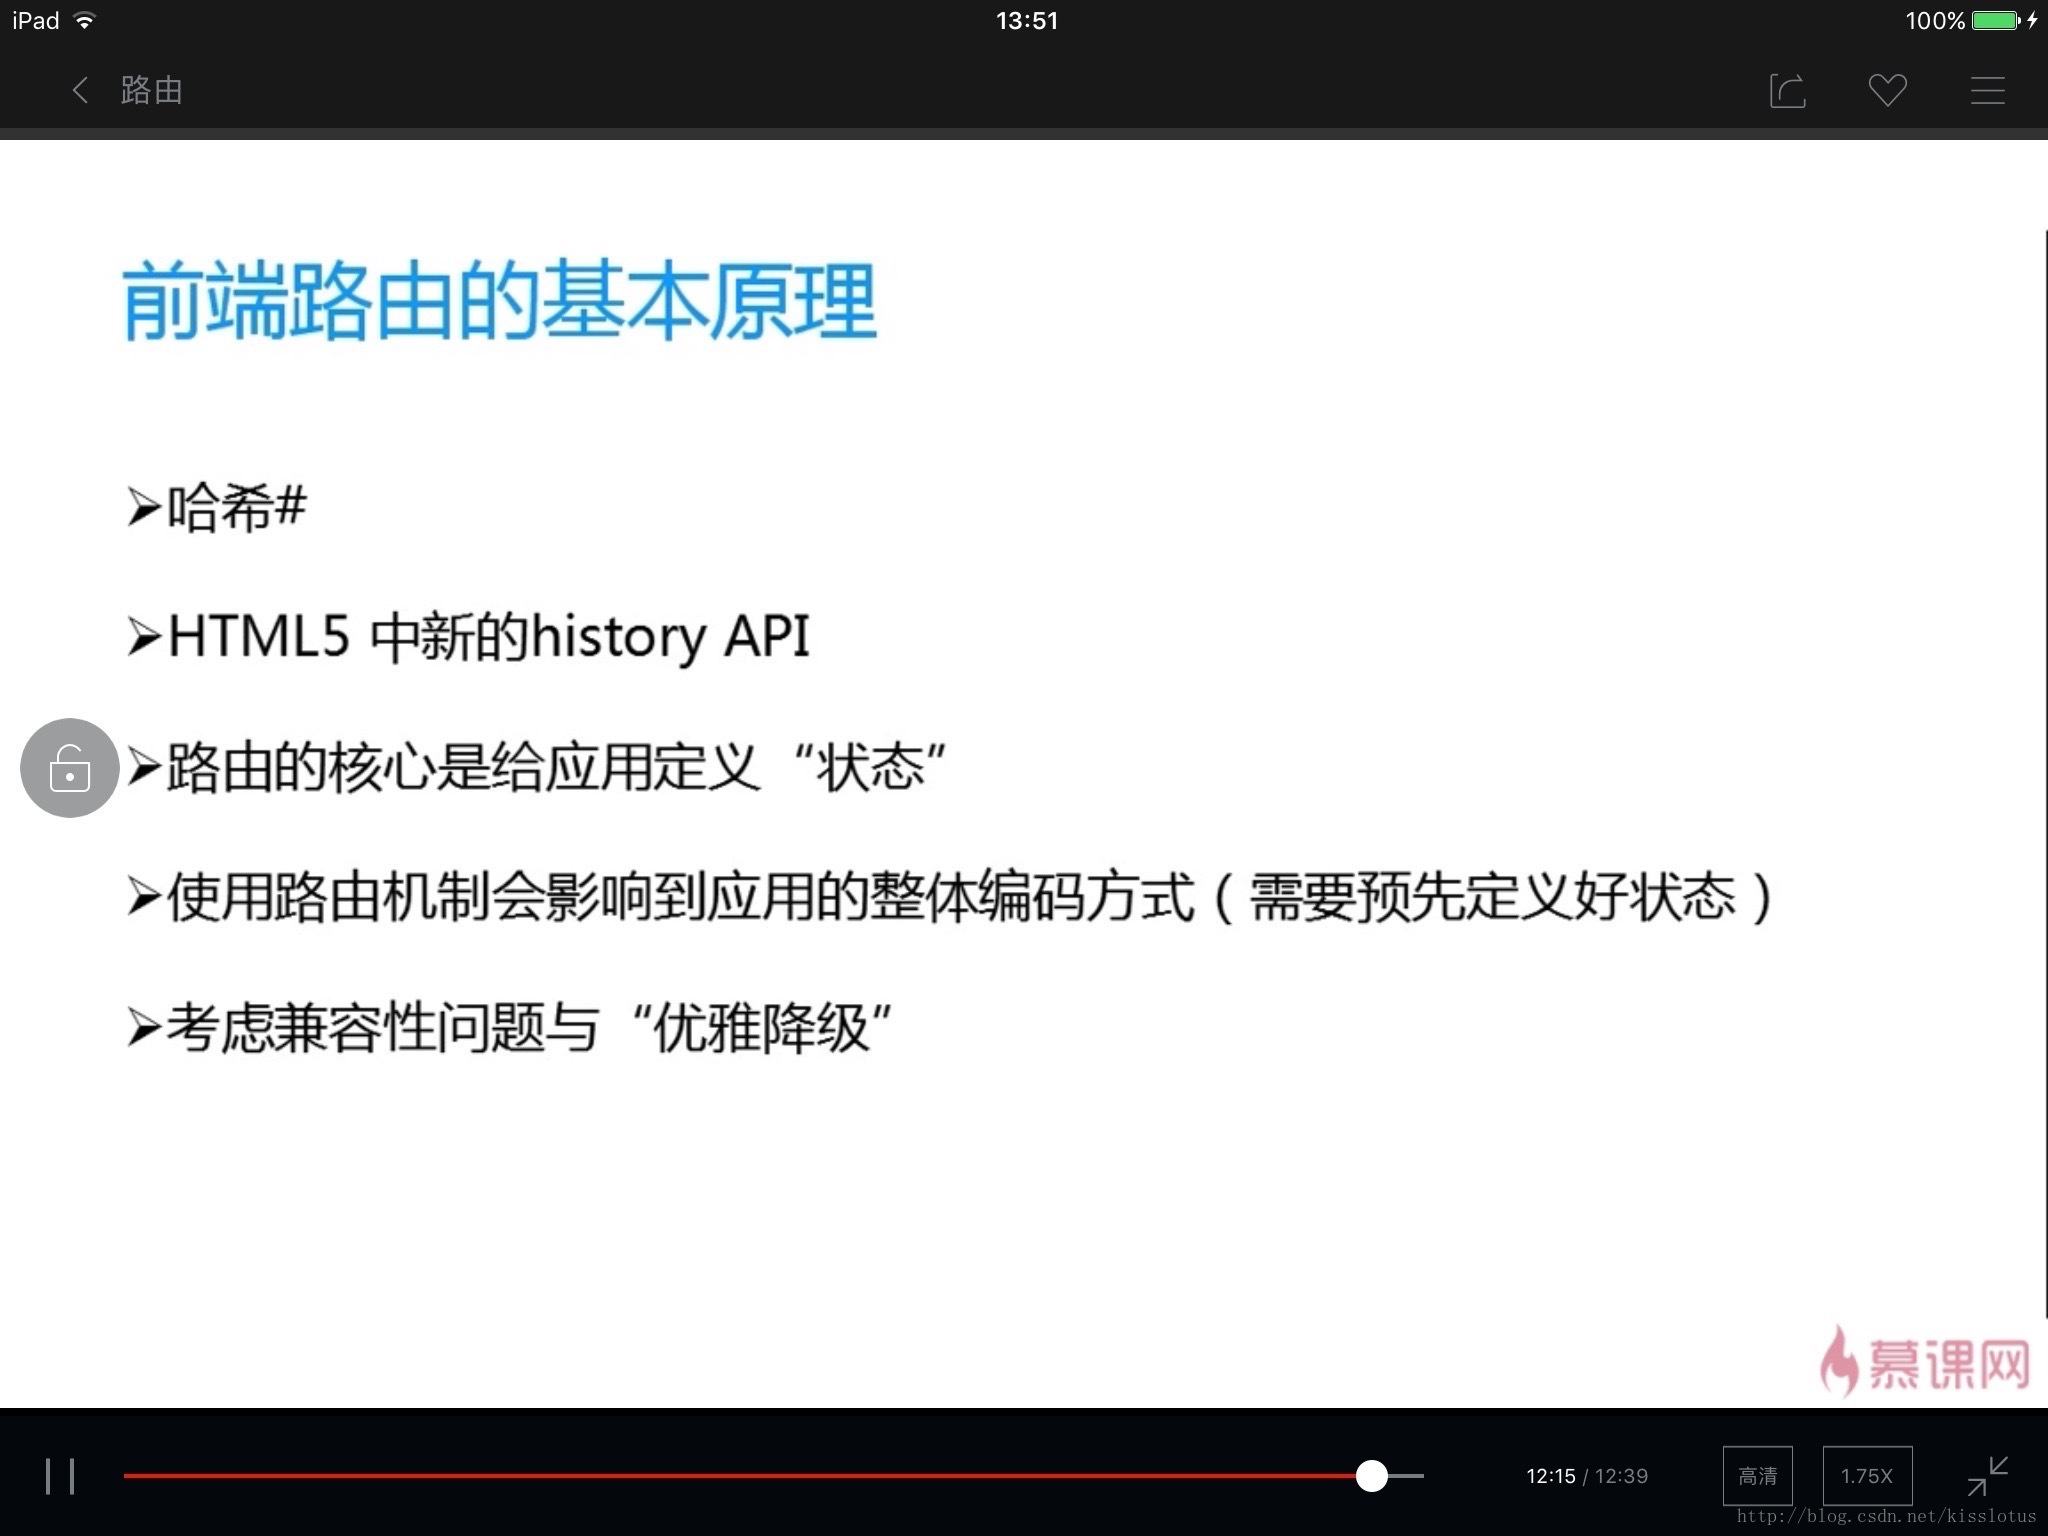
</div >4. 前端路由的基本原理


 461
461

 被折叠的 条评论
为什么被折叠?
被折叠的 条评论
为什么被折叠?
 到【灌水乐园】发言


