


 本文深入探讨了Java中的多线程概念,包括并发与并行、进程与线程的区别、线程调度、主线程的执行流程。详细讲解了如何创建多线程程序,包括继承Thread类和实现Runnable接口的方式,并介绍了线程安全问题和解决方案,如线程同步、锁机制。此外,还讨论了线程池的使用以及Lambda表达式在简化多线程代码中的应用。
一、多线程
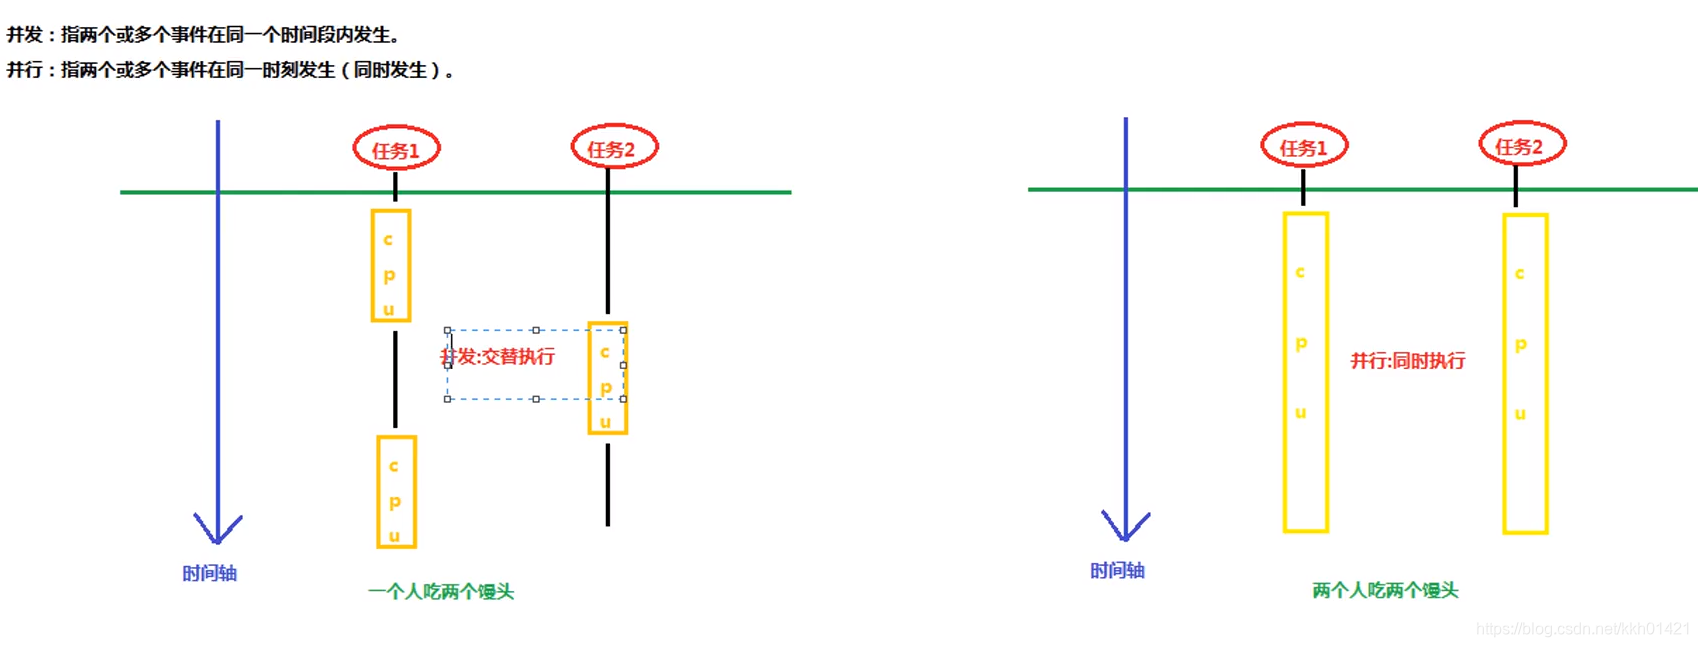
(一)并发与并行
(二)进程概念
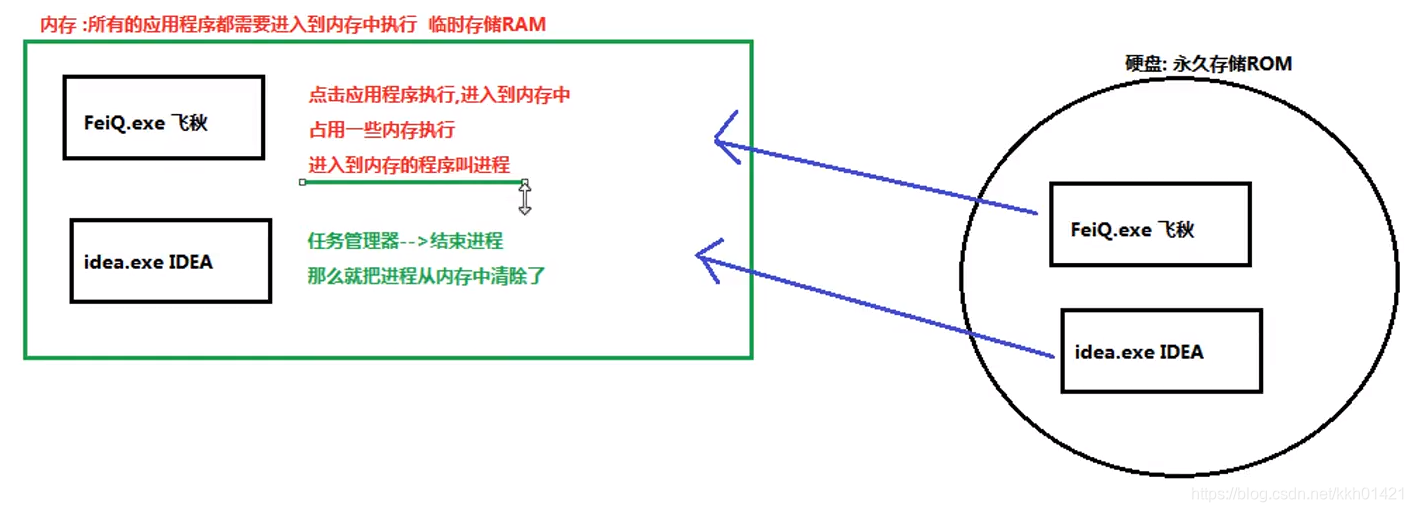
- 进程指一个内存中的应用程序,每个进程都有一个独立的内存空间,一个应用程序可以同时运行多个进程;进程也是程序的一次执行过程,是系统运行程序的基本单位;系统运行一个程序即是一个程序从创建、运行到消亡的过程。
(三)线程概念
- 线程是进程中的一个执行单元,负责当前进程中程序的执行,一个进程中至少有一个线程。一个进程中是可以有多个线程的,这个应用程序也可以被称之为多线程程序。
- 总之:一个程序运行后至少有一个进程,一个进程中可以包含多个线程。
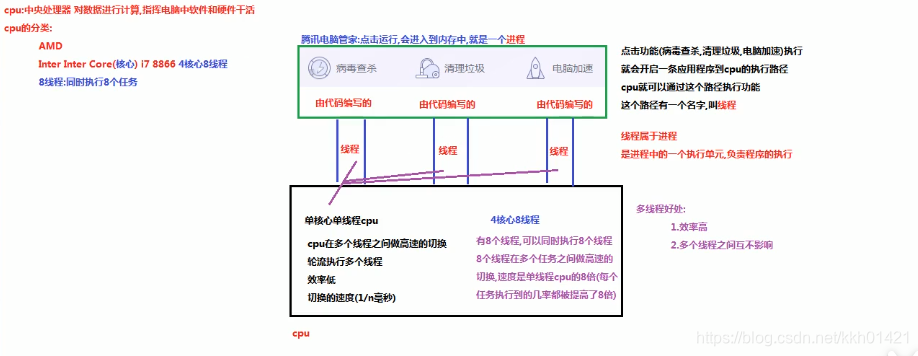
(四)线程的调度
1、分时调度
- 所有线程轮流使用CPU的使用权,平均分配每个线程占用CPU的时间
2、抢占式调度
- 优先让优先级高的线程使用CPU,如果线程的优先级相同,那么就会随机选择一个(线程随机性),Java使用的为抢占式调度。
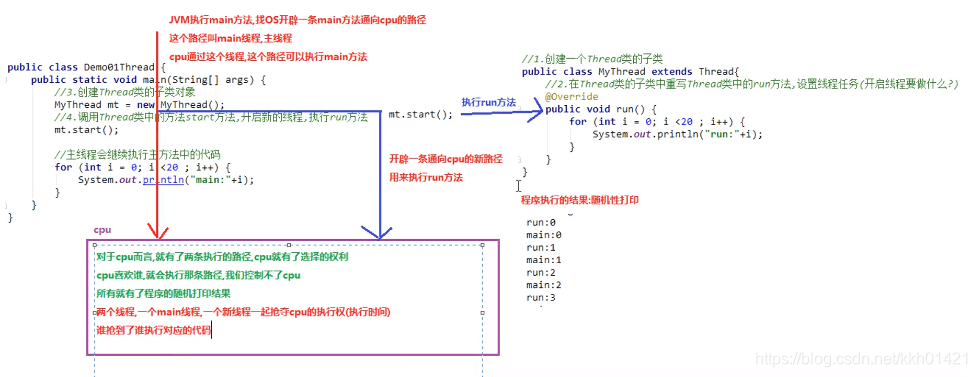
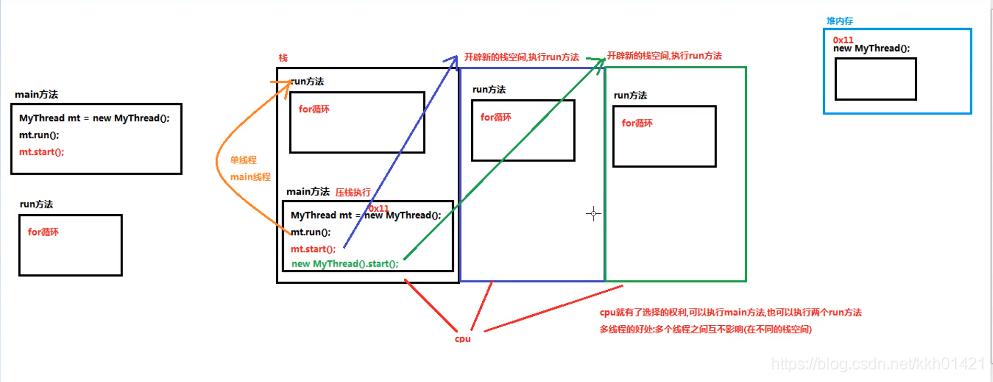
(五)主线程
- 执行(main)方法的线程
- 单线程程序:Java程序中只有一个线程,执行从main方法开始,从上到下依次执行。
- JVM执行main方法,main方法会进入到栈内存。JVM会找操作系统开辟一条main方法通向CPU的执行路径。cpu就可以通过这个路径(主线程)来执行main方法。
(六)创建多线程程序第一种方式
- 创建Thread类的子类
- java.lang.Thread类:是描述线程的类,如果想要实现多线程程序,就必须继承Thread类
1、实现步骤
- 创建一个Thread类的子类
- 在Thread类的子类中重写Thread类中的run方法,设置线程任务
- 创建Thread类的子类对象
- 调用Thread类中的方法start方法,开启新的线程,执行run方法
void start() 使该线程开始执行;Java虚拟机调用该线程的run方法。
    结果是两个线程并发地运行;当前线程(main线程)和另一个线程(创建的新线程,执行其run方法)。
    多次启动一个线城是非法的。特别是当线程已经结束执行后不能再重新启动。
2、测试代码
public class test1 extends Thread {

    @Override
    public void run() {
        for (int i = 1; i <=10; i++) {
            System.out.println("run"+i);
        }
    }
}

public class test01 {
    public static void main(String[] args) {
        test1 t1 = new test1();
        t1.start();
        for (int i = 1; i <=10 ; i++) {
            System.out.println("main"+i);
        }

    }
}
run1
run2
main1
run3
main2
run4
main3
run5
main4
run6
main5
run7
main6
run8
main7
run9
main8
run10
main9
main10
二、线程
(一)多线程原理
1、随机打印结果
2、多线程内存图解
(二)Thread类
1、获取线程的名称
- 使用Thread类中的方法getName
String getName() 返回该线程的名称
- 可以先获取到当前正在执行的线程,使用线程中的方法getName获取线程的名称
static Thread currentTHread() 返回对当前正在执行的线程对象的引用
- 测试代码
public class test2 extends Thread{

    @Override
    public void run() {
        //直接获取线程名称
        String name = getName();
        System.out.println(name);
        //线程运行中获取
       Thread name1 = currentThread();
        System.out.println(name1);
        //链式编程获取线程名
        System.out.println(Thread.currentThread().getName());
    }
}

public class test02 {
    public static void main(String[] args) {
        test2 t2 = new test2();
        t2.start();
        //输出主线程名
        System.out.println(Thread.currentThread().getName());
    }
}
Thread-0
main
Thread[Thread-0,5,main]
Thread-0
2、设置线程的名程(了解)
(1)使用Thread类中的方法setName(名字)
void setName(String name) 改变线程名称,使之与参数name相同。
(2)创建一个带参数的构造方法,参数传递线程的名称;调用父类的带参数构造方法,把线程的名称传递给父类,让父类(Thread)给子线程起一个名字Thread(String name)分配给新的Thread对象。
public class test3 extends Thread{
    //获取线程名称
    public void run(){
        System.out.println(Thread.currentThread().getName());
    }
    //获取线程名称
    public test3(){}
    public test3(String name){
        super(name);
    }

}

public class test03 {
    public static void main(String[] args) {
        test3 t1=new test3();
        t1.setName("zhangsan");
        t1.start();

        new test3("lisi").start();

    }

}
3、Thread类常用方法:Sleep
public static void sleep (long millis):使当前正在执行的线程以指定的毫秒数暂停(暂时停止执行)
毫秒数结束后,线程继续执行。
public class test4 {
    public static void main(String[] args) {
        //模拟秒表
        for (int i = 1; i <60 ; i++) {
            System.out.println(i);
            try {
                Thread.sleep(1000);
            } catch (InterruptedException e) {
                e.printStackTrace();
            }
        }
    }
}
(三)Runable接口
1、实现Runable接口
(1)Runable接口应该由那些打算通过某一线程执行其实例的类实现。类必须定义为一个称为run的无参数方法。
(2)构造方法
Thread(Runable target):分配新的Thread对象
Thread(Runable target,String name):分配新的Thread对象
实现步骤
1、创建一个Runable接口的实现类
2、在实现类中重写Runable接口的run方法,设置线程任务
3、创建一个Runable接口的实现类对象
4、创建Thread类对象,构造方法中传递Runable接口的是实现类对象
5、调用Thread类中的start方法,开启新的线程执行run方法。
public  class test5 implements Runnable{
    public void run(){
        for (int i = 0; i < 10; i++) {
            System.out.println(Thread.currentThread().getName()+"-->"+i);
        }
    }
}

public class test05 {
    public static void main(String[] args) {
        test5 t1 = new test5();
        Thread t = new Thread(t1);
        t.start();
        for (int i = 0; i < 10; i++) {
            System.out.println(Thread.currentThread().getName() + "-->" + i);
        }
    }
}
2、Thread和Runnable的区别
如果一个类继承Thread,则不适合资源共享,如果实现了Runable接口,则很容易实现资源共享。
实现Runable接口创建多线程程序好处
1、避免了单线程局限性
一个类只能继承一个类,实现Runable接口还可以继承其他类实现其他接口
2、增强了程序的扩展性,降低了程序的耦合性(解耦)
实现Runable接口的方式,把设置线程任务和开启新线程进行了分离(解耦)
实现类中,重写了run方法:用来设置线程任务
创建Thread类对象,调用start方法:用来开启新线程
(四)匿名内部类方式实现线程的创建
匿名:没有名字
内部类:写在其他类内部的类
作用:简化代码。把子类继承父类,重写父类的方法,创建子类对象合一步完成。把实现类实现类接口,重写接口中的方法,创建实现类对象合一步完成。
产物:子类/实现类对象,而这个类没有名字。
格式:
new 父类/接口 (){
    重复父类/接口中方法
};
测试代码:
public class test6 {
    public static void main(String[] args) {
        //类
       new Thread(){
           @Override
           public void run() {
               for (int i = 0; i < 10; i++) {
                   System.out.println(Thread.currentThread().getName()+"-->"+i);
               }
           }
       }.start();
       //接口
        Runnable r =new Runnable() {
            @Override
            public void run() {
                for (int i = 0; i < 10; i++) {
                    System.out.println(Thread.currentThread().getName()+"-->"+i);
                }
            }
        };
        new Thread(r).start();
        //接口简化
        new Thread(new Runnable() {
            @Override
            public void run() {
                for (int i = 0; i < 10; i++) {
                    System.out.println(Thread.currentThread().getName()+"-->"+i);
                }
            }
        }).start();
    }
}
二、线程安全
(一)线程安全概述
1、单线程程序不会出现线程安全问题
2、多线程程序没有访问共享数据不会产生问题
3、多线程程序访问了共享数据会产生数据安全问题
(二)线程同步
1、同步代码块
格式:
synchronized(锁对象){
    代码
}
注意:
通过代码块中的锁对象可以使用任意对象。但是必须保证多个线程使用的锁对象是同一个。
锁对象作用:
把同步代码块锁住,只让一个线程在同步代码块执行
public class test7 implements Runnable{
    private int number=100;
    //创建锁对象
    Object obj=new Object();
    @Override
    public void run() {
        while(number>0){
            synchronized (obj){
                try {
                    Thread.sleep(100);
                } catch (InterruptedException e) {
                    e.printStackTrace();
                }
                if(number>0){
                    System.out.println("现在到第"+number+"号");
                }
                number--;
            }
        }
    }
}


public class test07 {
    public static void main(String[] args) {
       test7 t=new test7();
        Thread t1=new Thread(t);
        Thread t2=new Thread(t);
        Thread t3=new Thread(t);
        t1.start();
        t2.start();
        t3.start();
    }
}
2、同步技术原理
使用一个锁对象,这个锁对象叫同步锁也叫对象锁,也叫对象监视器。
同步中的线程没有执行完毕不会释放锁,同步外的线程没有锁进不去同步。
同步保证了只有一个线程在同步在中执行共享数据,保证安全。程序频繁的判断锁,获取锁,释放锁,程序的效率会降低。
3、同步方法
(1)把访问共享数据代码抽取出来,放到一个方法中
(2)在方法上 添加synchronized修饰符
格式:定义方法的格式
修饰符 synchronized 返回值类型 方法名(参数列表){
    代码
}
public class test7 implements Runnable{
    private int number=100;
    @Override
    public void run() {
        syn();
    }
    //创建同步方法
    private synchronized void syn() {
        while(number>0){
            synchronized (this){
                try {
                    Thread.sleep(100);
                } catch (InterruptedException e) {
                    e.printStackTrace();
                }
                if(number>0){
                    System.out.println("现在到第"+number+"号");
                }
                number--;
            }
        }
    }
}
4、静态同步方法
public class test7 implements Runnable{
    private static int number=100;
    @Override
    public void run() {
        syn();
    }

    private static synchronized void syn() {
        while(number>0){
                try {
                    Thread.sleep(100);
                } catch (InterruptedException e) {
                    e.printStackTrace();
                }
                if(number>0){
                    System.out.println("现在到第"+number+"号");
                }
                number--;
            }
        }
    }
静态同步方法的锁对象是本类的class文件
5、Lock锁
Lock接口中的方法:
void Lock():获取锁
void unLock():释放锁
使用步骤
1、在成员位置创建一个ReentrantLock对象
2、在可能出现安全问题代码前调用Lock接口中方法获取Lock获取锁
3、在可能出现安全问题代码后调用Lock接口中方法释放unLock获取锁
import java.util.concurrent.locks.Lock;
import java.util.concurrent.locks.ReentrantLock;

public class test7 implements Runnable {
    private static int number = 100;
    Lock l =new ReentrantLock();
    @Override
    public void run() {
        while (true) {
            l.lock();
            if (number > 0) {
                System.out.println("现在到第" + number + "号");
            }
            number--;
            try {
                Thread.sleep(100);
            } catch (InterruptedException e) {
                e.printStackTrace();
            }
            l.unlock();
        }
    }
}
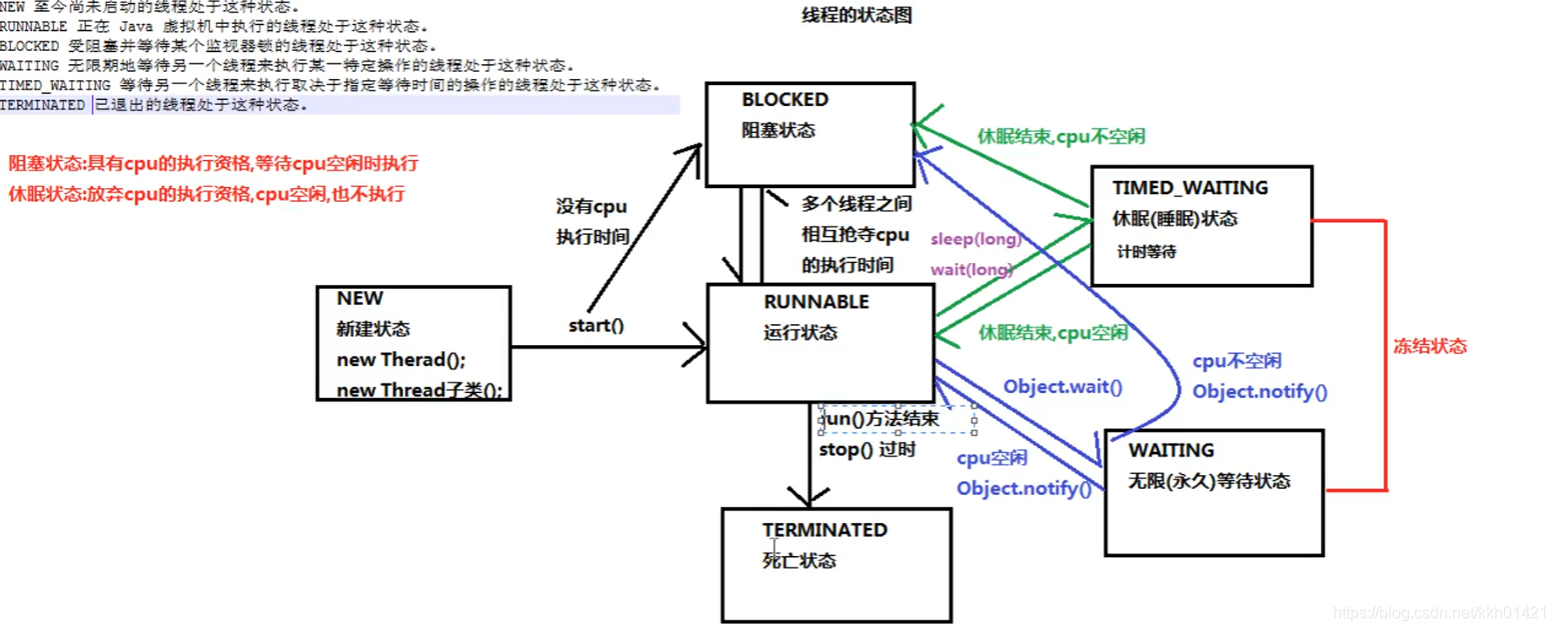
三、线程状态
(一)线程状态概述
(二)等待唤醒
线程间通信
1、通信的线程必须死用同步代码块包裹起来,保证等待和唤醒自由一个人在执行
2、同步使用的锁对象必须保证唯一
3、只有锁对象才能调用wait和notify方法
Object类中方法
void wait()
    在其他线程调用此对象的notify方法或者ontifyALL方法前,导致当前线程等待
void notify()
    唤醒在此对象监视器上等待的单个线程,会继续执行wait方法之后的代码
public class test8 {
    public static void main(String[] args) {
        Object obj = new Object();
        //创建一个顾客线程
        new Thread(){
            @Override

            public void run() {
                synchronized (obj) {
                    System.out.println("告知老板要的包子种类和数量。");
                    try {
                        obj.wait();
                    } catch (InterruptedException e) {
                        e.printStackTrace();
                    }
                    System.out.println("开吃!");
                }
            }
        }.start();
        //创建一个老板线程
        new Thread(){
            @Override
            public void run() {
                try {
                    Thread.sleep(3000);
                } catch (InterruptedException e) {
                    e.printStackTrace();
                }
                synchronized (obj){
                    System.out.println("老板三秒后做好包子");
                    obj.notify();
                }

            }
        }.start();
    }
}
(三)Object类中的wait带参方法和notifyALL方法
进入到TimeWaiting(计时等待)有两种方式
1、使用sleep(long m)方法,在毫秒值结束后,线程睡醒进入到Runable/Bolcked状态
2、使用wait(long m)方法,wait方法如果在毫秒值结束后,还没有notify唤醒,就会自动醒来,线程睡醒进入到Runable/Blocked状态
唤醒的方法:
void notify():唤醒在此对象监视器上等待的单个线程
void notifyALL():唤醒在此对象监视器上等待的所有线程
public class test8 {
    public static void main(String[] args) {
        Object obj = new Object();
        //创建一个顾客线程
        new Thread(){
            @Override

            public void run() {
                synchronized (obj) {
                    System.out.println("告知老板要的包子种类和数量。");
                    try {
                        obj.wait();
                    } catch (InterruptedException e) {
                        e.printStackTrace();
                    }
                    System.out.println("顾客张三开吃!");
                }
            }
        }.start();
        new Thread(){
            @Override

            public void run() {
                synchronized (obj) {
                    System.out.println("告知老板要的包子种类和数量。");
                    try {
                        obj.wait();
                    } catch (InterruptedException e) {
                        e.printStackTrace();
                    }
                    System.out.println("顾客李四开吃!");
                }
            }
        }.start();
        //创建一个老板线程
        new Thread(){
            @Override
            public void run() {
                try {
                    Thread.sleep(3000);
                } catch (InterruptedException e) {
                    e.printStackTrace();
                }
                synchronized (obj){
                    System.out.println("老板三秒后做好包子");
                    obj.notifyAll();
                }

            }
        }.start();
    }
}
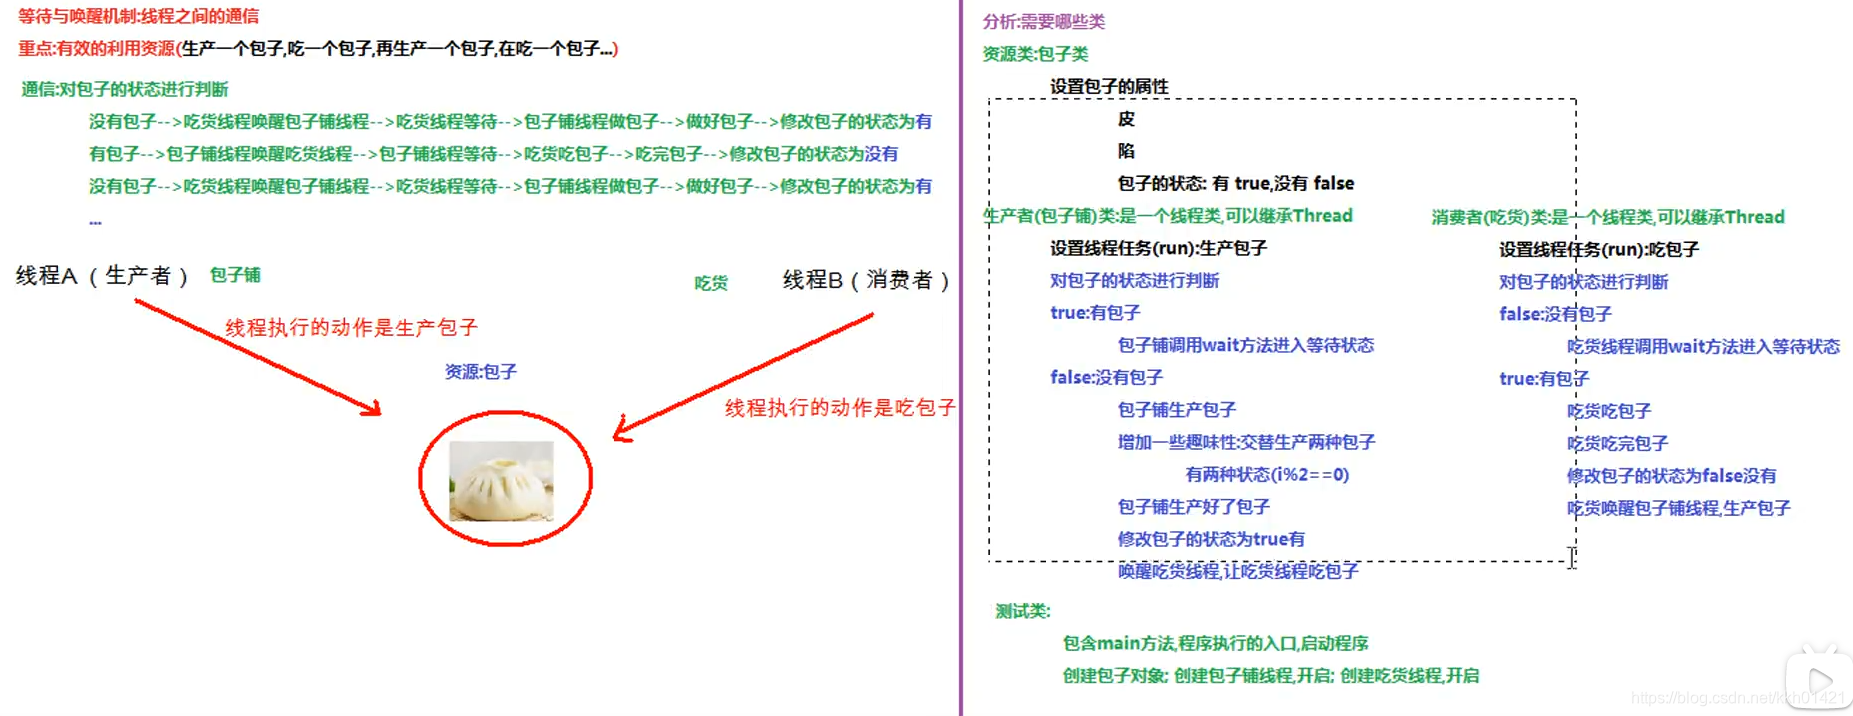
四、等待唤醒机制
(一)线程间通信
1、概念:多个线程在处理同一个资源,但是处理的动作(线程的任务)却不相同。
2、作用:当我们需要多个线程来共同完成一个任务时,并且我们希望他们有规律的执行,那么多线程之间需要一些协调通信,以此来帮我们达到多线程共同操作一份数据。
(二)等待唤醒机制
等待唤醒机制:线程之间的通信。
重点:有效利用资源。
1、等待唤醒中的方法
wait:线程不再活动,不再参与调度,进入wait set中,因此不会浪费CPU资源,也不会去竞争锁了,这时的线程状态即是WAITTING。它还要等着别的线程执行一个特别的动作,也就是通知(notify)在这个对象上等待的线程从wait set中释放出来,重新进入到调度队列(ready queue)中。
notify:选取所通知wait set中的一个线程释放。
notifyAll:释放所通知对象的wait set上的全部线程。
2、调用wait和notify需要注意的细节
(1)wait方法与notify方法必须要由同一个锁对象调用。因为:对应的锁对象可以通过notify唤醒使用同一个锁对象调用的wait方法后的线程。
(2)wait方法与notify方法是属于Object类的方法的。因为:锁对象可以是任意对象,而任意对象的所属类都是继承了Object类的。
(3)wait方法与notify方法必须要在同步代码块或者是同步函数中使用。因为:必须要通过锁对象调用这2个方法。
3、等待唤醒机制需求分析
4、代码实现
public class baozi {
    String pi;
    String xian;
    boolean zhuangtai = false;
}


public class baozipu extends Thread {
    private baozi bz;

    public baozipu(baozi bz) {
        this.bz = bz;
    }

    @Override
    public void run() {
        int count = 0;
        while (true) {
            synchronized (bz) {
                if (bz.zhuangtai == true) {
                    try {
                        bz.wait();
                    } catch (InterruptedException e) {
                        e.printStackTrace();
                    }
                }
                if (count % 2 == 0) {
                    bz.pi = "薄皮";
                    bz.xian = "猪肉大葱";
                } else {
                    bz.pi = "冰皮";
                    bz.xian = "香辣茄子";
                }
                count++;
                System.out.println("包子铺的" + bz.pi + bz.xian + "包子马上出锅了");
                try {
                    Thread.sleep(3000);
                } catch (InterruptedException e) {
                    e.printStackTrace();
                }
                bz.zhuangtai = true;
                bz.notify();
                System.out.println("包子出锅,可以开吃啦!");

            }
        }
    }
}


public class eat extends Thread{
    private baozi bz;

    public eat(baozi bz) {
        this.bz = bz;
    }

    @Override
    public void run() {
        while(true){
            synchronized (bz){
                if(bz.zhuangtai==false){
                    try {
                        bz.wait();
                    } catch (InterruptedException e) {
                        e.printStackTrace();
                    }
                }
                System.out.println("顾客正在吃"+bz.pi+bz.xian+"包子");
                bz.zhuangtai=false;
                bz.notify();
                System.out.println("顾客已经吃完了。");
                System.out.println("-------------------------------");
            }
        }
    }
}


public class test09 {
    public static void main(String[] args) {
        baozi baozi=new baozi();
        new baozipu(baozi).start();
        new eat(baozi).start();
    }
}
五、线程池
(一)线程池的概念和原理
1、概念
线程池其实就是一个容纳多个线程的容器,其中的线程可以反复使用,省去了频繁创建线程对象的操作,无需反复创建线程而消耗过多资源。
2、原理
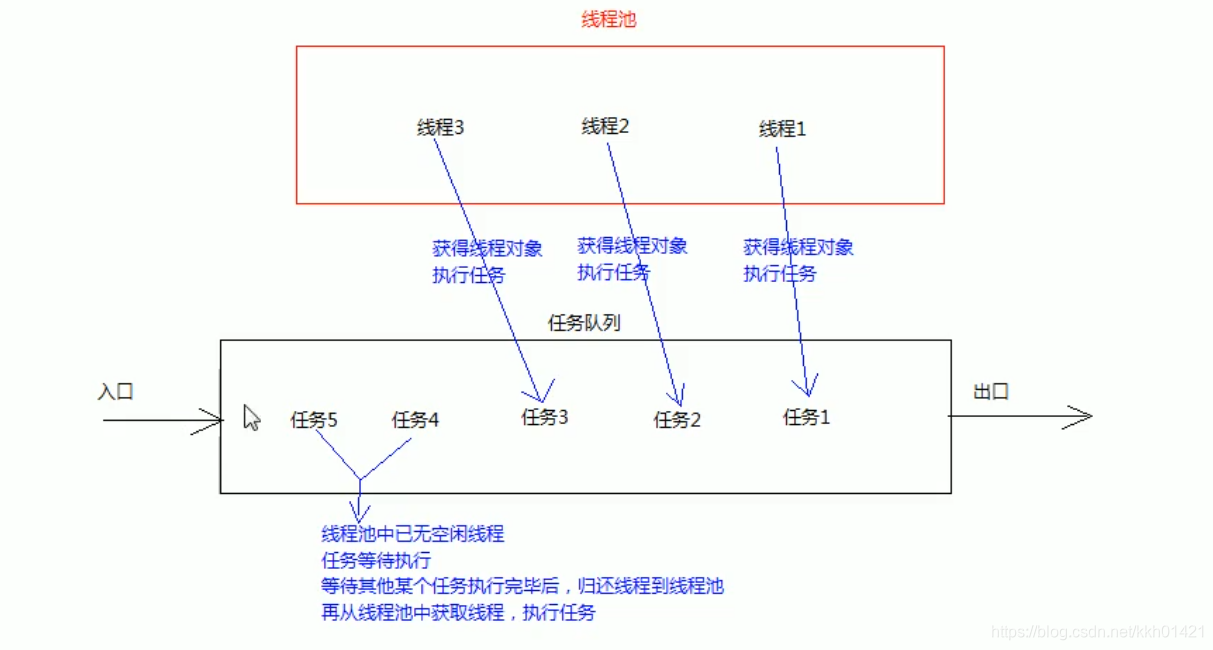
(二)线程池使用
1、使用步骤
(1)使用线程池的工厂类Executors里边提供的静态方法newFixedThreadPool生产一个指定线程数量的线程池
(2)创建一个类实现Runnable接口,重写run方法,设置线程任务
(3)调用ExecutorsService中的方法submit,传递线程任务(实现类),开启线程执行run方法
(4)线程池会一直开启,使用完了线程,会自动把线程归还给线程池,线程可以继续使用。调用ExecutorsService中的方法shutdow销毁线程池(不建议执行)
2、代码实现
public class rmpl implements Runnable{
    public void run(){
            System.out.println(Thread.currentThread().getName());
    }
}


import java.util.concurrent.ExecutorService;
import java.util.concurrent.Executors;

public class test {
    public static void main(String[] args) {
        ExecutorService es = Executors.newFixedThreadPool(3);
        es.submit(new rmpl());
        es.submit(new rmpl());
        es.submit(new rmpl());
        es.submit(new rmpl());
        es.shutdown();
        es.submit(new rmpl());//执行后出现异常
    }
}
六、Lambda表达式
(一)函数式编程思想概述
1、面向对象思想:
做一件事情,找一个能解决这个事情的对象,调用对象的方法完成事情
2、函数式编程思想:
纸要能获取到结果,谁去做的,怎么做的都不重要,重要的是结果而不是过程。
(二)冗余的Runnable代码
1、传统写法
public class test6 {
    public static void main(String[] args) {
        //类
       new Thread(){
           @Override
           public void run() {
               for (int i = 0; i < 10; i++) {
                   System.out.println(Thread.currentThread().getName()+"-->"+i);
               }
           }
       }.start();
       //接口
        Runnable r =new Runnable() {
            @Override
            public void run() {
                for (int i = 0; i < 10; i++) {
                    System.out.println(Thread.currentThread().getName()+"-->"+i);
                }
            }
        };
        new Thread(r).start();
        //接口简化
        new Thread(new Runnable() {
            @Override
            public void run() {
                for (int i = 0; i < 10; i++) {
                    System.out.println(Thread.currentThread().getName()+"-->"+i);
                }
            }
        }).start();
    }
}
(1)为了指定run方法,不得不需要Runnable接口的实现类
(2)为了指定run的方法体,不得不需要Runnable接口的实现类
(3)为了省去定义一个实现类的麻烦,不得不使用匿名内部类
(4)必须覆盖重写抽象run方法,所以方法名称,方法参数,方法返回值不得不再写一遍且不能写错
(三)函数式编程思想
public class test01 {
    public static void main(String[] args) {
        //使用匿名内部类实现多线程
        new Thread(new Runnable() {
            @Override
            public void run() {
                 {
                    System.out.println(Thread.currentThread().getName());
                }
            }
        }).start();

        //使用lambda表达式实现多线程
       new Thread(()->{
           System.out.println(Thread.currentThread().getName());
       }).start();
    }
}
(四)Lambda标准格式
Lambda表达式的标准格式由三部分组成
1、一些参数
2、一个箭头
3、一段代码
格式:(参数列表)->(一些重写方法的代码)
解释说明格式:
():接口中抽象方法的参数列表,没有参数,就空着;有参数就写出参数,多个参数使用逗号分隔
->:传递的意思,把参数传递给方法体{ }
{ }:重写接口的抽象方法
1、无参数无返回
public interface cook {
    public abstract void makefood();
}


public class test {
    public static void main(String[] args) {
        invokecook(()->{
            System.out.println("做饭了!");
        });
    }

    public static void invokecook(cook c){
        c.makefood();
    }
}
2、有参数和返回值
案例一:
public class person {
    private String name;
    private int age;

    public person() {
    }

    public person(String name, int age) {
        this.name = name;
        this.age = age;
    }

    @Override
    public String toString() {
        return "person{" +
                "name='" + name + '\'' +
                ", age=" + age +
                '}';
    }

    public String getName() {
        return name;
    }

    public void setName(String name) {
        this.name = name;
    }

    public int getAge() {
        return age;
    }

    public void setAge(int age) {
        this.age = age;
    }
}

public class test {
    public static void main(String[] args) {
        person[] arr= {
                new person("zhangsan",18),
                new person("lisi",28),
                new person("wangwu",16),
        };
      Arrays.sort(arr,(person o1,person o2)->{
          return o1.getAge()-o2.getAge();
      });
        for (person p:
             arr) {
            System.out.println(p);
        }
    }
}
案例二:
public interface CAL {
    public abstract int cal(int a,int b);
}

public class test01 {
    public static void main(String[] args) {
        invokcal(120,130,(int a,int b)->{
            return a+b;
        });
    }

    private static void invokcal(int a, int b, CAL c) {
        int sum=c.cal(a,b);
        System.out.println(sum);
    }
}
(五)Lambda表达式省略
Lambda表达式是可推导可省略
凡是根据上下文推导出来的内容,都可以省略书写
可以省略的内容:
1(参数列表):括号中参数列表的数据类型可以省略不写
2(参数列表):括号中的参数只有一个,那么类型和()都可以省略
3 {一些代码}:如果{ }中的代码只有一行,无论是否有返回值,都可以省略({ },return ,分号)
注意:要省略{ },return,分号必须一起省略
(六)Lambda的使用前提
1、使用Lambda必须具有接口且要求接口中只有一个抽象方法。
2、使用Lambda必须具有上下文推断。


 475
475

 被折叠的 条评论
为什么被折叠?
被折叠的 条评论
为什么被折叠?
 到【灌水乐园】发言


