微博开放平台SDK 移动端的H5方式授权过程分析

最近公司要做一个sdk,仿照微博开放平台。要写移动sdk,并且采用H5页面进行授权。看了几天微博SDK源码,终于理解了微博如何做到通过H5页面授权,并回调移动端的方法返回授权码,access Token等信息,在此做个记录。

对于用户认证采用OAuth2.0协议,以下是从微博copy过来的Oauth2授权机制。


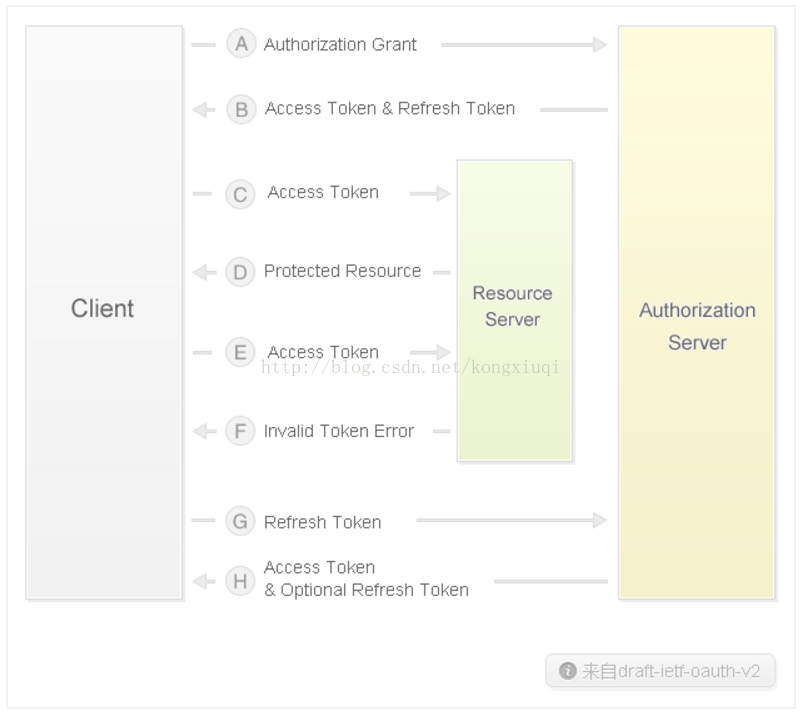
OAuth2.0协议这里不作具体分析。主要通过微博sdk的demo代码(版本:3.1.4)分析如何通过h5方式授权。

demo的授权页面


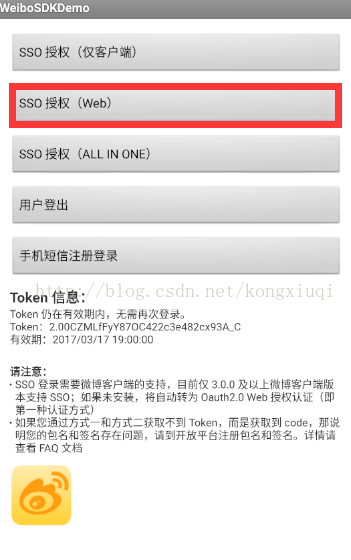
这个页面对应 WBAuthActivity

微博授权按钮操作:

// SSO 授权, 仅Web
findViewById(R.id.obtain_token_via_web).setOnClickListener(new OnClickListener() {
    @Override
    public void onClick(View v) {
        mSsoHandler.authorizeWeb(new AuthListener());
    }
});
这里调用了SsoHandler的authorizeWeb方法,并创建了一个回调监听。最终就是在这个回调监听中获取授权通过后的token信息。
class AuthListener implements WeiboAuthListener {
    
    @Override
    public void onComplete(Bundle values) {
        // 从 Bundle 中解析 Token
        mAccessToken = Oauth2AccessToken.parseAccessToken(values);
        // 省略其他代码
    }

    @Override
    public void onCancel() {
        Toast.makeText(WBAuthActivity.this, 
               R.string.weibosdk_demo_toast_auth_canceled, Toast.LENGTH_LONG).show();
    }

    @Override
    public void onWeiboException(WeiboException e) {
        Toast.makeText(WBAuthActivity.this, 
                "Auth exception : " + e.getMessage(), Toast.LENGTH_LONG).show();
    }
}
这个回调是何时进行,怎么进行回调的呢?
先看SsoHandler的authorizeWeb方法
(这里是Android Studio 反编译的微博weibosdkcore_release.jar,有些显示不正确,但不影响阅读)
public void authorizeWeb(WeiboAuthListener listener) {
    this.authorize('胍', listener, SsoHandler.AuthType.WebOnly);
    WbAppActivator.getInstance(this.mAuthActivity, this.mAuthInfo.getAppKey()).activateApp();
}
首先会调用该类的authorize方法,并将类型设置为WebOnly。 authorise方法如下
private void authorize(int requestCode, WeiboAuthListener listener, SsoHandler.AuthType authType) {
    this.mSSOAuthRequestCode = requestCode;
    this.mAuthListener = listener;
    boolean onlyClientSso = false;
    if(authType == SsoHandler.AuthType.SsoOnly) {
        onlyClientSso = true;
    }
    // 会走到这个分支
    if(authType == SsoHandler.AuthType.WebOnly) {
        if(listener != null) {
            this.mWebAuthHandler.anthorize(listener);
        }

    } else {
	// 这里进行的sso方式授权,不做分析
        boolean bindSucced = this.bindRemoteSSOService(this.mAuthActivity.getApplicationContext());
        if(!bindSucced) {
            if(onlyClientSso) {
                if(this.mAuthListener != null) {
                    this.mAuthListener.onWeiboException(new WeiboException("not install weibo client!!!!!"));
                }
            } else {
                this.mWebAuthHandler.anthorize(this.mAuthListener);
            }
        }

    }
}
可以看到会调用WebAuthHandler的anthorize方法
public void anthorize(WeiboAuthListener listener) {
    this.authorize(listener, 1);
}

public void authorize(WeiboAuthListener listener, int type) {
    this.startDialog(listener, type);
}

private void startDialog(WeiboAuthListener listener, int type) {
    if(listener != null) {
        WeiboParameters requestParams = new WeiboParameters(this.mAuthInfo.getAppKey());
        requestParams.put("client_id", this.mAuthInfo.getAppKey());
        requestParams.put("redirect_uri", this.mAuthInfo.getRedirectUrl());
        requestParams.put("scope", this.mAuthInfo.getScope());
        requestParams.put("response_type", "code");
        requestParams.put("version", "0031405000");
        String aid = Utility.getAid(this.mContext, this.mAuthInfo.getAppKey());
        if(!TextUtils.isEmpty(aid)) {
            requestParams.put("aid", aid);
        }

        if(1 == type) {
	    // 这里是增加应用的包名和签名,做验证用的
            requestParams.put("packagename", this.mAuthInfo.getPackageName());
            requestParams.put("key_hash", this.mAuthInfo.getKeyHash());
        }

        String url = "https://open.weibo.cn/oauth2/authorize?" + requestParams.encodeUrl();
        if(!NetworkHelper.hasInternetPermission(this.mContext)) {
	    // 网络权限判断,不管
            UIUtils.showAlert(this.mContext, "Error", "Application requires permission to access the Internet");
        } else {
	    // 正常会进入这个分支
            AuthRequestParam req = new AuthRequestParam(this.mContext);
            req.setAuthInfo(this.mAuthInfo);
            req.setAuthListener(listener); // 把listener 设置到了AuthRequestParam中,并传递到WeiboSdkBrowser这个WebView页面
            req.setUrl(url);
            req.setSpecifyTitle("微博登录");
            Bundle data = req.createRequestParamBundle(); // 这里就是把req的成员转化为了bundle
            Intent intent = new Intent(this.mContext, WeiboSdkBrowser.class);
            intent.putExtras(data);
            this.mContext.startActivity(intent);
        }

    }
}
// 贴一下AuthRequestParam的构造函数 主要是mLaucher 这个值会用到
public AuthRequestParam(Context context) {
    super(context);
    this.mLaucher = BrowserLauncher.AUTH;
}
Bundle data = req.createRequestParamBundle(); // 这里就是把req的成员转化为了bundle
这个方法有必要提一下,bundler都是键值对,listener是不会存进去的。他是怎么做的呢
createRequestParamBundle调用了AuthRequestParam父类的方法
public Bundle createRequestParamBundle() {
    Bundle data = new Bundle();
    if(!TextUtils.isEmpty(this.mUrl)) {
        data.putString("key_url", this.mUrl);
    }

    if(this.mLaucher != null) {
        data.putSerializable("key_launcher", this.mLaucher); // 这里是传递的是BrowserLauncher.AUTH
    }

    if(!TextUtils.isEmpty(this.mSpecifyTitle)) {
        data.putString("key_specify_title", this.mSpecifyTitle);
    }

    this.onCreateRequestParamBundle(data); 
    return data;
}
看下AuthRequestParam的onCreateRequestParamBundle方法
public void onCreateRequestParamBundle(Bundle data) {
    if(this.mAuthInfo != null) {
        data.putBundle("key_authinfo", this.mAuthInfo.getAuthBundle());
    }

    if(this.mAuthListener != null) {
        WeiboCallbackManager manager = WeiboCallbackManager.getInstance(this.mContext);
        this.mAuthListenerKey = manager.genCallbackKey();
        manager.setWeiboAuthListener(this.mAuthListenerKey, this.mAuthListener);// 将lisener放到了WeiboCallbackManager中管理
        data.putString("key_listener", this.mAuthListenerKey);// 这里其实是传递了一个listener对应的key值
    }

}

接下来回到H5授权页面WeiboSdkBrowser
protected void onCreate(Bundle savedInstanceState) {
    super.onCreate(savedInstanceState);
    if(!this.initDataFromIntent(this.getIntent())) {
        this.finish();
    } else {
        this.setContentView();
        this.initWebView();
        if(this.isWeiboShareRequestParam(this.mRequestParam)) {
            this.startShare();
        } else {
            this.openUrl(this.mUrl);
        }

    }
}
这里初始化webView是WebViewClient 用的是WeiboWebViewClient 在后文给出,这里就是关键处理回调的地方
@SuppressLint({"SetJavaScriptEnabled"})
private void initWebView() {
    this.mWebView.getSettings().setJavaScriptEnabled(true);
    if(this.isWeiboShareRequestParam(this.mRequestParam)) {
        this.mWebView.getSettings().setUserAgentString(Utility.generateUA(this));
    }

    this.mWebView.getSettings().setSavePassword(false);
    this.mWebView.setWebViewClient(this.mWeiboWebViewClient);
    this.mWebView.setWebChromeClient(new WeiboSdkBrowser.WeiboChromeClient((WeiboSdkBrowser.WeiboChromeClient)null));
    this.mWebView.requestFocus();
    this.mWebView.setScrollBarStyle(0);
    if(VERSION.SDK_INT >= 11) {
        this.mWebView.removeJavascriptInterface("searchBoxJavaBridge_");
    } else {
        this.removeJavascriptInterface(this.mWebView);
    }

}

private boolean initDataFromIntent(Intent data) {
    Bundle bundle = data.getExtras();
    this.mRequestParam = this.createBrowserRequestParam(bundle);
    if(this.mRequestParam != null) {
        this.mUrl = this.mRequestParam.getUrl();
        this.mSpecifyTitle = this.mRequestParam.getSpecifyTitle();
    } else {
        String url = bundle.getString("key_url");
        String specifyTitle = bundle.getString("key_specify_title");
        if(!TextUtils.isEmpty(url) && url.startsWith("http")) {
            this.mUrl = url;
            this.mSpecifyTitle = specifyTitle;
        }
    }
    // 这里的url在createRequestParamBundle中传递所以不为空,该方法返回true
    if(TextUtils.isEmpty(this.mUrl)) {
        return false;
    } else {
        LogUtil.d(TAG, "LOAD URL : " + this.mUrl);
        return true;
    }
}

进入initDataFromIntent 会调用 createBrowserRequestParam
private BrowserRequestParamBase createBrowserRequestParam(Bundle data) {
    this.isFromGame = Boolean.valueOf(false);
    Object result = null;
    BrowserLauncher launcher = (BrowserLauncher)data.getSerializable("key_launcher");
    if(launcher == BrowserLauncher.AUTH) { // 这里就是上文提到的launcher,会走到该分支
        AuthRequestParam gameRequestParam1 = new AuthRequestParam(this);
        gameRequestParam1.setupRequestParam(data);
        this.installAuthWeiboWebViewClient(gameRequestParam1);
        return gameRequestParam1;
    } else {
        if(launcher == BrowserLauncher.SHARE) {
            ShareRequestParam gameRequestParam = new ShareRequestParam(this);
            gameRequestParam.setupRequestParam(data);
            this.installShareWeiboWebViewClient(gameRequestParam);
            result = gameRequestParam;
        } else if(launcher == BrowserLauncher.WIDGET) {
            WidgetRequestParam gameRequestParam2 = new WidgetRequestParam(this);
            gameRequestParam2.setupRequestParam(data);
            this.installWidgetWeiboWebViewClient(gameRequestParam2);
            result = gameRequestParam2;
        } else if(launcher == BrowserLauncher.GAME) {
            this.isFromGame = Boolean.valueOf(true);
            GameRequestParam gameRequestParam3 = new GameRequestParam(this);
            gameRequestParam3.setupRequestParam(data);
            this.installWeiboWebGameClient(gameRequestParam3);
            result = gameRequestParam3;
        }

        return (BrowserRequestParamBase)result;
    }
}
这里需要在介绍下AuthRequestParam的onSetupRequestParam方法
protected void onSetupRequestParam(Bundle data) {
    Bundle authInfoBundle = data.getBundle("key_authinfo");
    if(authInfoBundle != null) {
        this.mAuthInfo = AuthInfo.parseBundleData(this.mContext, authInfoBundle);
    }
    // 这里获取onCreateRequestParamBundle中listener的key值从manager中取出listener
    this.mAuthListenerKey = data.getString("key_listener");
    if(!TextUtils.isEmpty(this.mAuthListenerKey)) {
        this.mAuthListener = WeiboCallbackManager.getInstance(this.mContext).getWeiboAuthListener(this.mAuthListenerKey);
    }

}

接下来是installAuthWeiboWebViewClient 方法
//这里只有两行代码,初始化webViewClient 设置回调 如此就看看AuthWeiboWebViewClient 这个类
private void installAuthWeiboWebViewClient(AuthRequestParam param) {
    this.mWeiboWebViewClient = new AuthWeiboWebViewClient(this, param);
    this.mWeiboWebViewClient.setBrowserRequestCallBack(this);
}
先把AuthWeiboWebViewClient 父类代码贴出
abstract class WeiboWebViewClient extends WebViewClient {
    protected BrowserRequestCallBack mCallBack;

    WeiboWebViewClient() {
    }

    public void setBrowserRequestCallBack(BrowserRequestCallBack callback) {
        this.mCallBack = callback;
    }
}
interface BrowserRequestCallBack {
    void onPageStartedCallBack(WebView var1, String var2, Bitmap var3);

    boolean shouldOverrideUrlLoadingCallBack(WebView var1, String var2);

    void onPageFinishedCallBack(WebView var1, String var2);

    void onReceivedErrorCallBack(WebView var1, int var2, String var3, String var4);

    void onReceivedSslErrorCallBack(WebView var1, SslErrorHandler var2, SslError var3);
}

AuthWeiboWebViewClient 实际上继承的WebViewClient 
class AuthWeiboWebViewClient extends WeiboWebViewClient {
    private Activity mAct;
    private AuthRequestParam mAuthRequestParam;
    private WeiboAuthListener mListener;
    private boolean isCallBacked = false;

    public AuthWeiboWebViewClient(Activity activity, AuthRequestParam requestParam) {
        this.mAct = activity;
        this.mAuthRequestParam = requestParam;
// 这个就是最开始那个AuthListener,传递了好多层。传递了这么久你终于要派上用场了
this.mListener = this.mAuthRequestParam.getAuthListener(); } public void onPageStarted(WebView view, String url, Bitmap favicon) { if(this.mCallBack != null) { this.mCallBack.onPageStartedCallBack(view, url, favicon); } AuthInfo authInfo = this.mAuthRequestParam.getAuthInfo(); if(url.startsWith(authInfo.getRedirectUrl()) && !this.isCallBacked) {
	    // 微博授权结束会重定向到RedirectUrl 在这里用上了,如果是重定向页面,并且没有回调,进入该分支
            this.isCallBacked = true;
	    // 处理方法 此方法在该类底端
            this.handleRedirectUrl(url);
            view.stopLoading();
            // 关闭H5授权页
            WeiboSdkBrowser.closeBrowser(this.mAct, this.mAuthRequestParam.getAuthListenerKey(), (String)null);
        } else {
            super.onPageStarted(view, url, favicon);
        }
    }

    public boolean shouldOverrideUrlLoading(WebView view, String url) {
        if(this.mCallBack != null) {
            this.mCallBack.shouldOverrideUrlLoadingCallBack(view, url);
        }

        if(url.startsWith("sms:")) {
            Intent sendIntent = new Intent("android.intent.action.VIEW");
            sendIntent.putExtra("address", url.replace("sms:", ""));
            sendIntent.setType("vnd.android-dir/mms-sms");
            this.mAct.startActivity(sendIntent);
            return true;
        } else if(url.startsWith("sinaweibo://browser/close")) {
            if(this.mListener != null) {
                this.mListener.onCancel();
            }

            WeiboSdkBrowser.closeBrowser(this.mAct, this.mAuthRequestParam.getAuthListenerKey(), (String)null);
            return true;
        } else {
            return super.shouldOverrideUrlLoading(view, url);
        }
    }

    public void onPageFinished(WebView view, String url) {
        if(this.mCallBack != null) {
            this.mCallBack.onPageFinishedCallBack(view, url);
        }

        super.onPageFinished(view, url);
    }

    public void onReceivedError(WebView view, int errorCode, String description, String failingUrl) {
        if(this.mCallBack != null) {
            this.mCallBack.onReceivedErrorCallBack(view, errorCode, description, failingUrl);
        }

        super.onReceivedError(view, errorCode, description, failingUrl);
    }

    public void onReceivedSslError(WebView view, SslErrorHandler handler, SslError error) {
        if(this.mCallBack != null) {
            this.mCallBack.onReceivedSslErrorCallBack(view, handler, error);
        }

        super.onReceivedSslError(view, handler, error);
    }

    private void handleRedirectUrl(String url) {
        Bundle values = Utility.parseUrl(url);
        String errorType = values.getString("error");
        String errorCode = values.getString("error_code");
        String errorDescription = values.getString("error_description");
        if(errorType == null && errorCode == null) {
	    // 如果授权正常,回调onComplete,终于找到你,还好没放弃。
            if(this.mListener != null) {
                this.mListener.onComplete(values);
            }
        } else if(this.mListener != null) {
	    // 如果授权失败,回调onWeiboException
this.mListener.onWeiboException(new WeiboAuthException(errorCode, errorType, errorDescription)); } }}

那么onCancel在哪里调用呢
public boolean onKeyUp(int keyCode, KeyEvent event) {
    if(keyCode == 4) {// 返回按钮
        if(this.mRequestParam != null) {
            this.mRequestParam.execRequest(this, 3); 
	    // 这个mRequestParam 就是AuthRequestParam 可以看前文initDataFromIntent 对其进行的复值

        }

        this.finish();
        return true;
    } else {
        return super.onKeyUp(keyCode, event);
    }
}

AuthRequestParam 的execRequest 方法
public void execRequest(Activity act, int action) {
    if(action == 3) {
        if(this.mAuthListener != null) {
            // onCancel在这里
            this.mAuthListener.onCancel();
        }
	// 关闭WebView页面
        WeiboSdkBrowser.closeBrowser(act, this.mAuthListenerKey, (String)null);
    }

}
至此,整个H5授权过程就结束了,饶了好大一圈,不过一步一步看下去总算看明白了,第一次写源码分析,好多代码,不过最终看明白了流程感觉还是棒棒的。


  • 2
    点赞
  • 2
    收藏
    觉得还不错? 一键收藏
  • 0
    评论

“相关推荐”对你有帮助么?

  • 非常没帮助
  • 没帮助
  • 一般
  • 有帮助
  • 非常有帮助
提交
评论
添加红包

请填写红包祝福语或标题

红包个数最小为10个

红包金额最低5元

当前余额3.43前往充值 >
需支付:10.00
成就一亿技术人!
领取后你会自动成为博主和红包主的粉丝 规则
hope_wisdom
发出的红包
实付
使用余额支付
点击重新获取
扫码支付
钱包余额 0

抵扣说明:

1.余额是钱包充值的虚拟货币,按照1:1的比例进行支付金额的抵扣。
2.余额无法直接购买下载,可以购买VIP、付费专栏及课程。

余额充值