


ATF(ARM Trusted Firmware)是一针对ARM芯片给出的底层的开源固件代码。固件将整个系统分成四种运行等级,分别为:EL0,EL1,EL2,EL3,并规定了每个安全等级中运行的Image名字。本文以ARCH64为示例,介绍冷启动时,ATF的运行过程。ATF的源代码可以从github上获取,具体地址如下:
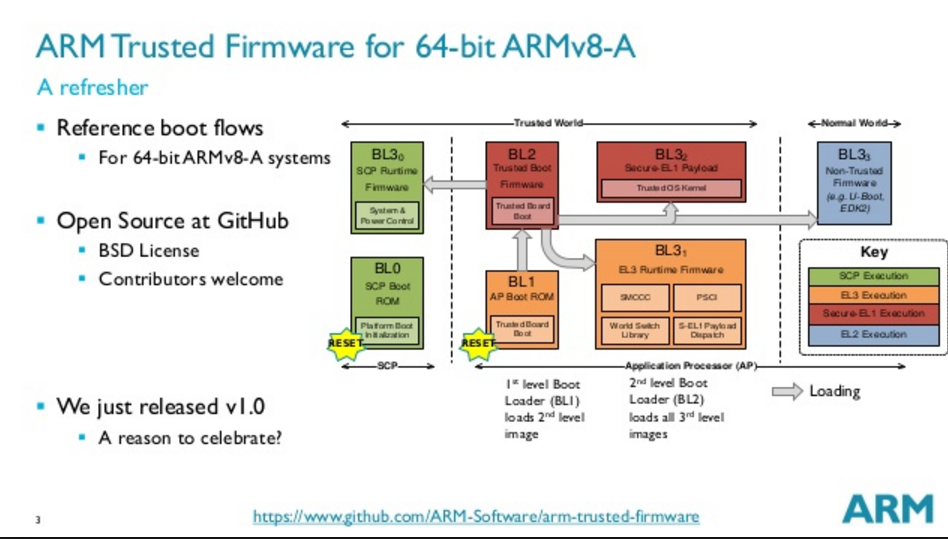
系统上电之后首先会运行SCP boot ROM。之后会跳转到ATF的bl1中继续执行。bl1主要初始化CPU,设定异常向量,将bl2的image加载到安全RAM中,然后跳转到bl2中进行执行。
在bl2中将会去加载bl31和bl32以及bl33,其中的cpu状态切换以及跳转将在以下章节详细介绍。
bl1的主要代码存放在bl1目录中, bl1的连接脚本是bl1/bl1.ld.s文件,其中可以看到bl1的入口函数是:bl1_entrypoint。
1.1 bl1_entrypoint
该函数主要需要执行EL3环境的基本初始化,设定向量表,加载bl2 image并跳转到bl2等操作
func bl1_entrypoint
	/* ---------------------------------------------------------------------
	 * If the reset address is programmable then bl1_entrypoint() is
	 * executed only on the cold boot path. Therefore, we can skip the warm
	 * boot mailbox mechanism.
	 * ---------------------------------------------------------------------
	 */
/* EL3级别运行环境的初始化,该函数定义在   include/common/aarch64/el3_common_macros.S文件中
*/
	el3_entrypoint_common					\
		_set_endian=1					\
		_warm_boot_mailbox=!PROGRAMMABLE_RESET_ADDRESS	\
		_secondary_cold_boot=!COLD_BOOT_SINGLE_CPU	\
		_init_memory=1					\
		_init_c_runtime=1				\
		_exception_vectors=bl1_exceptions

	/* ---------------------------------------------
	 * Architectural init. can be generic e.g.
	 * enabling stack alignment and platform spec-
	 * ific e.g. MMU & page table setup as per the
	 * platform memory map. Perform the latter here
	 * and the former in bl1_main.
	 * ---------------------------------------------
	 */
	bl	bl1_early_platform_setup	//调用bl1_early_platform_setup函数完成底层初始化
	bl	bl1_plat_arch_setup	//调用bl1_plat_arch_setup完成平台初始化

	/* --------------------------------------------------
	 * Initialize platform and jump to our c-entry point
	 * for this type of reset.
	 * --------------------------------------------------
	 */
	bl	bl1_main	//调用bl1_main函数,初始化验证模块,加载下一阶段的image到RAM中

	/* --------------------------------------------------
	 * Do the transition to next boot image.
	 * --------------------------------------------------
	 */
	b	el3_exit	//调用el3_exit函数,跳转到下一个image(bl2)
endfunc bl1_entrypoint
1.2 el3_entrypoint_common函数
该函数是以宏的形式被定义的,主要完成el3基本设置和向量表注册
.macro el3_entrypoint_common					\
		_set_endian, _warm_boot_mailbox, _secondary_cold_boot,	\
		_init_memory, _init_c_runtime, _exception_vectors
/* 设定大小端 */
	.if \_set_endian
		/* -------------------------------------------------------------
		 * Set the CPU endianness before doing anything that might
		 * involve memory reads or writes.
		 * -------------------------------------------------------------
		 */
		mrs	x0, sctlr_el3
		bic	x0, x0, #SCTLR_EE_BIT
		msr	sctlr_el3, x0
		isb
	.endif /* _set_endian */

/* 判定是否需要调用do_cold_boot流程 */
	.if \_warm_boot_mailbox
		/* -------------------------------------------------------------
		 * This code will be executed for both warm and cold resets.
		 * Now is the time to distinguish between the two.
		 * Query the platform entrypoint address and if it is not zero
		 * then it means it is a warm boot so jump to this address.
		 * -------------------------------------------------------------
		 */
		bl	plat_get_my_entrypoint
		cbz	x0, do_cold_boot
		br	x0

	do_cold_boot:
	.endif /* _warm_boot_mailbox */

	/* ---------------------------------------------------------------------
	 * It is a cold boot.
	 * Perform any processor specific actions upon reset e.g. cache, TLB
	 * invalidations etc.
	 * ---------------------------------------------------------------------
	 */
	bl	reset_handler		//执行reset handle操作

/* 初始化异常向量 */
	el3_arch_init_common \_exception_vectors

/* 判定当前CPU是否是主CPU,如果是则做主CPU的初始化 */
	.if \_secondary_cold_boot
		/* -------------------------------------------------------------
		 * Check if this is a primary or secondary CPU cold boot.
		 * The primary CPU will set up the platform while the
		 * secondaries are placed in a platform-specific state until the
		 * primary CPU performs the necessary actions to bring them out
		 * of that state and allows entry into the OS.
		 * -------------------------------------------------------------
		 */
		bl	plat_is_my_cpu_primary
		cbnz	w0, do_primary_cold_boot

		/* This is a cold boot on a secondary CPU */
		bl	plat_secondary_cold_boot_setup
		/* plat_secondary_cold_boot_setup() is not supposed to return */
		bl	el3_panic

	do_primary_cold_boot:
	.endif /* _secondary_cold_boot */

	/* ---------------------------------------------------------------------
	 * Initialize memory now. Secondary CPU initialization won't get to this
	 * point.
	 * ---------------------------------------------------------------------
	 */
/* 初始化memory */
	.if \_init_memory
		bl	platform_mem_init
	.endif /* _init_memory */

	/* ---------------------------------------------------------------------
	 * Init C runtime environment:
	 *   - Zero-initialise the NOBITS sections. There are 2 of them:
	 *       - the .bss section;
	 *       - the coherent memory section (if any).
	 *   - Relocate the data section from ROM to RAM, if required.
	 * ---------------------------------------------------------------------
	 */
/* 初始化C语言的运行环境 */
	.if \_init_c_runtime
#ifdef IMAGE_BL31
		/* -------------------------------------------------------------
		 * Invalidate the RW memory used by the BL31 image. This
		 * includes the data and NOBITS sections. This is done to
		 * safeguard against possible corruption of this memory by
		 * dirty cache lines in a system cache as a result of use by
		 * an earlier boot loader stage.
		 * -------------------------------------------------------------
		 */
		adr	x0, __RW_START__
		adr	x1, __RW_END__
		sub	x1, x1, x0
		bl	inv_dcache_range
#endif /* IMAGE_BL31 */

		ldr	x0, =__BSS_START__
		ldr	x1, =__BSS_SIZE__
		bl	zeromem

#if USE_COHERENT_MEM
		ldr	x0, =__COHERENT_RAM_START__
		ldr	x1, =__COHERENT_RAM_UNALIGNED_SIZE__
		bl	zeromem
#endif

#ifdef IMAGE_BL1
		ldr	x0, =__DATA_RAM_START__
		ldr	x1, =__DATA_ROM_START__
		ldr	x2, =__DATA_SIZE__
		bl	memcpy16
#endif
	.endif /* _init_c_runtime */

	/* ---------------------------------------------------------------------
	 * Use SP_EL0 for the C runtime stack.
	 * ---------------------------------------------------------------------
	 */
	msr	spsel, #0

	/* ---------------------------------------------------------------------
	 * Allocate a stack whose memory will be marked as Normal-IS-WBWA when
	 * the MMU is enabled. There is no risk of reading stale stack memory
	 * after enabling the MMU as only the primary CPU is running at the
	 * moment.
	 * ---------------------------------------------------------------------
	 */
	bl	plat_set_my_stack	//设定堆栈

#if STACK_PROTECTOR_ENABLED
	.if \_init_c_runtime
	bl	update_stack_protector_canary
	.endif /* _init_c_runtime */
#endif
	.endm

#endif /* __EL3_COMMON_MACROS_S__ */
该函数是需要带参数调用,参数说明如下:
_set_endian:设定大小端
_warm_boot_mailbox:检查当前是属于冷启动还是热启动(power on or reset)
_secondary_cold_boot: 确定当前的CPU是主CPU还是从属CPU
_init_memory:是否需要初始化memory
_init_c_runtime: 是否需要初始化C语言的执行环境
_exception_vectors: 异常向量表地址
1.3 bl1_early_patform_setup
该函数用来完成早期的初始化操作,主要包括memory, page table, 所需外围设备的初始化以及相关状态设定等;
void bl1_early_platform_setup(void)
{
/* 使能看门狗,初始化console,初始化memory */
	arm_bl1_early_platform_setup();

	/*
	 * Initialize Interconnect for this cluster during cold boot.
	 * No need for locks as no other CPU is active.
	 */
	plat_arm_interconnect_init();//初始化外围设备
	/*
	 * Enable Interconnect coherency for the primary CPU's cluster.
	 */
	plat_arm_interconnect_enter_coherency();//使能外围设备
}
1.4 bl_main
该函数完成bl2 image的加载和运行环境的设置,如果开启了trusted boot,则需要对image进行verify操作
void bl1_main(void)
{
	unsigned int image_id;

	/* Announce our arrival */
	NOTICE(FIRMWARE_WELCOME_STR);
	NOTICE("BL1: %s\n", version_string);
	NOTICE("BL1: %s\n", build_message);

	INFO("BL1: RAM %p - %p\n", (void *)BL1_RAM_BASE,
					(void *)BL1_RAM_LIMIT);

	print_errata_status();

#if DEBUG
	u_register_t val;
	/*
	 * Ensure that MMU/Caches and coherency are turned on
	 */
#ifdef AARCH32
	val = read_sctlr();
#else
	val = read_sctlr_el3();
#endif
	assert(val & SCTLR_M_BIT);
	assert(val & SCTLR_C_BIT);
	assert(val & SCTLR_I_BIT);
	/*
	 * Check that Cache Writeback Granule (CWG) in CTR_EL0 matches the
	 * provided platform value
	 */
	val = (read_ctr_el0() >> CTR_CWG_SHIFT) & CTR_CWG_MASK;
	/*
	 * If CWG is zero, then no CWG information is available but we can
	 * at least check the platform value is less than the architectural
	 * maximum.
	 */
	if (val != 0)
		assert(CACHE_WRITEBACK_GRANULE == SIZE_FROM_LOG2_WORDS(val));
	else
		assert(CACHE_WRITEBACK_GRANULE <= MAX_CACHE_LINE_SIZE);
#endif

	/* Perform remaining generic architectural setup from EL3 */
	bl1_arch_setup();	//设置下一个image的EL级别

#if TRUSTED_BOARD_BOOT
	/* Initialize authentication module */
	auth_mod_init();	//初始化image的验证模块
#endif /* TRUSTED_BOARD_BOOT */

	/* Perform platform setup in BL1. */
	bl1_platform_setup();	//平台相关设置,主要是IO的设置

	/* Get the image id of next image to load and run. */
	image_id = bl1_plat_get_next_image_id();	//获取下一个阶段image的ID值。默认返回值为BL2_IMAGE_ID

	/*
	 * We currently interpret any image id other than
	 * BL2_IMAGE_ID as the start of firmware update.
	 */
	if (image_id == BL2_IMAGE_ID)
		bl1_load_bl2();		//将bl2 image加载到安全RAM中
	else
		NOTICE("BL1-FWU: *******FWU Process Started*******\n");

	bl1_prepare_next_image(image_id);	//获取bl2 image的描述信息,包括名字,ID,entry potin info等,并将这些信息保存到bl1_cpu_context的上下文中
	console_flush();
}
1.5 bl1_prepare_next_image
该函数用来获取bl2 image的描述信息,获取bl2的入口地址,这只下个阶段的CPU上下文,以备执行从bl1跳转到bl2的操作使用
void bl1_prepare_next_image(unsigned int image_id)
{
	unsigned int security_state;
	image_desc_t *image_desc;
	entry_point_info_t *next_bl_ep;

#if CTX_INCLUDE_AARCH32_REGS
	/*
	 * Ensure that the build flag to save AArch32 system registers in CPU
	 * context is not set for AArch64-only platforms.
	 */
	if (((read_id_aa64pfr0_el1() >> ID_AA64PFR0_EL1_SHIFT)
			& ID_AA64PFR0_ELX_MASK) == 0x1) {
		ERROR("EL1 supports AArch64-only. Please set build flag "
				"CTX_INCLUDE_AARCH32_REGS = 0");
		panic();
	}
#endif

	/* Get the image descriptor. */
/* 获取bl2 image的描述信息,主要包括入口地址,名字等信息 */
	image_desc = bl1_plat_get_image_desc(image_id);
	assert(image_desc);

	/* Get the entry point info. */
/* 获取image的入口地址信息 */
	next_bl_ep = &image_desc->ep_info;

	/* Get the image security state. */
/* 获取bl2 image的安全状态(判定该image是属于安全态的image的还是非安全态的image) */
	security_state = GET_SECURITY_STATE(next_bl_ep->h.attr);

	/* Setup the Secure/Non-Secure context if not done already. */
/* 设定用于存放CPU context的变量 */
	if (!cm_get_context(security_state))
		cm_set_context(&bl1_cpu_context[security_state], security_state);

	/* Prepare the SPSR for the next BL image. */
/* 为下个阶段的image准备好SPSR数据 */
	if (security_state == SECURE) {
		next_bl_ep->spsr = SPSR_64(MODE_EL1, MODE_SP_ELX,
				   DISABLE_ALL_EXCEPTIONS);
	} else {
		/* Use EL2 if supported else use EL1. */
		if (read_id_aa64pfr0_el1() &
			(ID_AA64PFR0_ELX_MASK << ID_AA64PFR0_EL2_SHIFT)) {
			next_bl_ep->spsr = SPSR_64(MODE_EL2, MODE_SP_ELX,
				DISABLE_ALL_EXCEPTIONS);
		} else {
			next_bl_ep->spsr = SPSR_64(MODE_EL1, MODE_SP_ELX,
			   DISABLE_ALL_EXCEPTIONS);
		}
	}

	/* Allow platform to make change */
	bl1_plat_set_ep_info(image_id, next_bl_ep);

	/* Prepare the context for the next BL image. */
/* 使用获取到的bl2 image的entrypoint info数据来初始化cpu context */
	cm_init_my_context(next_bl_ep);
/* 为进入到下个EL级别做准备 */
	cm_prepare_el3_exit(security_state);

	/* Indicate that image is in execution state. */
/* 设定image的执行状态 */
	image_desc->state = IMAGE_STATE_EXECUTED;

/* 打印出bl2 image的入口信息 */
	print_entry_point_info(next_bl_ep);
}


 4094
4094


 被折叠的 条评论
为什么被折叠?
被折叠的 条评论
为什么被折叠?
 到【灌水乐园】发言


