


第二章目录:
Chapter 02.TF-A(Arm Trusted Firmware, ATF ) BL1-ROMCode
Chapter 02.TF-A(Arm Trusted Firmware, ATF ) BL1-ROMCode - Continued(1)
Chapter 02.TF-A(Arm Trusted Firmware, ATF ) BL1-ROMCode - Continued(2) (本文)
下一章:
Chapter 03.TF-A(Arm Trusted Firmware, ATF ) Chain of Trust (CoT)
继续BL1-ROMCode 的说明。
我们看下firmware desgin对BL2 load and execute的描述:
In the normal boot flow, BL1 execution continues as follows:
BL1 prints the following string from the primary CPU to indicate successful execution of the BL1 stage:
"Booting Trusted Firmware"
BL1 loads a BL2 raw binary image from platform storage, at a platform-specific base address. Prior to the load, BL1 invokes bl1_plat_handle_pre_image_load() which allows the platform to update or use the image information. If the BL2 image file is not present or if there is not enough free trusted SRAM the following error message is printed:
"Failed to load BL2 firmware."
BL1 invokes bl1_plat_handle_post_image_load() which again is intended for platforms to take further action after image load. This function must populate the necessary arguments for BL2, which may also include the memory layout. Further description of the memory layout can be found later in this document.
BL1 passes control to the BL2 image at Secure EL1 (for AArch64) or at Secure SVC mode (for AArch32), starting from its load address.
指的注意的是,arm设计的一个方案是BL2在EL1上运行(另一个方案是在EL3)BL1将控制权交给secure EL1(AArch64)或安全SVC模式(AArch32)的BL2image,从其加载地址开始。
bl1_load_bl2与之前的bl1_platform_setup->arm_bl1_platform_setup->arm_load_tb_fw_config->load_auth_image流程类似:
- 获取image_desc
- pre-load-image
- load_auth_image
- bl1_plat_handle_post_image_load

首先bl1_plat_get_image_desc返回的是BL2的static desc
接着pre-load-image:

bl1_plat_handle_pre_image_load直接返回0,需要的话自己实现替换这个函数
load_auth_image,load bl2到sram
最后bl1_plat_handle_post_image_load
Porting guide中:

Plat/common/plat_common.c

80~95行,和之前load方法相同,不在描述,重点是bl1_plat_sec_mem_layout(plat/arm/common/arm_bl1_setup.c)

- 一个weak实现
- 只在cold boot时调用此函数。
- 它在enable MMU和D-cache的情况下执行。
- 此函数返回的指针必须指向包含BL1阶段的安全RAM的范围和可用性的meminfo结构。
- BL1使用此信息将BL2映像加载到安全RAM中。 BL1还填充了一个类似的结构,告诉BL2可供自己使用的内存范围。
代码中直接返回一个静态结构体变量:

回忆在bl_entrypoint.s的bl_entrypoint,43行调用的bl1_early_platform_setup->arm_bl1_early_platform_setup

回到bl1_plat_handle_post_image_load:
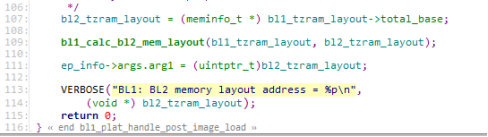
bl1_calc_bl2_mem_layout看计算bl2 layout,并按照arm约定的参数将bl2_tzram地址保存到arg1
bl2_mem_layout->total_size= 40000 -1000-b000=256k-4k-44k
bl2_mem_layout->total_base= 0400 0000 +1000

红色部分为bl2可用的sram大小
返回到bl1_main<-bl1_load_bl2<-bl1_plat_handle_post_image_load

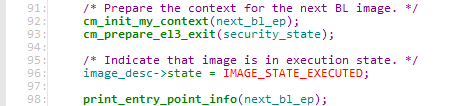
bl1_prepare_next_image(bl1/aarch64/bl1_context_mgmt.c,41行)主要是设置Secure/Non-Secure 和EL的信息给next_bl_ep-,等进入bl2前设置
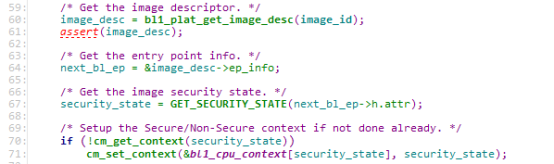
这里id传进来的bl2的id,87行,h.attr为SECURE | EXECUTABLE
73行,security _statewei==secure为true
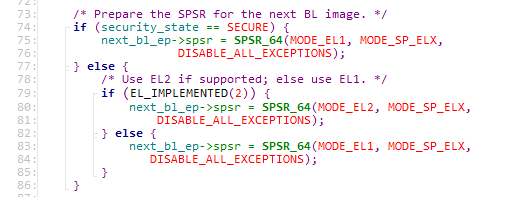
将spsr保存到next_bl_sp->spsr(image_desc->ep_info->spsr)中,内容为:
- M[4]=0 ,exception taken from aarch64
- N[3:]=0b0100,进入当前el之前的状态来自el1t的aarch64
- FIQ,IRQ_,ABT,DBG exception被mask
在执行:
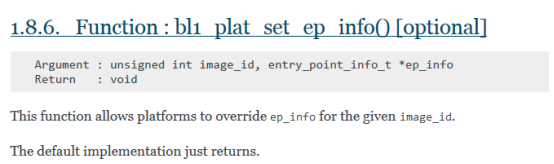
![]()

空函数,看看porting guide怎么说的:
继续,
![]()
92行,初始化上下文管理,为退出el3做准备
Ctx为bl1_cpu_context_ptr[2]指针,一个指向安全,一个非安全
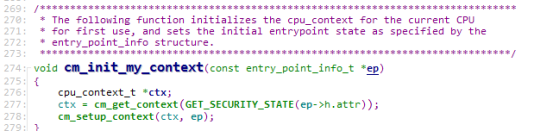
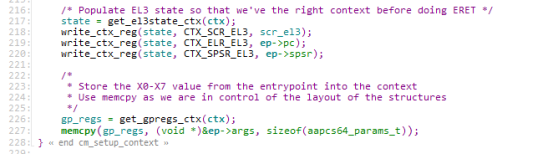
cm_setup_context:
首次使用前初始化ctx,设置entry_point_info结构指定的初始入口点状态。
EE和ST属性用于为新执行上下文配置endianess和安全计时器可用性。
为入口调用cm_prepare_el3_exit()和el3_exit()准备寄存器状态。 对于Secure-EL1,cm_prepare_el3_exit()等效于cm_e1_sysreg_context_restore()。
看代码:

描述的很清楚,先恢复默认值:
SCR:清NS, EL0 and EL1 are in Secure state。
清RW, bit [10,Lower levels are all AArch32
清FIQ, bit [2]和IRQ, bit [1],When executing at Exception levels below EL3, physical FIQ&IRQ interrupts are not taken to EL3
清ST, bit [11],Secure EL1 using AArch64 accesses to the CNTPS_TVAL_EL1, CNTPS_CTL_EL1, and CNTPS_CVAL_EL1 are trapped to EL3.
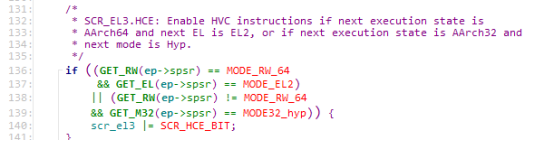
清HCE, bit [8],0 HVC instructions are UNDEFINED at EL3, EL2, and Non-secure EL1, and any resulting exception is taken from the current Exception level to the current Exception level.
再设置:SCR_RW_BIT,The next lower level is AArch64.
前面代码分析过,SCR_EL3在宏el3_arch_init_common中的复位序列期间初始化。此代码修改影响下一个EL的SCR_EL3字段。回忆一下.macro el3_entrypoint_common代码,
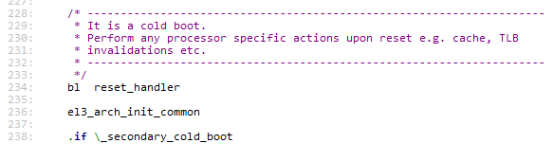
已经把EL3上的一些寄存器污染了,需要reset下,然后根据SPSR_EL3的状态以及下一个EL的安全状态和入口点属性更新为所需的值。
注释写的很清楚:

HANDLE_EA_EL3_FIRST=0,FAULT_INJECTION_SUPPORT=0,没有定义IMAGE_BL31忽略部分代码
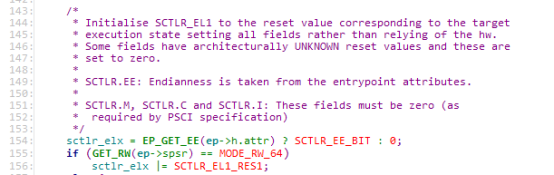
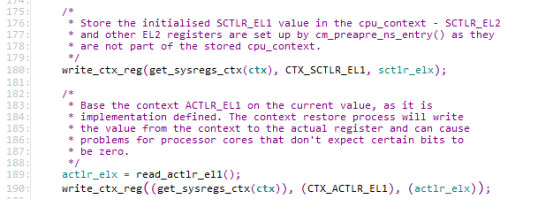
给sctlr变量赋值,用于后续设置sctlr_el1寄存器:
给 bit29,28,23,22,20,11置位(SCTLR_EL1_RES1展开后)
Bit29,28,23,22,2011在ARMv8.1 and ARMv8.0中保留
保存actlr到ctx。 ACTLR_EL1, Auxiliary Control Register (EL1)为IMPLEMENTATION DEFINED,应该是Soc厂商IMPLEMENTATION

初始化PMCR_EL0, Performance Monitors Control Register
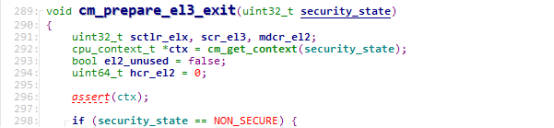
回到bl1_prepare_next_image,执行cm_prepare_el3_exit:

- 准备CPU系统寄存器,以便首次进入安全或正常的世界
- 如果在EL2(aarch64)或hyp模式(aarch32)下执行,则初始化SCTLR_EL2
- 如果请求执行非安全EL1(aarch64)或svc模式(aarch32),并且CPU支持EL2,则通过配置所有必需的EL2寄存器来禁用EL2。
- 对于所有入口,EL1寄存器是从cpu_context初始化的
这里直接看代码。
直接跳过non_secure的情况

cm_el1_sysregs_context_restore(lib/el3_runtime/aarch64/conntext_mgmt.c,485行)
调用el1_sysregs_context_restore(lib/el3_runtime/aarch64/conntext.S,119行)
这个函数严格遵循AArch64 PCS,使用x9-x17(临时调用者保存的寄存器)来恢复EL1系统寄存器上下文。 它假定'x0'指向'el1_sys_regs'结构,从中恢复寄存器上下文。
cm_set_next_context:
这个函数用于读写用于异常返回的上下文,初始化SP_EL3为指向为所需安全状态设置的“cpu_context”的指针:

执行完,返回bl1_prepare_next_image:
返回bl1_main,返回到bl1_entrypoint

bl1_entrypoint:

退出EL3:lib/el3_runtime/aarch64/context.S,386行
分析下el3_exit代码,el3_exit在多个bl阶段都会用到
首先,这个函数假定SP_EL3指向一个有效的ctx保存secure 状态下的bl2相关寄存器值
El3_exit主要工作:
- 保存当前的SP_EL0,即将用于处理下一个SMC的EL3运行时堆栈。 然后切换到SP_EL3
- 在ERET之前恢复SPSR_EL3,ELR_EL3和SCR_EL3
- 恢复保存的gp寄存器并返回EL1

![]()


对于执行ATF BLX ,总是通过ERET(异常返回)指令执行下一阶段的BLx。而执行RERT指令所在的BLx,在ARM的设计思想(ARM的Trust Boot规范)里,总是由Secure EL状态执行,基本上就是在EL3上执行。
而对于加载BLx,加载本身不涉及到安全,而且会使用外设和外部memory,则可以在Non-Secure EL上加载。
所以,ARM ATF(这套代码其实主要是linaro写的,你会发现ATF和OPTEE的设计思路,函数命名,调用实现方式都是类似的),加载在运行在Non-Secure EL的Blx上执行,跳转是运行在Secure EL的Blx上执行。例如,BL1(EL3)跳到BL2(NS-EL1),BL2加载BL31,BL32,BL33,甚至是kernel,通过SMC指令陷入到EL3,此时EL3上异常入口还是在BL1上设置的,自然就返回到BL1上处理。BL1通过传递的EP info等参数,配置SCR,SPSR等寄存器,执行RERT,就返回到了下一阶段的BLx上,开始执行代码。
在EL3上执行的BL主要有两个:BL1和BL31。当然,BL2也有BL2 AT EL3这种形式的存在,这主要是给那些ROMCODE(BL1)不符合trust boot规范的厂商准备的。
所以,ATF在设计上充分考虑了各个SoC厂家的可移植性,可能也是出于推行Trust boot规范和atf的考虑,基本上只要厂家愿意投入时间和人力,都可以很好porting到ATF上。


 1295
1295


 被折叠的 条评论
为什么被折叠?
被折叠的 条评论
为什么被折叠?
 到【灌水乐园】发言


