


Java
自
1995
年面世以来得到了广泛得一个运用,但是对多线程编程的支持
Java
很长时间一直停留在初级阶段。在
Java 5.0
之前
Java
里的多线程编程主要是通过
Thread
类,
Runnable
接口,
Object
对象中的
wait()
、
notify()
、
notifyAll()
等方法和
synchronized
关键词来实现的。这些工具虽然能在大多数情况下解决对共享资源的管理和线程间的调度,但存在以下几个问题
1.
过于原始,拿来就能用的功能有限,即使是要实现简单的多线程功能也需要编写大量的代码。这些工具就像汇编语言一样难以学习和使用,比这更糟糕的是稍有不慎它们还可能被错误地使用,而且这样的错误很难被发现。
2.
如果使用不当,会使程序的运行效率大大降低。
3.
为了提高开发效率,简化编程,开发人员在做项目的时候往往需要写一些共享的工具来实现一些普遍适用的功能。但因为没有规范,相同的工具会被重复地开发,造成资源浪费。
4.
因为锁定的功能是通过
Synchronized
来实现的,这是一种块结构,只能对代码中的一段代码进行锁定,而且锁定是单一的。如以下代码所示:
|
synchronized
(
lock
)
{
//
执行对共享资源的操作
……
}
|
一些复杂的功能就很难被实现。比如说如果程序需要取得
lock A
和
lock B
来进行操作
1
,然后需要取得
lock C
并且释放
lock A
来进行操作
2
,
Java 5.0
之前的多线程框架就显得无能为力了。
因为这些问题,程序员对旧的框架一直颇有微词。这种情况一直到
Java 5.0
才有较大的改观,一系列的多线程工具包被纳入了标准库文件。这些工具包括了一个新的多线程程序的执行框架,使编程人员可方便地协调和调度线程的运行,并且新加入了一些高性能的常用的工具,使程序更容易编写,运行效率更高。本文将分类并结合例子来介绍这些新加的多线程工具。
在我们开始介绍
Java 5.0
里的新
Concurrent
工具前让我们先来看一下一个用旧的多线程工具编写的程序,这个程序里有一个
Server
线程,它需要启动两个
Component
,
Server
线程需等到
Component
线程完毕后再继续。相同的功能在
Synchronizer
一章里用新加的工具
CountDownLatch
有相同的实现。两个程序,孰优孰劣,哪个程序更容易编写,哪个程序更容易理解,相信大家看过之后不难得出结论。
|
public class ServerThread {
Object concLock = new Object();
int count = 2;
public void runTwoThreads() {
//
启动两个线程去初始化组件
new Thread(new ComponentThread1(this)).start();
new Thread(new ComponentThread1(this)).start();
// Wait for other thread
while(count != 0) {
synchronized(concLock) {
try {
concLock.wait();
System.out.println("Wake up.");
} catch (InterruptedException ie) { //
处理异常
}
}
}
System.out.println("Server is up.");
}
public void callBack() {
synchronized(concLock) {
count--;
concLock.notifyAll();
}
}
public static void main(String[] args){
ServerThread server = new ServerThread();
server.runTwoThreads();
}
}
public class ComponentThread1 implements Runnable {
private ServerThread server;
public ComponentThread1(ServerThread server) {
this.server = server;
}
public void run() {
//
做组件初始化的工作
System.out.println("Do component initialization.");
server.callBack();
}
}
|
1
:三个新加的多线程包
Java 5.0
里新加入了三个多线程包:
java.util.concurrent, java.util.concurrent.atomic, java.util.concurrent.locks.
- java.util.concurrent包含了常用的多线程工具,是新的多线程工具的主体。
- java.util.concurrent.atomic包含了不用加锁情况下就能改变值的原子变量,比如说AtomicInteger提供了addAndGet()方法。Add和Get是两个不同的操作,为了保证别的线程不干扰,以往的做法是先锁定共享的变量,然后在锁定的范围内进行两步操作。但用AtomicInteger.addAndGet()就不用担心锁定的事了,其内部实现保证了这两步操作是在原子量级发生的,不会被别的线程干扰。
- java.util.concurrent.locks包包含锁定的工具。
2
:
Callable
和
Future
接口
Callable
是类似于
Runnable
的接口,实现
Callable
接口的类和实现
Runnable
的类都是可被其它线程执行的任务。
Callable
和
Runnable
有几点不同:
- Callable规定的方法是call(),而Runnable规定的方法是run().
- Callable的任务执行后可返回值,而Runnable的任务是不能返回值的。
- call()方法可抛出异常,而run()方法是不能抛出异常的。
- 运行Callable任务可拿到一个Future对象,通过Future对象可了解任务执行情况,可取消任务的执行,还可获取任务执行的结果。
以下是
Callable
的一个例子:
|
public class DoCallStuff implements Callable{ // *1
private int aInt;
public DoCallStuff(int aInt) {
this.aInt = aInt;
}
public String call() throws Exception { //*2
boolean resultOk = false;
if(aInt == 0){
resultOk = true;
} else if(aInt == 1){
while(true){ //infinite loop
System.out.println("looping....");
Thread.sleep(3000);
}
} else {
throw new Exception("Callable terminated with Exception!"); //*3
}
if(resultOk){
return "Task done.";
} else {
return "Task failed";
}
}
}
|
*1:
名为
DoCallStuff
类实现了
Callable
,
String
将是
call
方法的返回值类型。例子中用了
String
,但可以是任何
Java
类。
*2: call
方法的返回值类型为
String
,这是和类的定义相对应的。并且可以抛出异常。
*3: call
方法可以抛出异常,如加重的斜体字所示。
以下是调用
DoCallStuff
的主程序。
|
import java.util.concurrent.ExecutionException;
import java.util.concurrent.ExecutorService;
import java.util.concurrent.Executors;
import java.util.concurrent.Future;
public class Executor {
public static void main(String[] args){
//*1
DoCallStuff call1 = new DoCallStuff(0);
DoCallStuff call2 = new DoCallStuff(1);
DoCallStuff call3 = new DoCallStuff(2);
//*2
ExecutorService es = Executors.newFixedThreadPool(3);
//*3
Future future1 = es.submit(call1);
Future future2 = es.submit(call2);
Future future3 = es.submit(call3);
try {
//*4
System.out.println(future1.get());
//*5
Thread.sleep(3000);
System.out.println("Thread 2 terminated? :" + future2.cancel(true));
//*6
System.out.println(future3.get());
} catch (ExecutionException ex) {
ex.printStackTrace();
} catch (InterruptedException ex) {
ex.printStackTrace();
}
}
}
|
*1:
定义了几个任务
*2:
初始了任务执行工具。任务的执行框架将会在后面解释。
*3:
执行任务,任务启动时返回了一个
Future
对象,如果想得到任务执行的结果或者是异常可对这个
Future
对象进行操作。
Future
所含的值必须跟
Callable
所含的值对映,比如说例子中
Future
对印
Callable
*4:
任务
1
正常执行完毕,
future1.get()
会返回线程的值
*5:
任务
2
在进行一个死循环,调用
future2.cancel(true)
来中止此线程。传入的参数标明是否可打断线程,
true
表明可以打断。
*6:
任务
3
抛出异常,调用
future3.get()
时会引起异常的抛出。
运行
Executor
会有以下运行结果:
|
looping....
Task done. //*1
looping....
looping....//*2
looping....
looping....
looping....
looping....
Thread 2 terminated? :true //*3
//*4
java.util.concurrent.ExecutionException: java.lang.Exception: Callable terminated with Exception!
at java.util.concurrent.FutureTask$Sync.innerGet(FutureTask.java:205)
at java.util.concurrent.FutureTask.get(FutureTask.java:80)
at concurrent.Executor.main(Executor.java:43)
…….
|
*1:
任务
1
正常结束
*2:
任务
2
是个死循环,这是它的打印结果
*3:
指示任务
2
被取消
*4:
在执行
future3.get()
时得到任务
3
抛出的异常
3
:新的任务执行架构
在
Java 5.0
之前启动一个任务是通过调用
Thread
类的
start()
方法来实现的,任务的提于交和执行是同时进行的,如果你想对任务的执行进行调度或是控制同时执行的线程数量就需要额外编写代码来完成。
5.0
里提供了一个新的任务执行架构使你可以轻松地调度和控制任务的执行,并且可以建立一个类似数据库连接池的线程池来执行任务。这个架构主要有三个接口和其相应的具体类组成。这三个接口是
Executor, ExecutorService
和
ScheduledExecutorService
,让我们先用一个图来显示它们的关系:
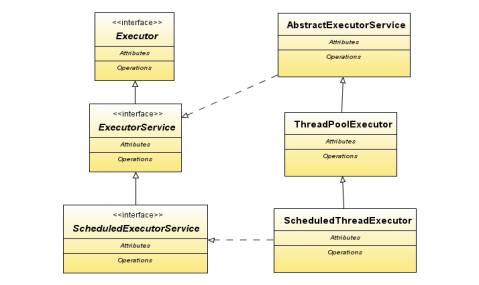
图的左侧是接口,图的右侧是这些接口的具体类。注意
Executor
是没有直接具体实现的。
Executor
接口:
是用来执行
Runnable
任务的,它只定义一个方法:
- execute(Runnable command):执行Ruannable类型的任务
ExecutorService
接口:
ExecutorService
继承了
Executor
的方法,并提供了执行
Callable
任务和中止任务执行的服务,其定义的方法主要有:
- submit(task):可用来提交Callable或Runnable任务,并返回代表此任务的Future对象
- invokeAll(collection of tasks):批处理任务集合,并返回一个代表这些任务的Future对象集合
- shutdown():在完成已提交的任务后关闭服务,不再接受新任务
- shutdownNow():停止所有正在执行的任务并关闭服务。
- isTerminated():测试是否所有任务都执行完毕了。
- isShutdown():测试是否该ExecutorService已被关闭
ScheduledExecutorService
接口
在
ExecutorService
的基础上,
ScheduledExecutorService
提供了按时间安排执行任务的功能,它提供的方法主要有:
- schedule(task, initDelay): 安排所提交的Callable或Runnable任务在initDelay指定的时间后执行。
- scheduleAtFixedRate():安排所提交的Runnable任务按指定的间隔重复执行
- scheduleWithFixedDelay():安排所提交的Runnable任务在每次执行完后,等待delay所指定的时间后重复执行。
代码:
ScheduleExecutorService
的例子
|
public class ScheduledExecutorServiceTest {
public static void main(String[] args)
throws InterruptedException, ExecutionException{
//*1
ScheduledExecutorService service = Executors.newScheduledThreadPool(2);
//*2
Runnable task1 = new Runnable() {
public void run() {
System.out.println("Task repeating.");
}
};
//*3
final ScheduledFuture future1 =
service.scheduleAtFixedRate(task1, 0, 1, TimeUnit.SECONDS);
//*4
ScheduledFuture future2 = service.schedule(new Callable(){
public String call(){
future1.cancel(true);
return "task cancelled!";
}
}, 5, TimeUnit.SECONDS);
System.out.println(future2.get());
//*5
service.shutdown();
}
}
|
这个例子有两个任务,第一个任务每隔一秒打印一句
“Task repeating”,
第二个任务在
5
秒钟后取消第一个任务。
*1:
初始化一个
ScheduledExecutorService
对象,这个对象的线程池大小为
2
。
*2:
用内函数的方式定义了一个
Runnable
任务。
*3:
调用所定义的
ScheduledExecutorService
对象来执行任务,任务每秒执行一次。能重复执行的任务一定是
Runnable
类型。注意我们可以用
TimeUnit
来制定时间单位,这也是
Java 5.0
里新的特征,
5.0
以前的记时单位是微秒,现在可精确到奈秒。
*4:
调用
ScheduledExecutorService
对象来执行第二个任务,第二个任务所作的就是在
5
秒钟后取消第一个任务。
*5:
关闭服务。
Executors
类
虽然以上提到的接口有其实现的具体类,但为了方便
Java 5.0
建议使用
Executors
的工具类来得到
Executor
接口的具体对象,需要注意的是
Executors
是一个类,不是
Executor
的复数形式。
Executors
提供了以下一些
static
的方法:
- callable(Runnable task): 将Runnable的任务转化成Callable的任务
- newSingleThreadExecutor: 产生一个ExecutorService对象,这个对象只有一个线程可用来执行任务,若任务多于一个,任务将按先后顺序执行。
- newCachedThreadPool(): 产生一个ExecutorService对象,这个对象带有一个线程池,线程池的大小会根据需要调整,线程执行完任务后返回线程池,供执行下一次任务使用。
- newFixedThreadPool(int poolSize):产生一个ExecutorService对象,这个对象带有一个大小为poolSize的线程池,若任务数量大于poolSize,任务会被放在一个queue里顺序执行。
- newSingleThreadScheduledExecutor:产生一个ScheduledExecutorService对象,这个对象的线程池大小为1,若任务多于一个,任务将按先后顺序执行。
- newScheduledThreadPool(int poolSize): 产生一个ScheduledExecutorService对象,这个对象的线程池大小为poolSize,若任务数量大于poolSize,任务会在一个queue里等待执行
以下是得到和使用
ExecutorService
的例子:
代码:如何调用
Executors
来获得各种服务对象
|
//Single Threaded ExecutorService
ExecutorService singleThreadeService = Executors.newSingleThreadExecutor();
//Cached ExecutorService
ExecutorService cachedService = Executors.newCachedThreadPool();
//Fixed number of ExecutorService
ExecutorService fixedService = Executors.newFixedThreadPool(3);
//Single ScheduledExecutorService
ScheduledExecutorService singleScheduledService =
Executors.newSingleThreadScheduledExecutor();
//Fixed number of ScheduledExecutorService
ScheduledExecutorService fixedScheduledService =
Executors.newScheduledThreadPool(3);
|
4
:
Lockers
和
Condition
接口
在多线程编程里面一个重要的概念是锁定,如果一个资源是多个线程共享的,为了保证数据的完整性,在进行事务性操作时需要将共享资源锁定,这样可以保证在做事务性操作时只有一个线程能对资源进行操作,从而保证数据的完整性。在
5.0
以前,锁定的功能是由
Synchronized
关键字来实现的,这样做存在几个问题:
- 每次只能对一个对象进行锁定。若需要锁定多个对象,编程就比较麻烦,一不小心就会出现死锁现象。
- 如果线程因拿不到锁定而进入等待状况,是没有办法将其打断的
在
Java 5.0
里出现两种锁的工具可供使用,下图是这两个工具的接口及其实现:
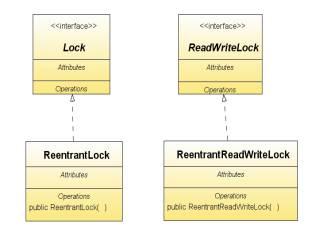
ReentrantLock
是
Lock
的具体类,
Lock
提供了以下一些方法:
- lock(): 请求锁定,如果锁已被别的线程锁定,调用此方法的线程被阻断进入等待状态。
- tryLock():如果锁没被别的线程锁定,进入锁定状态,并返回true。若锁已被锁定,返回false,不进入等待状态。此方法还可带时间参数,如果锁在方法执行时已被锁定,线程将继续等待规定的时间,若还不行才返回false。
- unlock():取消锁定,需要注意的是Lock不会自动取消,编程时必须手动解锁。
代码:
|
//
生成一个锁
Lock lock = new ReentrantLock();
public void accessProtectedResource() {
lock.lock(); //
取得锁定
try {
//
对共享资源进行操作
} finally {
//
一定记着把锁取消掉,锁本身是不会自动解锁的
lock.unlock();
}
}
|
ReadWriteLock
接口
为了提高效率有些共享资源允许同时进行多个读的操作,但只允许一个写的操作,比如一个文件,只要其内容不变可以让多个线程同时读,不必做排他的锁定,排他的锁定只有在写的时候需要,以保证别的线程不会看到数据不完整的文件。
ReadWriteLock
可满足这种需要。
ReadWriteLock
内置两个
Lock
,一个是读的
Lock
,一个是写的
Lock
。多个线程可同时得到读的
Lock
,但只有一个线程能得到写的
Lock
,而且写的
Lock
被锁定后,任何线程都不能得到
Lock
。
ReadWriteLock
提供的方法有:
- readLock(): 返回一个读的lock
- writeLock(): 返回一个写的lock, 此lock是排他的。
ReadWriteLock
的例子:
|
public class FileOperator{
//
初始化一个
ReadWriteLock
ReadWriteLock lock = new ReentrantReadWriteLock();
public String read() {
//
得到
readLock
并锁定
Lock readLock = lock.readLock();
readLock.lock();
try {
//
做读的工作
return "Read something";
} finally {
readLock.unlock();
}
}
public void write(String content) {
//
得到
writeLock
并锁定
Lock writeLock = lock.writeLock();
writeLock.lock();
try {
//
做读的工作
} finally {
writeLock.unlock();
}
}
}
|
需要注意的是
ReadWriteLock
提供了一个高效的锁定机理,但最终程序的运行效率是和程序的设计息息相关的,比如说如果读的线程和写的线程同时在等待,要考虑是先发放读的
lock
还是先发放写的
lock
。如果写发生的频率不高,而且快,可以考虑先给写的
lock
。还要考虑的问题是如果一个写正在等待读完成,此时一个新的读进来,是否要给这个新的读发锁,如果发了,可能导致写的线程等很久。等等此类问题在编程时都要给予充分的考虑。
Condition
接口:
有时候线程取得
lock
后需要在一定条件下才能做某些工作,比如说经典的
Producer
和
Consumer
问题,
Consumer
必须在篮子里有苹果的时候才能吃苹果,否则它必须暂时放弃对篮子的锁定,等到
Producer
往篮子里放了苹果后再去拿来吃。而
Producer
必须等到篮子空了才能往里放苹果,否则它也需要暂时解锁等
Consumer
把苹果吃了才能往篮子里放苹果。在
Java 5.0
以前,这种功能是由
Object
类的
wait(), notify()
和
notifyAll()
等方法实现的,在
5.0
里面,这些功能集中到了
Condition
这个接口来实现,
Condition
提供以下方法:
- await():使调用此方法的线程放弃锁定,进入睡眠直到被打断或被唤醒。
- signal(): 唤醒一个等待的线程
- signalAll():唤醒所有等待的线程
Condition
的例子:
|
public class Basket {
Lock lock = new ReentrantLock();
//
产生
Condition
对象
Condition produced = lock.newCondition();
Condition consumed = lock.newCondition();
boolean available = false;
public void produce() throws InterruptedException {
lock.lock();
try {
if(available){
consumed.await(); //
放弃
lock
进入睡眠
}
/*
生产苹果
*/
System.out.println("Apple produced.");
available = true;
produced.signal(); //
发信号唤醒等待这个
Condition
的线程
} finally {
lock.unlock();
}
}
public void consume() throws InterruptedException {
lock.lock();
try {
if(!available){
produced.await();//
放弃
lock
进入睡眠
}
/*
吃苹果
*/
System.out.println("Apple consumed.");
available = false;
consumed.signal();//
发信号唤醒等待这个
Condition
的线程
} finally {
lock.unlock();
}
}
}
|
ConditionTester:
|
public class ConditionTester {
public static void main(String[] args) throws InterruptedException{
final Basket basket = new Basket();
//
定义一个
producer
Runnable producer = new Runnable() {
public void run() {
try {
basket.produce();
} catch (InterruptedException ex) {
ex.printStackTrace();
}
}
};
//
定义一个
consumer
Runnable consumer = new Runnable() {
public void run() {
try {
basket.consume();
} catch (InterruptedException ex) {
ex.printStackTrace();
}
}
};
//
各产生
10
个
consumer
和
producer
ExecutorService service = Executors.newCachedThreadPool();
for(int i=0; i < 10; i++)
service.submit(consumer);
Thread.sleep(2000);
for(int i=0; i<10; i++)
service.submit(producer);
service.shutdown();
}
}
|
5: Synchronizer
:同步装置
Java 5.0
里新加了
4
个协调线程间进程的同步装置,它们分别是
Semaphore, CountDownLatch, CyclicBarrier
和
Exchanger.
Semaphore:
用来管理一个资源池的工具,
Semaphore
可以看成是个通行证,线程要想从资源池拿到资源必须先拿到通行证,
Semaphore
提供的通行证数量和资源池的大小一致。如果线程暂时拿不到通行证,线程就会被阻断进入等待状态。以下是一个例子:
|
public class Pool {
ArrayList pool = null;
Semaphore pass = null;
public Pool(int size){
//
初始化资源池
pool = new ArrayList();
for(int i=0; i
pool.add("Resource "+i);
}
//Semaphore
的大小和资源池的大小一致
pass = new Semaphore(size);
}
public String get() throws InterruptedException{
//
获取通行证
,
只有得到通行证后才能得到资源
pass.acquire();
return getResource();
}
public void put(String resource){
//
归还通行证,并归还资源
pass.release();
releaseResource(resource);
}
private synchronized String getResource() {
String result = pool.get(0);
pool.remove(0);
System.out.println("Give out "+result);
return result;
}
private synchronized void releaseResource(String resource) {
System.out.println("return "+resource);
pool.add(resource);
}
}
|
SemaphoreTest:
|
public class SemaphoreTest {
public static void main(String[] args){
final Pool aPool = new Pool(2);
Runnable worker = new Runnable() {
public void run() {
String resource = null;
try {
//
取得
resource
resource = aPool.get();
} catch (InterruptedException ex) {
ex.printStackTrace();
}
//
用
resource
做工作
System.out.println("I worked on "+resource);
//
归还
resource
aPool.put(resource);
}
};
ExecutorService service = Executors.newCachedThreadPool();
for(int i=0; i<20; i++){
service.submit(worker);
}
service.shutdown();
}
}
|
CountDownLatch:
CountDownLatch
是个计数器,它有一个初始数,等待这个计数器的线程必须等到计数器倒数到零时才可继续。比如说一个
Server
启动时需要初始化
4
个部件,
Server
可以同时启动
4
个线程去初始化这
4
个部件,然后调用
CountDownLatch(4).await()
阻断进入等待,每个线程完成任务后会调用一次
CountDownLatch.countDown()
来倒计数
,
当
4
个线程都结束时
CountDownLatch
的计数就会降低为
0
,此时
Server
就会被唤醒继续下一步操作。
CountDownLatch
的方法主要有:
- await():使调用此方法的线程阻断进入等待
- countDown(): 倒计数,将计数值减1
- getCount(): 得到当前的计数值
CountDownLatch
的例子:一个
server
调了三个
ComponentThread
分别去启动三个组件,然后
server
等到组件都启动了再继续。
|
public class Server {
public static void main(String[] args) throws InterruptedException{
System.out.println("Server is starting.");
//
初始化一个初始值为
3
的
CountDownLatch
CountDownLatch latch = new CountDownLatch(3);
//
起
3
个线程分别去启动
3
个组件
ExecutorService service = Executors.newCachedThreadPool();
service.submit(new ComponentThread(latch, 1));
service.submit(new ComponentThread(latch, 2));
service.submit(new ComponentThread(latch, 3));
service.shutdown();
//
进入等待状态
latch.await();
//
当所需的三个组件都完成时,
Server
就可继续了
System.out.println("Server is up!");
}
}
public class ComponentThread implements Runnable{
CountDownLatch latch;
int ID;
/** Creates a new instance of ComponentThread */
public ComponentThread(CountDownLatch latch, int ID) {
this.latch = latch;
this.ID = ID;
}
public void run() {
System.out.println("Component "+ID + " initialized!");
//
将计数减一
latch.countDown();
}
}
|
运行结果:
|
Server is starting.
Component 1 initialized!
Component 3 initialized!
Component 2 initialized!
Server is up!
|
CyclicBarrier:
CyclicBarrier
类似于
CountDownLatch
也是个计数器,不同的是
CyclicBarrier
数的是调用了
CyclicBarrier.await()
进入等待的线程数,当线程数达到了
CyclicBarrier
初始时规定的数目时,所有进入等待状态的线程被唤醒并继续。
CyclicBarrier
就象它名字的意思一样,可看成是个障碍,所有的线程必须到齐后才能一起通过这个障碍。
CyclicBarrier
初始时还可带一个
Runnable
的参数,此
Runnable
任务在
CyclicBarrier
的数目达到后,所有其它线程被唤醒前被执行。
CyclicBarrier
提供以下几个方法:
- await():进入等待
- getParties():返回此barrier需要的线程数
- reset():将此barrier重置
以下是使用
CyclicBarrier
的一个例子:两个线程分别在一个数组里放一个数,当这两个线程都结束后,主线程算出数组里的数的和(这个例子比较无聊,我没有想到更合适的例子)
|
public class MainThread {
public static void main(String[] args)
throws InterruptedException, BrokenBarrierException, TimeoutException{
final int[] array = new int[2];
CyclicBarrier barrier = new CyclicBarrier(2,
new Runnable() {//
在所有线程都到达
Barrier
时执行
public void run() {
System.out.println("Total is:"+(array[0]+array[1]));
}
});
//
启动线程
new Thread(new ComponentThread(barrier, array, 0)).start();
new Thread(new ComponentThread(barrier, array, 1)).start();
}
}
public class ComponentThread implements Runnable{
CyclicBarrier barrier;
int ID;
int[] array;
public ComponentThread(CyclicBarrier barrier, int[] array, int ID) {
this.barrier = barrier;
this.ID = ID;
this.array = array;
}
public void run() {
try {
array[ID] = new Random().nextInt();
System.out.println(ID+ " generates:"+array[ID]);
//
该线程完成了任务等在
Barrier
处
barrier.await();
} catch (BrokenBarrierException ex) {
ex.printStackTrace();
} catch (InterruptedException ex) {
ex.printStackTrace();
}
}
}
|
Exchanger:
顾名思义
Exchanger
让两个线程可以互换信息。用一个例子来解释比较容易。例子中服务生线程往空的杯子里倒水,顾客线程从装满水的杯子里喝水,然后通过
Exchanger
双方互换杯子,服务生接着往空杯子里倒水,顾客接着喝水,然后交换,如此周而复始。
|
class FillAndEmpty {
//
初始化一个
Exchanger
,并规定可交换的信息类型是
DataCup
Exchanger exchanger = new Exchanger();
Cup initialEmptyCup = ...; //
初始化一个空的杯子
Cup initialFullCup = ...; //
初始化一个装满水的杯子
//
服务生线程
class Waiter implements Runnable {
public void run() {
Cup currentCup = initialEmptyCup;
try {
//
往空的杯子里加水
currentCup.addWater();
//
杯子满后和顾客的空杯子交换
currentCup = exchanger.exchange(currentCup);
} catch (InterruptedException ex) { ... handle ... }
}
}
//
顾客线程
class Customer implements Runnable {
public void run() {
DataCup currentCup = initialFullCup;
try {
//
把杯子里的水喝掉
currentCup.drinkFromCup();
//
将空杯子和服务生的满杯子交换
currentCup = exchanger.exchange(currentCup);
} catch (InterruptedException ex) { ... handle ...}
}
}
void start() {
new Thread(new Waiter()).start();
new Thread(new Customer()).start();
}
}
|
6: BlockingQueue
接口
BlockingQueue
是一种特殊的
Queue
,若
BlockingQueue
是空的,从
BlockingQueue
取东西的操作将会被阻断进入等待状态直到
BlocingkQueue
进了新货才会被唤醒。同样,如果
BlockingQueue
是满的任何试图往里存东西的操作也会被阻断进入等待状态,直到
BlockingQueue
里有新的空间才会被唤醒继续操作。
BlockingQueue
提供的方法主要有:
- add(anObject): 把anObject加到BlockingQueue里,如果BlockingQueue可以容纳返回true,否则抛出IllegalStateException异常。
- offer(anObject):把anObject加到BlockingQueue里,如果BlockingQueue可以容纳返回true,否则返回false。
- put(anObject):把anObject加到BlockingQueue里,如果BlockingQueue没有空间,调用此方法的线程被阻断直到BlockingQueue里有新的空间再继续。
- poll(time):取出BlockingQueue里排在首位的对象,若不能立即取出可等time参数规定的时间。取不到时返回null。
- take():取出BlockingQueue里排在首位的对象,若BlockingQueue为空,阻断进入等待状态直到BlockingQueue有新的对象被加入为止。
根据不同的需要
BlockingQueue
有
4
种具体实现:
- ArrayBlockingQueue:规定大小的BlockingQueue,其构造函数必须带一个int参数来指明其大小。其所含的对象是以FIFO(先入先出)顺序排序的。
- LinkedBlockingQueue:大小不定的BlockingQueue,若其构造函数带一个规定大小的参数,生成的BlockingQueue有大小限制,若不带大小参数,所生成的BlockingQueue的大小由Integer.MAX_VALUE来决定。其所含的对象是以FIFO(先入先出)顺序排序的。LinkedBlockingQueue和ArrayBlockingQueue比较起来,它们背后所用的数据结构不一样,导致LinkedBlockingQueue的数据吞吐量要大于ArrayBlockingQueue,但在线程数量很大时其性能的可预见性低于ArrayBlockingQueue。
- PriorityBlockingQueue:类似于LinkedBlockingQueue,但其所含对象的排序不是FIFO,而是依据对象的自然排序顺序或者是构造函数所带的Comparator决定的顺序。
- SynchronousQueue:特殊的BlockingQueue,对其的操作必须是放和取交替完成的。
下面是用
BlockingQueue
来实现
Producer
和
Consumer
的例子:
|
public class BlockingQueueTest {
static BlockingQueue basket;
public BlockingQueueTest() {
//
定义了一个大小为
2
的
BlockingQueue
,也可根据需要用其他的具体类
basket = new ArrayBlockingQueue(2);
}
class Producor implements Runnable {
public void run() {
while(true){
try {
//
放入一个对象,若
basket
满了,等到
basket
有位置
basket.put("An apple");
} catch (InterruptedException ex) {
ex.printStackTrace();
}
}
}
}
class Consumer implements Runnable {
public void run() {
while(true){
try {
//
取出一个对象,若
basket
为空,等到
basket
有东西为止
String result = basket.take();
} catch (InterruptedException ex) {
ex.printStackTrace();
}
}
}
}
public void execute(){
for(int i=0; i<10; i++){
new Thread(new Producor()).start();
new Thread(new Consumer()).start();
}
}
public static void main(String[] args){
BlockingQueueTest test = new BlockingQueueTest();
test.execute();
}
}
|
7
:
Atomics
原子级变量
原子量级的变量,主要的类有
AtomicBoolean, AtomicInteger, AotmicIntegerArray, AtomicLong, AtomicLongArray, AtomicReference ……
。这些原子量级的变量主要提供两个方法:
- compareAndSet(expectedValue, newValue): 比较当前的值是否等于expectedValue,若等于把当前值改成newValue,并返回true。若不等,返回false。
- getAndSet(newValue): 把当前值改为newValue,并返回改变前的值。
这些原子级变量利用了现代处理器(
CPU
)的硬件支持可把两步操作合为一步的功能,避免了不必要的锁定,提高了程序的运行效率。
8
:
Concurrent Collections
共点聚集
在
Java
的聚集框架里可以调用
Collections.synchronizeCollection(aCollection)
将普通聚集改变成同步聚集,使之可用于多线程的环境下。但同步聚集在一个时刻只允许一个线程访问它,其它想同时访问它的线程会被阻断,导致程序运行效率不高。
Java 5.0
里提供了几个共点聚集类,它们把以前需要几步才能完成的操作合成一个原子量级的操作,这样就可让多个线程同时对聚集进行操作,避免了锁定,从而提高了程序的运行效率。
Java 5.0
目前提供的共点聚集类有:
ConcurrentHashMap, ConcurrentLinkedQueue, CopyOnWriteArrayList
和
CopyOnWriteArraySet.


 521
521

 被折叠的 条评论
为什么被折叠?
被折叠的 条评论
为什么被折叠?
 到【灌水乐园】发言


