


Apache
Apache详解
Apache概述
Apache是世界使用排名第一的Web服务器软件。它可以运行在几乎所有广泛使用的计算机平台上,由于其跨平台和安全性被广泛使用,是最流行的Web服务器端软件之一。它快速、可靠并且可通过简单的API扩充,将Per1/Python/php等解释器编译到服务器中。
Apache有多种产品,可以支持SSL技术,支持多个虚拟主机。Apache是以进程为基础的结构,进程要比线程消耗更多的系统开支,不太适合于多处理器环境,因此,在一个Apache Web站点扩容时,通常是增加服务器或扩充群集节点而不是增加处理器。到目前为止Apache仍然是世界上用的最多的Web服务器,市场占有率达60%左右。
Apache的工作模式
Apache一共有三种文档的MPM模式(多进程处理模块),他们分别是prefork、worker、event。
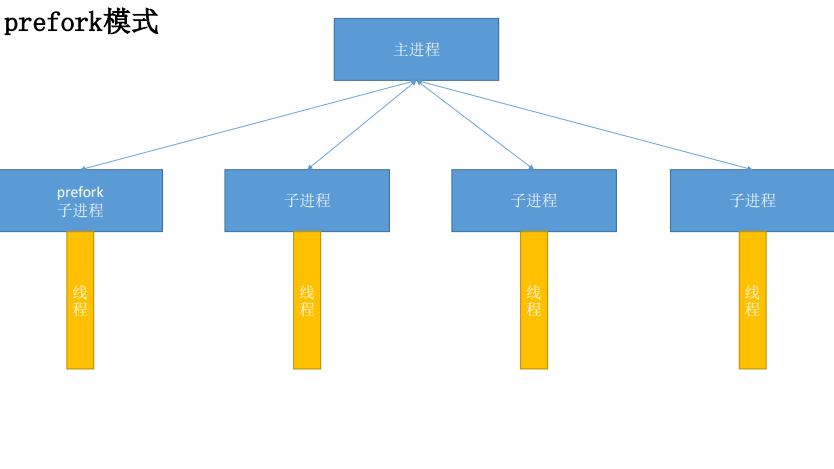
prefork
Apache在启动之初,就预先fork一些子进程,然后等待请求进来。之所以这样做,是为了减少频繁创建和销毁进程的开销。每个子进程只有一个线程,在一个时间点内,只能处理一个请求。
优点:成熟稳定,兼容所有新老模块。同时,不需要担心线程安全的问题。
缺点:一个进程相对占用更多的系统资源,消耗更多的内存。而且,它并不擅长处理高并发请求。,
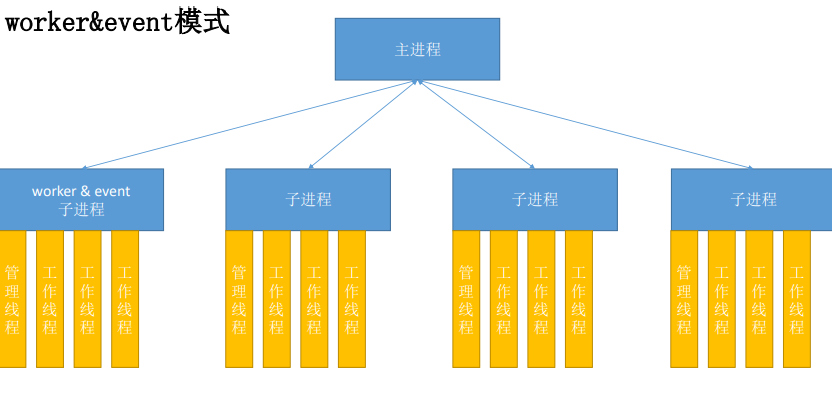
worker
使用了多进程和多线程的混合模式。它也预先fork了几个子进程(数量比较少),然后每个子进程创建一些线程,同时包括一个监听线程。每个请求过来,会被分配到1个线程来服务。线程比起进程会更轻量,因为线程通常会共享父进程的内存空间,因此,内存的占用会减少一些。在高并发的场景下,因为比起prefork有更好的可用线程,表现会更优秀一些。
优点:占据更少的内存,高并发下表现更优秀
缺点:必须考虑线程安全的问题
event
它和worker模式很像,最大的区别在于,它解决了keep-alive场景下,长期被占用的线程的资源浪费问题。event MPM中,会有一个专门的线程来管理这些keep-alive类型的线程,当有真实请求过来的时候,将请求传递给服备线程,执行完毕后,又允许它释放。这样增强了高并发场景下的请求处理能力。
HTTP采用keepalive方式减少TCP连接数量,但是由于需要与服务器线程或进程进行绑定,导致一个繁忙的服务器会消耗完所有的线程。Event MPM是解决这个问题的一种新模型,它把服务进程从连接中分离出来。在服务器处理速度很快,同时具有非常高的点击率时,可用的线程数量就是关键的资源限制,此时Event MPM方式是最有效的,但不能在HTTPS访问下工作。
查看方式
httpd -V | grep -i "server mpm"
指定方式
在编译时,在选项中指定,–with-mpm=xxx
Apache安装
安装环境
[root@localhost ~]# yum -y install openssl-devel pcre-devel expat-devel libtool gcc-c++ libstdc++-devel make
编译安装
//下载好apr、apr-util和httpd的包
[root@localhost ~]# wget https://mirrors.bfsu.edu.cn/apache/apr/apr-1.7.0.tar.bz2
[root@localhost ~]# wget https://mirrors.bfsu.edu.cn/apache/apr/apr-util-1.6.1.tar.bz2
[root@localhost ~]# wget https://mirrors.bfsu.edu.cn/apache/httpd/httpd-2.4.46.tar.bz2

//解压
[root@localhost ~]# tar xf apr-1.7.0.tar.bz2
[root@localhost ~]# tar xf apr-util-1.6.1.tar.bz2
[root@localhost ~]# tar xf httpd-2.4.46.tar.bz2

//修改apr的configure文件
[root@localhost ~]# cd apr-1.7.0/
[root@localhost apr-1.7.0]# vim configure
    cfgfile=${ofile}T
    trap "$RM \"$cfgfile\"; exit 1" 1 2 15
    # $RM "$cfgfile"		//注释或者删掉这一行

//编译安装apr
[root@localhost apr-1.7.0]# ./configure --prefix=/usr/local/apr
[root@localhost apr-1.7.0]# make
[root@localhost apr-1.7.0]# make install

//编译安装apr-util
[root@localhost apr-1.7.0]# cd ../apr-util-1.6.1/
[root@localhost apr-util-1.6.1]# ./configure --prefix=/usr/local/apr-util --with-apr=/usr/local/apr
[root@localhost apr-util-1.6.1]# make
[root@localhost apr-util-1.6.1]# make install

//编译安装httpd
[root@localhost apr-util-1.6.1]# cd ../httpd-2.4.46/
[root@localhost httpd-2.4.46]# ./configure --prefix=/usr/local/apache \
> --sysconfdir=/etc/httpd24 \
> --enable-so \
> --enable-ssl \
> --enable-cgi \
> --enable-rewrite \
> --with-zlib \
> --with-pcre \
> --with-apr=/usr/local/apr \
> --with-apr-util=/usr/local/apr-util/ \
> --enable-modules=most \
> --enable-mpms-shared=all \
> --with-mpm=prefork
[root@localhost httpd-2.4.46]#make && make install
Apache配置文件
配置文件位置:
位置不一定完全一样,在安装的时候,你们可能设置的是其他目录,可能跟我不一样。
源码包安装: /etc/httpd24/httpd.conf(主配置文件)
/etc/htppd24/extra/*.conf(子配置文件)
rpm包安装: /etc/httpd/conf/httpd.conf
网页文件位置: //PREFIX代表安装目录
源码包安装: PREFIX/htdocs/
rpm包安装: /var/www/html/
日志文件位置:
源码包安装: PREFIX/logs/
rpm包安装: /var/log/httpd
配置文件详解
注意:apache配置文件严格区分大小写
针对主机环境的基本配置参数
ServerRoot		/usr/local/apache		//apache主目录
Listen			:80						//监听端口
LoadModule		php7					//加载的相关模块
User
Group			//用户和组
ServerAdmin		//管理员邮箱
ServerName		//服务器名(没有域名解析时,使用临时解析。默认不开启>
ErrorLog "logs/error_log		//服务器错误日志
CustomLog "logs/access_log"common	//访问记录日志
DirectoryIndex index.html index.php		//默认网页文件名,优先级顺序
Includeetc/extra/httpd-vhosts.conf		//子配置文件中内容也会加载生效
主页目录及权限
DocumentRoot "/usr/local/apache2/htdocs"		//网页文件存放目录(默认)
<Directory " /usr/local/apache2/htdocs">		//定义指定目录的权限
	Options Indexes FollowSymLinks
		None		//没有任何额外权限
		All			//所有权限(除去MultiViews以外)
		Indexes		//浏览权限(当此目录下没有默认网页文件时,显示目录内容)

		FollowSymLinks	//准许软连接到其他目录
		MultiViews		//准许文件名泛匹配(需要手动开启模块才有效negotiation)
	AllowOverride None		//定义是否允许目录下.htaccess文件中的权限生效
		None			//. htaccess中权限不生效
		All				//文件中所有权限都生效
		AuthConfig		//文件中,只有网页认证的权限生效
	Require all granted (denied)		//访问控制列表
</Directory>

<IfModule dir_module>		//此标签用来指定访问到指定目录时自动加载哪个页面文件
	DirectoryIndex index. php index.html	//可以写多个,但是有优先级之分
</IfModule>
实验
目录别名
[root@localhost ~]# vim /etc/profile.d/aa.sh
export PATH=/usr/local/apache/bin:$PATH
[root@localhost profile.d]# source /etc/profile.d/aa.sh
[root@localhost ~]# apachectl start
[root@localhost ~]# ss -antl
State           Recv-Q          Send-Q                     Local Address:Port                     Peer Address:Port          Process
LISTEN          0               128                              0.0.0.0:22                            0.0.0.0:*
LISTEN          0               128                                 [::]:22                               [::]:*
LISTEN          0               128                                    *:80                                  *:*


//先进入apache的主配置文件里开启调用这个子配置文件
[root@localhost ~]# vim /etc/httpd24/httpd.conf
# Fancy directory listings
Include /etc/httpd24/extra/httpd-autoindex.conf	//删掉#,取消注释

//在他原本的那个模板下面,新建一条新的模板
[root@localhost ~]# vim /etc/httpd24/extra/httpd-autoindex.conf
Alias /lad/ "/lad/abc/"

<Directory "/lad/abc">
    Options Indexes MultiViews
    AllowOverride None
    Require all granted
</Directory>

[root@localhost ~]# mkdir -p /lad/abc
[root@localhost ~]# cd /lad/abc
[root@localhost abc]# vim index.php
hello
[root@localhost ~]# systemctl stop firewalld.service 	/关闭防火墙
[root@localhost ~]# setenforce 0
[root@localhost abc]# apachectl restart		//重启服务


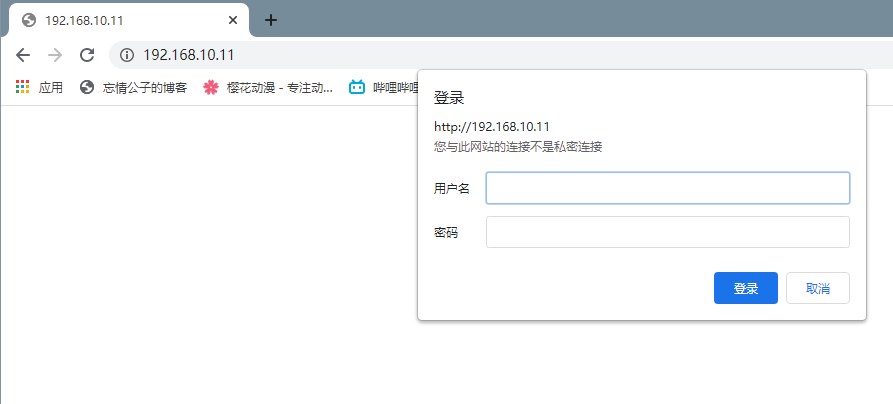
用户认证
有时候,我们需要给一些特殊的访问设置一个用户认证机制,增加安全。比如我们的个人网站,一般都是有一个管理后台的,虽然管理后台本身就有密码,但我们为了更加安全,可以再设置一层用户身份认证。
编辑配置文件
[root@localhost ~]# vim /etc/httpd24/httpd.conf
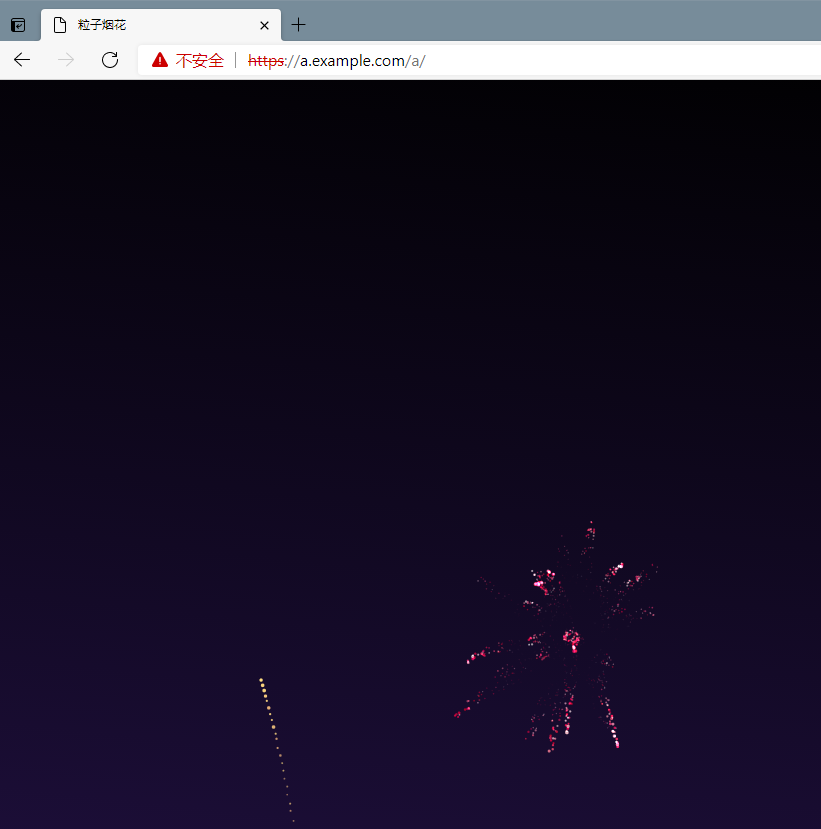
<Directory "/usr/local/apache/htdocs/a/"> //声明被保护的目录
Options Indexes FollowSymLinks
AllowOverride All //开启授权文件.htaccess
Require all granted
</Directory>
在指定目录下创建权限文件
[root@localhost ~]# cd /usr/local/apache/htdocs/a
[root@localhost a]# vim .htaccess
AuthName "Welcome to atguigu"	//提示信息
AuthType basic		//加密类型
AuthUserFile /usr/local/apache/htdocs/a/apache.passwd		//密码文件,文件名自定义(使用绝对路径)
require valid-user                //允许密码文件中所有用户访问
编辑密码文件
[root@localhost a]# touch apache.passwd
[root@localhost a]# htpasswd -c /usr/local/apache/htdocs/a/apache.passwd test1	//建立密码文件(第一次用-c)
New password:
Re-type new password:
Adding password for user test1
[root@localhost a]# htpasswd -m /usr/local/apache/htdocs/a/apache.passwd test2	//建立密码文件(第二次用-m)
New password:
Re-type new password:
Adding password for user test2
//htpasswd命令是httpd命令,需要绝对路径
重启服务
[root@localhost a]# apachectl restart
这里可以看到需要验证
虚拟主机
相同IP不同端口
//修改主配置文件开启文件关联
[root@localhost ~]# vim /etc/httpd24/httpd.conf
# Virtual hosts
Include /etc/httpd24/extra/httpd-vhosts.conf	//取消注释

//编辑子配置文件
[root@localhost ~]# vim /etc/httpd24/extra/httpd-vhosts.conf
<VirtualHost *:80>
    ServerAdmin a.example.com
    DocumentRoot "/usr/local/apache/htdocs/a/"
    ServerName dummy-host.example.com
    ErrorLog "logs/a.example.com-error_log"
    CustomLog "logs/a.example.com-access_log" common
</VirtualHost>
listen 81		//监听端口
<VirtualHost *:81>
    ServerAdmin b.example.com
    DocumentRoot "/usr/local/apache/htdocs/a/"
    ServerName dummy-host.example.com
    ErrorLog "logs/b.example.com-error_log"
    CustomLog "logs/b.example.com-access_log" common
</VirtualHost>

//这里注意了,如果里面已经有两个80端口的模板了,请删掉一个,不然如果监听80端口的虚拟主机一同工作的多了,会出现无权限访问,或者加上serverName 别名,可以解决
[root@localhost ~]# apachectl restart
默认80端口
81端口
不同IP相同端口
[root@localhost ~]# vim /etc/httpd24/extra/httpd-vhosts.conf
<VirtualHost 192.168.10.11:80>	//把*修改成IP就行了
    ServerAdmin a.example.com
    DocumentRoot "/usr/local/apache/htdocs/a/a/"
    ServerName dummy-host.example.com
    ErrorLog "logs/a.example.com-error_log"
    CustomLog "logs/a.example.com-access_log" common
</VirtualHost>

<VirtualHost 192.168.10.20:80>
    ServerAdmin b.example.com
    DocumentRoot "/usr/local/apache/htdocs/b/b/"
    ServerName dummy-host.example.com
    ErrorLog "logs/b.example.com-error_log"
    CustomLog "logs/b.example.com-access_log" common
</VirtualHost>
[root@localhost ~]# apachectl restart
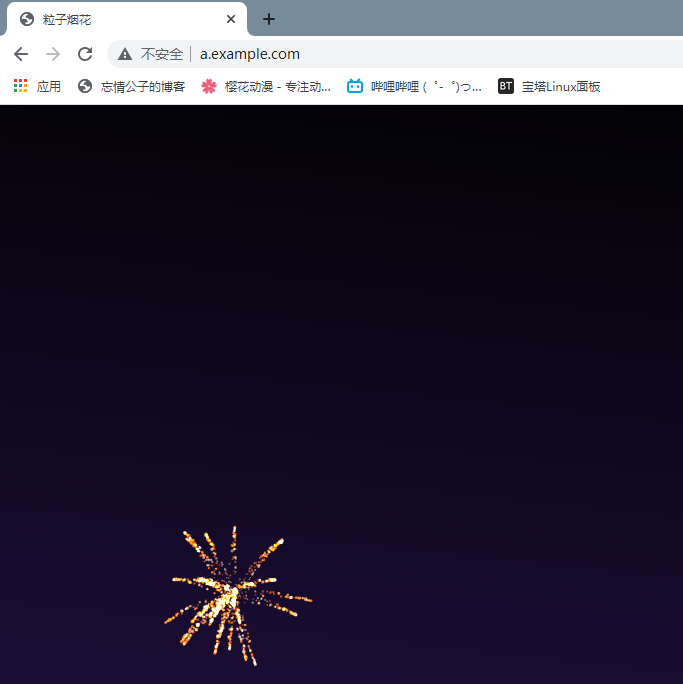
192.168.10.11的效果
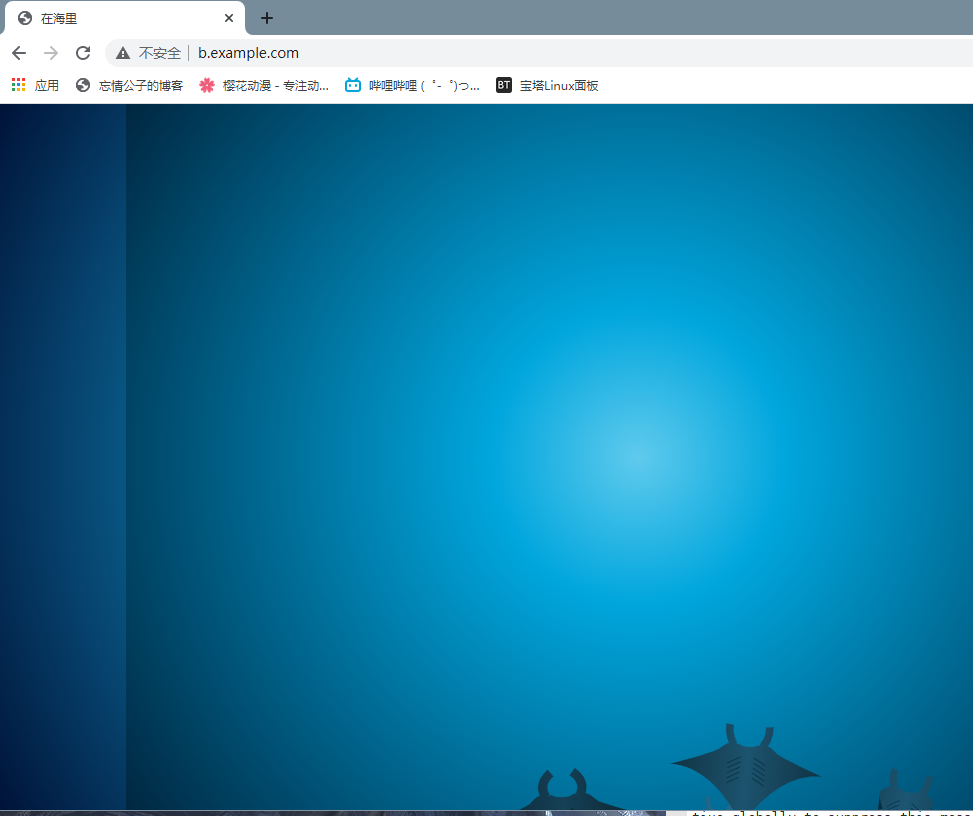
192.168.10.20的效果
相同IP相同端口域名不同
[root@localhost ~]# vim /etc/httpd24/extra/httpd-vhosts.conf
<VirtualHost *:80>
    ServerAdmin a.example.com
    DocumentRoot "/usr/local/apache/htdocs/a/a/"
    ServerName a.example.com
    ErrorLog "logs/a.example.com-error_log"
    CustomLog "logs/a.example.com-access_log" common
</VirtualHost>

<VirtualHost *:80>
    ServerAdmin b.example.com
    DocumentRoot "/usr/local/apache/htdocs/b/b/"
    ServerName b.example.com
    ErrorLog "logs/b.example.com-error_log"
    CustomLog "logs/b.example.com-access_log" common
</VirtualHost>

接下来windows,就去C:\Windows\System32\drivers\etc\hosts
拖到桌面上,用记事本打开写入以下内容
192.168.10.11 a.example.com b.example.com
然后再拖回去
效果:
域名跳转
https
修改配置文件
[root@localhost httpd24]# vim httpd.conf
#LoadModule session_dbd_module modules/mod_session_dbd.so
#LoadModule slotmem_shm_module modules/mod_slotmem_shm.so
LoadModule ssl_module modules/mod_ssl.so		//注释取消掉
#LoadModule lbmethod_byrequests_module modules/mod_lbmethod_byrequests.so
#LoadModule lbmethod_bytraffic_module modules/mod_lbmethod_bytraffic.so
...
# Secure (SSL/TLS) connections
Include /etc/httpd24/extra/httpd-ssl.conf		//注释取消掉
#
# Note: The following must must be present to support
#       starting without SSL on platforms with no /dev/random equivalent
#       but a statically compiled-in mod_ssl.
#

[root@localhost ~]# yum -y install mod_ssl		//装一下这个模块
[root@localhost ~]# vim /etc/httpd24/extra/httpd-ssl.conf
#   General setup for the virtual host
DocumentRoot "/usr/local/apache/htdocs/a"	//加上你要加证书的那个
ServerName a.example.com:443
ErrorLog "/usr/local/apache/logs/a_error_log"
TransferLog "/usr/local/apache/logs/a_access_log"
...
SSLCertificateFile "/etc/httpd24/httpd.crt"
#SSLCertificateFile "/etc/httpd24/server-dsa.crt"
#SSLCertificateFile "/etc/httpd24/server-ecc.crt"
...
SSLCertificateKeyFile "/etc/httpd24/httpd.key"
#SSLCertificateKeyFile "/etc/httpd24/server-dsa.key"
#SSLCertificateKeyFile "/etc/httpd24/server-ecc.key"

#SSLSessionCache        "shmcb:/usr/local/apache/logs/ssl_scache(512000)"	//这两行都注释掉
#SSLSessionCacheTimeout  300
生成ssl证书
//创建证书
[root@localhost ~]# mkdir /etc/pki/CA
[root@localhost ~]# cd /etc/pki/CA
[root@localhost CA]# mkdir private
[root@localhost CA]# (umask 077;openssl genrsa -out private/cakey.pem 2048)	//生成密钥,括号必须要
Generating RSA private key, 2048 bit long modulus (2 primes)
..................+++++
........+++++
e is 65537 (0x010001)
[root@localhost CA]# openssl req -new -x509 -key private/cakey.pem -out cacert.pem -days 365		//生成自签署证书
You are about to be asked to enter information that will be incorporated
into your certificate request.
What you are about to enter is what is called a Distinguished Name or a DN.
There are quite a few fields but you can leave some blank
For some fields there will be a default value,
If you enter '.', the field will be left blank.
-----
Country Name (2 letter code) [XX]:CN		//国家
State or Province Name (full name) []:HB
Locality Name (eg, city) [Default City]:WH		//城市
Organization Name (eg, company) [Default Company Ltd]:aa	//公司
Organizational Unit Name (eg, section) []:aa
Common Name (eg, your name or your server's hostname) []:a.example.com	//你要颁发的那个域名
Email Address []:2561165
[root@localhost CA]# ls
cacert.pem  private
[root@localhost CA]# mkdir certs newcerts crl
[root@localhost CA]# touch index.txt && echo 01 > serial
[root@localhost CA]# ls
cacert.pem  certs  crl  index.txt  newcerts  private  serial
客户端生成密钥
[root@localhost CA]# cd /opt
[root@localhost opt]# ls
[root@localhost opt]# (umask 077;openssl genrsa -out httpd.key 2048)	//客户端生成密钥
Generating RSA private key, 2048 bit long modulus (2 primes)
..........+++++
..............................................................................................................................+++++
e is 65537 (0x010001)
[root@localhost opt]# ls
httpd.key

//客户端生成证书签署请求
[root@localhost opt]# openssl req -new -key httpd.key -days 365 -out httpd.csr	//
Ignoring -days; not generating a certificate
You are about to be asked to enter information that will be incorporated
into your certificate request.
What you are about to enter is what is called a Distinguished Name or a DN.
There are quite a few fields but you can leave some blank
For some fields there will be a default value,
If you enter '.', the field will be left blank.
-----
Country Name (2 letter code) [XX]:a.^H^H^C
[root@localhost opt]# openssl req -new -key httpd.key -days 365 -out httpd.csr
Ignoring -days; not generating a certificate
You are about to be asked to enter information that will be incorporated
into your certificate request.
What you are about to enter is what is called a Distinguished Name or a DN.
There are quite a few fields but you can leave some blank
For some fields there will be a default value,
If you enter '.', the field will be left blank.
-----
Country Name (2 letter code) [XX]:CN
State or Province Name (full name) []:HB
Locality Name (eg, city) [Default City]:WH
Organization Name (eg, company) [Default Company Ltd]:aa
Organizational Unit Name (eg, section) []:aa
Common Name (eg, your name or your server's hostname) []:a.example.com
Email Address []:2561165

Please enter the following 'extra' attributes
to be sent with your certificate request
A challenge password []:
An optional company name []:
[root@localhost opt]# ls
httpd.csr  httpd.key
[root@localhost opt]# openssl ca -in /opt/httpd.csr -out httpd.crt -days 365
Using configuration from /etc/pki/tls/openssl.cnf
Check that the request matches the signature
Signature ok
Certificate Details:
        Serial Number: 1 (0x1)
        Validity
            Not Before: Apr 27 13:09:24 2021 GMT
            Not After : Apr 27 13:09:24 2022 GMT
        Subject:
            countryName               = CN
            stateOrProvinceName       = HB
            organizationName          = aa
            organizationalUnitName    = aa
            commonName                = a.example.com
            emailAddress              = 2561165
        X509v3 extensions:
            X509v3 Basic Constraints:
                CA:FALSE
            Netscape Comment:
                OpenSSL Generated Certificate
            X509v3 Subject Key Identifier:
                1F:3E:4F:A1:2F:1C:75:F3:EB:DF:BC:A8:49:60:AB:68:42:30:6A:41
            X509v3 Authority Key Identifier:
                keyid:59:1A:7D:BE:0B:E1:62:51:24:BF:2E:A0:31:D0:F0:86:8E:23:63:B8

Certificate is to be certified until Apr 27 13:09:24 2022 GMT (365 days)
Sign the certificate? [y/n]:y


1 out of 1 certificate requests certified, commit? [y/n]y
Write out database with 1 new entries
Data Base Updated
[root@localhost opt]# mv httpd.crt httpd.key /etc/httpd24/
[root@localhost opt]# apachectl restart
[root@localhost opt]# ss -antl
State           Recv-Q          Send-Q                     Local Address:Port                     Peer Address:Port          Process
LISTEN          0               128                              0.0.0.0:22                            0.0.0.0:*
LISTEN          0               128                                    *:80                                  *:*
LISTEN          0               128                                 [::]:22                               [::]:*
LISTEN          0               128                                    *:443                                 *:*


 2万+
2万+


 被折叠的 条评论
为什么被折叠?
被折叠的 条评论
为什么被折叠?
 到【灌水乐园】发言


