


SpringDataJpa学习
-
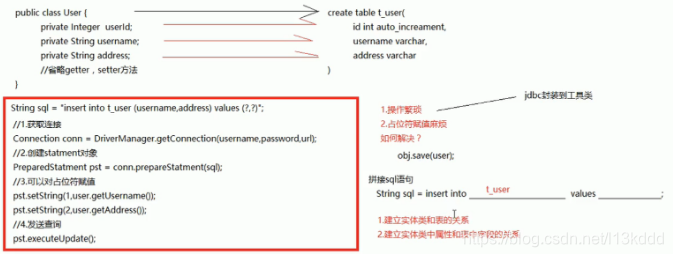
jdbc操作数据库问题引入
-
orm思想
- 主要目的:操作实体类就相当于操作数据库表
- 建立两个映射关系:
- 实体类和表的映射关系
- 实体类中属性和表中字段的映射关系
- 不在重点关注:sql语句
- 实现了orm思想的框架:mybatis,hibernate
-
hibernate框架介绍
- Hibernate是一个开放源代码的对象关系映射框架,它对JDBC进行了非常轻量级的对象封装,它将pojo与数据库表建立映射关系,是一个全自动的orm框架,hibernate可以自动生成sql语句,自动执行,使得java程序员可以随心所欲额使用对象编程思想来操作数据库。
-
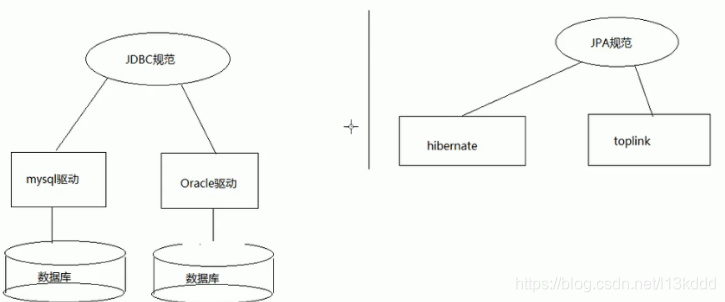
JPA规范
-
内部由接口和抽象类组成,实现它的是一个个的生产厂商比如hibernate
-
-
JPA的全称是Java Persistence API,即Java持久层API,是SUN公司推出的一套基于ORM的规范,内部是由一系列的接口和抽象类构成。
-
JPA通过JDK5.0注解描述对象-关系表的映射关系,并将运行期的实体对象持久化到数据库中。
-
-
jpa查询操作步骤:
-
1.加载配置文件创建实体管理器工厂
- Persistence:
- createEntityManagerFactory(持久化单元名称) ----静态方法(根据持久化单元名称创建实体管理器工厂)
- 作用:创建实体管理器工厂
- Persistence:
-
2.根据实体管理器工厂,创建实体管理器
-
EntityManagerFatory:获取EntityManager对象
-
方法:createEntityManager
-
内部维护了很多的内容
-
内部维护了数据库信息
-
维护了缓存信息
-
维护了所有的实体管理器对象
-
再创建EntityManagerFactory的过程中会根据配置创建数据库表
-
-
EntityManagerFactory的创建过程比较浪费资源。
-
特点:线程安全的对象
- 多个线程访问同一个EntityManagerFactor不会有线程安全问题
-
如何解决EntityManagerFactory的创建过程浪费资源的问题?
-
思路:创建一个公共的EntityManagerFactory的对象
- 静态代码块的形式创建EntityManagrFactory
-
-
3.创建事务对象,开启事务
- EntityManager对象:实体类管理器
- beginTranction:创建事务对象
- presist:保存
- merge:更新
- remove:删除
- find/getRefrence:根据id查询
-
Transaction对象:事务
- begin:开启事务
- commit:提交事务
SpringataJpa
SpringdataJpa概述:
-
SpringDataJpa的概述:
-
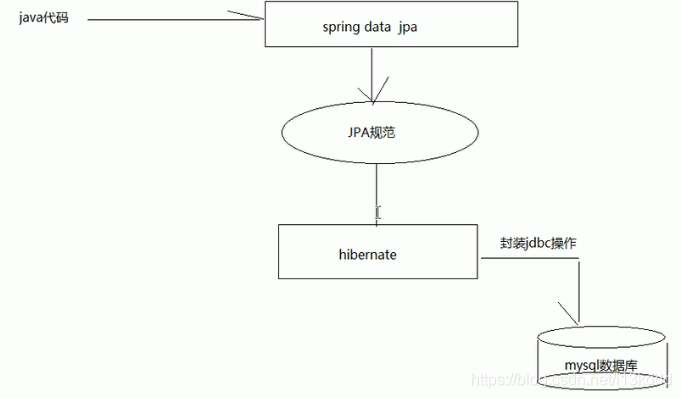
SpringdataJpa是Spring基于ORM框架、JPA规范的基础上封装的一套JPA应用框架,可使开发者用极简单的代码可实现对数据库的访问和操作,它提供了包括增删查改等在内的常用功能,且易于扩展!学习并使用SpringDataJpa可以极大的提高开发效率。
-
SpringDataJPA让我们解脱了DAO层的操作,基本上所有CRUD都可以依赖于它来实现,在实际的工作工程中,推荐使用SpringDataJpa+ORM(如:hibernate)完成操作,这样在切换不同的ORM框架时提供了极大的方便,同时也使数据库层操作更加简单,方便解耦。
-
-
SpringDataJpa特性:
- SpringDataJPA极大简化了数据库访问层代码。如何简化的呢?使用了SpringDataJpa,我们的dao层只需要写接口,就自动具有了增删改查、分页查询等方法。
-
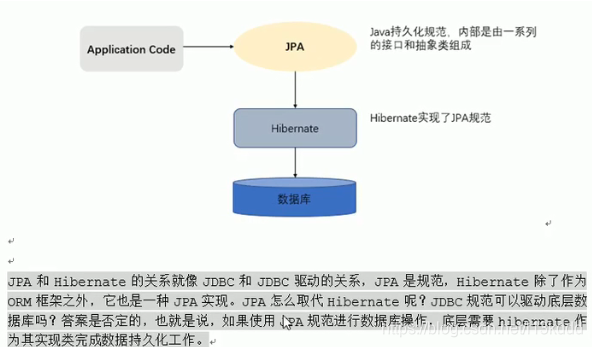
SpringDataJpa与JPA和hibernate之间的关系
- JPA是一套规范,内部是有接口和抽象类组成的。hibernate是一套成熟的ORM框架,而且hibernate实现了JPA规范,所以也可以称hibernate为JPA的一种实现方式,我们使用JPA的API编程,意味着站在更高的角度上看待问题(面向接口编程)。
- SpringDataJPA是Spring提供的一套对JPA操作更加高级的封装,是在JPA规范下的专门用来进行数据持久层的解决方案。
SpringdataJpa入门操作:
案例:客户的基本CRUD
-
搭建环境
-
创建工程导入坐标
-
<properties> <spring.version>5.0.2.RELEASE</spring.version> <hibernate.version>5.0.7.Final</hibernate.version> <slf4j.vrsion>1.6.6</slf4j.vrsion> <log4j.version>1.2.12</log4j.version> <c3p0.version>0.9.1.2</c3p0.version> <mysql.version>5.1.6</mysql.version> </properties> <dependencies> <!--junit单元测试--> <dependency> <groupId>junit</groupId> <artifactId>junit</artifactId> <version>4.9</version> <scope>test</scope> </dependency> <!--spring aop--> <dependency> <groupId>org.aspectj</groupId> <artifactId>aspectjweaver</artifactId> <version>1.6.8</version> </dependency> <dependency> <groupId>org.springframework</groupId> <artifactId>spring-aop</artifactId> <version>${spring.version}</version> </dependency> <!--spring ioc--> <dependency> <groupId>org.springframework</groupId> <artifactId>spring-context</artifactId> <version>${spring.version}</version> </dependency> <dependency> <groupId>org.springframework</groupId> <artifactId>spring-context-support</artifactId> <version>${spring.version}</version> </dependency> <dependency> <groupId>org.springframework</groupId> <artifactId>spring-beans</artifactId> <version>${spring.version}</version> </dependency> <dependency> <groupId>org.springframework</groupId> <artifactId>spring-core</artifactId> <version>${spring.version}</version> </dependency> <!--spring对ORM框架的支持包--> <dependency> <groupId>org.springframework</groupId> <artifactId>spring-orm</artifactId> <version>${spring.version}</version> </dependency> <!--hibernate核心包--> <dependency> <groupId>org.hibernate</groupId> <artifactId>hibernate-core</artifactId> <version>${hibernate.version}</version> </dependency> <!--hibernate对JPA实现的包--> <dependency> <groupId>org.hibernate</groupId> <artifactId>hibernate-entitymanager</artifactId> <version>${hibernate.version}</version> </dependency> <!--hibernae验证包--> <dependency> <groupId>org.hibernate</groupId> <artifactId>hibernate-validator</artifactId> <version>5.2.1.Final</version> </dependency> <!--c3p0数据库连接池--> <dependency> <groupId>c3p0</groupId> <artifactId>c3p0</artifactId> <version>${c3p0.version}</version> </dependency> <!--log--> <dependency> <groupId>log4j</groupId> <artifactId>log4j</artifactId> <version>${log4j.version}</version> </dependency> <dependency> <groupId>org.slf4j</groupId> <artifactId>slf4j-api</artifactId> <version>${slf4j.vrsion}</version> </dependency> <dependency> <groupId>org.slf4j</groupId> <artifactId>slf4j-log4j12</artifactId> <version>${slf4j.vrsion}</version> </dependency> <!--mysql驱动--> <dependency> <groupId>mysql</groupId> <artifactId>mysql-connector-java</artifactId> <version>${mysql.version}</version> </dependency> <!--SpringDataJPA的包--> <dependency> <groupId>org.springframework.data</groupId> <artifactId>spring-data-jpa</artifactId> <version>1.9.0.RELEASE</version> </dependency> <!--Spring提供的单元测试的包--> <dependency> <groupId>org.springframework</groupId> <artifactId>spring-test</artifactId> <version>${spring.version}</version> </dependency> <!--SpringDataJPA必须要求导入的两个坐标--> <dependency> <groupId>javax.el</groupId> <artifactId>javax.el-api</artifactId> <version>2.2.4</version> </dependency> <dependency> <groupId>org.glassfish.web</groupId> <artifactId>javax.el</artifactId> <version>2.2.4</version> </dependency> </dependencies> -
配置spring的配置文件
-
<?xml version="1.0" encoding="UTF-8"?>
<beans xmlns="http://www.springframework.org/schema/beans"
       xmlns:xsi="http://www.w3.org/2001/XMLSchema-instance"
       xmlns:aop="http://www.springframework.org/schema/aop"
       xmlns:context="http://www.springframework.org/schema/context"
       xmlns:jdbc="http://www.springframework.org/schema/jdbc"
       xmlns:jpa="http://www.springframework.org/schema/data/jpa"
       xmlns:tx="http://www.springframework.org/schema/tx"
       xmlns:task="http://www.springframework.org/schema/task"
       xsi:schemaLocation="
        http://www.springframework.org/schema/beans
        http://www.springframework.org/schema/beans/spring-beans.xsd
        http://www.springframework.org/schema/aop
        http://www.springframework.org/schema/aop/spring-aop.xsd
        http://www.springframework.org/schema/context
        http://www.springframework.org/schema/context/spring-context.xsd
        http://www.springframework.org/schema/jdbc
        http://www.springframework.org/schema/jdbc/spring-jdbc.xsd
        http://www.springframework.org/schema/tx
        http://www.springframework.org/schema/tx/spring-tx.xsd
        http://www.springframework.org/schema/data/jpa
        http://www.springframework.org/schema/data/jpa/spring-jpa.xsd">

    <!--spring和springdatajpa配置-->

    <!--1.创建entityManagerFactory对象交给spring容器管理-->
    <bean id="entityManagerFactory" class="org.springframework.orm.jpa.LocalContainerEntityManagerFactoryBean">
        <property name="dataSource" ref="dataSource"/>
        <!--配置扫描的包(实体类所在的包)-->
        <property name="packagesToScan" value="com.muzi.domain"/>
        <!--jpa的实现厂家-->
        <property name="persistenceProvider">
            <bean class="org.hibernate.jpa.HibernatePersistenceProvider"/>
        </property>
        <!--jpa的供应商适配器-->
        <property name="jpaVendorAdapter">
            <bean class="org.springframework.orm.jpa.vendor.HibernateJpaVendorAdapter">
                <!--配置是否自动创建数据库表-->
                <property name="generateDdl" value="false"/>
                <!--指定数据库类型-->
                <property name="database" value="MYSQL"/>
                <!--数据库方言:支持的特有语法-->
                <property name="databasePlatform" value="org.hibernate.dialect.MySQLDialect"/>
                <!--是否显示SQL语句(打印到控制台上)-->
                <property name="showSql" value="true"/>
            </bean>
        </property>
        <!--jpa的方言:高级的特性-->
        <property name="jpaDialect">
            <bean class="org.springframework.orm.jpa.vendor.HibernateJpaDialect"/>
        </property>
    </bean>
    <!--2.数据库连接池-->
    <bean id="dataSource" class="com.mchange.v2.c3p0.ComboPooledDataSource">
        <property name="user" value="root"/>
        <property name="password" value="123456"/>
        <property name="jdbcUrl" value="jdbc:mysql:///jpa"/>
        <property name="driverClass" value="com.mysql.jdbc.Driver"/>
    </bean>

    <!--3.整合SpringDataJPA-->
    <!--对com.muzi.dao包下的接口进行动态代理增强-->
    <jpa:repositories base-package="com.muzi.dao" transaction-manager-ref="transactionManager" entity-manager-factory-ref="entityManagerFactory"></jpa:repositories>
    <!--4.配置事务管理器-->
    <bean id="transactionManager" class="org.springframework.orm.jpa.JpaTransactionManager">
        <property name="entityManagerFactory" ref="entityManagerFactory"/>
    </bean>

    <!--5.声明式事务-->

    <!--6.ioc注解,配置包扫描-->
    <context:component-scan base-package="com.muzi"></context:component-scan>


</beans>
- 编写实体类(Customer),使用JPA注解配置映射关系 - ```java /** * 1.实体类和表的映射关系 * @Entity * @Table * 2.类中属性和表中字段的映射关系 * @Id * @GeneratedValue * @Column */ @Entity @Table(name = "cst_customer") public class Customer { @Id @GeneratedValue(strategy=GenerationType.IDENTITY) @Column(name="cust_id") private Long custId; @Column(name="cust_address") private String custAddress; @Column(name="cust_industry") private String custIndustry; @Column(name="cust_level") private String custLevel; @Column(name="cust_name") private String custName; @Column(name="cust_phone") private String custPhone; @Column(name="cust_source") private String custSource; public Long getCustId() { return custId; } public void setCustId(Long custId) { this.custId = custId; } public String getCustAddress() { return custAddress; } public void setCustAddress(String custAddress) { this.custAddress = custAddress; } public String getCustIndustry() { return custIndustry; } public void setCustIndustry(String custIndustry) { this.custIndustry = custIndustry; } public String getCustLevel() { return custLevel; } public void setCustLevel(String custLevel) { this.custLevel = custLevel; } public String getCustName() { return custName; } public void setCustName(String custName) { this.custName = custName; } public String getCustPhone() { return custPhone; } public void setCustPhone(String custPhone) { this.custPhone = custPhone; } public String getCustSource() { return custSource; } public void setCustSource(String custSource) { this.custSource = custSource; } @Override public String toString() { return "Customer{" + "custId=" + custId + ", custAddress='" + custAddress + '\'' + ", custIndustry='" + custIndustry + '\'' + ", custLevel='" + custLevel + '\'' + ", custName='" + custName + '\'' + ", custPhone='" + custPhone + '\'' + ", custSource='" + custSource + '\'' + '}'; } } -
-
编写一个符合SpringDataJpa的dao层接口
-
只需要编写dao层接口,不需要编写dao层接口的实现类
-
dao层接口规范
- 需要继承另个接口(JpaRepositry,JpaSpecificationExecutor)
- 需要提供相应的泛型
-
/**
 * 符合SpringDataJpa的dao层接口规范
 *      JpaRepository<操作的实体类类型,实体类中主键属性的类型>
 *          封装了基本的CRUD操作
 *      JpaSpecificationExecutor<操作的实体类类型>
 *          封装了复杂查询(分页)
 */
public interface CustomerDao extends JpaRepository<Customer,Long>,JpaSpecificationExecutor<Customer> {

}
-
-
测试:
-
findOne(id):根据id查询
-
save(customer):保存或者更新(依据:传递的实体类对象中是否包含id属性)
-
delete(id):根据id删除
-
findAll():查询全部
-
//声明了spring提供的单元测试环境
@RunWith(SpringJUnit4ClassRunner.class)
//指定spring容器的配置信息
@ContextConfiguration(locations = "classpath:applicationContext.xml")
public class CustomerDaoTest {
    @Autowired
    private CustomerDao customerDao;

    /**
     * 根据id查询
     */
    @Test
    public void testFindOne(){
        Customer customer = customerDao.findOne(3l);
        System.out.println(customer);
    }

    /**
     *save:保存或者更新
     *  根据传递的对象是否存在主键id,
     *  如果没有id主键属性,保存
     *  如果存在id属性,根据id查询数据,更新数据
     */
    @Test
    public void testSave(){
        Customer customer = new Customer();
        customer.setCustName("大桥");
        customer.setCustLevel("vip");
        customerDao.save(customer);
    }

    @Test
    public void testUpdate(){
        Customer customer = new Customer();
        customer.setCustId(4l);
        customer.setCustName("大桥1");
        customer.setCustLevel("vip");
        customerDao.save(customer);
    }

    @Test
    public void testDelete(){
        customerDao.delete(3l);
    }

    /**
     * 查询所有
     */
    @Test
    public void testFindAll(){
        List<Customer> list = customerDao.findAll();
        for(Customer cust : list){
            System.out.println(cust);
        }
    }
}
-
-
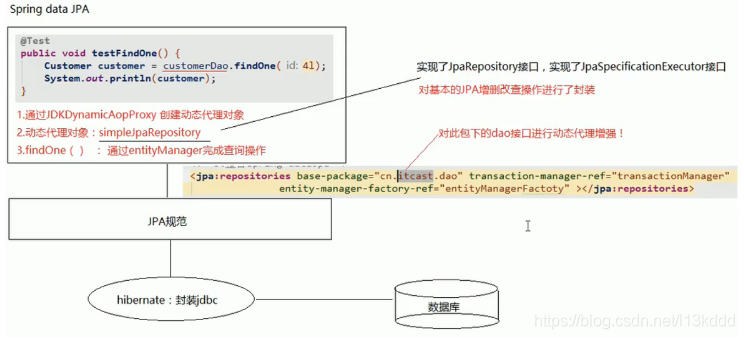
SpringDataJpa的运行过程和原理剖析
- 通过JdkDynamicAopProxy的invoke方法创建一个动态代理对象
- SimpleJpaRepository当中封装了JPA的啊哦做(借助JPA的api完成数据库的CRUD)
- 通过hibernate完成数据库操作(封装了jdbc)
-
复杂查询
-
借助接口中的定义好的方法完成查询
-
findOne(id):根据id查询
-
/**
    * 测试统计查询:查询客户的总数量
    */
   @Test
   public void testCount(){

       long count = customerDao.count();
       System.out.println(count);

   }

   /**
    * 测试:判断id为4的客户是否存在
    * 1.可以查询一以下id为的客户
    *      如果值为空,代表不存在,如果不为空,代表存在
    * 2.判断数据库中id为4的客户数量,如果数量为0代表不存在,如果大于0代表存在
    *
    */
   @Test
   public void testExists(){

       boolean exists = customerDao.exists(4l);
       System.out.println(exists);

   }

   /**
    * 根据id从数据库查询
    *  @Transactional:保证getOne正常运行
    *
    * findOne:
    *      em.find():立即加载
    * getOne:
    *      em.getReference():延迟加载
    *      返回的是一个客户的动态代理对象
    *      什么时候用,什么时候查询
    */
   @Test
   @Transactional
   public void testGetOne(){
       Customer customer = customerDao.getOne(4l);
       System.out.println(customer);

   }
-
-
jpql的查询方式
-
jpql:jpa query language(jpq查询语言)
-
特点:语法或关键字和sql语句类似
- 查询的是类和类中的属性
-
需要将jpql语句配置到接口方法上
-
1.特有的查询:需要在dao接口上配置方法
-
2.在新添加的方法上,使用注解的形式配置jpql查询语句
-
3.注解:@Query
-
/** * 案例:根据客户名称查询客户 * 使用jpql的形式查询 * jpql : from Customer where custName = ? * 配置jpql语句,使用@Query注解 * */ @Query(value ="from Customer where custName = ?") public Customer findJpql(String custName); /** * 案例:根据客户名称和客户id查询客户 * jpql:from Customer where custNme=? and custId=? * 对多个占位符参数 * 赋值的时候,默认的情况下,占位符的位置需要和方法参数中额位置保持一致 * 可以指定占位符参数的位置 * ?索引的方式,指定此占位符的取值来源 */ @Query(value ="from Customer where custNme=?1 and custId=?2 ") public Customer findCustNameAndId(String custName,Long custId); /** * 使用jpql完成更新操作 * 案例:根据id更新客户的名称 * 更新4号客户的名称,将名称改为”哈哈哈“ * sql:update cst_customer set cust_name=? where cust_id=? * jpql:update Customer set custName=? where custId=? *@Query:代表的是进行查询 * 声明此方法是用来查询操作 *@Modifying * 此时执行的是一个更新操作 */ @Query(value ="update Customer set custName=?1 where custId=?2") @Modifying public Customer updateCutomer(String custName,Long custId); -
测试:
-
@Test
    public void testJpql(){
        Customer customer = customerDao.findJpql("123");
    }

    /**
     * 测试jpql的更新操作
     * SpringDataJPA中使用jpql完成更新/删除操作
     *      需要手动添加事务的支持
     *      默认会执行结束后,回滚事务。
     *     @Rollback(value = false)设置不自动回滚
     */
    @Test
    @Transactional
    @Rollback(value = false)
    public void testUpdateCustomer(){
		Customer customer = customerDao.updateCutomer("哈哈哈", 1l);
        System.out.println(customer);
    }
-
-
-
sql语句的查询
-
1.特有的查询:需要在dao接口上配置方法
-
2.在新添加的方法上,使用注解的形式配置sql查询语句
-
3.注解:@Query
-
value:jpql语句 | sql语句
-
nativeQuery:false(使用jpql查询) | true(使用本地查询:sql查询)
- 默认为false
-
-
/**
     * 使用sql的形式查询
     *      查询全部的客户
     *    sql:select * from cst_customer;
     *    Query:配置sql语句
     *          value:sql语句
     *          nativeQuery:查询方式
     *              true:sql查询
     *              false:jpql查询
     */
    //@Query(value = "select * from cst_customer",nativeQuery = true)
    @Query(value = "select * from cst_customer where cust_name like ?1",nativeQuery = true)
    public List<Object[]> findSql(String name);
-
-
方法名称规则查询
- 是对jpql查询,更加深入的一层封装
- 我们只需要按照pringDataJPA提供的方法名称规则定义方法,不需要再去配置jpql语句,完成查询。
- findBy开头:代表查询
- 对象中属性的名称(首字母大写)
- 含义:根据属性名称进行查询
-
/**
     * 方法名的约定:
     *      findBy:查询
     *          对象名的属性名(首字母大写):查询的条件
     *          CustName
     *          默认情况:使用等于的方式查询
     *              特殊的查询方式
     *
     *  findByCustName --根据客户名称查询
     *  在Springdatajpa的运行阶段
     *          会根据方法名称进行解析  findBy    from   xxx(实体类)
     *
     *      1.findBy + 属性名称(根据属性名称进行完成匹配的查询)
     *      2.findBy + 属性名称 + “查询方式(Like|isnull)”
     *          findByCustNameLike
     *      3.多条件查询
     *          findBy + 属性名 + “查询方式” + “多条件的连接符(and|or)” + 属性名 + "查询方式”
     */
    public Customer findByCustName(String custName);
    public Customer findByCustNameLike(String custName);

    //使用客户名称模糊匹配和客户所属行业精准匹配的查询
    public Customer findByCustNameLikeAndCustIndustry(String custName,String custIndustry);
}
-
-
Specifications动态查询
-
JpaSpecificationExecutor方法列表
-
T findOne(Specification<T> spec);//查询单个对象 List<T> findAll(Specification<T> spec);//查询列表 //查询全部,分页 希望分几页 //pageable:分页参数 每页显示多少条 //返回值:分页pageBean(page:是sprngdatajpa提供的) Page<T> findAll(Specification<T> spec, Pageable pageable); //查询列表 //sort:排序参数 List<T> findAll(Specification<T> spec, Sort sort); //统计查询 long count(Specification<T> spec); -
Specification:查询条件
-
自定义我们自己的Sepcification实现类
- 实现
- root:查询的根对象(查询的任何属性都可以从根对象中获取)
- CriteriaQuery:顶层查询对象,自定义查询方式(了解)
- CriteriaBuilder:查询的构造器,封装了很多的查询条件
- 实现
-
//声明了spring提供的单元测试环境
@RunWith(SpringJUnit4ClassRunner.class)
//指定spring容器的配置信息
@ContextConfiguration(locations = "classpath:applicationContext.xml")
public class CustomerDaoTest {
    @Autowired
    private CustomerDao customerDao;

    @Test
    public void testSpec(){

        /**
         * 匿名内部类
         * 自定义查询条件
         *      1.实现Specification接口(提供泛型:查询的对象类型)
         *      2.实现toPredicate方法(构造查询条件)
         *      3.需要借助方法参数中两个参数(
         *          root:获取需要查询的对象属性
         *          CriteriaBuilder:构造查询条件,内部封装了很多的查询条件(模糊匹配,精准匹配)
         *          )
         * 案例:根据客户名称查询,查询客户名为哈哈哈的客户。
         *      查询条件
         *          1.查询方式
         *              全部都存在cb对象中
         *          2.比较的属性名称
         *              全部都在root对象中
         */
        Specification<Customer> spec=new Specification<Customer>() {
            @Override
            public Predicate toPredicate(Root<Customer> root, CriteriaQuery<?> query, CriteriaBuilder cb) {
                //获取比较的属性
                Path<Object> custName = root.get("custName");
                //构造查询条件
                /**
                 * 第一个参数:需要比较的属性名(path对象)
                 * 第二个参数:比较的值
                 */
                Predicate predicate = cb.equal(custName, "哈哈哈");//进行精准匹配(比较的属性名,比较的属性取值)
                return predicate;
            }
        };
        //动态查询
        Customer customer = customerDao.findOne(spec);
        System.out.println(customer);
    }
    /**
     * 多条件查询
     * 案例:根据客户名称和客户所属行业查询
     */
    @Test
    public void testSpec1(){
        Specification<Customer> spec=new Specification<Customer>() {
            @Override
            public Predicate toPredicate(Root<Customer> root, CriteriaQuery<?> query, CriteriaBuilder cb) {
                Path<Object> custName = root.get("custName");
                Path<Object> custIndustry = root.get("custIndustry");
                Predicate predicate1 = cb.equal(custName, "哈哈哈");
                Predicate predicate2 = cb.equal(custIndustry, "lalala");
                //将多个查询条件组合在一起,组合(且,或)
                Predicate predicate = cb.and(predicate1, predicate2);
                //Predicate predicate = cb.or(predicate1, predicate2);
                return predicate;
            }
        };
        Customer customer = customerDao.findOne(spec);
        System.out.println(customer);
    }
    /**
     * 案例:完成根据客户的名称模糊匹配,返回客户列表
     * gt,lt,ge,le,like:得到path对象,根据path指定比较的参数类型,再去进行比较
     */
    @Test
    public void testSpec2(){
        Specification<Customer> spec=new Specification<Customer>() {
            @Override
            public Predicate toPredicate(Root<Customer> root, CriteriaQuery<?> query, CriteriaBuilder cb) {
                Path<Object> custName = root.get("custName");
                Expression<String> expression = custName.as(String.class);
                Predicate predicate = cb.like(expression, "123");
                return predicate;
            }
        };
//        List<Customer> list = customerDao.findAll(spec);
//        for(Customer cust:list){
//            System.out.println(cust);
//        }
        //添加排序
        //创建排序对象,需要调用构造方法实例化sort对象
        //第一参数,排序的顺序(倒序,正序)
        //Sort.Direction.DESC:倒序
        //Sort.Direction.AESC:正序
        //第二个参数:排序的属性名称
        Sort sort = new Sort(Sort.Direction.DESC,"custId");
        List<Customer> all = customerDao.findAll(spec, sort);
        for(Customer cust:all){
            System.out.println(cust);
        }
    }

    /**
     * 分页查询
     *      Specification:查询条件
     *      Pageable:分页参数
     *          分页参数:查询的页码。,每一页查询的条数
     *      findAll(Specification,Pageable):带有条件的分页
     *      findAll(Pageable):没有条件的分页
     *    都返回Page对象(springdatajpa为我们封装好的pageBean对象,数据列表,总条数)
     */
    @Test
    public void tesrSpec3(){
        Specification<Customer> spec=null;
        //PageRequest对象是Pageable接口的实现类
        /**
         * 创建PageRequest的过程中,需要调用他的构造方法传入两个参数
         *      第一个参数:当前查询的页数(从0开始)
         *      第二个参数:每页查询的数量
         */
        Pageable pageable=new PageRequest(0,2);
        Page<Customer> customers = customerDao.findAll(spec, pageable);
        System.out.println(customers.getContent());//得到数据集合列表
        System.out.println(customers.getTotalPages());//得到总页数
        System.out.println(customers.getTotalElements());//得到总条数
    }

}
-
-
-
多表之间的关系和操作多表的操作步骤
- 表关系
- 一对一
- 一对多
- 一的一方:主表
- 多的一方:从表
- 多键:需要再从表上新建一列作为外键,他的取值来源于主表的主键
- 多对多
- 中间表:中间表中最少应该由两个字段组成,这两个字段作为外键指向两张表的主键,又组成了联合主键

- 实体类中的关系
- 包含关系:可以通过实体类中的包含关系描述表关系
- 继承关系
- 分析步骤
- 明确表关系
- 确定表关系(描述 外键|中间表)
- 编写实体类,在实体类中描述表关系(包含关系)
- 配置映射关系
- 表关系
-
完成多表操作
-
一对多操作
- 案例:客户和联系人的案例
- 客户:一家公司
- 联系人:这家公司的员工
- 一个客户可以有多个联系人
- 一个联系人从属于一家公司
- 分析步骤
- 明确表关系
- 确定表关系(描述 外键|中间表)
- 主表:客户表
- 从表:联系人表
- 再从表上添加外键
- 编写实体类,在实体类中描述表关系(包含关系)
- 客户:在客户的实体类中包含一个联系人的集合
- 联系人:在联系人的实体类中包含一个客户的对象
- 配置映射关系
- 使用jpa注解配置一对多映射关系
- 案例:客户和联系人的案例
-
@Entity @Table(name = "cst_customer") public class Customer { @Id @GeneratedValue(strategy=GenerationType.IDENTITY) @Column(name="cust_id") private Long custId; @Column(name="cust_address") private String custAddress; @Column(name="cust_industry") private String custIndustry; @Column(name="cust_level") private String custLevel; @Column(name="cust_name") private String custName; @Column(name="cust_phone") private String custPhone; @Column(name="cust_source") private String custSource; //配置客户和联系人之间的关系(一对多关系) /** * 使用注解的形式配置多表关系 * 1.声明关系 * @OneToMany:配置一对多关系 * targetEntity:对方对象的字节码 * 2.配置外键(中间表) * @JoinColumn:配置外键 * name:外键字段名称 * referencedColumnName:参照的主表的主键字段名称 * 在客户实体类上(一的一方)添加了外键的配置,所以对于客户而言,也具备了维护外键的作用 */ // @OneToMany(targetEntity = LinkMan.class) // @JoinColumn(name="lkm_cust_id",referencedColumnName = "cust_id") /** *放弃外键维护权 * mappedBy:对方配置关系的属性名称 */ @OneToMany(mappedBy = "customer") private Set<LinkMan> linkMans=new HashSet<>(); public Long getCustId() { return custId; } public void setCustId(Long custId) { this.custId = custId; } public String getCustAddress() { return custAddress; } public void setCustAddress(String custAddress) { this.custAddress = custAddress; } public String getCustIndustry() { return custIndustry; } public void setCustIndustry(String custIndustry) { this.custIndustry = custIndustry; } public String getCustLevel() { return custLevel; } public void setCustLevel(String custLevel) { this.custLevel = custLevel; } public String getCustName() { return custName; } public void setCustName(String custName) { this.custName = custName; } public String getCustPhone() { return custPhone; } public void setCustPhone(String custPhone) { this.custPhone = custPhone; } public String getCustSource() { return custSource; } public void setCustSource(String custSource) { this.custSource = custSource; } public Set<LinkMan> getLinkMans() { return linkMans; } public void setLinkMans(Set<LinkMan> linkMans) { this.linkMans = linkMans; } @Override public String toString() { return "Customer{" + "custId=" + custId + ", custAddress='" + custAddress + '\'' + ", custIndustry='" + custIndustry + '\'' + ", custLevel='" + custLevel + '\'' + ", custName='" + custName + '\'' + ", custPhone='" + custPhone + '\'' + ", custSource='" + custSource + '\'' + '}'; } } @Entity @Table(name="cst_linkman") public class LinkMan { @Id @GeneratedValue(strategy = GenerationType.IDENTITY) @Column(name = "lkm_id") private Long lkmId; @Column(name = "lkm_name") private String lkmName; @Column(name = "lkm_gender") private String lkmGender; @Column(name = "lkm_phone") private String lkmPhone; @Column(name = "lkm_mobile") private String lkmMobile; @Column(name = "lkm_email") private String lkmEmail; @Column(name = "lkm_position") private String lkmPosition; @Column(name = "lkm_memo") private String lkmMemo; /** * 配置联系人到客户的多对一关系 * 使用注解的形式配置多对一关系 * 1.配置表关系 * @ManyToOne:配置多对一关系 * targetEntity:对方的实体类字节码 * 2.配置外键(中间表) * 配置外键的过程,配置到了多的一方,就会在多的一方维护外键 */ @ManyToOne(targetEntity = LinkMan.class) @JoinColumn(name = "lkm_id",referencedColumnName = "cust_id") private Customer customer; public Long getLkmId() { return lkmId; } public void setLkmId(Long lkmId) { this.lkmId = lkmId; } public String getLkmName() { return lkmName; } public void setLkmName(String lkmName) { this.lkmName = lkmName; } public String getLkmGender() { return lkmGender; } public void setLkmGender(String lkmGender) { this.lkmGender = lkmGender; } public String getLkmPhone() { return lkmPhone; } public void setLkmPhone(String lkmPhone) { this.lkmPhone = lkmPhone; } public String getLkmMobile() { return lkmMobile; } public void setLkmMobile(String lkmMobile) { this.lkmMobile = lkmMobile; } public String getLkmEmail() { return lkmEmail; } public void setLkmEmail(String lkmEmail) { this.lkmEmail = lkmEmail; } public String getLkmPosition() { return lkmPosition; } public void setLkmPosition(String lkmPosition) { this.lkmPosition = lkmPosition; } public String getLkmMemo() { return lkmMemo; } public void setLkmMemo(String lkmMemo) { this.lkmMemo = lkmMemo; } public Customer getCustomer() { return customer; } public void setCustomer(Customer customer) { this.customer = customer; } @Override public String toString() { return "LinkMan{" + "lkmId=" + lkmId + ", lkmName='" + lkmName + '\'' + ", lkmGender='" + lkmGender + '\'' + ", lkmPhone='" + lkmPhone + '\'' + ", lkmMobile='" + lkmMobile + '\'' + ", lkmEmail='" + lkmEmail + '\'' + ", lkmPosition='" + lkmPosition + '\'' + ", lkmMemo='" + lkmMemo + '\'' + '}'; } } /** * 保存一个客户,保存一个联系人 * 效果:客户和联系人作为独立的数据保存到数据库中 * 联系人外键为空 * 原因? * 实体类中没有配置信息 */ @Test @Transactional @Rollback(value = false) public void testAdd(){ //创建一个客户,创建一个联系人 Customer customer = new Customer(); customer.setCustName("6555"); LinkMan linkMan = new LinkMan(); linkMan.setLkmName("85526"); /** * 配置了客户到联系人的关系 * 从客户角度上,发送两条insert语句,发送一条更新数据库语句 */ customer.getLinkMans().add(linkMan); /** * 配置了联系人到客户的关系 */ linkMan.setCustomer(customer); customerDao.save(customer); linkManDao.save(linkMan); }-
级联:
-
操作一个对象的同时操作它的关联对象
-
级联操作:
- 1.需要区分操作主体
- 2.需要在操作主体的实体类上,添加级联属性(需要添加到多表映射关系的注释上)
- 3.cascade(配置级联)
-
级联添加
- 案例:当我保存一个客户的同时保存联系人
-
/** *放弃外键维护权 * mappedBy:对方配置关系的属性名称 * cascade:配置级联(可以设置多表的映射关系的注解上) * Cascade.all :所有 * MERGE:更新 * PERSIST:保存 * REMOVE:删除 */ @OneToMany(mappedBy = "customer",cascade = CascadeType.ALL) -
级联删除
-
级联更新
-
-
-
多对多操作
- 案例:用户和角色
- 用户:
- 角色:
- 分析步骤
- 明确表关系
- 多对多
- 确定表关系(描述 外键|中间表)
- 中间表
- 编写实体类,在实体类中描述表关系(包含关系)
- 用户:包含角色的集合
- 角色:包含用户的角色
- 配置映射关系
- 明确表关系
- 案例:用户和角色
-
多表的查询
-
对象导航查询
- 查询一个对象的同时,通过此对象查询它的关联对象
-
//测试对象导航查询 @Test @Transactional @Rollback(value = false) public void testQuery(){ Customer customer = customerDao.getOne(1l); Set<LinkMan> linkMans = customer.getLinkMans(); for (LinkMan linkMan : linkMans) { System.out.println(linkMan); } } -
从一方查询多方
- 默认:使用延迟加载
-
从多方查询一方
- 默认:使用立即加载
-
-


 3044
3044


 被折叠的 条评论
为什么被折叠?
被折叠的 条评论
为什么被折叠?
 到【灌水乐园】发言


