


目录
一、MyBatis集成
1.项目搭建
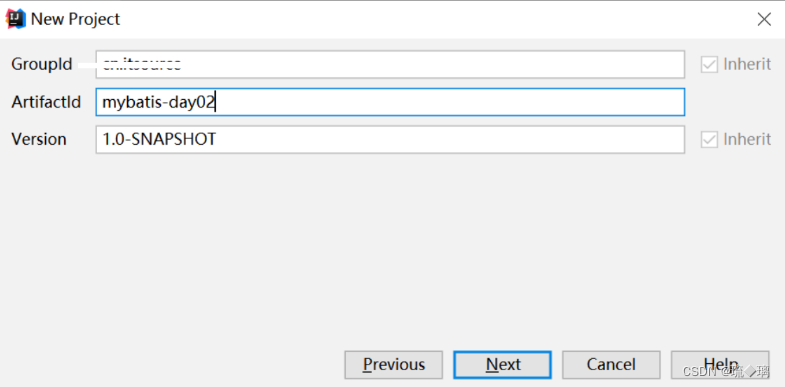
1.1.idea中创建maven项目

1.2导入maven包
以前导包是直接拷备jar包(1个核心包,7个依赖包,1个数据库连接包) ,maven导包都是在pom.xml中进行配置(代码如下)
导包部分大家直接拷备使用即可,但是要求必需知道每个配置的含义
<?xml version="1.0" encoding="UTF-8"?>
<project xmlns="http://maven.apache.org/POM/4.0.0"
         xmlns:xsi="http://www.w3.org/2001/XMLSchema-instance"
         xsi:schemaLocation="http://maven.apache.org/POM/4.0.0 http://maven.apache.org/xsd/maven-4.0.0.xsd">
    <modelVersion>4.0.0</modelVersion>

    <groupId>cn.ronghuanet</groupId>
    <artifactId>mybatis-day02</artifactId>
    <version>1.0-SNAPSHOT</version>
    <dependencies>
    	<!-- mybatis核心包 -->
        <dependency>
            <groupId>org.mybatis</groupId>
            <artifactId>mybatis</artifactId>
            <version>3.2.1</version>
        </dependency>
        <!-- mysql驱动包 -->
        <dependency>
             <groupId>mysql</groupId>
             <artifactId>mysql-connector-java</artifactId>
             <version>5.1.26</version>
         </dependency>
         <!-- junit测试包 -->
         <dependency>
             <groupId>junit</groupId>
             <artifactId>junit</artifactId>
             <version>4.12</version>
             <scope>test</scope>
         </dependency>
        <!-- https://mvnrepository.com/artifact/log4j/log4j -->
        <dependency>
            <groupId>log4j</groupId>
            <artifactId>log4j</artifactId>
            <version>1.2.17</version>
        </dependency>
  </dependencies>
    <!-- 局部jdk 1.8配置,pom.xml中 -->
    <build>
        <plugins>
            <plugin>
                <groupId>org.apache.maven.plugins</groupId>
                <artifactId>maven-compiler-plugin</artifactId>
                <configuration>
                    <source>1.8</source>
                    <target>1.8</target>
                </configuration>
            </plugin>
        </plugins>
    </build>
</project>
2.MyBatis集成
2.1MyBatis配置文件
log4j.properties
#全局日志配置
log4j.rootLogger = info,console

#输出局部的日志信息(自己的包中的日志打印方式)
log4j.logger.自己要扫描包的路径=TRACE


### 配置输出到控制台
log4j.appender.console = org.apache.log4j.ConsoleAppender
### 使用System.out打印日志
log4j.appender.console.Target = System.out
### 指定日志的格式布局(日志是有格式的)
log4j.appender.console.layout = org.apache.log4j.PatternLayout
### 日志的打印格式
log4j.appender.console.layout.ConversionPattern =  %d{ABSOLUTE} %5p %c{1}:%L - %m%n
先准备jdbc.properties
jdbc.username=root
jdbc.password=admin
jdbc.url=jdbc:mysql:///mybatis
jdbc.driverClassName=com.mysql.jdbc.Driver
创建:mybatis-config.xml
<?xml version="1.0" encoding="UTF-8"?>
<!DOCTYPE configuration
        PUBLIC "-//mybatis.org//DTD Config 3.0//EN"
        "http://mybatis.org/dtd/mybatis-3-config.dtd">
<configuration>
   <!-- 加载jdbc.properties-->
    <properties resource="jdbc.properties"/>
    <!--申明操作数据库的环境-->
    <environments default="MYSQL">
        <environment id="MYSQL">
            <!--使用jdbc的事务-->
            <transactionManager type="JDBC"/>
            <!--支持连接池-->
            <dataSource type="POOLED">
                <!--自动补全结构:ctrl+shift+回车-->
                <property name="username" value="${jdbc.username}"/>
                <property name="password" value="${jdbc.password}"/>
                <property name="url" value="${jdbc.url}"/>
                <property name="driver" value="${jdbc.driverClassName}"/>
            </dataSource>
        </environment>
    </environments>
    <mappers>
       <!-- 加载mapper.xml文件-->
    </mappers>
</configuration>
2.2.创建MyBatisUtils
public class MybatisUtils {
    private static SqlSessionFactory sessionFactory ;
    static{
        try {
            //提示处理异常快捷键    alt+回车       移动代码的快捷键  alt+上键或者下键
            //快速使用变量接收,    alt+回车
            InputStream inputStream = Resources.getResourceAsStream("mybatis-config.xml");
            //根据io流创建SqlSessionFactory对象
            sessionFactory = new SqlSessionFactoryBuilder().build(inputStream);
        } catch (IOException e) {
            e.printStackTrace();
        }
    }
    public static SqlSession openSession(){
        if (sessionFactory != null) {
            return sessionFactory.openSession();
        }
        return null;
    }
    public static void closeSession(SqlSession sqlSession){
        if (sessionFactory != null) {
            sqlSession.close();
        }
    }
}
2.3 测试Mybatis是否可用
package com.ronghuanet;

import com.ronghuanet.util.MybatisUtils;
import org.apache.ibatis.session.SqlSession;
import org.junit.Test;

/**
 * 测试mybatis集成进来没有
 */
public class MybatisTest {

    @Test
    public void test() throws Exception{
        SqlSession sqlSession = MybatisUtils.openSession();
        System.out.println(sqlSession);
        MybatisUtils.closeSession(sqlSession);

    }
}
2.4.创建模型
public class Product {
    private Long id;
    private String name;
    private BigDecimal price;
    /**
     * alt+insert:快速生成setter  getter方法  toString方法   构造方法
     */
	//getter,setter代码略...
}
2.5.productMapper接口
public interface ProductMapper {
    Product findOne(Long id);
}
2.6创建productMapper.xml文件
<?xml version="1.0" encoding="UTF-8" ?>
<!DOCTYPE mapper PUBLIC "-//mybatis.org//DTD Mapper 3.0//EN"
        "http://mybatis.org/dtd/mybatis-3-mapper.dtd">
<!--注:namespace的内容就是ProductMapper接口的全限定名-->
<mapper namespace="cn.ronghuanet.mybatis._01_batch.mapper.ProductMapper">
    <!--id的值保证ProductMapper接口的方法名一值-->
    <select id="findOne" parameterType="long" resultType="cn.ronghuanet.mybatis._01_batch.domain.Product">
        select * from product where id = #{id}
    </select>
</mapper>
2.7注册mapper.xml
主配置文件(mybatis-config.xml)中引入
<?xml version="1.0" encoding="UTF-8"?>
<!DOCTYPE configuration
PUBLIC "-//mybatis.org//DTD Config 3.0//EN"
"http://mybatis.org/dtd/mybatis-3-config.dtd">
<configuration>
...
<mappers>
<!-- 加载mapper.xml文件-->
<mapper resource="cn/ronghuanet/mybatis/_01_batch/mapper/ProductMapper.xml" />
</mappers>
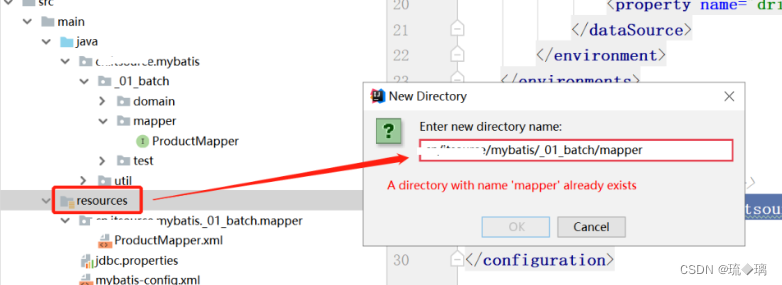
</configuration>【注意】大家特别注意文件的位置
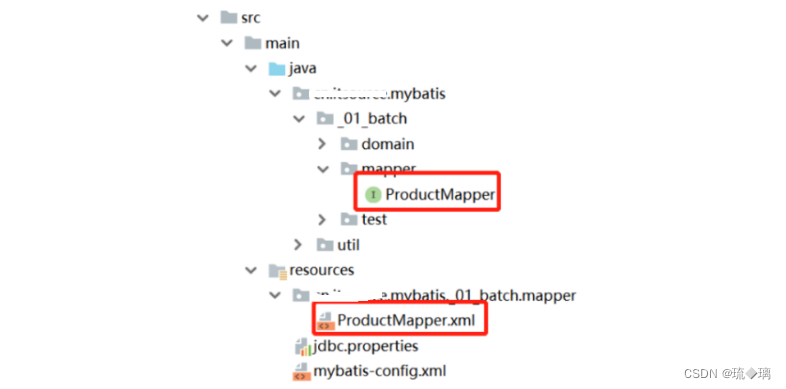
【注意】创建resources中文件夹的方式(小心再小心)
3.1获取单个对象
public class MyBatisTest {
    /**
     * 定义一个映射器mapper接口,使用mybatis自动为我们创建代理类
     * @throws Exception
     */
    @Test
    public void findOne()throws Exception{
        //获取到会话对象
        SqlSession session = MybatisUtils.openSession();
        //拿到映射对象,可以做相应的操作
        ProductMapper mapper = session.getMapper(ProductMapper.class);
        Product product = mapper.findOne(1L);

        System.out.println(product);
    }
}
二.MyBatis映射器(重要)
1什么是映射器
我感觉到了有点不爽,根据我们上面代码我们已经可以完成单表的CRUD了,但是我们发现我们的dao实现类中出现了大量重复的代码,并且每个方法中的代码都相对比较复杂。手动去拼Sql的Statement很容易出错。
MyBatis的映射器就是用来解决这一问题,映射器其实是一个Interface接口,我们通过编写简单的映射器接口,就可以将我们之前在Dao中做的重复的,看起来比较低级的代码给替换掉。也就是说我们以后不用向之前那样写代码,而是直接调用映射器接口即可完成SQL的调用。我们可以理解为 这个映射器 底层使用了动态代理的方式将复杂的代码进行了处理,屏蔽了细节。--- 如同JPA的接口
2创建Domain
新开一个包 _02_mapper,创建domain/Employee 实体类
public class Employee{
    private Long id;
    private String username;
    private Integer age = 0;
    private Boolean sex;
    //...
}
3创建映射器接口
创建实体类接口,我们一般给接口命名: XxxMapper ,如 EmployeeMapper ,跟EmployeeMapper.xml同名
import java.util.List;

public interface EmployeeMapper {
    int insert(Employee employee);
    int updateById(Employee employee);
    int deleteById(Long id);
    Employee selectById(Long id);
    List<Employee> selectAll();
}
4创建SQL映射文件
需要注意:SQL映射文件的namespace必须和 映射器接口的全限定名一直,这个非常重要,因为我们在调用映射器接口的时候,底层是通过该接口的 ==全限定名+方法名== 去匹配 SQL映射文件的==namespace+id==。
<?xml version="1.0" encoding="UTF-8" ?>
<!DOCTYPE mapper PUBLIC "-//mybatis.org//DTD Mapper 3.0//EN"
        "http://mybatis.org/dtd/mybatis-3-mapper.dtd">

<mapper namespace="cn.ronghuanet.mybatis._02_mapper.mapper.EmployeeMapper">

    <resultMap id="baseResultMap" type="cn.ronghuanet.mybatis._02_mapper.domain.Employee">
        <id column="id" property="id" />
        <result column="username" property="username"/>
        <result column="age" property="age"/>
        <result column="sex" property="sex"/>
    </resultMap>

    <select id="selectAll" resultMap="baseResultMap" >
        select
            id,
            username,
            age,
            sex
        from employee
    </select>
</mapper>
注意:这里是另外一个Mapper,对应的是Employee,所以所有的 有用到实体类的地方都要使用Employee的全限定名。
再次强调:底层是通过映射器接口的 ==全限定名+方法名== 去匹配 SQL映射文件的==namespace+Id==,所以:
-
namespace 需要和 映射器接口的全限定名一致
-
sql的id必须和 映射器的 方法名一致。
这里暂时写了一个查询所有的方法,同学们自行完成其他的几个方法
5注册Mapper
修改mybatis-config.xml文件,添加<mappers> , 注意修改成自己的路径
<mappers>
    <mapper resource="cn//xxxxxxxx/mapper/ProductMapper.xml"/>
    <mapper resource="cn/xxxxxxxxxt/mybatis/mapper/EmployeeMapper.xml"/>
</mappers>
6 实现CRUD操作
//编写测试类,使用Mapper接口映射器进行CRUD

//``java
@Test
public void selectAll() {
    try(SqlSession sqlSession = MyBatisUtil.openSession()){
        EmployeeMapper employeeMapper = sqlSession.getMapper(EmployeeMapper.class);
        employeeMapper.selectAll().forEach(e ->{
            System.out.println(e);
        });
    }

}
//```
三. Sql编写高级特性-高级查询
1什么是高级查询
-
高级查询即为多条件查询,为了快速查找想要的信息,过滤掉不需要的信息,这种查询在web项目中是必不可少的。例如一些后台管理系统、招聘网站等;
根据查询条件查询出相应的内容,可以是多个查询条件任意组合,查询出的结果都是满足查询条件的;
高级查询可以使用Mybatis的动态Sql实现,减少了原始的很多逻辑判断代码,提高开发效率;
2 Query规范
-
一般高级查询会将前端传递的参数封装成一个XxxQuery对象,方便维护和扩展;
-
一个实体类对应一个Query对象;
例如:针对上面的页面中的两个查询条件,我们可以写一个XxxQuery类【Xxx是实体类名或模块名或表名】,Controller直接使用这个类型去接收前端传递过来的数据,然后将该对象传递到Mapper中使用动态sql查询;
-
public class ArticleQuery{
//文章标题
private String title;
//默认启用状态
private Boolean enable;
//此处省略getter和setter方法
}
3 高级查询实现
3.1.动态SQL - Concat
我们先使用一个高级查询案例来演示
3.1.1.编写查询对象
public class EmployeeQuery {
private Integer sex;
private String username;
//...
}
3.1.2.编写Mapper查询方法
public interface EmployeeMapper {
List<Employee> selectForList(EmployeeQuery employeeQuery);
//...
}
3.1.3.编写SQL
方式一 :"%"#{username}"%" 不推荐
<select id="selectForList" resultMap="baseResultMap" >
SELECT
id,
username,
age,
sex
FROM employee WHERE username like "%"#{username}"%"
</select>
方式二 CONCAT("%",#{username},"%") :标准
<select id="selectForList" resultMap="baseResultMap" >
SELECT
id,
username,
age,
sex
FROM employee WHERE username like CONCAT("%",#{username},"%")
</select>
CONCAT: mysql提供的用来拼接字符串的函数
3.1.4.编写测试
  @Test
    public void selectForList() {
        try(SqlSession sqlSession = MyBatisUtil.openSession()){
            //查询条件
            EmployeeQuery employeeQuery = new EmployeeQuery() ;
            employeeQuery.setUsername("zs");

            EmployeeMapper employeeMapper = sqlSession.getMapper(EmployeeMapper.class);
            employeeMapper.selectForList(employeeQuery).forEach(e ->{
                System.out.println(e);
            });
        }
    }
3.2.动态SQL -If
在上面的查询中,我们有这样的查询条件 , 其实这样的写法是不合理的,如果 username的值为 “null” 或者“”空字符串呢?是不是这个SQL就查询不出内容了,所以我们在添加查询条件的时候一般==需要判断条件的值不为空的时候在加条件==
3.2.1.SQL条件增加IF判断
<select id="selectForList" resultMap="baseResultMap" >
SELECT
id,
username,
age,
sex
FROM employee
<if test="username != null">
WHERE username like concat("%",#{username},"%")
</if>
</select>
3.3.动态SQL-WHERE
我们上面演示了一个条件的情况,可以通过IF来判断条件的空值然后在加入WHERE。那如果有两个以上的条件呢?
3.3.1.修改SQL增加查询条件
在原本的SQL基础上增加一个age
<select id="selectForList" resultMap="baseResultMap" >
SELECT
id,
username,
age,
sex
FROM employee
<if test="username != null and username != ''">
WHERE username LIKE concat("%",#{username},"%")
</if>
<if test="age != null">
AND age = #{age}
</if>
</select>
测试代码
@Test
public void selectForList() {
    try(SqlSession sqlSession = MyBatisUtil.openSession()){
        //查询条件
        EmployeeQuery employeeQuery = new EmployeeQuery() ;
        employeeQuery.setUsername("zs");
        //增加age查询条件
        employeeQuery.setAge(11);
        EmployeeMapper employeeMapper = sqlSession.getMapper(EmployeeMapper.class);
        employeeMapper.selectForList(employeeQuery).forEach(e ->{
            System.out.println(e);
        });
    }
}
3.3.3.使用WHERE动态SQL
<select id="selectForList" resultMap="baseResultMap" >
SELECT
id,
username,
age,
sex
FROM employee
<where>
<if test="username != null and username != ''">
AND username LIKE concat("%",#{username},"%")
</if>
<if test="age != null">
AND age = #{age}
</if>
</where>
</select>
在条件外面套一个 <where> 元素 ,里面写IF判断,增加条件 ,所有的条件前面全部用 AND ,Mybatis会自动把第一个条件前面变成where。
注意喔:不要自以为是的把第一个条件前面的AND 变成WHERE 。都用AND就对了。
3.4.公共SQL片段的抽取
当我们的SQL中的内容写得比较多的时候,看起来就比较臃肿,加载上有些SQL片段是公共的,比如 selectForList和 selectForCount 拥有相同的 where条件。对于这些内容我们可以进行统一抽取,让SQL的结构看起来更清爽。
3.4.1.抽取WHERE条件
<sql id="base_where">
<where>
<if test="username != null and username != ''">
AND username LIKE concat("%",#{username},"%")
</if>
<if test="age != null">
AND age = #{age}
</if>
</where>
</sql><select id="selectForList" resultMap="baseResultMap" >
SELECT
id,
username,
age,
sex
FROM employee
<include refid="base_where"/>
</select>
使用 <sql id=""/> 标签来抽取公共的SQL片段,然后使用 <include refid="sql片段ID"/> 来引入抽取的SQL片段 ,代码结构是不是编的清爽了呢?
3.4.2.抽取查询的列
<sql id="base_where">
<where>
<if test="username != null and username != ''">
AND username LIKE concat("%",#{username},"%")
</if>
<if test="age != null">
AND age = #{age}
</if>
</where>
</sql>
<sql id="base_columns">
id,username,age,sex
</sql><select id="selectForList" resultMap="baseResultMap" >
SELECT
<include refid="base_columns"/>
FROM employee
<include refid="base_where"/>
</select>
3.5.特殊符号 -“>” , "<"处理
3.5.1.修改查询对象
public class EmployeeQuery {
private Integer minAge;
private Integer maxAage;
//...
3.5.2.修改SQL增加条件
<sql id="base_where">
<where>
<if test="minAge != null">
and age >= #{minAage}
</if>
<if test="maxAge != null">
and age <= #{maxAge}
</if>
<if test="username != null and username != ''">
AND username LIKE concat("%",#{username},"%")
</if>
<if test="age != null">
AND age = #{age}
</if>
</where>
</sql>
因为在XML里面, "<" 符号是一个特殊符号
这个SQL一写出来IDEA编译器就会检查出错,直接测试的话会出现如下错误
使用 CDATA 原样输出, <![CDATA[ 内容 ]]> 这个是固定格式
<if test="maxAge != null">
<![CDATA[
and age <= #{maxAge}
]]>
</if>
5.3.测试代码
@Test
    public void selectForList() {
        try(SqlSession sqlSession = MyBatisUtil.openSession()){
            //查询条件
            EmployeeQuery employeeQuery = new EmployeeQuery() ;
            //employeeQuery.setUsername("zs");
            //增加age查询条件
            //employeeQuery.setAge(11);
            employeeQuery.setMinAge(10);
            employeeQuery.setMaxAge(20);
            EmployeeMapper employeeMapper = sqlSession.getMapper(EmployeeMapper.class);
            employeeMapper.selectForList(employeeQuery).forEach(e ->{
                System.out.println(e);
            });
        }
    }
3.6.取值表达式 #{}和${}
我们之前的SQL中取方法传入的参数值使用的都是#{} , 其实${}也可以用来取值,但是他们有有着很大的区别,和不同的使用场景。
3.6.1.#{}和${}的相同点
都可以用来取值
3.6.2.不同点
其实==#{}的底层就是使用的 “?”占位符==的方式来拼接SQL,而==${}使用的是直接把拼接到SQL中==。 如有两条SQL如下:
<select id="selectById" parameterType="long" resultType="...Employee">
select * from employee where id = #{id}
</select>
-----------------------------------------------------------------------------------------------------
<select id="selectById" parameterType="long" resultType="...Employee">
select * from employee where id = ${id}
</select>
上面是接受==普通数据类型的参数==, 他们表现出如下区别:
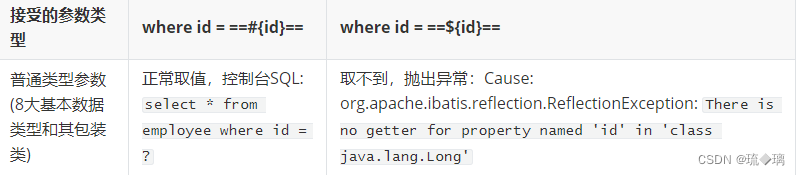
使用#{}正常取值,使用${}抛出异常,根据异常我们可以看到,其实他去参数值找了一个名字叫 “getId”的属性。说白了就是这个==它默认是取对象的属性值。而不能用来取一个普通值。==
增加一个方法,我们把SQL的参数类型修改为对象类型Employee,(mapper接口也要改哦)如有下面SQL:
3.6.3.做个小结
# 的特点
-
#它可以用来取任意值 ,普通值和对象都可以 -
#使用的占位符 ?拼接SQL,有效防止SQL注入 - 预编译 -
#使用预编译性能较高 -
#在接受字符串的时候会给字符串的两边加上“”引号 ,如username=zs ,使用where username = #{username}最终效果where username = "zs",而使用where username = ${username}最终效果where username = zs,值的两边没有引号,会导致SQL异常,出现找不到 column的情况。
$ 的特点
-
$它只能取对象中的属性值。 -
$没有使用?占位符,直接拼接参数到SQL有SQL注入的风险 - 没有预编译 -
$没有使用预编译,性能比#低一点 -
$在接受字符串的时候,不会给字符串的两边加上“”引号,所以一般用来接受字段名或者表名的时候用如:
select id,${fieldName} from ${tableName} order by ${orderColumns}
如何选择? 尽量用 #{} 来取值 ,${}一般用来动态排序。
例如: 表明 , 字段名,或者 排序条件 需要动态传入的时候,可以使用${}。


 384
384


 被折叠的 条评论
为什么被折叠?
被折叠的 条评论
为什么被折叠?
 到【灌水乐园】发言


