


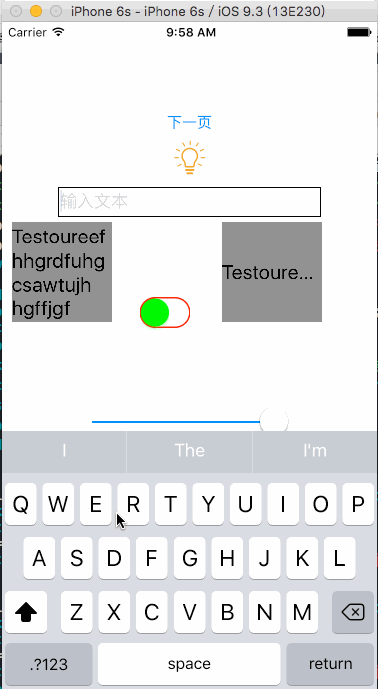
标题中写到的控件在开发都是一些常用的控件,他们的效果如下图:
- 除了标题中的控件之外,这次还会更进一步的了解UILabel,UIButton和UITextField的一些属性和用法
1·UITextField :键盘的弹出与回收,边框,以及清除按钮等
UITextField * textField=[[UITextField alloc]init];
    textField.bounds=CGRectMake(0, 0, SCREEN_WIDTH*0.7, 30);
    textField.center=CGPointMake(SCREEN_WIDTH/2, 180);
    textField.borderStyle=UITextBorderStyleLine;//边框样式
    //边框的粗细和颜色以及圆角
    [[userNameTextfield layer] setBorderWidth:1];
    [[textField layer] setBorderColor:[[UIColor colorWithRed:0.0365 green:0.656 blue:0.955 alpha:1.0] CGColor]];
    [[textField layer] setCornerRadius:8];
    //用点语法也可以
    //textField.layer.BorderColor=[[UIColor colorWithRed:0.0365 green:0.656 blue:0.955 alpha:1.0] CGColor];

    textField.keyboardType=UIKeyboardTypeASCIICapable;//键盘类型
    textField.clearButtonMode=UITextFieldViewModeWhileEditing;//末尾的清空按钮出现的时机
    textField.secureTextEntry=NO;//密码模式
    textField.placeholder=@"输入文本";//没有输入时的提示文字
注意:IOS和安卓不同,弹出的键盘需要程序员手动的设置何时回收
回收方式有两种
1,实现UITextFieldDelegate协议,监听UITextField的状态,在合适的时机回收键盘。
使用这一句代码回收键盘:
[textField resignFirstResponder];
2,覆盖ViewController的
-(void)touchesBegan:(NSSet<UITouch *> *)touches withEvent:(UIEvent *)event
方法,在里面使用这句代码回收键盘:
[self.view endEditing:YES];第一种方法经常用于用户点击Return键时回收键盘:
- 第一步,实现UITextFieldDelegate协议:
@interface LoginViewController ()<UITextFieldDelegate> //后面的代码省略 - 第二步,设置代理:
[userNameTextfield setDelegate:self];
由于实现写一的是ViewController,所以代理设置self。 - 第三步,实现协议中的方法。
- (BOOL)textFieldShouldReturn:(UITextField *)textField{
 [textField resignFirstResponder];
 return YES;
 }
系统会在用户点击键盘的return键时调用这个方法。可以在这里处理一些事情,比如在开头的效果图中,我在这里把文本框里的文本赋值给了UILabel。改变了UILabel的文字。
- 第一步,实现UITextFieldDelegate协议:
第二种方法经常用在点击键盘外空白地方时回收键盘:
覆盖一个方法即可:
-(void)touchesBegan:(NSSet<UITouch *> *)touches withEvent:(UIEvent *)event{
 [self.view endEditing:YES];
 }
2 · UILabel 宽度和高度自适应。
    label2.numberOfLines=0;//设置行数,0为自适应
[label2 sizeToFit];//长度自适应- 需要注意的是,必须在设置文本之后设置自适应,而且每次文本改变之后都要重新使用这两个方法来适应新的内容,如果要限定label的宽度的话,在使用长度自适应之后还应该重设label的fram或者boundst调整大小。
3 · UISwitch 开关
UISwitch * switchButton=[[UISwitch alloc]init];
    [switchButton setTag:1005];
    switchButton.bounds=CGRectMake(0, 0, 100, 50);
    switchButton.center=CGPointMake(SCREEN_WIDTH/2, 300);
    switchButton.on=NO;//是否开启
    switchButton.tintColor=[UIColor redColor];//前景色
    switchButton.onTintColor=[UIColor blueColor];//打开时的前景色
    switchButton.thumbTintColor=[UIColor greenColor];//圆形按钮的颜色
    [switchButton addTarget:self action:@selector(onClick:) forControlEvents:UIControlEventValueChanged];//valueChanged事件。
4 · UISlider 滑条(类似于调节亮度的那个滑条)
    UISlider * slider=[[UISlider alloc]init];
    slider.bounds=CGRectMake(0, 0, 200, 20);
    slider.center=CGPointMake(SCREEN_WIDTH/2, 400);
    [slider setTag:1006];
    slider.maximumValue=1.0;//最大值
    slider.minimumValue=0.1;//最小值
    slider.value=1;//当前值
    [slider addTarget:self action:@selector(onClick:) forControlEvents:UIControlEventValueChanged];//设置响应事件的方法
5 · UIActivityIndicatorView 活动指示器(加载时转圈的那个)
        //活动指示器
    activityIndicatorView = [[UIActivityIndicatorView alloc]initWithActivityIndicatorStyle:UIActivityIndicatorViewStyleGray];
    activityIndicatorView.frame=CGRectMake(SCREEN_WIDTH/2, 355, 30, 30);
    activityIndicatorView.hidesWhenStopped=YES;//停止后隐藏
    [activityIndicatorView startAnimating];//开始动画
    [activityIndicatorView stopAnimating];//停止动画
6 · UISegmentedControl 分段控制去(效果图中最下面的那个)
    UISegmentedControl * segmentcontrol =[[UISegmentedControl alloc]initWithItems:@[@"第1个",@"第2个",@"第3个"]];//初始化有哪些分段选项
    [segmentcontrol setBounds:CGRectMake(0, 0, 300, 35)];
    [segmentcontrol setCenter:CGPointMake(SCREEN_WIDTH/2, 430)];
    segmentcontrol.selectedSegmentIndex=0;//设置选中的项目
    [segmentcontrol setTag:1007];
    [segmentcontrol addTarget:self action:@selector(onClick:) forControlEvents:UIControlEventValueChanged];//响应点击事件
    segmentcontrol.tintColor=[UIColor grayColor];//设置前景色
    [segmentcontrol setTitleTextAttributes:@{NSForegroundColorAttributeName:[UIColor whiteColor]} forState:UIControlStateNormal];//设置文字颜色
大多数控件都可以用这个方法设置响应一些事件。
addTarget:(nullable id) action:(nonnull SEL) forControlEvents:(UIControlEvents)
开头效果图片的Viewcontroller完整代码
- 请忽略“下一页”这个按钮,因为它只是跳转到另一个ViewController,除此之外啥都没做:
//
//  ViewController.m
//  三
//
//  Created by rimi on 16/4/8.
//  Copyright © 2016年 BlueSky. All rights reserved.
//

#import "ViewController.h"
#import "MyViewController.h"

#define SCREEN_WIDTH (CGRectGetWidth(self.view.bounds))
#define SCREEN_HEIGHT (CGRectGetHeight(self.view.bounds))
//2,引入协议
@interface ViewController ()<UITextFieldDelegate>
@property(nonatomic,strong)UIActivityIndicatorView * ActivityIndicatorView;

@end

@implementation ViewController

- (void)viewDidLoad {
    [super viewDidLoad];
    UIButton * nextPageButton=[UIButton buttonWithType:UIButtonTypeSystem];
    [nextPageButton setBounds:CGRectMake(0, 0, 100, 30)];
    [nextPageButton setCenter:CGPointMake(SCREEN_WIDTH/2, 100)];
    [nextPageButton setTitle:@"下一页" forState:UIControlStateNormal];
    [nextPageButton setTag:1001];
    [nextPageButton addTarget:self action:@selector(onButtonClick:) forControlEvents:UIControlEventTouchUpInside];
    [[self view]addSubview:nextPageButton];

    UIButton * lightButton=[UIButton buttonWithType:UIButtonTypeCustom];
    [lightButton setTag:1002];
    [lightButton setBounds:CGRectMake(0, 0, 40, 40)];
    [lightButton setCenter:CGPointMake(SCREEN_WIDTH/2, 135)];
    [lightButton addTarget:self action:@selector(onButtonClick:) forControlEvents:UIControlEventTouchUpInside];
    //[lightButton setImage:[UIImage imageNamed:@"开灯"]forState:UIControlStateNormal];
    //[lightButton setImage:[UIImage imageNamed:@"关灯"]forState:UIControlStateSelected];
    [lightButton setBackgroundImage:[UIImage imageNamed:@"开灯"] forState:UIControlStateNormal];
    [lightButton setBackgroundImage:[UIImage imageNamed:@"关灯"] forState:UIControlStateSelected];
    [[self view]addSubview:lightButton];

    UITextField * textField=[[UITextField alloc]init];
    textField.bounds=CGRectMake(0, 0, SCREEN_WIDTH*0.7, 30);
    textField.center=CGPointMake(SCREEN_WIDTH/2, 180);
    textField.borderStyle=UITextBorderStyleLine;//边框
    textField.keyboardType=UIKeyboardTypeASCIICapable;//键盘类型
    textField.clearButtonMode=UITextFieldViewModeWhileEditing;//末尾的清空按钮出现的时机
    textField.secureTextEntry=NO;//密码模式
    textField.placeholder=@"输入文本";//没有输入时的提示文字
    textField.delegate=self;//1,设置代理。
    [self.view addSubview:textField];

    UILabel * label1    =[[UILabel alloc]initWithFrame:CGRectMake(220, 200, 100, 100)];
    label1.backgroundColor=[UIColor grayColor];
    label1.font=[UIFont systemFontOfSize:20];
    label1.tag=1003;
    label1.text=@"lkajhdfkjhakdsfhksjhdfkjhdfkjgauygffdkjgkjhdgfjhgdkjhgajhgfdjhagjkhfgjhagfjh";
    [self.view addSubview:label1];

    UILabel * label2    =[[UILabel alloc]initWithFrame:CGRectMake(10, 200, 100, 100)];
    label2.backgroundColor=[UIColor grayColor];
    label2.font=[UIFont systemFontOfSize:20];
    label2.tag=1004;
    label2.text=@"lkajhdfkjhakdsfhksjhdfkjhdfkjgauygffdkjgkjhdgfjhgdkjhgajhgfdjhagjkhfgjhagfjh";
    label2.numberOfLines=0;//行数,0为自适应
    [label2 sizeToFit];//长度自适应
    [self.view addSubview:label2];
    //开关
    UISwitch * switchButton=[[UISwitch alloc]init];
    [switchButton setTag:1005];
    switchButton.bounds=CGRectMake(0, 0, 100, 50);
    switchButton.center=CGPointMake(SCREEN_WIDTH/2, 300);
    switchButton.on=NO;//是否开启
    switchButton.tintColor=[UIColor redColor];//前景色
    switchButton.onTintColor=[UIColor blueColor];//打开时的前景色
    switchButton.thumbTintColor=[UIColor greenColor];//圆形按钮的颜色
    [switchButton addTarget:self action:@selector(onClick:) forControlEvents:UIControlEventValueChanged];//valuchanged事件。
    [self.view addSubview:switchButton];
    //活动指示器
    _ActivityIndicatorView = [[UIActivityIndicatorView alloc]initWithActivityIndicatorStyle:UIActivityIndicatorViewStyleGray];
    _ActivityIndicatorView.frame=CGRectMake(SCREEN_WIDTH/2, 355, 30, 30);
    _ActivityIndicatorView.hidesWhenStopped=YES;
    [self.view addSubview:_ActivityIndicatorView];
    //滑条
    UISlider * slider=[[UISlider alloc]init];
    slider.bounds=CGRectMake(0, 0, 200, 20);
    slider.center=CGPointMake(SCREEN_WIDTH/2, 400);
    [slider setTag:1006];
    slider.maximumValue=1.0;//最大值
    slider.minimumValue=0.1;//最小值
    slider.value=1;//当前值
    [slider addTarget:self action:@selector(onClick:) forControlEvents:UIControlEventValueChanged];//设置响应事件的方法
    [self.view addSubview:slider];
    //分段控制器
    UISegmentedControl * segmentcontrol =[[UISegmentedControl alloc]initWithItems:@[@"1",@"2",@"3"]];//初始化有哪些分段选项
    [segmentcontrol setBounds:CGRectMake(0, 0, 300, 35)];
    [segmentcontrol setCenter:CGPointMake(SCREEN_WIDTH/2, 430)];
    segmentcontrol.selectedSegmentIndex=0;//设置选中的项目
    [segmentcontrol setTag:1007];
    [segmentcontrol addTarget:self action:@selector(onClick:) forControlEvents:UIControlEventValueChanged];//响应点击事件
    [self.view addSubview:segmentcontrol];

}

- (void)didReceiveMemoryWarning {
    [super didReceiveMemoryWarning];

}
-(void)onButtonClick:(UIButton *)sender{
    switch (sender.tag) {
        case 1001:{
            MyViewController * secondController=[[MyViewController alloc]init];
            [self presentViewController:secondController animated:YES completion:nil];
        }
            break;
        case 1002:{
            sender.selected=!sender.selected;
            if (sender.selected) {
                self.view.backgroundColor=[UIColor blackColor];
            }else{
                self.view.backgroundColor=[UIColor whiteColor];
            }
            }break;
    }
}

#pragma mark ---UITextFieldDelegate

- (BOOL)textFieldShouldReturn:(UITextField *)textField{
    UILabel * label1=[self.view viewWithTag:1003];
    UILabel * label2=[self.view viewWithTag:1004];
    label2.text=textField.text;
    label1.text=textField.text;
    [label2 sizeToFit];//再次自适应
    label2.frame=CGRectMake(10, 200, 100, 100);//再次设置frame
    [textField resignFirstResponder];//回收键盘
    NSLog(@"单击return");
    return YES;
}

-(void)onClick:(UIView *)sender{
    switch (sender.tag) {
  case 1005:{
      UISwitch * switchButton =(UISwitch *)sender;
      if (switchButton.on) {
    [_ActivityIndicatorView startAnimating];//开始动画
      }else
      [_ActivityIndicatorView stopAnimating];//停止动画
  }break;
  case 1006:{
      UISlider * slider=(UISlider * )sender;
      self.view.alpha=slider.value;
  }break;
  case 1007:{
      UISegmentedControl * segmentcontrol =(UISegmentedControl * )sender;
      switch (segmentcontrol.selectedSegmentIndex) {
          case 0:
              segmentcontrol.tintColor=[UIColor grayColor];
              [segmentcontrol setTitleTextAttributes:@{NSForegroundColorAttributeName:[UIColor whiteColor]} forState:UIControlStateNormal];
              self.view.backgroundColor=[UIColor purpleColor];
              break;
          case 1:
              segmentcontrol.tintColor=[UIColor blueColor];
              //[segmentcontrol setTitleTextAttributes:@{NSForegroundColorAttributeName:[UIColor whiteColor]} forState:UIControlStateNormal];
              self.view.backgroundColor=[UIColor cyanColor];

              break;
          case 2:
              segmentcontrol.tintColor=[UIColor yellowColor];
             // [segmentcontrol setTitleTextAttributes:@{NSForegroundColorAttributeName:[UIColor blackColor]} forState:UIControlStateNormal];
              self.view.backgroundColor=[UIColor brownColor];

              break;
      }
  }break;


  default:
            break;
    }
}

-(void)touchesBegan:(NSSet<UITouch *> *)touches withEvent:(UIEvent *)event{
    [self.view endEditing:YES];
}
@end


 628
628

 被折叠的 条评论
为什么被折叠?
被折叠的 条评论
为什么被折叠?
 到【灌水乐园】发言


