上篇博客说到了ViewController和几个控件(UITextView ,UIImageView),接下来就用它们做出个稍微好看一点的界面吧!
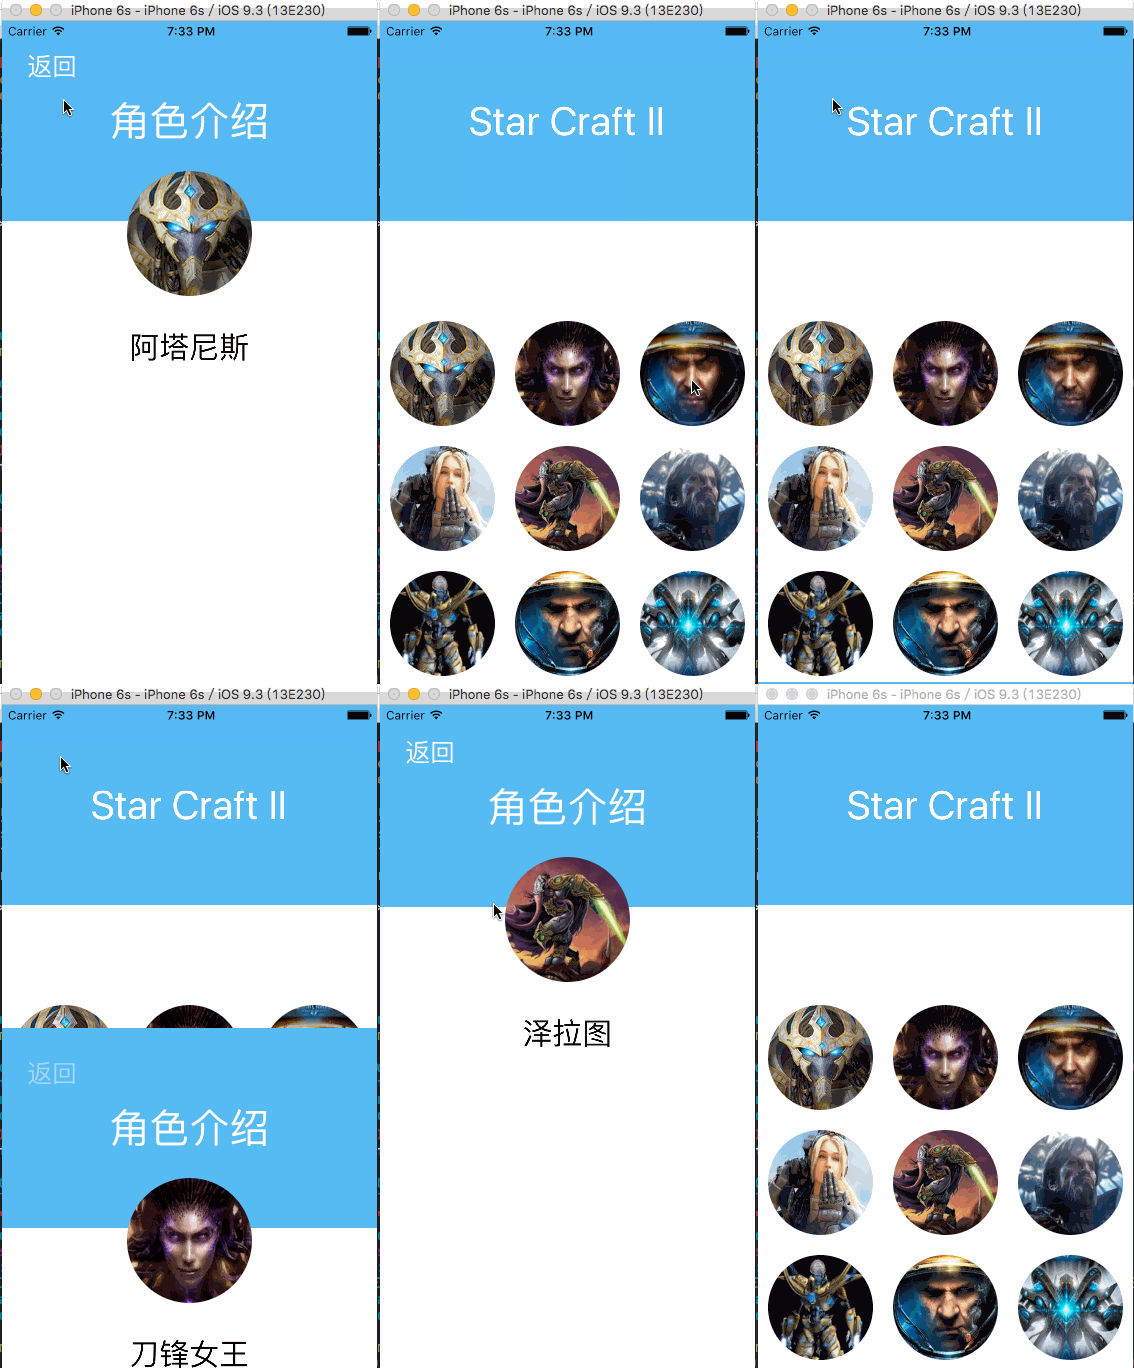
最终效果如下图:

如图,屏幕上排列了一些《星际争霸2》的人物角色,点击他们进入第二个界面显示介绍。
首先准备9张图片分别命名为img0.png~img8.png,放到工程中。
然后是写代码:
- MyViewController.h
//
//  MyViewController.h

//  Copyright © 2016年 BlueSky. All rights reserved.
//

#import <UIKit/UIKit.h>
@interface MyViewController : UIViewController
@property(nonatomic,strong)NSString * imgName;
@property(nonatomic,strong)NSString * text;
@end
- ViewController.m
//
//  ViewController.m
//
//  Copyright © 2016年 BlueSky. All rights reserved.
//

#import "ViewController.h"
#define SCREEN_WIDTH (CGRectGetWidth(self.view.bounds))
#define SCREEN_HEIGHT (CGRectGetHeight(self.view.bounds))
#define BUTTON_WIDETH (SCREEN_WIDTH/3.0-20)
#define BUTTON_HEIGHT (SCREEN_WIDTH/3.0-20)
#import "MyViewController.h"

//将屏幕和按钮的宽度及高度定义为宏,方便使用。

@interface ViewController ()
@property(nonatomic,strong) NSArray * arrayText;
@end

@implementation ViewController

- (void)viewDidLoad {
    [super viewDidLoad];
    self.arrayText=@[@"阿塔尼斯",//这个数组保存角色的介绍信息
                     @"刀锋女王",
                     @"吉姆.雷诺",
                     @"幽灵特工",
                     @"泽拉图",
                     @"阿克图尔斯.蒙斯克",
                     @"圣堂武士",
                     @"泰凯斯.芬利",
                     @"执政官"
                     ];
    UILabel * titLeLatel = [[UILabel alloc]initWithFrame:CGRectMake(0, 0,SCREEN_WIDTH, 200)];
    titLeLatel.backgroundColor=[UIColor colorWithRed:72/255.0 green:170/255.0 blue:241/255.0 alpha:1.0];
    titLeLatel.font=[UIFont systemFontOfSize:40];
    titLeLatel.textAlignment=NSTextAlignmentCenter;
    //设置文本中心对齐
    [titLeLatel setTextColor:[UIColor whiteColor]];
    titLeLatel.text=@"Star Craft II";
    [self.view addSubview:titLeLatel];
    for (int i=0; i<9; i++) {
        //循环添加9个UIButton控件
        UIButton * button =[UIButton buttonWithType:UIButtonTypeCustom];
        [button setTag:i+1000];
        //为它们分别设置Tag方便之后配合Tag查找对应的图片。
        [button setFrame:CGRectMake(i%3*(SCREEN_WIDTH/3)+10, i/3*(SCREEN_WIDTH/3.0)+300,BUTTON_WIDETH, BUTTON_HEIGHT)];
        //设置按钮的大小
        [button setImage:[UIImage imageNamed:[NSString stringWithFormat:@"img%d",i]] forState:UIControlStateNormal];
        //设置按钮的背景图片
        [[button layer] setCornerRadius:BUTTON_HEIGHT/2.0];
        //设置背景图的圆角
        [[button layer] setMasksToBounds:YES];
        //应用圆角到视图上
        [button addTarget:self action:@selector(onButtonClick:)  forControlEvents:UIControlEventTouchUpInside];
        [[self view] addSubview:button];
    }
}

- (void)didReceiveMemoryWarning {
    [super didReceiveMemoryWarning];
    // Dispose of any resources that can be recreated.
}
-(void)onButtonClick:(UIButton *)sender{
    MyViewController * controller2 = [[MyViewController alloc]init];
    [controller2 setImgName:[NSString stringWithFormat:@"img%ld",[sender tag]-1000]];//根据Tag值设置即将显示的图片的名字
    [controller2 setText:self.arrayText[sender.tag-1000]];//根据tag值在数组中找到即将显示的介绍信息。
    [self presentViewController:controller2 animated:YES completion:nil];//显示第二个界面
}
@end
- MyViewController.m
//
//  MyViewController.m

//  Copyright © 2016年 BlueSky. All rights reserved.
//

#import "MyViewController.h"
#define SCREEN_WIDTH (CGRectGetWidth(self.view.bounds))
#define SCREEN_HEIGHT (CGRectGetHeight(self.view.bounds))
//同样的宏定义,方便使用
@interface MyViewController ()
@end
@implementation MyViewController

- (void)viewDidLoad {
    [super viewDidLoad];
    [[self view]setBackgroundColor:[UIColor whiteColor]];
    NSLog(@"%@",self.imgName);
    UILabel * titLeLatel = [[UILabel alloc]initWithFrame:CGRectMake(0, 0,SCREEN_WIDTH, 200)];
    //标题
    titLeLatel.backgroundColor=[UIColor colorWithRed:72/255.0 green:170/255.0 blue:241/255.0 alpha:1.0];
    titLeLatel.font=[UIFont systemFontOfSize:40];
    titLeLatel.textAlignment=NSTextAlignmentCenter;
    [titLeLatel setTextColor:[UIColor whiteColor]];
    [titLeLatel setText:@"角色介绍"];
    [self.view addSubview:titLeLatel];
    UIButton * backButton=[UIButton buttonWithType:UIButtonTypeSystem];
    //返回按钮
    [backButton setFrame:CGRectMake(10, 30, 80, 30)];
    [[backButton titleLabel]setFont:[UIFont systemFontOfSize:25]];
    [backButton setTitle:@"返回" forState:UIControlStateNormal];
    [backButton setTintColor:[UIColor whiteColor]];
    [backButton addTarget:self action:@selector(onButtonClick:) forControlEvents:UIControlEventTouchUpInside];
    [[self view]addSubview:backButton];
    UIImageView * img=[[UIImageView alloc]initWithFrame:CGRectMake(SCREEN_WIDTH/2-SCREEN_WIDTH/6, 150, SCREEN_WIDTH/3, SCREEN_WIDTH/3)];
    [[img layer]setCornerRadius:SCREEN_WIDTH/6];
    [[img layer] setMasksToBounds:YES];
    [img setImage:[UIImage imageNamed:self.imgName]];//取出刚才设置的图片名字,用UIImageView显示出来
    UITextView * textview=[[UITextView alloc]initWithFrame:CGRectMake(0, 300, SCREEN_WIDTH, 150)];
    textview.text=self.text;//取出介绍的内容设置给Label
    textview.textAlignment=NSTextAlignmentCenter;
    textview.editable=NO;
    textview.font=[UIFont systemFontOfSize:30];
    [[self view] addSubview:img];
    [[self view] addSubview:textview];

}

- (void)didReceiveMemoryWarning {

}
-(void)viewWillAppear:(BOOL)animated{
    [super viewWillAppear:animated];
}
-(void)onButtonClick:(UIButton *)sender{
    [[self presentingViewController] dismissViewControllerAnimated:YES completion:nil];//返回上一个界面
}
@end
上面的例子做到了在两个ViewController之间进行值得传递,这是最简单的一种通过属性来传递数据。今后还会学习其他的传值方式。
The End.


 1354
1354


 被折叠的 条评论
为什么被折叠?


