


1.懒加载基本
懒加载——也称为延迟加载,即在需要的时候才加载(效率低,占用内存小)。所谓懒加载,写的是其get方法.
注意:如果是懒加载的话则一定要注意先判断是否已经有了,如果没有那么再去进行实例化
2.使用懒加载的好处:
(1)不必将创建对象的代码全部写在viewDidLoad方法中,代码的可读性更强
(2)每个控件的getter方法中分别负责各自的实例化处理,代码彼此之间的独立性强,松耦合
3.代码示例
1#import "ViewController.h"
- #import "ViewController.h"
- @interface ViewController ()
- @property (weak, nonatomic) IBOutlet UILabel *indexLabel;
- @property (weak, nonatomic) IBOutlet UIImageView *imageView;
- @property (weak, nonatomic) IBOutlet UILabel *titleLabel;
- - (IBAction)leftButton:(UIButton *)sender;
- - (IBAction)rightButton:(UIButton *)sender;
- @property (weak, nonatomic) IBOutlet UIButton *leftButton;
- @property (weak, nonatomic) IBOutlet UIButton *rightButton;
- // 定义数组, 读取plist的数据
- @property (nonatomic, strong) NSArray *dataArray;
- // 全局变量的索引
- @property (nonatomic, assign) NSInteger index;
- @end
- @implementation ViewController
- // dataArray的get方法
- // 懒加载, 延迟加载
- - (NSArray *)dataArray {
- if (nil == _dataArray) {
- // 填充数据
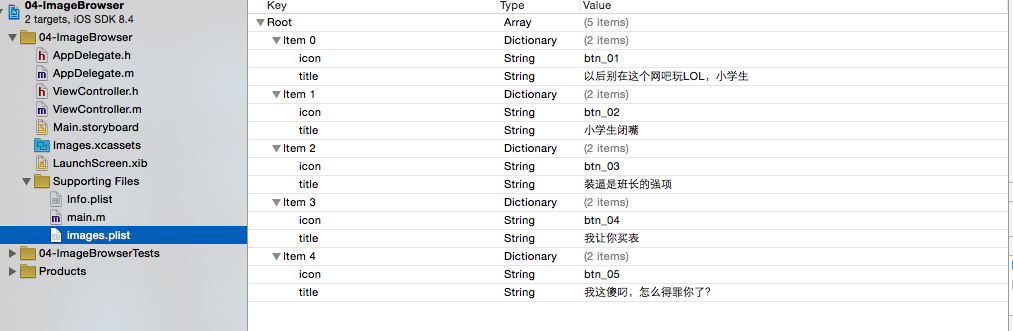
- // 1. 拿到文件路径
- NSString *path = [[NSBundle mainBundle] pathForResource:@"images.plist" ofType:nil];
- // 读取文件
- _dataArray = [NSArray arrayWithContentsOfFile:path];
- }
- return _dataArray;
- }
- - (void)viewDidLoad {
- [super viewDidLoad];
- // Do any additional setup after loading the view, typically from a nib.
- // 初始化index
- _index = 1;
- // 更新界面
- [self updateUI];
- // // 1. 顶部的索引Label
- // self.indexLabel.text = [NSString stringWithFormat:@"%ld/%ld",_index,self.dataArray.count];
- //
- // // 取出当前_index对应的字典
- // NSDictionary *dict = self.dataArray[_index - 1];
- //
- // // 2. imageView的image
- // self.imageView.image = [UIImage imageNamed:dict[@"icon"]];
- //
- // // 3. 下部的Label
- //
- // self.titleLabel.text = dict[@"title"];
- // 4. 让上一张图片按钮不可被点击
- // self.leftButton.enabled = NO;
- }
- // 左侧上一张图片按钮
- - (IBAction)leftButton:(UIButton *)sender {
- // index - 1
- _index--;
- // self.rightButton.enabled = YES;
- //
- // sender.enabled = _index != 1;
- // 调用更新界面的方法
- [self updateUI];
- // // 取出数组, 设置数据
- // NSDictionary *dict = self.dataArray[_index - 1];
- //
- // self.indexLabel.text = [NSString stringWithFormat:@"%ld/%ld",_index,self.dataArray.count];
- //
- // self.imageView.image = [UIImage imageNamed:dict[@"icon"]];
- //
- // self.titleLabel.text = dict[@"title"];
- }
- // 右侧下一张图片按钮
- - (IBAction)rightButton:(UIButton *)sender {
- // index + 1
- _index++;
- // 调用更新界面的方法
- [self updateUI];
- // 设置下一张图片的按钮 , 不可被点击(只要不是最后一张图片都可以被点击)
- // sender.enabled = _index != self.dataArray.count;
- // if (_index == self.dataArray.count) {
- // sender.enabled = NO;
- // }
- //
- //
- // // 把左侧, 上一张图片的按钮置为可点击状态
- // self.leftButton.enabled = YES;
- }
- // 更新界面数据展示
- - (void)updateUI {
- // 取出对应的字典
- NSDictionary *dict = self.dataArray[_index -1];
- // 设置imageView的image 和 Label 的text
- self.imageView.image = [UIImage imageNamed:dict[@"icon"]];
- self.titleLabel.text = dict[@"title"];
- // 顶部的indexLabel
- self.indexLabel.text = [NSString stringWithFormat:@"%ld/%ld",_index, self.dataArray.count];
- self.leftButton.enabled = (_index != 1);
- self.rightButton.enabled = (_index != self.dataArray.count);
- }
- @end


 313
313

 被折叠的 条评论
为什么被折叠?
被折叠的 条评论
为什么被折叠?
 到【灌水乐园】发言


