


纯代码自定义UItableviewcell实现一个简单的微博界面布局
一、使用纯代码自定义一个tableview的步骤
1.新建一个继承自UITableViewCell的类
2.重写initWithStyle:reuseIdentifier:方法
添加所有需要显示的子控件(不需要设置子控件的数据和frame, 子控件要添加到contentView中)
进行子控件一次性的属性设置(有些属性只需要设置一次, 比如字体\固定的图片)
3.提供2个模型
数据模型: 存放文字数据\图片数据
frame模型: 存放数据模型\所有子控件的frame\cell的高度
4.cell拥有一个frame模型(不要直接拥有数据模型)
5.重写frame模型属性的setter方法: 在这个方法中设置子控件的显示数据和frame
6.frame模型数据的初始化已经采取懒加载的方式(每一个cell对应的frame模型数据只加载一次)
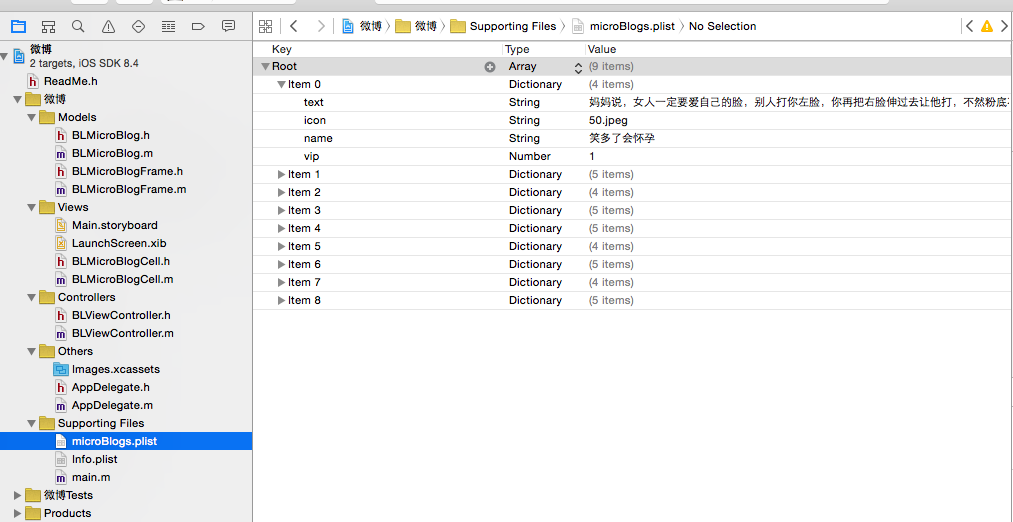
二、文件结构和实现代码
1.文件结构
2.实现代码:
// BLMicroBlog.h文件
<span style="font-size:18px;">#import <Foundation/Foundation.h>

@interface BLMicroBlog : NSObject
//字典数据属性
@property (nonatomic,copy) NSString *text;
@property (nonatomic,copy) NSString *icon;
@property (nonatomic,copy) NSString *picture;
@property (nonatomic,copy) NSString *name;
@property (nonatomic,assign,getter=isVip) BOOL vip;
//字典转模型
//对象方法
- (instancetype) initWithDict:(NSDictionary *) dict;
//类方法
+ (instancetype) microBlogWithDict:(NSDictionary *) dict;
//读取plist文件
+ (NSArray *) microBlogs;


@end</span>
// BLMicroBlog.m文件
<span style="font-size:18px;">#import "BLMicroBlog.h"

@implementation BLMicroBlog
//方法实现
- (instancetype)initWithDict:(NSDictionary *)dict
{
    if (self = [super init]) {
        //这个方法把字典中所有属性赋值
        //key 对应的属性

        [self setValuesForKeysWithDictionary:dict];
    }
    return self;

}
+ (instancetype)microBlogWithDict:(NSDictionary *)dict
{
    return [[self alloc] initWithDict:dict];

}
+ (NSArray *)microBlogs
{
    NSString *filePath = [[NSBundle mainBundle] pathForResource:@"microBlogs" ofType:@"plist"];
    //从plist文件中加载数据
    NSArray *array = [NSArray arrayWithContentsOfFile:filePath];
    NSMutableArray *arrayM = [NSMutableArray arrayWithCapacity:array.count];
    //遍历数组
    for (NSDictionary *dict in array) {
        BLMicroBlog *microBlog = [self microBlogWithDict:dict];
        [arrayM addObject:microBlog];
    }
    return arrayM;


}
@end
</span>
// BLMicroBlogFrame.h文件
<span style="font-size:18px;">#import <UIKit/UIKit.h>
#import "BLMicroBlog.h"
//名称字体
#define nameFont [UIFont systemFontOfSize:18]
//文本字体
#define textFont [UIFont systemFontOfSize:14]

@interface BLMicroBlogFrame : NSObject
//readonly 只读 没有setter方法 不要外部修改
@property (nonatomic,assign,readonly) CGRect iconFrame;
@property (nonatomic,assign,readonly) CGRect nameFrame;
@property (nonatomic,assign,readonly) CGRect vipFrame;
@property (nonatomic,assign,readonly) CGRect contentFrame;
@property (nonatomic,assign,readonly) CGRect pictureFrame;
@property (nonatomic,assign,readonly) CGFloat rowHeight;


//定义属性
@property (nonatomic,strong) BLMicroBlog *microBlog;

@end
</span>
// BLMicroBlogFrame.m文件
<span style="font-size:18px;">#import "BLMicroBlogFrame.h"

@implementation BLMicroBlogFrame
- (void)setMicroBlog:(BLMicroBlog *)microBlog
{
    //给自己成员变量赋值
    _microBlog = microBlog;
    //计算frame和行高
    //计算子控件的frame
    CGFloat margin = 8;
    //1.头像
    CGFloat iconX = margin;
    CGFloat iconY = margin;
    CGFloat iconW = 30;
    CGFloat iconH = 30;
    _iconFrame = CGRectMake(iconX, iconY, iconW, iconH);
    //2.名称
    CGFloat nameX = CGRectGetMaxX(_iconFrame) + margin;
    CGSize nameSize = [microBlog.name sizeWithAttributes:@{NSFontAttributeName:nameFont}];
    CGFloat nameY = iconY + (iconH - nameSize.height) / 2;
    _nameFrame = (CGRect){nameX,nameY,nameSize};
    //3.vip的frame
    CGFloat vipX = CGRectGetMaxX(_nameFrame) + margin;
    CGFloat vipH = 14;
    CGFloat vipW = 14;
    CGFloat vipY = iconY + (iconH - vipH) / 2;
    _vipFrame = CGRectMake(vipX, vipY, vipW, vipH);
    //4.文本
    CGFloat screenW = [UIScreen mainScreen].bounds.size.width;
    CGSize maxTextSize = CGSizeMake(screenW - 2 * margin, CGFLOAT_MAX);
    NSDictionary *attributes = @{NSFontAttributeName:textFont};
    CGSize textSize = [microBlog.text boundingRectWithSize:maxTextSize options:NSStringDrawingUsesLineFragmentOrigin attributes:attributes context:nil].size;
    CGFloat textX = iconX;
    CGFloat textY = CGRectGetMaxY(_iconFrame) + margin;
    _contentFrame = CGRectMake(textX, textY, textSize.width, textSize.height);
    //图片
    if (microBlog.picture) {
        CGFloat pictureX = iconX;
        CGFloat pictureY = CGRectGetMaxY(_contentFrame) + margin;
        CGFloat pictureW = 100;
        CGFloat pictureH = 100;
        _pictureFrame = CGRectMake(pictureX, pictureY, pictureW, pictureH);
    }
    //行高
    _rowHeight = CGRectGetMaxY(_contentFrame);
    if (microBlog.picture) {
        _rowHeight = CGRectGetMaxY(_pictureFrame);
    }
    _rowHeight += margin;


}

@end
</span>
// BLMicroBlogCell.h文件
<span style="font-size:18px;">

#import <UIKit/UIKit.h>
#import "BLMicroBlogFrame.h"
@interface BLMicroBlogCell : UITableViewCell
@property (nonatomic,strong) BLMicroBlogFrame *microBlogFrame;
@end
</span>
// BLMicroBlogCell.m文件
#import "BLMicroBlogCell.h"
#import "BLMicroBlogFrame.h"

@interface BLMicroBlogCell ()
@property (nonatomic,weak) UIImageView *iconView;
@property (nonatomic,weak) UILabel *nameLabel;
@property (nonatomic,weak) UIImageView *vipView;
@property (nonatomic,weak) UILabel *contentLabel;
@property (nonatomic,weak) UIImageView *pictureView;

@end

@implementation BLMicroBlogCell

//重写cell初始化方法
- (instancetype)initWithStyle:(UITableViewCellStyle)style reuseIdentifier:(NSString *)reuseIdentifier
{
    self = [super initWithStyle:style reuseIdentifier:reuseIdentifier];
    if (self) {
        UIImageView *iconView = [[UIImageView alloc] init];
        [self.contentView addSubview:iconView];
        self.iconView = iconView;
        //   创建名称标签
        UILabel *nameLabel = [[UILabel alloc] init];
        [self.contentView addSubview:nameLabel];
        self.nameLabel  = nameLabel;
        //   创建vip视图
        UIImageView *vipView = [[UIImageView alloc] init];
        [self.contentView addSubview:vipView];
        self.vipView = vipView;
        //   创建内容标签
        UILabel *contentLabel = [[UILabel alloc] init];
        [self.contentView addSubview:contentLabel];
        self.contentLabel = contentLabel;
        //  创建图片视图
        UIImageView *pictureView = [[UIImageView alloc] init];
        [self.contentView addSubview:pictureView];
        self.pictureView = pictureView;

        //   只需要设置一次的属性放到这里
        self.vipView.image = [UIImage imageNamed:@"vip"];

        //   设置名称字体
        self.nameLabel.font = nameFont;
        //   指定文本字体
        self.contentLabel.font = textFont;
        //    设置contentLabel支持换行
        self.contentLabel.numberOfLines = 0;
    }
    return self;


    }
//重新microBlogFrame模型属性的setter方法

- (void) setMicroBlogFrame:(BLMicroBlogFrame *)microBlogFrame
{
    // 1.给自己对应的成员变量赋值
    _microBlogFrame = microBlogFrame;

    // 2.给子控件设置数据
    //**给子控件设置数据************************************/
    BLMicroBlog *microBlog = microBlogFrame.microBlog;
    //  给子控件赋值
    self.iconView.image = [UIImage imageNamed: microBlog.icon];
    self.nameLabel.text = microBlog.name;

    //    if (microBlog.isVip) {
    //        self.vipView.hidden = NO;
    //    }else{
    //        self.vipView.hidden = YES;
    //    }
    //  当不是vip的时候隐藏,是vip的时候显示
    self.vipView.hidden = !microBlog.isVip;

    //  给文本设置数据
    self.contentLabel.text = microBlog.text;

    if (microBlog.picture) {
        //  给图标设置数据
        self.pictureView.image = [UIImage imageNamed: microBlog.picture];
    }else{
        self.pictureView.image = nil;
    }

    //**给子控件设置数据************************************/

    // 3.给子控件设置frame

    self.iconView.frame = microBlogFrame.iconFrame;
    self.nameLabel.frame = microBlogFrame.nameFrame;
    self.vipView.frame = microBlogFrame.vipFrame;
    self.contentLabel.frame = microBlogFrame.contentFrame;
    self.pictureView.frame = microBlogFrame.pictureFrame;

}


@end
主控制器
// BLViewController.m文件
#import "BLViewController.h"
#import "BLMicroBlog.h"
#import "BLMicroBlogFrame.h"
#import "BLMicroBlogCell.h"
@interface BLViewController ()
@property (nonatomic,strong) NSArray *microBlogFrames;
@end

@implementation BLViewController

- (void)viewDidLoad {
    [super viewDidLoad];


}
//去掉状态栏
- (BOOL) prefersStatusBarHidden
{
    return YES;
}


#pragma mark - Table view data source

//一共多少行
- (NSInteger)tableView:(UITableView *)tableView numberOfRowsInSection:(NSInteger)section
{
    return self.microBlogFrames.count;
}

//每行的内容
- (UITableViewCell *)tableView:(UITableView *)tableView cellForRowAtIndexPath:(NSIndexPath *)indexPath {
    NSString *reuseId = @"cell";
    BLMicroBlogCell *cell = [tableView dequeueReusableCellWithIdentifier:reuseId];
    if (cell == nil) {
        cell = [[BLMicroBlogCell alloc] initWithStyle:UITableViewCellStyleDefault reuseIdentifier:reuseId];
    }
    cell.microBlogFrame = self.microBlogFrames[indexPath.row];


    return cell;
}
#pragma mark - tableView的代理方法
//根据不同indexPath返回不同行高
- (CGFloat) tableView:(UITableView *)tableView heightForRowAtIndexPath:(NSIndexPath *)indexPath
{
    //    NSLog(@"%s %zd---%zd",__func__,indexPath.section,indexPath.row);
    //  取出microBlogFrame模型
    BLMicroBlogFrame *microBlogFrame = self.microBlogFrames[indexPath.row];
    //  返回行高
    return microBlogFrame.rowHeight;
}


#pragma mark - 懒加载数据
- (NSArray *)microBlogFrames
{
    if (_microBlogFrames == nil) {

        NSArray *microBlogs = [BLMicroBlog microBlogs];
        NSMutableArray *arrayM = [NSMutableArray array];
        for (BLMicroBlog *microBlog in microBlogs) {
            BLMicroBlogFrame *microBlogFrame = [[BLMicroBlogFrame alloc] init];
            microBlogFrame.microBlog = microBlog;
            [arrayM addObject:microBlogFrame];
        }
        _microBlogFrames = arrayM;
    }
    return _microBlogFrames;
}


@end
三.实现效果图
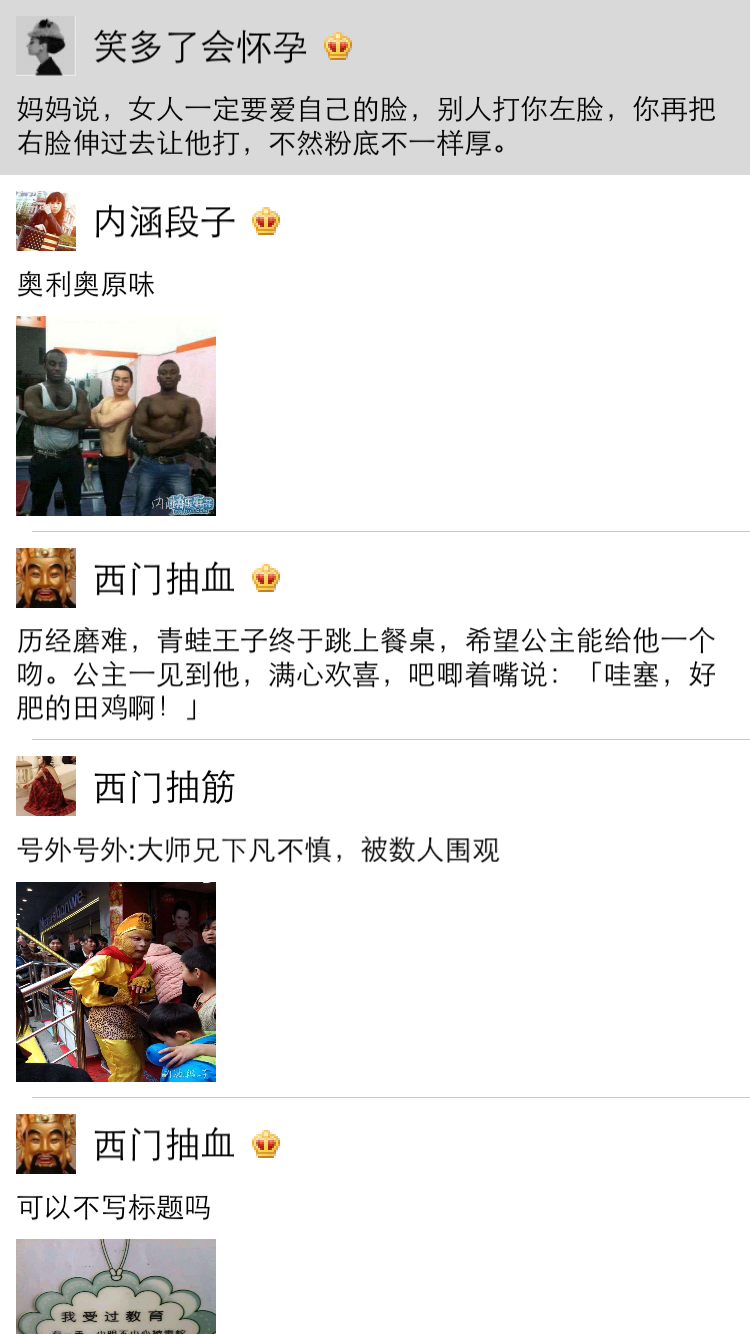
提示:由于系统提供的tableview可能并不能满足我们的开发需求,所以经常要求我们能够自定义tableview。
自定义tableview有两种方式,一种是使用xib创建,一种是使用纯代码的方式创建。
对于样式一样的tableview,通常使用xib进行创建,对于高度不一样,内容也不完全一致的通常使用纯代码进行自定义。


 877
877

 被折叠的 条评论
为什么被折叠?
被折叠的 条评论
为什么被折叠?
 到【灌水乐园】发言


