


今天和组长聊起有关如何将图片(例如:头像)上传至服务器,通过度娘发现这一过程可分为两步
1、将图片上传至服务器本地的路径下
2、将图片所在路径以字符串的形式存储到数据库中
1、所需依赖
pom.xml
<?xml version="1.0" encoding="UTF-8"?>
<project xmlns="http://maven.apache.org/POM/4.0.0" xmlns:xsi="http://www.w3.org/2001/XMLSchema-instance"
         xsi:schemaLocation="http://maven.apache.org/POM/4.0.0 https://maven.apache.org/xsd/maven-4.0.0.xsd">
    <modelVersion>4.0.0</modelVersion>
    <parent>
        <groupId>org.springframework.boot</groupId>
        <artifactId>spring-boot-starter-parent</artifactId>
        <version>2.5.3</version>
        <relativePath/> <!-- lookup parent from repository -->
    </parent>
    <groupId>com.ding</groupId>
    <artifactId>uploadphotodemo</artifactId>
    <version>0.0.1-SNAPSHOT</version>
    <name>uploadphotodemo</name>
    <description>uploadphotodemo</description>
    <properties>
        <java.version>11</java.version>
    </properties>
    <dependencies>
        <dependency>
            <groupId>org.springframework.boot</groupId>
            <artifactId>spring-boot-starter-web</artifactId>
        </dependency>

        <dependency>
            <groupId>org.springframework.boot</groupId>
            <artifactId>spring-boot-devtools</artifactId>
            <scope>runtime</scope>
            <optional>true</optional>
        </dependency>
        <dependency>
            <groupId>org.projectlombok</groupId>
            <artifactId>lombok</artifactId>
            <optional>true</optional>
        </dependency>
        <dependency>
            <groupId>org.springframework.boot</groupId>
            <artifactId>spring-boot-starter-test</artifactId>
            <scope>test</scope>
        </dependency>
        <dependency>
            <groupId>org.springframework.boot</groupId>
            <artifactId>spring-boot-starter-thymeleaf</artifactId>
        </dependency>
        <dependency>
            <groupId>org.mybatis.spring.boot</groupId>
            <artifactId>mybatis-spring-boot-starter</artifactId>
            <version>2.2.0</version>
        </dependency>
        <dependency>
            <groupId>org.springframework.boot</groupId>
            <artifactId>spring-boot-starter-jdbc</artifactId>
        </dependency>
        <dependency>
            <groupId>mysql</groupId>
            <artifactId>mysql-connector-java</artifactId>
        </dependency>
    </dependencies>

    <build>
        <plugins>
            <plugin>
                <groupId>org.springframework.boot</groupId>
                <artifactId>spring-boot-maven-plugin</artifactId>
                <configuration>
                    <excludes>
                        <exclude>
                            <groupId>org.projectlombok</groupId>
                            <artifactId>lombok</artifactId>
                        </exclude>
                    </excludes>
                </configuration>
            </plugin>
        </plugins>
    </build>
</project>
2、编写springboot及mybatis相关设置
该设置文件我以yaml文件形式保存
无论用properties格式还是yaml本质差不多
只不过个人认为还是yaml书写更为方便(❁´◡`❁)
application.yaml
mybatis:
  type-aliases-package: com.ding.uploadphotodemo.pojo
  mapper-locations: classpath:mapper/*.xml
spring:
  servlet:
    multipart:
    #用于提高springboot上传文件容量,默认为1MB
      max-file-size: 20MB
  datasource:
    username: root
    password: root
    url: jdbc:mysql://localhost:3306/mybatis?serverTimezone=UTC&useUnicode=true&characterEncoding=utf-8
    driver-class-name: com.mysql.cj.jdbc.Driver
3、编写pojo类
Photo.java
package com.ding.uploadphotodemo.pojo;

import lombok.AllArgsConstructor;
import lombok.Data;
import lombok.NoArgsConstructor;
import java.util.Date;

@Data
@AllArgsConstructor
@NoArgsConstructor
public class Photo {
    private Integer pid;
    private Date date;
    private String Path;
    public Photo(Date date, String Path){
        this.date = date;
        this.Path = Path;
    }
}
显而易见:
- pid:用来标识照片
- date:用来存储当前上传时间
- Path:存储图片的绝对路径
附:sql代码
/*
Navicat MySQL Data Transfer

Source Server         : mysql
Source Server Version : 50558
Source Host           : localhost:3306
Source Database       : uploaddemo

Target Server Type    : MYSQL
Target Server Version : 50558
File Encoding         : 65001

Date: 2021-07-31 14:42:02
*/

SET FOREIGN_KEY_CHECKS=0;

-- ----------------------------
-- Table structure for photos
-- ----------------------------
DROP TABLE IF EXISTS `photos`;
CREATE TABLE `photos` (
  `pid` int(20) NOT NULL AUTO_INCREMENT,
  `date` date DEFAULT NULL,
  `Path` varchar(255) DEFAULT NULL,
  PRIMARY KEY (`pid`)
) ENGINE=InnoDB AUTO_INCREMENT=4 DEFAULT CHARSET=utf8;
4、编写相应html页面
uploaddemo.html
<!DOCTYPE html>
<html lang="en" xmlns:th="https://www.thymeleaf.org/">
<head>
    <meta charset="UTF-8">
    <title>uploaddemo</title>
</head>
<body>
    <form enctype="multipart/form-data" method="post" action="http://localhost:8080/file">
        <input type="file" name="photo">
        <br>
        <input type="submit">
    </form>
    <img th:src="${file}">

</body>
</html>
该网站显示如下:
(丑确实丑了点,不要介意) /_ \
5、编写对应controller类
a、编写网址跳转类
UrlController.java
package com.ding.uploadphotodemo.controller;

import org.springframework.stereotype.Controller;
import org.springframework.web.bind.annotation.PostMapping;
import org.springframework.web.bind.annotation.RequestMapping;

@Controller
public class UrlController {
    //http://localhost:8080/index
    // 跳转至uploaddemo页面
    @RequestMapping("/index")
    public String index(){
        return "uploaddemo";
    }
}
b、编写功能类
FileController.java
package com.ding.uploadphotodemo.controller;

import com.ding.uploadphotodemo.Mapper.PhotoMapper;
import com.ding.uploadphotodemo.pojo.Photo;
import org.springframework.beans.factory.annotation.Autowired;
import org.springframework.stereotype.Controller;
import org.springframework.ui.Model;
import org.springframework.web.bind.annotation.GetMapping;
import org.springframework.web.bind.annotation.PostMapping;
import org.springframework.web.bind.annotation.RequestMapping;
import org.springframework.web.bind.annotation.RequestParam;
import org.springframework.web.multipart.MultipartFile;

import java.io.File;
import java.io.IOException;
import java.util.Date;
import java.util.List;
import java.util.UUID;

@Controller
public class FileController {
    @Autowired
    private PhotoMapper mapper;

    @PostMapping("/file")
    public String file(@RequestParam("photo") MultipartFile fileimage, Model model) throws IOException {
        final String imagePathRoot = "E:\\upload\\images\\";//存放图片的本地路径

        File file = new File(imagePathRoot);
        if (!file.exists()) {
            file.mkdirs();
        }

        if (fileimage.isEmpty()) {
            System.out.println("无文件");
        }
        System.out.println(fileimage.getOriginalFilename());
        //获取原文件的前缀
        String fileName = fileimage.getOriginalFilename();
        //获取后缀名
        String fileType = fileName.substring(fileName.lastIndexOf("."));
        //获取UUID为新的图片进行重新赋值(防止重复)
        String uuid = UUID.randomUUID().toString().replace("-", "");
        String imageFilePath = imagePathRoot + uuid + fileType;
        fileimage.transferTo(new File(imageFilePath));
        //通过thymeleaf传递到前端
        model.addAttribute("file","/imgs/" + uuid + fileType);
        System.out.println("/imgs/" + uuid + fileType);

        String path = imageFilePath;
        Date date = new Date();
        Photo photo = new Photo(date,path);
        System.out.println(mapper.insert(photo));
        return "uploaddemo";
    }
}
6、编写Mapper
PhotoMapper.java
package com.ding.uploadphotodemo.Mapper;

import com.ding.uploadphotodemo.pojo.Photo;
import org.apache.ibatis.annotations.Mapper;
import org.springframework.stereotype.Repository;
import java.util.List;

@Mapper
@Repository
public interface PhotoMapper {
    int insert(Photo photo);
}
以及对应的xml
PhotoMapper.xml
<?xml version="1.0" encoding="UTF-8" ?>
<!DOCTYPE mapper
        PUBLIC "-//mybatis.org//DTD Mapper 3.0//EN"
        "http://mybatis.org/dtd/mybatis-3-mapper.dtd">
<!--namespace绑定一个Dao接口-->
<mapper namespace="com.ding.uploadphotodemo.Mapper.PhotoMapper">
    <insert id="insert" parameterType="Photo">
        insert into uploaddemo.photos (date, Path) values (#{date},#{Path})
    </insert>
</mapper>
7、运行验证
选择文件

点击提交 (博主老二次元了2333)

观察对应文件夹是否有对应图片

观察数据库内是否包含对应路径
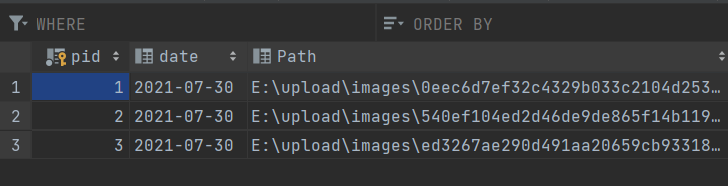
程序运行成功!\( ̄︶ ̄*\))
那么这就是我制作整个小程序的流程了
如果上述过程有错误或者值得指正的地方,欢迎在评论区告诉我
(* ̄3 ̄)╭


 9884
9884


 被折叠的 条评论
为什么被折叠?
被折叠的 条评论
为什么被折叠?
 到【灌水乐园】发言


