


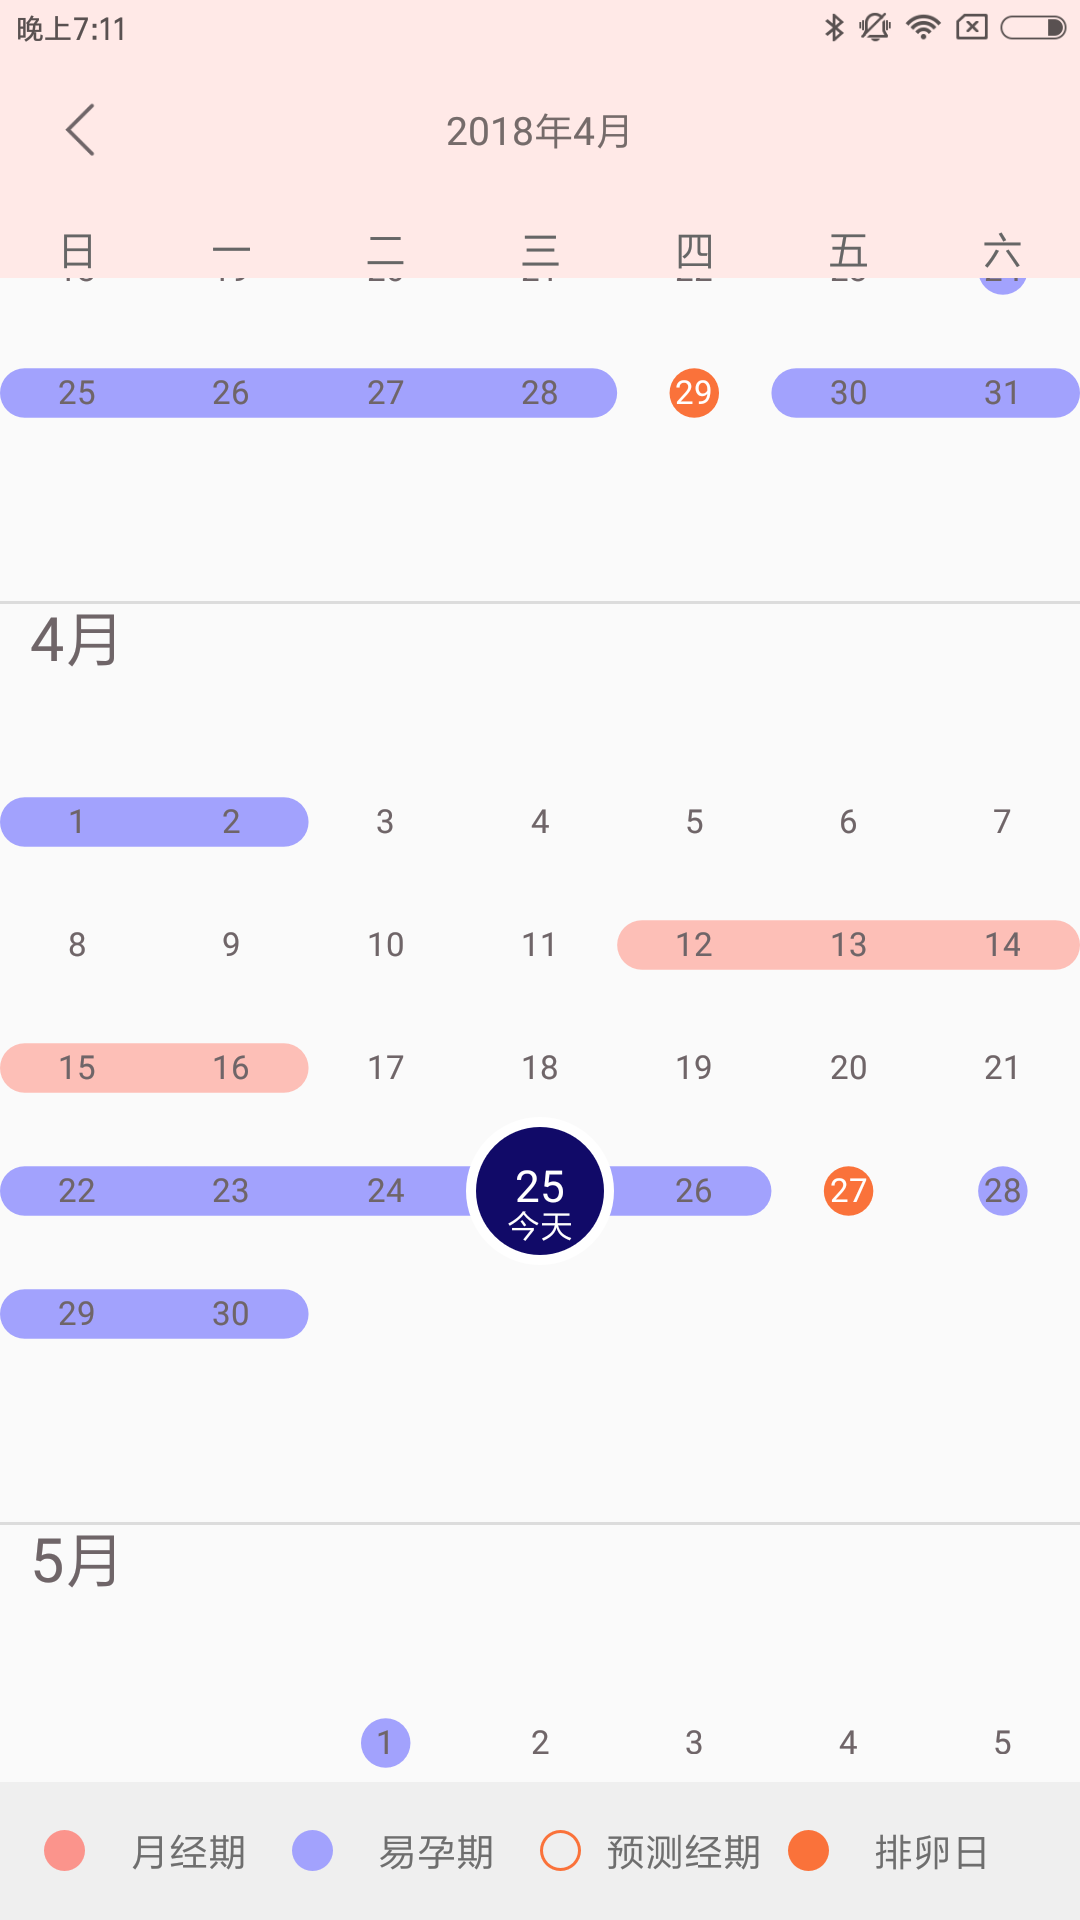
我们在一款关爱女性健康的app里边,有用到自定义日历的需要,最后的实现如下:
因为要在一个listview里边显示日历,最多的时候,一屏幕会显示3个月,这样的话, 如果采用网上流行的堆叠大量子view的方式实现(每一天都是一个子view),会导致性能严重下降甚至卡顿,因此这里思考采用一个画布将一整个月都整体绘制出来的方案。
然后,由于每一天的样式可能有很多个,月经期是红色实心圆,预测经期是红色空心圆,易孕期是蓝色实心圆,还有当天和被选中的日期要有特殊颜色并且放大。考虑到对更多样式的支持,这里决定不写死样式,而是由调用者自由决定拥有哪些样式,要达到的目的是:就算设计师爸爸是个大变态,要求一个月30天都不重样儿也没有问题。
明日继续写。
观察系统日历,一个月共7列(一周),最多有6行。这里的话,将组件宽度均分为7份,然后每一行之间有间距,显示天的区域与显示月份的区域有间距,显示天的区域有下边距;
然后观察日期样式,每个样式有颜色、半径以及实心或者空心的区别。然后每个样式可能有一天,也可能有连续好几天,这里的话,可以将没有特殊样式的空白的地方应用一个默认的样式,然后填充数据的时候,只需要提供有特殊样式的日期即可。所以,这里的数据应该包括样式,开始日期,结束日期。如果数据中的开始日期和结束日期跨月了,需要提前分割数据。
由于需要动态设置样式,这里提供一个内部的样式类:
    public static class RoundBgStyle implements Serializable {
        int bgColor;
        int textColor;
        boolean ifStroke;
        float radius;
        float textSize;

        /**
         * @param radius  set 0 means have no special style
         * @param color
         * @param ifStroke
         * @param textColor
         * @param textSize  -1 not set this text style,use default text style.
         */
        public RoundBgStyle(float radius, int color, boolean ifStroke, int textColor, float textSize) {
            this.radius = radius;
            this.bgColor = color;
            this.ifStroke = ifStroke;
            this.textColor = textColor;
            this.textSize = textSize;
        }
    }
这里的话,如果将半径设置为0 ,则表示没有特殊样式,也就是默认的背景。当天有可能需要显示一些特殊的文本,因此需要提供文本的样式,如果将textSize设置为-1则不设置特殊的文本样式,而是使用默认的文本样式。
“今天”或者点击选中的日期,会有一个超大的圆,由于这个样式会和其他的样式重叠显示,所以这里单独设置样式和数据。
日期的数据中应该包含样式,开始日期,结束日期,这里没有直接使用RoundBgStyle,而是用一个int值来指代:
    public static class DataArray implements Serializable {
        int styleType;
        int startDay;//样式开始的时候是当月的第几天
        int endDay;//样式结束的时候是当月的第几天,结束那一天也算

        public DataArray(int styleType, int startDay, int endDay) {
            this.styleType = styleType;
            this.startDay = startDay;
            this.endDay = endDay;
        }
    }
然后需要设置样式表和样式的日期序列,因为要按照日期来判断,为方便引用,这里日期序列被设计为一个map,key的值为该序列开始的那一天:
    /**
     * 样式表
     */
    HashMap<Integer, RoundBgStyle> styleMap = new HashMap<>();
    HashMap<Integer, DataArray> dataArray = new HashMap<>();
设置样式表,这里使用一个HashMap来管理样式,key表示该样式在DataArray中对应的styleType:
    public void setStyleMap(HashMap<Integer, RoundBgStyle> styleMap) {
        this.styleMap = styleMap;
    }
添加日期序列:
    public CalendarView addDataArray(DataArray array) {
        dataArray.put(array.startDay, array);
        return this;
    }
日期序列的处理:每个月,每个样式都算一段,比如在当月的5号到10号是styleType为1的样式,那么就要添加一个DataArray为 {1,5,10} 的段。
数据和样式都有了之后,就可以开始处理UI了。
声明属性:
    final static int ROWS = 6;//6行
    final static int COLUMNS = 7;//7列
    float width, height;//尺寸
    float textMonthSize;//月份文本大小
    int textMonthColor;//月份文本颜色
    float daysAreaMarginTop;//日期区域的上边距
    float daysAreaMarginBottom;//日期区域的下边距
    float lineSpec;//行间距
    float columnWidth;//列宽度
    float commonTextSize;//默认文本
    int commonTextColor;//默认文本
    float textHeight;//默认文本高度
    float daysAreaTop;//第一行距离view顶部的位置

    float selectTextSize;//选中日期的文本
    int selectTextColor;
    float todaySmallTextSize;//"今天"的文本大小
    int selectBgColor;//选中日期背景
    int selectRadius;//选中日期半径
    String todayStr;//"今天" or "today"

    Paint textPaint = new Paint(Paint.ANTI_ALIAS_FLAG);//绘制文本画笔
    Paint decorPaint = new Paint(Paint.ANTI_ALIAS_FLAG);//绘制背景画笔
    Paint selectPaint = new Paint(Paint.ANTI_ALIAS_FLAG);//绘制选中日期

    RoundBgStyle defaultStyle;//默认样式
    RoundBgStyle curStyle;//当前使用的样式
    int curStyleStart, curStyleEnd;//当前使用的样式的开始和结束日期
    Calendar mCurCalendar;//某个月中的一天,用来确定是哪一月,默认为当前时间
    Calendar mFirstDayCalendar;//当月第一天
    Calendar mTodayCalendar;//今天
    Calendar mSelectCalendar;//选中的那一天
    String monthFormater;//格式化
    int dayOfMonth;//本月的天数
    int firstIndex;//本月第一天处在什么位置,用于留出空白
    int firstNum;//本月第一行的天数
    int endNum;//本月最后一行的天数
构造方法,读取xml属性,并初始化各个日期对象:
    public CalendarView(Context context, @Nullable AttributeSet attrs) {
        this(context, attrs, 0);
    }

    public CalendarView(Context context, @Nullable AttributeSet attrs, int defStyleAttr) {
        super(context, attrs, defStyleAttr);
        TypedArray ta = context.obtainStyledAttributes(attrs, R.styleable.CalendarView);
        textMonthSize = ta.getDimensionPixelSize(R.styleable.CalendarView_textMonthSize, getResources().getDimensionPixelSize(R.dimen.textMonthSize));
        textMonthColor = ta.getColor(R.styleable.CalendarView_textMonthColor, getResources().getColor(R.color.textMonthColor));
        daysAreaMarginTop = ta.getDimensionPixelSize(R.styleable.CalendarView_daysAreaMarginTop, getResources().getDimensionPixelSize(R.dimen.daysAreaMarginTop));
        daysAreaMarginBottom = ta.getDimensionPixelSize(R.styleable.CalendarView_daysAreaMarginBottom, getResources().getDimensionPixelSize(R.dimen.daysAreaMarginBottom));
        lineSpec = ta.getDimensionPixelSize(R.styleable.CalendarView_lineSpec, getResources().getDimensionPixelSize(R.dimen.lineSpec));
        commonTextSize = ta.getDimensionPixelSize(R.styleable.CalendarView_commonTextSize, getResources().getDimensionPixelSize(R.dimen.commonTextSize));
        commonTextColor = ta.getColor(R.styleable.CalendarView_commonTextColor, getResources().getColor(R.color.commonTextColor));
        monthFormater = ta.getString(R.styleable.CalendarView_monthFormater);


        //today
        selectTextSize = ta.getDimensionPixelSize(R.styleable.CalendarView_selectTextSize, getResources().getDimensionPixelSize(R.dimen.selectTextSize));
        todaySmallTextSize = ta.getDimensionPixelSize(R.styleable.CalendarView_todaySmallTextSize, getResources().getDimensionPixelSize(R.dimen.todaySmallTextSize));
        selectRadius = ta.getDimensionPixelSize(R.styleable.CalendarView_selectRadius, getResources().getDimensionPixelSize(R.dimen.selectRadius));
        selectTextColor = ta.getColor(R.styleable.CalendarView_selectTextColor, getResources().getColor(R.color.selectTextColor));
        selectBgColor = ta.getColor(R.styleable.CalendarView_selectBgColor, getResources().getColor(R.color.selectBgColor));
        ta.recycle();
        defaultStyle = new RoundBgStyle(0, 0, false, commonTextColor, commonTextSize);
        curStyle = defaultStyle;
        mCurCalendar = Calendar.getInstance();
        mTodayCalendar = Calendar.getInstance();
        mSelectCalendar = Calendar.getInstance();
        mFirstDayCalendar = Calendar.getInstance();
        mFirstDayCalendar.set(Calendar.DAY_OF_MONTH, 1);
        todayStr = context.getString(R.string.calendar_today);
        getFirstDayPosition();
    }
确认当月第一天和最后一天的位置,忘了修改方法名字了,这里因为不管是几月,都至少有三个星期都有日期,所以endNum可以直接 -21:
    void getFirstDayPosition() {
        dayOfMonth = mCurCalendar.getActualMaximum(Calendar.DAY_OF_MONTH);//当月的天数
        firstIndex = mFirstDayCalendar.get(Calendar.DAY_OF_WEEK) - 1;
        firstNum = COLUMNS - firstIndex;//首行天数
        endNum = dayOfMonth - firstNum - COLUMNS * 3;
    }
onMeasure方法中确定各种尺寸,记得这里最后需要调用 setMeasureDimension方法。
@Override
    protected void onMeasure(int widthMeasureSpec, int heightMeasureSpec) {
        super.onMeasure(widthMeasureSpec, heightMeasureSpec);
        width = MeasureSpec.getSize(widthMeasureSpec);
        columnWidth = width / COLUMNS;
        textPaint.setTextSize(commonTextSize);
        textHeight = (int) FontUtil.getFontHeight(textPaint);
        height = textMonthSize + daysAreaMarginBottom + daysAreaMarginTop + textHeight * ROWS + lineSpec * (ROWS - 1);
        daysAreaTop = textMonthSize + daysAreaMarginTop;//第一行的顶部位置
        setMeasuredDimension((int) width, (int) height);
    }
onDraw 方法...
    @Override
    protected void onDraw(Canvas canvas) {
        drawMonth(mCurCalendar.get(Calendar.MONTH) + 1, canvas);
        drawDays(canvas);
    }
绘制月份:
void drawMonth(int month, Canvas canvas) {
        textPaint.setTextSize(textMonthSize);
        float dayTextLeading = FontUtil.getFontLeading(textPaint);
        textPaint.setColor(textMonthColor);
        String monthStr = String.format(monthFormater, month);
        float len = textPaint.measureText(monthStr);
        float left = (columnWidth - len) / 2;
        canvas.drawText(monthStr, left, dayTextLeading, textPaint);
}void drawDays(Canvas canvas) {
textPaint.setColor(defaultStyle.textColor);
textPaint.setTextSize(defaultStyle.textSize);
float top;
/**
* 使用 listview 来装载的时候,发现 curStyleEnd 经常不为0,暂时没有找到什么地方修改了这个值,这里将其重置为0.
*/
curStyleEnd = 0;
for (int line = 0; line < ROWS; line++) {
top = daysAreaTop + line * (lineSpec + textHeight);
if (line == 0) {//第一行
drawLines(canvas, top, line, firstIndex, 1, firstNum);
} else if (line == ROWS - 1) {
drawLines(canvas, top, line, 0, firstNum + (line - 1) * COLUMNS + 1, dayOfMonth);
} else {//最后一行
int endDay = firstNum + line * COLUMNS;
endDay = Math.min(dayOfMonth, endDay);
drawLines(canvas, top, line, 0, firstNum + (line - 1) * COLUMNS + 1, endDay);
}
}
}其中绘制每一天的方法 void drawLines(Canvas canvas, float top, int line, int startIndex, int firstDay, int endDay),top为该行的顶部位置,line为行数,startIndex为该行的开始位置,除了第一行,其他行都是0,firstDay和endDay为该行的第一天和最后一天。
drawLines方法,先绘制背景再绘制文本,由于‘今天’和被选中的那一天是特殊样式,要悬浮在其他样式之上,对应的样式要最后绘制:
void drawLines(Canvas canvas, float top, int line, int startIndex, int firstDay, int endDay) {
        if (endDay < firstDay) {
            return;
        }
        int styleStart = 0, styleEnd = 0;//当前样式开始和结束的日期,和curStyleStart,curStyleEnd 不同,这里可能比这个小
        float fontHeight = textHeight;
        float centerY = top + fontHeight / 2;//背景和文本需要同步中心位置
        for (int i = firstDay; i <= endDay; i++) {
            checkStyle(i);//检查样式,确定当天处于什么样式,如果样式跨行了,会添加一个结束日期和一个开始日期
            //draw bg
            if (i >= curStyleStart && i <= curStyleEnd) {
                if ((i == firstDay || i == curStyleStart)) {//新的样式开始了,一次绘制完背景
                    styleStart = i;
                    styleEnd = Math.min(endDay, curStyleEnd);
                    //draw
                    if (curStyle.radius != 0) {
                        float leftX = (startIndex + styleStart - firstDay) * columnWidth;
                        float rightX = (startIndex + styleEnd - firstDay + 1) * columnWidth;
                        //x方向和y方向不同,x是均分的尺寸,y只包含了textsize,这里需要将中心点加上radius
                        if (styleEnd == styleStart) {//样式只有一天,画圆
                            canvas.drawCircle(leftX + columnWidth / 2, centerY, curStyle.radius, decorPaint);
                        } else {//样式有多天,画椭圆,跨行的情况下会画两个椭圆,见checkStyle方法
                            RectF rect = new RectF(leftX, centerY - curStyle.radius, rightX, centerY + curStyle.radius);
                            canvas.drawRoundRect(rect, curStyle.radius, curStyle.radius, decorPaint);
                        }
                    } else {
                        Log.e("TAG", "radius is zero,not draw.");
                    }
                }
            }
            //draw text,‘今天’和被选中的那一天都是深色的大圆
            String str = String.valueOf(i);
            Paint.FontMetrics fm = textPaint.getFontMetrics();
            canvas.drawText(str, (startIndex + i - firstDay) * columnWidth + (columnWidth - textPaint.measureText(str)) / 2, (top + fontHeight - fm.descent), textPaint);
            if (mSelectCalendar != null && mSelectCalendar.get(Calendar.YEAR) == mCurCalendar.get(Calendar.YEAR)
                    && mSelectCalendar.get(Calendar.MONTH) == mCurCalendar.get(Calendar.MONTH)
                    && mSelectCalendar.get(Calendar.DAY_OF_MONTH) == i) {
                float leftX = (startIndex + i - firstDay) * columnWidth;
                drawSelectBg(canvas, leftX + columnWidth / 2, centerY);
                selectPaint.setColor(selectTextColor);
                selectPaint.setTextSize(selectTextSize);
                canvas.drawText(str, (startIndex + i - firstDay) * columnWidth + (columnWidth - selectPaint.measureText(str)) / 2, (top + fontHeight - fm.descent), selectPaint);
            }
            if (mTodayCalendar.get(Calendar.YEAR) == mCurCalendar.get(Calendar.YEAR)
                    && mTodayCalendar.get(Calendar.MONTH) == mCurCalendar.get(Calendar.MONTH)
                    && mTodayCalendar.get(Calendar.DAY_OF_MONTH) == i) {
                float textTodayBottom;
                boolean ifSelect = false;
                /**
                 * 调整‘今天’的位置
                 */
                if (mSelectCalendar.get(Calendar.DAY_OF_YEAR) == mTodayCalendar.get(Calendar.DAY_OF_YEAR)) {
                    textTodayBottom = top + textHeight;
                    ifSelect = true;
                } else {
                    textTodayBottom = curStyle.radius > 0 ? (centerY + curStyle.radius) : (top + textHeight);
                }
                drawTodayText(canvas, (startIndex + i - firstDay) * columnWidth, textTodayBottom, ifSelect);
            }
        }
    }
检查样式:
    /**
     * 如果灭有新样式,沿用上一次的样式
     *
     * @param day
     * @return
     */
    boolean checkStyle(int day) {
        boolean res = false;//当天是否被设置过样式
        if (day > curStyleEnd || day == 1) {//如果不在当前样式区间,检查是否有新样式开始
            DataArray array = dataArray.get(day);
            if (array != null) {
                curStyle = styleMap.get(array.styleType);
                curStyleStart = array.startDay;
                curStyleEnd = array.endDay;
                res = true;
            } else {
                curStyle = defaultStyle;
                res = false;
            }
            if (res || (!res && day == curStyleEnd + 1)) {//当天被设置过样式或者样式结束了,都要刷新样式
                if (curStyle.textSize > 0) {
                    textPaint.setTextSize(curStyle.textSize);
                    textPaint.setColor(curStyle.textColor);
                } else {
                    textPaint.setTextSize(defaultStyle.textSize);
                    textPaint.setColor(defaultStyle.textColor);
                }
                decorPaint.setColor(curStyle.bgColor);
                decorPaint.setStyle(curStyle.ifStroke ? Paint.Style.STROKE : Paint.Style.FILL);
            }
        }
        return res;
    }
选中的那一天和‘今天’单独绘制:
   void drawSelectBg(Canvas canvas, float x, float y) {
        selectPaint.setColor(Color.WHITE);
        selectPaint.setStyle(Paint.Style.FILL);
        canvas.drawCircle(x, y, selectRadius, selectPaint);
        selectPaint.setColor(selectBgColor);
        selectPaint.setStyle(Paint.Style.FILL);
        canvas.drawCircle(x, y, selectRadius - 10, selectPaint);
    }

    void drawTodayText(Canvas canvas, float left, float top, boolean ifSelect) {
        selectPaint.setColor(ifSelect ? selectTextColor : commonTextColor);
        selectPaint.setTextSize(selectTextSize);
        int decent = selectPaint.getFontMetricsInt().descent;
        selectPaint.setTextSize(todaySmallTextSize);
        //这里向上微调
        canvas.drawText(todayStr, left + (columnWidth - selectPaint.measureText(todayStr)) / 2, top + FontUtil.getFontHeight(selectPaint) - decent, selectPaint);
    }
至此,只要设置好数据,基本上已经可以显示出一个漂亮的view了。
在app的二级页面中,需要显示一个特殊的日历,该日历与前面的日历样式和数据完全一致,但是只显示选中的那一天所在的行,这里考虑通过移动画布和调整view的尺寸来解决这个问题 :
    boolean ifJustShowSpecialLine = false;
    int specialDay;
    int specialLine;
    /**
     * 如果只显示某一行,画布需要移动的高度
     */
    float deltaHeightIfSpecialLine;
    /**
     * 只显示选中的行
     */
    public void setJustShowSelectLine() {
        ifJustShowSpecialLine = true;
    }

    public void setSelectDate(Calendar calendar) {
        mSelectCalendar = Calendar.getInstance();
        mSelectCalendar.setTime(calendar.getTime());
        specialDay = calendar.get(Calendar.DAY_OF_MONTH);
    }
然后,onMeasure方法中添加如下代码,直接将height设置为大圆的直径,然后画布需要向上滚动的距离是月份文本占据的空间+margin+该行之前的行所占的空间:
        if (ifJustShowSpecialLine) {
            float extraHeight = selectRadius * 2;
            height = extraHeight;
            specialLine = getAdayInWitchLine(specialDay);
            deltaHeightIfSpecialLine = textMonthSize + daysAreaMarginTop + (textHeight + lineSpec) * specialLine - (selectRadius - textHeight / 2);
        }
在onDraw方法中移动画布:
        if (ifJustShowSpecialLine) {
            canvas.translate(0, -deltaHeightIfSpecialLine);
        }
下面是点击事件的处理。
设置一个接口:
    public interface OnDateClickedListener {
        void onDateClicked(CalendarView view, Calendar calendar);
    }
//焦点坐标
private PointF focusPoint = new PointF();
float THRESHOLD_DISTANCE = ViewConfiguration.getWindowTouchSlop();
OnDateClickedListener mClickListener;重写onTouchEvent方法,这里因为是放到listView中的,需要判断一下是否是滑动事件:
    @Override
    public boolean onTouchEvent(MotionEvent event) {
        int action = event.getAction() & MotionEvent.ACTION_MASK;
        switch (action) {
            case MotionEvent.ACTION_DOWN:
                focusPoint.set(event.getX(), event.getY());
                break;
            case MotionEvent.ACTION_UP:
                if (Math.sqrt(Math.pow(event.getX() - focusPoint.x, 2) + Math.pow(event.getY() - focusPoint.y, 2)) < THRESHOLD_DISTANCE) {
                    findSelectDay(focusPoint);
                }
                break;
        }
        return true;
    }
findSelectDay方法:
    void findSelectDay(PointF position) {
        /**
         * 划定可以判定点击的区域,超过这个区域则不处理
         */
        float startClickPosition = daysAreaTop - lineSpec / 2;//为了方便点击与绘制不同,这里向上计算了半个lineSpec的距离
        float endClickPosition = height - daysAreaMarginBottom;
        int line;//当前点击的位置处于哪一行
        if (ifJustShowSpecialLine) {
            line = specialLine;
        } else {
            if (position.y < startClickPosition || position.y > endClickPosition) {
                return;
            }
            line = (int) ((position.y - startClickPosition) / (lineSpec + textHeight));
        }
        int extraSize = 0;//每一行前面可能存在的空白
        int selectDay = 0;
        if (line == 0) {
            extraSize = firstIndex;
            if (position.x < (firstIndex * columnWidth)) {//点在第一行第一天前面的空白处
                return;
            }
        }
        if (line == ROWS - 1) {
            if (position.x > (endNum * columnWidth)) {//点在最后一行最后一天的空白处
                return;
            }
        }
        int clickIndex = (int) ((position.x - extraSize * columnWidth) / columnWidth);//点在了该行的第几个位置
        int startIndex = line == 0 ? 1 : (1 + firstNum + COLUMNS * (line - 1));//该行第一天的值
        selectDay = clickIndex + startIndex;
        if (mSelectCalendar == null) {
            mSelectCalendar = Calendar.getInstance();
        }
        mSelectCalendar.setTime(mCurCalendar.getTime());
        mSelectCalendar.set(Calendar.DAY_OF_MONTH, selectDay);
        if (mClickListener != null) {
            mClickListener.onDateClicked(this, mSelectCalendar);
        }
        invalidate();//重绘,因为选中的日期已改变
    }
使用该组件的时候需要先初始化样式,可以根据需要设置无数个样式:
    HashMap<Integer, CalendarView.RoundBgStyle> styles;
    final static int STYLE_MENSTRUAL = 1;
    final static int STYLE_PREGNANT = 2;
    final static int STYLE_PRE_MENSTRUAL = 3;
    final static int STYLE_OVULATE = 4;
void initStyle(CalendarView view) {
if (styles == null) {
float sectionRadius = getResources().getDimension(R.dimen.calendar_section_radius);
CalendarView.RoundBgStyle style_menstrual = new CalendarView.RoundBgStyle(sectionRadius, getResources().getColor(R.color.color13), false, -1, -1);
CalendarView.RoundBgStyle style_pregnant = new CalendarView.RoundBgStyle(sectionRadius, getResources().getColor(R.color.color18), false, -1, -1);
CalendarView.RoundBgStyle style_pre_menstrual = new CalendarView.RoundBgStyle(sectionRadius, getResources().getColor(R.color.color15), true, -1, -1);
CalendarView.RoundBgStyle style_ovulate = new CalendarView.RoundBgStyle(sectionRadius, getResources().getColor(R.color.color15), false, getResources().getColor(android.R.color.white), getResources().getDimension(R.dimen.sizeMinText));
styles = new HashMap<>();
styles.put(STYLE_MENSTRUAL, style_menstrual);
styles.put(STYLE_PREGNANT, style_pregnant);
styles.put(STYLE_PRE_MENSTRUAL, style_pre_menstrual);
styles.put(STYLE_OVULATE, style_ovulate);
}
view.setStyleMap(styles);
} 附 顶部红色背景星期几的代码:
public class WeekView extends View {
    final static int COLUMNS = 7;
    float columnWidth;//列宽度
    float weekHeight;
    float weekTextSize;
    int weekTextColor;
    int weekBackgroundColor;
    String[] weeks;

    Paint textPaint = new Paint(Paint.ANTI_ALIAS_FLAG);
    Paint decorPaint = new Paint(Paint.ANTI_ALIAS_FLAG);

    @Override
    protected void onDraw(Canvas canvas) {
        drawWeek(canvas);
    }

    void drawWeek(Canvas canvas) {
        decorPaint.setColor(weekBackgroundColor);
        decorPaint.setStyle(Paint.Style.FILL);
        canvas.drawRect(0, 0, width, weekHeight, decorPaint);
        textPaint.setColor(weekTextColor);
        textPaint.setTextSize(weekTextSize);
        float yPosition = weekHeight / 2 + FontUtil.getFontHeight(textPaint) / 2;
        for (int i = 0; i < weeks.length; i++) {
            float xPosition = i * columnWidth + (columnWidth - textPaint.measureText(weeks[i])) / 2;
            canvas.drawText(weeks[i], xPosition, yPosition, textPaint);
        }
    }

    public WeekView(Context context) {
        super(context);
    }

    public WeekView(Context context, @Nullable AttributeSet attrs) {
        this(context, attrs, 0);
    }

    public WeekView(Context context, @Nullable AttributeSet attrs, int defStyleAttr) {
        super(context, attrs, defStyleAttr);
        //week
        TypedArray ta = context.obtainStyledAttributes(attrs, R.styleable.WeekView);
        weekHeight = ta.getDimensionPixelSize(R.styleable.WeekView_weekHeight, getResources().getDimensionPixelSize(R.dimen.weekHeight));
        weekTextSize = ta.getDimensionPixelSize(R.styleable.WeekView_weekTextSize, getResources().getDimensionPixelSize(R.dimen.weekTextSize));
        weekTextColor = ta.getColor(R.styleable.WeekView_weekTextColor, getResources().getColor(R.color.weekTextColor));
        weekBackgroundColor = ta.getColor(R.styleable.WeekView_weekBackgroundColor, getResources().getColor(R.color.weekBackgroundColor));
        ta.recycle();
        weeks = getResources().getStringArray(R.array.weeks);
    }

    @Override
    protected void onMeasure(int widthMeasureSpec, int heightMeasureSpec) {
        super.onMeasure(widthMeasureSpec, heightMeasureSpec);
        float width = MeasureSpec.getSize(widthMeasureSpec);
        columnWidth = width / 7;
        setMeasuredDimension((int) width, (int) weekHeight);
    }
}


 7916
7916


 被折叠的 条评论
为什么被折叠?
被折叠的 条评论
为什么被折叠?
 到【灌水乐园】发言


