


 本文详细介绍如何在CentOS 6.4环境下部署Ganglia监控系统,包括所需软件的安装与配置步骤,帮助读者快速搭建起集群监控平台。
目录[-]
- 前言
- 1.相关环境
- 2.部署规划
- 3.代码获取
- 4.前提依赖
- 4.1 主机环境检查(全部主机节点)
- 4.2 dejavu
- 4.3 rrdtool
- 4.4 apr
- 4.5 libexpat
- 4.6 libpcre
- 4.7 confuse
- 4.8 python
- 5.编译安装
- 5.1 安装ganglia (全部节点都要安装)
- 5.2 安装ganglia-web (主节点安装)
- 5.3 安装apache (主节点安装)
- 5.4 安装php (主节点安装)
- 5.5 使用apache发布ganglia-web (主节点安装)
- 6.配置Ganglia
- 6.1 配置gmetad (主节点配置)
- 6.2 配置gmond (全部节点配置)
- 7.监控页面
- 8.相关链接
前言
最近在研究云监控的相关工具,感觉ganglia颇有亮点,能从一个集群整体的角度来展现数据. 但是安装过程稍过复杂,相关依赖稍多,故写此文章与大家分享下.
本文不讲解相关原理,若想了解请参考其他资料.
本文目的: 即使之前未触过ganglia,也能按照文中步骤搭建自己的ganglia监控集群.
@Author duangr
@Website http://my.oschina.net/duangr/blog/181585
1.相关环境
| Host Name | IP | OS | Arch |
| duangr-1 | 192.168.56.10 | CentOS 6.4 | x86_64 |
| duangr-2 | 192.168.56.11 | CentOS 6.4 | x86_64 |
| duangr-3 | 192.168.56.12 | CentOS 6.4 | x86_64 |
全部主机确认:
-
iptables关闭
-
SELinux disabled
2.部署规划
| 项 | 值 |
| 监控服务主节点 | duangr-1 |
| 被监控从节点 | duangr-2 |
Ganglia监控服务的主节点需要安装:
-
ganglia
-
ganglia-web
-
php
-
apache
Ganglia被监控从节点需要安装:
-
ganglia
安装路径规划
| 项 | 值 |
| ganglia安装路径 | /usr/local/ganglia |
| php安装路径 | /usr/local/php |
| apache安装路径 | /usr/local/apache2 |
| ganglia-web安装路径 | /export/home/ganglia/ganglia-web-3.5.10 |
| rrds数据路径 | /export/home/ganglia/rrds |
3.代码获取
4.前提依赖
4.1 主机环境检查(全部主机节点)
|
1
2
3
4
5
6
7
8
9
10
11
12
13
14
|
# rpm -q gcc glibc glibc-common rrdtool rrdtool-devel apr apr-devel expat expat-devel pcre pcre-devel dejavu-lgc-sans-mono-fonts dejavu-sans-mono-fonts
gcc
-4.4.7-3.el6.x86_64
glibc-2.14.1-6.x86_64
glibc-common-2.14.1-6.x86_64
rrdtool-1.3.8-6.el6.x86_64
rrdtool-devel-1.3.8-6.el6.x86_64
apr-1.3.9-5.el6_2.x86_64
apr-devel-1.3.9-5.el6_2.x86_64
expat-2.0.1-11.el6_2.x86_64
expat-devel-2.0.1-11.el6_2.x86_64
pcre-7.8-6.el6.x86_64
pcre-devel-7.8-6.el6.x86_64
dejavu-lgc-sans-mono-fonts-2.30-2.el6.noarch.rpm
dejavu-sans-mono-fonts-2.30-2.el6.noarch.rpm
|
若有缺失,请先安装. 可通过如下几个镜像网站下载相关安装包:
4.2 dejavu
|
1
2
|
rpm -ivh dejavu-lgc-sans-mono-fonts-2.30-2.el6.noarch.rpm
rpm -ivh dejavu-sans-mono-fonts-2.30-2.el6.noarch.rpm
|
4.3 rrdtool
|
1
2
|
rpm -ivh rrdtool-1.3.8-6.el6.x86_64.rpm
rpm -ivh rrdtool-devel-1.3.8-6.el6.x86_64.rpm
|
4.4 apr
|
1
2
|
rpm -ivh apr-1.3.9-5.el6_2.x86_64.rpm
rpm -ivh apr-devel-1.3.9-5.el6_2.x86_64.rpm
|
4.5 libexpat
|
1
2
|
rpm -ivh expat-2.0.1-11.el6_2.x86_64.rpm
rpm -ivh expat-devel-2.0.1-11.el6_2.x86_64.rpm
|
4.6 libpcre
|
1
2
|
rpm -ivh pcre-7.8-6.el6.x86_64.rpm
rpm -ivh pcre-devel-7.8-6.el6.x86_64.rpm
|
4.7 confuse
confuse-2.7 http://www.nongnu.org/confuse/
|
1
2
3
4
|
tar
-zxf confuse-2.7.
tar
.gz
cd
confuse-2.7
.
/configure
CFLAGS=-fPIC --disable-nls
make
&&
make
install
|
4.8 python
Python-2.7.3.tar.bz2 http://www.python.org/
|
1
2
3
|
tar
-jxf Python-2.7.3.
tar
.bz2
.
/configure
--prefix=
/usr/local
--
enable
-shared
make
&&
make
install
|
配置共享库
|
1
2
3
4
|
vi
/etc/ld
.so.conf
-- 增加如下内容
/usr/local/lib
|
启用配置
ldconfig
检查是否生效
ldconfig -v |grep "libpython2.7.so"
5.编译安装
5.1 安装ganglia (全部节点都要安装)
|
1
2
3
4
5
6
7
8
9
10
11
12
13
14
15
16
17
18
|
# tar -zxf ganglia-3.6.0.tar.gz
# cd ganglia-3.6.0
# ./configure --prefix=/usr/local/ganglia --with-gmetad --enable-gexec --with-python=/usr/local
Welcome to..
______ ___
/ ____
/___
_____ ____ _/ (_)___ _
/ / __/ __ `/ __ \/ __ `/ / / __ `/
/
/_/
/
/_/
/ / / /
/_/
/ / /
/_/
/
\____/\__,_
/_/
/_/
\__,
/_/_/
\__,_/
/____/
Copyright (c) 2005 University of California, Berkeley
Version: 3.6.0
Library: Release 3.6.0 0:0:0
Type
"make"
to compile.
# make && make install
|
5.2 安装ganglia-web (主节点安装)
|
1
2
3
|
# tar -zxf ganglia-web-3.5.10.tar.gz -C /export/home/ganglia/
# cd /export/home/ganglia/ganglia-web-3.5.10
# cp conf_default.php conf.php
|
vi conf.php 调整为如下内容
|
1
2
|
$conf
[
'gweb_confdir'
] =
"/export/home/ganglia/ganglia-web-3.5.10"
;
$conf
[
'gmetad_root'
] =
"/export/home/ganglia"
;
|
vi header.php
|
1
2
3
4
5
6
7
8
9
|
<?php
session_start();
ini_set
(
'date.timezone'
,
'PRC'
); --修改时区为本地时区
if
(isset(
$_GET
[
'date_only'
])) {
$d
=
date
(
"r"
);
echo
$d
;
exit
(0);
}
|
配置临时目录
|
1
2
3
4
5
|
cd
/export/home/ganglia/ganglia-web-3
.5.10
/dwoo
mkdir
cache
chmod
777 cache
mkdir
compiled
chmod
777 compiled
|
5.3 安装apache (主节点安装)
|
1
2
3
4
|
tar
-zxf httpd-2.2.23.
tar
.gz
cd
httpd-2.2.23
.
/configure
--prefix=
/usr/local/apache2
make
&&
make
install
|
5.4 安装php (主节点安装)
|
1
2
3
4
|
tar
-zxf php-5.4.10.
tar
.gz
cd
php-5.4.10
.
/configure
--prefix=
/usr/local/php
--with-apxs2=
/usr/local/apache2/bin/apxs
--with-mysql=
/usr
make
&&
make
install
|
5.5 使用apache发布ganglia-web (主节点安装)
vi /usr/local/apache2/conf/httpd.conf
|
1
2
3
4
5
6
7
8
9
10
11
12
13
14
15
16
17
18
19
20
|
....
Listen 80
....
<
IfModule
dir_module>
DirectoryIndex index.html index.php
AddType application/x-httpd-php .php
</
IfModule
>
....
# 在文件最后增加如下内容
# ganglia
Alias /ganglia "/export/home/ganglia/ganglia-web-3.5.10"
<
Directory
"/export/home/ganglia/ganglia-web-3.5.10">
AuthType Basic
Options None
AllowOverride None
Order allow,deny
Allow from all
</
Directory
>
|
启动httpd服务
|
1
|
/usr/local/apache2/bin/apachectl
restart
|
6.配置Ganglia
6.1 配置gmetad (主节点配置)
|
1
2
3
|
cd
ganglia-3.6.0
cp
.
/gmetad/gmetad
.init
/etc/init
.d
/gmetad
cp
.
/gmetad/gmetad
.conf
/usr/local/ganglia/etc/
|
vi /etc/init.d/gmetad --修改如下内容
|
1
|
GMETAD=
/usr/local/ganglia/sbin/gmetad
|
vi /usr/local/ganglia/etc/gmetad.conf -- 修改如下内容
|
1
2
3
4
5
|
data_source
"duangr-cluster"
10 duangr-1 duangr-2 duangr-3
xml_port 8651
interactive_port 8652
rrd_rootdir
"/export/home/ganglia/rrds"
case_sensitive_hostnames 0
|
修改rrds数据目录所有者
|
1
|
chown
-R nobody:nobody
/export/home/ganglia/rrds
|
启动gmetad服务,并设为开机自动运行
|
1
2
|
service gmetad restart
chkconfig --add gmetad
|
6.2 配置gmond (全部节点配置)
|
1
2
3
|
cd
ganglia-3.6.0
cp
.
/gmond/gmond
.init
/etc/init
.d
/gmond
.
/gmond/gmond
-t >
/usr/local/ganglia/etc/gmond
.conf
|
vi /etc/init.d/gmond --修改如下内容
|
1
|
GMOND=
/usr/local/ganglia/sbin/gmond
|
vi /usr/local/ganglia/etc/gmond.conf -- 修改如下内容
|
1
2
3
4
5
6
|
cluster {
name =
"duangr-cluster"
owner =
"nobody"
latlong =
"unspecified"
url =
"unspecified"
}
|
复制python module到ganglia部署目录
|
1
2
|
mkdir
/usr/local/ganglia/lib64/ganglia/python_modules
cp
.
/gmond/python_modules/
*/*.py
/usr/local/ganglia/lib64/ganglia/python_modules
|
安装程序ganglia-3.6.0默认提供了一些python module的配置文件,只需要部署到 /usr/local/ganglia/etc/conf.d 目录下面即可生效
若对默认提供的这些监控脚本不太关心,可以跳过下面这步:
|
1
|
cp
.
/gmond/python_modules/conf
.d/*.pyconf
/usr/local/ganglia/etc/conf
.d
|
启动gmond服务,并设为开机自动运行
|
1
2
|
service gmond restart
chkconfig --add gmond
|
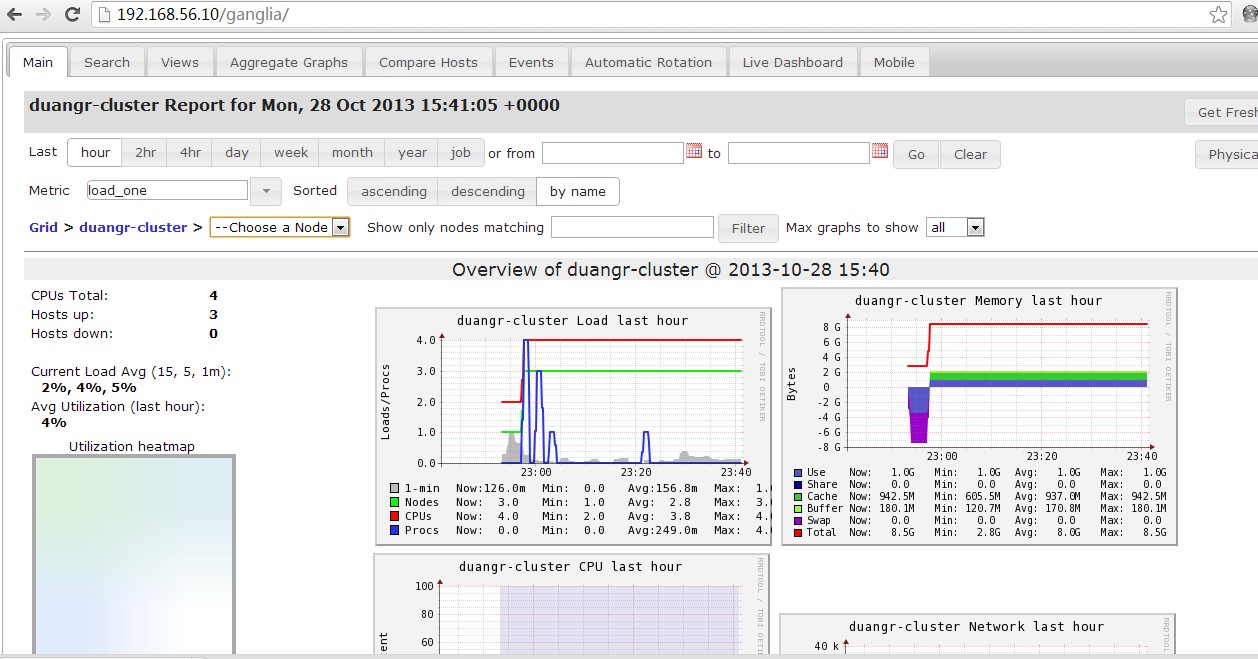
7.监控页面


 7595
7595

 被折叠的 条评论
为什么被折叠?
被折叠的 条评论
为什么被折叠?
 到【灌水乐园】发言


