


目录
1、准备好8台虚拟机(centos7 2核1G)用来搭建nginx和kafka集群
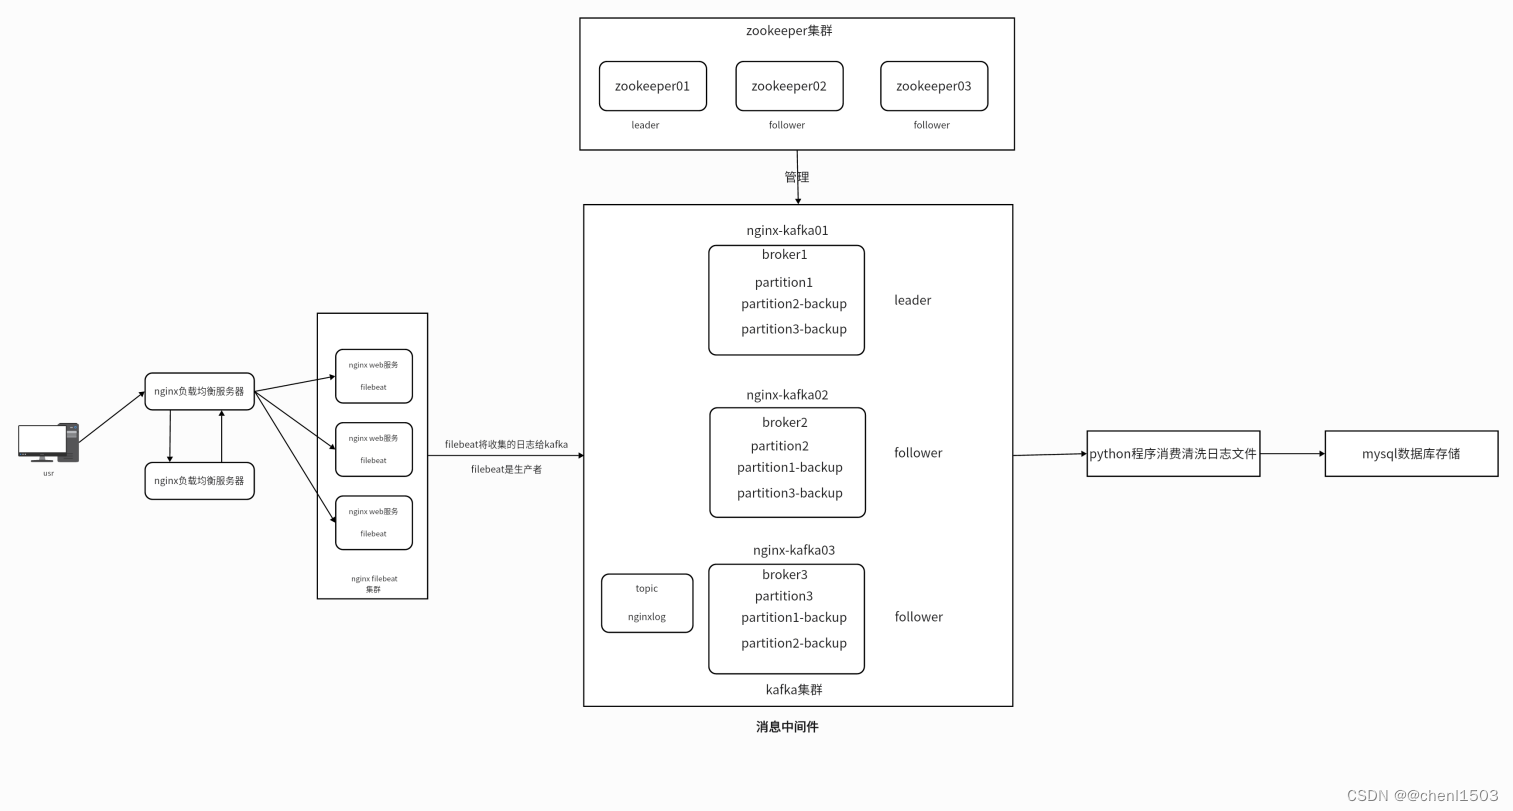
一、整体架构图
| 主机名 | IP | 描述 |
|---|---|---|
| keepalived01 | 192.168.226.13 | 反向代理机1,使用keepalived做高可用 |
| keepalived02 | 192.168.226.14 | 反向代理机2,使用keepalived做高可用 |
| nginx01 | 192.168.226.101 | 运行nginx和filebeat服务 |
| nginx02 | 192.168.226.102 | 运行nginx和filebeat服务 |
| nginx03 | 192.168.226.103 | 运行nginx和filebeat服务 |
| nginx-kafka01 | 192.168.226.149 | 运行kafka和zookeeper服务 |
| nginx-kafka02 | 192.168.226.150 | 运行kafka和zookeeper服务 |
| nginx-kafka03 | 192.168.226.151 | 运行kafka和zookeeper服务 |
二、环境准备
1、准备好8台虚拟机(centos7 2核1G)用来搭建nginx和kafka集群
每台机器都配置好相应的主机名和ip地址,kafka集群还要配置好域名解析,这里以nginx-kafka01为例
2、配置静态ip地址
[root@nginx-kafka01 ~]# vim /etc/sysconfig/network-scripts/ifcfg-ens33TYPE=Ethernet
PROXY_METHOD=none
BROWSER_ONLY=no
BOOTPROTO=static
IPADDR=192.168.226.149 #静态ip
NETMASK=255.255.255.0 #子网掩码
GATEWAY=192.168.226.2 #网关
DNS1=8.8.8.8 #DNS服务器
jDEFROUTE=yes
IPV4_FAILURE_FATAL=no
IPV6INIT=yes
IPV6_AUTOCONF=yes
IPV6_DEFROUTE=yes
IPV6_FAILURE_FATAL=no
IPV6_ADDR_GEN_MODE=stable-privacy
NAME=ens33
UUID=0bb9f3ba-4245-4281-9844-e9c8e7be74af
DEVICE=ens33
ONBOOT=yes3、修改主机名
[root@nginx-kafka01 ~]# vim /etc/hostname
#修改主机名
nginx-kafka01
4、每一台机器上都写好域名解析
[root@nginx-kafka01 ~]# vim /etc/hosts
#配置域名解析
192.168.226.149 nginx-kafka01
192.168.226.150 nginx-kafka02
192.168.226.151 nginx-kafka03
5、安装基本软件
[root@nginx-kafka01 ~]# yum install wget lsof vim -y6、设置时间同步服务
[root@nginx-kafka01 ~]# yum install chrony -y
#设置开机自启
[root@nginx-kafka01 ~]# systemctl enalble chronyd
[root@nginx-kafka01 ~]# systemctl start chronyd
#设置时区
[root@nginx-kafka01 ~]# cp /usr/share/zoneinfo/Asia/Shanghai /etc/localtime
7、关闭防火墙和selinux
#关闭防火墙
[root@nginx-kafka01 ~]# systemctl stop firewalld
[root@nginx-kafka01 ~]# systemctl disable firewalld
#关闭selinux
[root@nginx-kafka01 ~]# vim /etc/selinux/config
#将SELINUX由enforce修改为disabled
SELINUX=disabled
三、搭建nginx集群
准备三台机器组成nginx集群,主机名分别修改为nginx01、nginx02、nginx03
1、安装
#安装好epel源
[root@nginx01 ~]# yum install epel-release -y
[root@nginx01 ~]# yum install  nginx -y
2、启动并设置开机自启
#启动nginx
[root@nginx01 ~]# systemctl start nginx
#设置开机自启
[root@nginx01 ~]# systemctl enable nginx
3、编辑配置文件
[root@nginx01 ~]# cd /etc/nginx/
[root@nginx01 nginx]# ls
conf.d                fastcgi_params.default  nginx.conf           uwsgi_params.default
default.d             koi-utf                 nginx.conf.default   win-utf
fastcgi.conf          koi-win                 scgi_params
fastcgi.conf.default  mime.types              scgi_params.default
fastcgi_params        mime.types.default      uwsgi_params
[root@nginx01 nginx]# vim nginx.conf

# 进入nginx.conf目录后,做如下修改:
# 1、将:
#      listen 80 default_server;
#    修改成:
#      listen 80;
# 2、在http全局块中添加include /etc/nginx/conf.d/*.conf;
# 3、保存退出
# 4、在conf.d目录下新增chenl.conf文件
[root@nginx01 conf.d]# vim chenl.conf
# vim /etc/nginx/conf.d/chenl.conf
# 添加下列配置
server {
listen 80 default_server;
server_name www.sc.com;
root /usr/share/nginx/html; #设置根目录
access_log /var/log/nginx/sc/access.log main; #设置日志存储目录 日志格式采用主配置文件里的main格式
location / {
}
}4、语法检测并重新加载nginx
# 语法检测,建议使用绝对路径
[root@nginx01 nginx]# /usr/sbin/nginx -t
nginx: the configuration file /etc/nginx/nginx.conf syntax is ok
nginx: configuration file /etc/nginx/nginx.conf test is successful
# 重新加载nginx
[root@nginx01 nginx]# /usr/sbin/nginx -s reload
四、nginx反向代理配置
准备两台机器用作反向代理机,主机名分别修改为keepalived01、keepalived02,nginx安装步骤同上
1、编辑配置文件
[root@keepalived01 ~]# cd /etc/nginx/
[root@keepalived01 nginx]# ls
conf.d                fastcgi_params.default  nginx.conf           uwsgi_params.default
default.d             koi-utf                 nginx.conf.default   win-utf
fastcgi.conf          koi-win                 scgi_params
fastcgi.conf.default  mime.types              scgi_params.default
fastcgi_params        mime.types.default      uwsgi_params
[root@nginx01 nginx]# vim nginx.conf
# 1、将:
#      listen 80 default_server;
#    修改成:
#      listen 80;
# 2、在http全局块中添加include /etc/nginx/conf.d/*.conf;
# 3、保存退出
# 4、在conf.d目录下新增chenl.conf文件
[root@keepalived01 conf.d]# vim chenl.conf
upstream nginx_backend {
server 192.168.226.101:80; #nginx01
server 192.168.226.102:80; #nginx02
server 192.168.226.103:80; #nginx03
}
server {
listen 80 default_server;
root /usr/share/nginx/html;
location / {
proxy_pass http://nginx_backend;
}
}2、语法检测并重新加载nginx
# 语法检测,建议使用绝对路径
[root@nginx01 nginx]# /usr/sbin/nginx -t
nginx: the configuration file /etc/nginx/nginx.conf syntax is ok
nginx: configuration file /etc/nginx/nginx.conf test is successful
# 重新加载nginx
[root@nginx01 nginx]# /usr/sbin/nginx -s reload
五、搭建keepalived双VIP高可用
1、安装
[root@keepalived01 ~]# yum install keepalived -y2、编辑配置文件
# 进入/etc/keepalived目录
[root@keepalived01 keepalived]# vim keepalived.conf
# 配置全局
! Configuration File for keepalived
global_defs {
notification_email {
acassen@firewall.loc
failover@firewall.loc
sysadmin@firewall.loc
}
notification_email_from Alexandre.Cassen@firewall.loc
smtp_server 192.168.200.1
smtp_connect_timeout 30
router_id LVS_DEVEL
vrrp_skip_check_adv_addr
# vrrp_strict # 严格遵守vrrp协议
vrrp_garp_interval 0
vrrp_gna_interval 0
}# 配置keepalived01
vrrp_script chk_http_port {
script "/opt/check_nginx.sh"
interval 2
weight -60
}
vrrp_instance VI_1 {
state MASTER #设置为主
interface ens33
virtual_router_id 60
priority 100
advert_int 1
authentication {
auth_type PASS
auth_pass 1111
}
track_script {
chk_http_port
}
virtual_ipaddress {
192.168.1.250
}
}
vrrp_instance VI_2 {
state BACKUP # 设置为备
interface ens33 # 虚拟ip绑定到哪个网卡
virtual_router_id 61 # 0-255#虚拟路由id 在同一个局域网内 来区分不同的keepalive集群 ,
# 如果在同一个keepalive集群中,那每台主机的router id都是一样的
priority 50 # 0-255优先级, 优先越高拿到虚拟ip的概率就会越大
advert_int 1 # 隔1s钟发送一次存活检测
authentication { # 认证方式
auth_type PASS
auth_pass 1111
}
virtual_ipaddress {
192.168.1.251 # 设置虚拟ip(只要是本机能ping通的ip均可)
}
}# 配置keepalived02
vrrp_script chk_http_port {
script "/opt/check_nginx.sh"
interval 2
weight -60
}
vrrp_instance VI_1 {
state BACKUP # 设置为备
interface ens33
virtual_router_id 60
priority 100
advert_int 1
authentication {
auth_type PASS
auth_pass 1111
}
track_script {
chk_http_port
}
virtual_ipaddress {
192.168.1.250
}
}
vrrp_instance VI_2 {
state MASTER # 设置为主
interface ens33 # 虚拟ip绑定到哪个网卡
virtual_router_id 61 # 0-255#虚拟路由id 在同一个局域网内 来区分不同的keepalive集群 ,
# 如果在同一个keepalive集群中,那每台主机的router id都是一样的
priority 50 # 0-255优先级, 优先越高拿到虚拟ip的概率就会越大
advert_int 1 # 隔1s钟发送一次存活检测
authentication { # 认证方式
auth_type PASS
auth_pass 1111
}
virtual_ipaddress {
192.168.1.251 # 设置虚拟ip(只要是本机能ping通的ip均可)
}
}3、开启keepalived服务
[root@keepalived01 keepalived]# systemctl start keepalived4、查看效果
[root@keepalived01 keepalived]# ip a
1: lo: <LOOPBACK,UP,LOWER_UP> mtu 65536 qdisc noqueue state UNKNOWN group default qlen 1000
link/loopback 00:00:00:00:00:00 brd 00:00:00:00:00:00
inet 127.0.0.1/8 scope host lo
valid_lft forever preferred_lft forever
inet6 ::1/128 scope host
valid_lft forever preferred_lft forever
2: ens33: <BROADCAST,MULTICAST,UP,LOWER_UP> mtu 1500 qdisc pfifo_fast state UP group default qlen 1000
link/ether 00:0c:29:21:dc:2b brd ff:ff:ff:ff:ff:ff
inet 192.168.226.149/24 brd 192.168.226.255 scope global noprefixroute ens33
valid_lft forever preferred_lft forever
inet 192.168.100.250/32 scope global ens33
valid_lft forever preferred_lft forever
inet6 fe80::e634:2b63:9731:1da2/64 scope link noprefixroute
valid_lft forever preferred_lft forever
[root@keepalived02 keepalived]# ip a
1: lo: <LOOPBACK,UP,LOWER_UP> mtu 65536 qdisc noqueue state UNKNOWN group default qlen 1000
link/loopback 00:00:00:00:00:00 brd 00:00:00:00:00:00
inet 127.0.0.1/8 scope host lo
valid_lft forever preferred_lft forever
inet6 ::1/128 scope host
valid_lft forever preferred_lft forever
2: ens33: <BROADCAST,MULTICAST,UP,LOWER_UP> mtu 1500 qdisc pfifo_fast state UP group default qlen 1000
link/ether 00:0c:29:9c:d1:c7 brd ff:ff:ff:ff:ff:ff
inet 192.168.226.150/24 brd 192.168.226.255 scope global noprefixroute ens33
valid_lft forever preferred_lft forever
inet 192.168.1.251/32 scope global ens33
valid_lft forever preferred_lft forever
inet6 fe80::e634:2b63:9731:1da2/64 scope link tentative noprefixroute dadfailed
valid_lft forever preferred_lft forever
inet6 fe80::b3a5:597f:b278:1602/64 scope link noprefixroute
valid_lft forever preferred_lft forever六、搭建kafka和zookeeper集群
1、安装
# 安装java
[root@nginx-kafka01 opt]# yum install java wget -y
# 安装kafka
[root@nginx-kafka01 opt]# wget https://mirrors.bfsu.edu.cn/apache/kafka/2.8.2/kafka_2.12-2.8.2.tgz
# 安装zookeeper
[root@nginx-kafka01 opt]# wget https://mirrors.bfsu.edu.cn/apache/zookeeper/zookeeper-3.6.4/apache-zookeeper-3.6.3-bin.tar.gz
2、解包
[root@nginx-kafka01 opt]# tar xzvf kafka_2.12-2.8.1.tgz
[root@nginx-kafka01 opt]# tar xzvf apache-zookeeper-3.6.4-bin.tar.gz
3、配置kafka
进入/opt/kafka_2.12-2.8.1/config
[root@nginx-kafka01 config]# vim server.properties
# 每台机器都需要绑定唯一的id
broker.id=1
# 格式:listeners = PLAINTEXT://your.host.name:9092
listeners=PLAINTEXT://nginx-kafka01:9092
zookeeper.connect=192.168.226.149:2181,192.168.226.150.134:2181,192.168.226.151:21814、配置zookeeper
进入/opt/apache-zookeeper-3.6.4-bin/conf
[root@nginx-kafka01 conf]# cp zoo_sample.cfg zoo.cfg
[root@nginx-kafka01 conf]# vim zoo.cfg

# 在文件底部添加如下三行
server.1=192.168.226.149:3888:4888
server.2=192.168.226.150:3888:4888
server.3=192.168.226.151:3888:4888
# 3888端口用于标准的Leader选举通信,4888端口是为了提高集群的可用性和容错性而设计的
# 注意检查"dataDir"和"clientPort"等配置项是否配置正确
# 设置zookeeper服务器节点的唯一标识符,注意要和前面配置的broker.id保持一致
[root@nginx-kafka01 ~]# mkdir /tmp/zookeeper
[root@nginx-kafka01 ~]# echo 1 > /tmp/zookeeper/myid5、启动zookeeper
进入apache-zookeeper-3.6.4-bin目录,所有可执行文件都在bin目录下,启动前一定要确保防火墙已经关闭
[root@nginx-kafka01 apache-zookeeper-3.6.4-bin]# bin/zkServer.sh start
# 检查当前zookeeper服务的运行状态
[root@nginx-kafka01 apache-zookeeper-3.6.4-bin]# bin/zkServer.sh status
6、启动kafka
进入kafka_2.12-2.8.1目录,所有可执行文件都在bin目录下
[root@nginx-kafka01 kafka_2.12-2.8.1]# bin/kafka-server-start.sh -daemon config/server.properties七、部署filebeat集群
1、安装
# 导入Elastic Elasticsearch软件包的GPG密钥
[root@nginx01 ~]# rpm --import https://packages.elastic.co/GPG-KEY-elasticsearch
# 配置系统的yum包管理器,告诉系统从哪里获取Elastic Stack7.x版本的软件包,以及如何验证这些包的完整性
[root@nginx01 ~]# vim /etc/yum.repos.d/fb.repo

# 添加如下配置
[elastic-7.x]
name=Elastic repository for 7.x packages
baseurl=https://artifacts.elastic.co/packages/7.x/yum
gpgcheck=1
gpgkey=https://artifacts.elastic.co/GPG-KEY-elasticsearch
enabled=1
autorefresh=1
type=rpm-md
# yum安装
[root@nginx01 ~]# yum install filebeat -y
# 可以查看filebeat有没有安装 rpm -qa 是查看机器上安装的所有软件包
[root@nginx01 ~]# rpm -qa |grep filebeat
# 查看filebeat安装到哪里去了,牵扯的文件有哪些
[root@nginx01 ~]# rpm -ql filebeat
# 设置开机自启
[root@nginx01 ~]# systemctl enable filebeat2、配置
修改配置文件/etc/filebeat/filebeat.yml
filebeat.inputs:
- type: log
 # Change to true to enable this input configuration.
  enabled: true
 # Paths that should be crawled and fetched. Glob based paths.
  paths:
   - /var/log/nginx/chenl/access.log
#==========------------------------------kafka-----------------------------------
output.kafka:
   hosts: ["192.168.226.149:9092","192.168.226.150:9092","192.168.226.151:9092"]
   topic: nginxlog
   keep_alive: 10s
3、启动filebeat
[root@nginx01 ~]# systemctl start filebeat4、测试
# 创建主题nginxlog
[root@nginx01 ~]# bin/kafka-topics.sh --create --zookeeper 192.168.226.149:2181 --replication-factor 1 --partitions 1 --topic nginxlog
# 创建消费者消费数据
[root@nginx01 ~]# bin/kafka-console-consumer.sh --bootstrap-server 192.168.226.149:9092 --topic nginxlog --from-beginning
八、访问nginx集群生成日志
执行机器nginx01、kafka01
1、添加域名解析
# 进入/etc/hosts
192.168.100.250 www.test.com
192.168.1.251 www.test.com2、访问www.test.com
[root@keepalived01 ~]# curl www.test.com3、创建消费者获取日志
[root@nginx-kafka01 kafka_2.12-2.8.1]# bin/kafka-console-consumer.sh --bootstrap-server 192.168.226.149:9092 --topic nginxlog --from-beginning
# 可以看到消费了一条来自ip192.168.100.150的访问记录
{"@timestamp":"2023-09-05T05:35:04.248Z",
 "@metadata":{"beat":"filebeat","type":"_doc","version":"7.17.12"},
 "log":{"offset":3211,"file":{"path":"/var/log/nginx/chenl/access.log"}},
 "message":"192.168.100.250 - - [05/Sep/2023:13:34:59 +0800] \"GET / HTTP/1.1\" 200 4833 \"-\" \"curl/7.29.0\" \"-\"","input":{"type":"log"},
 "ecs":{"version":"1.12.0"},"host":{"name":"nginx-kafka01"},
 "agent":{"type":"filebeat","version":"7.17.12",
 "hostname":"nginx-kafka01",
 "ephemeral_id":"4a96ba90-3583-4c3d-b194-8dfec062e0d8",
 "id":"b4cb67b1-2919-4e65-ad2b-8bdd665f2093",
 "name":"nginx-kafka01"}}
九、数据入库
1、建表
CREATE TABLE `log` (
  `ip` varchar(50) DEFAULT NULL,
  `time` datetime DEFAULT NULL,
  `dk` varchar(30) DEFAULT NULL,
  `isp` varchar(50) DEFAULT NULL,
  `prov` varchar(30) DEFAULT NULL
) ENGINE=InnoDB DEFAULT CHARSET=utf8;
2、编写python脚本
#!/bin/python3
#encoding:utf-8
import json
import requests
import time
import pymysql
# 连接数据库
db = pymysql.connect(
host = "192.168.226.149",
user = "root",
passwd = "123456",
database = "nginx_log"
)
cursor = db.cursor()
taobao_url = "https://ip.taobao.com/outGetIpInfo?accessKey=alibaba-inc&ip="
# 查询ip地址的信息(省份和运营商isp),通过taobao网的接口
def resolv_ip(ip):
response = requests.get(taobao_url+ip)
if response.status_code == 200:
tmp_dict = json.loads(response.text)
prov = tmp_dict["data"]["region"]
isp = tmp_dict["data"]["isp"]
return prov,isp
return None,None
# 将日志里读取的格式转换为我们指定的格式
def trans_time(dt):
#把字符串转成时间格式
timeArray = time.strptime(dt, "%d/%b/%Y:%H:%M:%S")
#timeStamp = int(time.mktime(timeArray))
#把时间格式转成字符串
new_time = time.strftime("%Y-%m-%d %H:%M:%S", timeArray)
return new_time
# 从kafka里获取数据,清洗为我们需要的ip,时间,带宽
from pykafka import KafkaClient
client = KafkaClient(hosts="192.168.226.149:9092,192.168.226.150:9092,192.168.226.151:9092")
topic = client.topics['nginxlog']
balanced_consumer = topic.get_balanced_consumer(
consumer_group = 'testgroup',
auto_commit_enable = True,
zookeeper_connect = '192.168.226.149:2181,192.168.226.150:2181,192.168.226.51:2181'
)
# consumer = topic.get_simple_consumer()
for message in balanced_consumer:
if message is not None:
line = json.loads(message.value.decode("utf-8"))
log = line["message"]
tmp_lst = log.split()
ip = tmp_lst[0]
dt = tmp_lst[3].replace("[","")
bt = tmp_lst[9]
dt = trans_time(dt)
prov, isp = resolv_ip(ip)
insert = "insert into log(ip, time, dk, prov, isp) values( %s, %s, %s, %s, %s)"
values = (ip, dt, bt, prov,isp)
cursor.execute(insert,values)
db.commit()
if prov and isp:
print(prov, isp,dt)
db.close()3、运行效果

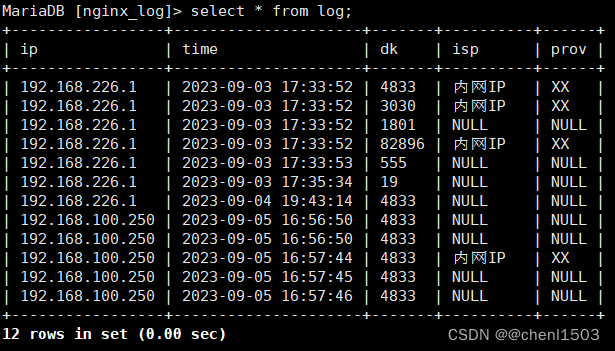
4、查看数据库


 517
517


 被折叠的 条评论
为什么被折叠?
被折叠的 条评论
为什么被折叠?
 到【灌水乐园】发言


