


一:OpenShift简介:
OpenShift是红帽Red Hat公司基于开源的云平台,是平台即服务(PaaS),是一种容器应用平台。允许开发人员构建、测试和部署云应用。该系统是在k8s核心之上添加工具,从而实现更快的应用开发、部署及扩展。 在OpenShift上可以进行开发、测试、部署、运维全流程,实现高度的自动化,满足企业中的应用持续集成和交付及部署的需求,同时也满足企业对于容器管理(docker)、容器编排(k8s)的需求
二:OpenShift功能
- 容器引擎:docker;
- 容器编排:kubernetes
- 应用开发框架及中间件:Java、Python、Tomcat、MySQL、PHP、Ruby、MongoDB和JBoss等中间件;
- 应用及服务目录:用户可一键部署各类应用及服务;
- 自动化流程及工具:内置自动化流程工具S2I(Source to Image),用户可完成代码编译、构建和镜像发布;
- 软件定义网络:提供OpenVSwitch,实现跨主机共享网络及多租户隔离网络模式;
- 性能监控及日志管理:内置Prometheus监控功能,用户可以通过Grafana仪表板上实时显示应用;
- 多用户接口:提供友好的UI、命令行工具(oc,类似于k8s的kubectl以及RESTful API,基本与k8s兼容);
- 自动化集群部署及管理:通过Ansible实现集群的自动化部署,为集群的自动化扩容提供接
OpenShift有多个版本,两个主要版本:
1.红帽OpenShift的开源社区版本称为OKD(The Origin Community Distribution of Kubernetes,或OpenShift Kubernetes Distribution的缩写,原名OpenShiftOrigin),是 Red Hat OpenShift Container Platform (OCP) 的上游和社区支持版本。
2.红帽OpenShift的企业版本称为OCP(Red Hat OpenShift Container Platform ),OpenShift 的私有云产品,不购买订阅也可以安装使用,只是不提供技术支持。
OpenShift安装方式分为以下两种:
1.IPI(Installer Provisioned Infrastructure)方式:安装程序配置的基础架构集群,基础架构引导和配置委托给安装程序,而不是自己进行。安装程序会创建支持集群所需的所有网络、机器和操作系统。
2.UPI(User Provisioned Infrastructure)方式:用户配置的基础架构集群,必须由用户自行提供所有集群基础架构和资源,包括引导节点、网络、负载均衡、存储和集群的每个节点。
安装架构示意图:

安装流程示意图:

三:集群信息
- 集群名称:okd4
- 基本域名:example.com
- 集群规格:一个基础节点bastion,一个火种节点bootstrap,3个maste节点,2个worker节点
节点信息配置:
| Hostname | FQDN | IPaddress | NodeType | CPU | Mem | Disk | OS |
|---|---|---|---|---|---|---|---|
| bastion | bastion.okd4.example.com | 10.64.34.80 | 基础节点 | 4C | 8G | 100G | Ubuntu 22.04 |
| bootstrap | bootstrap.okd4.example.com | 10.64.34.81 | 火种节点 | 8C | 16G | 100 | Fedora CoreOS 35 |
| master0 | master0.okd4.example.com | 10.64.34.82 | 控制节点 | 8C | 16G | 100 | Fedora CoreOS 35 |
| master1 | master1.okd4.example.com | 10.64.34.83 | 控制节点 | 8C | 16G | 100 | Fedora CoreOS 35 |
| master2 | master2.okd4.example.com | 10.64.34.84 | 控制节点 | 8C | 16G | 100 | Fedora CoreOS 35 |
| worker0 | worker0.okd4.example.com | 10.64.34.85 | 工作节点 | 4C | 8G | 100 | Fedora CoreOS 35 |
| worker1 | worker1.okd4.example.com | 10.64.34.86 | 工作节点 | 4C | 8G | 100 | Fedora CoreOS 35 |
| api server | api.okd4.example.com | 10.64.34.80 | Kubernetes API | ||||
| api-int | api-int.okd4.example.com | 10.64.34.80 | Kubernetes API | ||||
| apps | *.apps.okd4.example.com | 10.64.34.80 | Apps | ||||
| registry | registry.example.com | 10.64.34.80 | 镜像仓库 |
节点类型介绍:
Bastion节点,基础节点或堡垒机节点,提供http服务和registry的本地安装仓库服务,同时所有的ign点火文件,coreos所需要的ssh-rsa密钥等都由这个节点生成,OS类型可以任意。
Bootstrap节点,引导节点,引导工作完成后续可以删除
Master节点,openshift的管理节点
Worker节点,openshift的工作节点
注:刚开始用的是红帽自己的rhcos操作系统,创建火种节点时成功之后但是会有各种BUG,不知道为啥,后参考其他博主的换用Fedora没有出现BUG,还在测试rhcos系统中。
| 组件名称 | 组件说明 |
|---|---|
| Docker | 容器环境 |
| Bind9 | DNS服务器 |
| Haproxy | 负载均衡服务器 |
| Nginx | Web服务器 |
| Harbor | 容器镜像仓库 |
| OpenShift CLI | oc命令行客户端 |
| OpenShift-Install | openshift安装程序 |
部署开始:
1:bastion的部署:
1.1修改主机名:
hostnamectl set-hostname bastion.okd4.example.com
1.2.安装docker(用的阿里云的):
# step 1: 安装必要的一些系统工具
sudo apt-get update
sudo apt-get -y install apt-transport-https ca-certificates curl software-properties-common
# step 2: 安装GPG证书
curl -fsSL https://mirrors.aliyun.com/docker-ce/linux/ubuntu/gpg | sudo apt-key add -
# Step 3: 写入软件源信息
sudo add-apt-repository "deb [arch=amd64] https://mirrors.aliyun.com/docker-ce/linux/ubuntu $(lsb_release -cs) stable"
# Step 4: 更新并安装Docker-CE
sudo apt-get -y update
sudo apt-get -y install docker-ce

#设置docker服务自启动
systemctl start docker
systemctl enable docker
docker version

#docker-compose安装
cd /usr/local/bin
#2. 通过curl命令下载(不建议)
curl -L https://github.com/docker/compose/releases/download/1.28.6/docker-compose-uname -s-uname -m-o /usr/local/bin/docker-compose
#通过此方式安装会比较慢,所以强烈建议下面的手动安装。
#(3)赋予权限
chmod +x /usr/local/bin/docker-compose
#(4)检查是否安装成功
docker-compose --version
地址为:docker-ce镜像_docker-ce下载地址_docker-ce安装教程-阿里巴巴开源镜像站 (aliyun.com)
1.1:Bind安装
在 OKD 部署中,以下组件需要 DNS 名称解析:
- Kubernetes API
- OKD 应用访问入口
- 引导节点、控制平面和计算节点
Kubernetes API、引导机器、控制平面机器和计算节点也需要反向 DNS 解析。DNS A/AAAA 或 CNAME 记录用于名称解析,PTR 记录用于反向名称解析。反向记录很重要,因为 Fedora CoreOS (FCOS) 使用反向记录来设置所有节点的主机名,除非主机名由 DHCP 提供。此外,反向记录用于生成 OKD 需要操作的证书签名请求 (CSR)。
创建bind配置文件目录:
mkdir -p /etc/bind
mkdir -p /var/lib/bind
mkdir -p /var/cache/bind
创建bind主配置文件:
cat >/etc/bind/named.conf<<EOF
options {
        directory "/var/cache/bind";
        listen-on { any; };
        listen-on-v6 { any; };
        allow-query { any; };
        allow-query-cache { any; };
        recursion yes;
        allow-recursion { any; };
        allow-transfer { none; };
        allow-update { none; };
        auth-nxdomain no;
        dnssec-validation no;
        forward first;
        forwarders {
          223.5.5.5;
          114.114.114.114;
          8.8.8.8;
        };
};
zone "example.com" IN {
  type master;
  file "/var/lib/bind/example.com.zone";
};
zone "34.64.10.in-addr.arpa" IN {
  type master;
  file "/var/lib/bind/34.64.10.in-addr.arpa";
};
EOF
创建正向解析配置文件:
cat >/var/lib/bind/example.com.zone<<'EOF'
$TTL 1W
@   IN    SOA    ns1.example.com.    root (
                 2019070700        ; serial
                 3H                ; refresh (3 hours)
                 30M               ; retry (30 minutes)
                 2W                ; expiry (2 weeks)
                 1W )              ; minimum (1 week)
    IN    NS     ns1.example.com.
    IN    MX 10  smtp.example.com.
;
ns1.example.com.            IN A 10.64.34.80
smtp.example.com.           IN A 10.64.34.80
;
registry.example.com.       IN A 10.64.34.80
api.okd4.example.com.       IN A 10.64.34.80
api-int.okd4.example.com.   IN A 10.64.34.80
;
*.apps.okd4.example.com.    IN A 10.64.34.80
;
bastion.okd4.example.com.   IN A 10.64.34.80
bootstrap.okd4.example.com. IN A 10.64.34.81
;
master0.okd4.example.com.   IN A 10.64.34.82
master1.okd4.example.com.   IN A 10.64.34.83
master2.okd4.example.com.   IN A 10.64.34.84
;
worker0.okd4.example.com.   IN A 10.64.34.85
worker1.okd4.example.com.   IN A 10.64.34.86
EOF
创建反向解析配置文件:
cat >/var/lib/bind/34.64.10.in-addr.arpa<<'EOF'
$TTL 1W
@   IN    SOA      ns1.example.com.     root (
                   2019070700        ; serial
                   3H                ; refresh (3 hours)
                   30M               ; retry (30 minutes)
                   2W                ; expiry (2 weeks)
                   1W )              ; minimum (1 week)
    IN    NS       ns1.example.com.
;
80.34.64.10.in-addr.arpa. IN PTR api.okd4.example.com.
80.34.64.10.in-addr.arpa. IN PTR api-int.okd4.example.com.
;
80.34.64.10.in-addr.arpa. IN PTR bastion.okd4.example.com.

81.34.64.10.in-addr.arpa. IN PTR bootstrap.okd4.example.com.
;
82.34.64.10.in-addr.arpa. IN PTR master0.okd4.example.com.
83.34.64.10.in-addr.arpa. IN PTR master1.okd4.example.com.
84.34.64.10.in-addr.arpa. IN PTR master2.okd4.example.com.
;
85.34.64.10.in-addr.arpa. IN PTR worker0.okd4.example.com.
86.34.64.10.in-addr.arpa. IN PTR worker1.okd4.example.com.
EOF
配置文件权限,允许容器有读写权限:
chmod -R a+rwx /etc/bind
chmod -R a+rwx /var/lib/bind/
chmod -R a+rwx /var/cache/bind/
ubuntu中的dns由systemd-resolved管理,
修改以下配置项,指定dns为本地DNS:
 cat /etc/systemd/resolved.conf
#  This file is part of systemd.
#
#  systemd is free software; you can redistribute it and/or modify it
#  under the terms of the GNU Lesser General Public License as published by
#  the Free Software Foundation; either version 2.1 of the License, or
#  (at your option) any later version.
#
# Entries in this file show the compile time defaults.
# You can change settings by editing this file.
# Defaults can be restored by simply deleting this file.
#
# See resolved.conf(5) for details

[Resolve]
DNS=10.64.34.80     #修改此处
#FallbackDNS=
#Domains=
#LLMNR=no
#MulticastDNS=no
#DNSSEC=no
#DNSOverTLS=no
#Cache=no-negative
#DNSStubListener=yes
#ReadEtcHosts=yes
重启并配置dns服务:
systemctl restart systemd-resolved.service

#创建到resolv.conf的链接
ln -sf /run/systemd/resolve/resolv.conf /etc/resolv.conf


#查看resolv.conf配置
cat /etc/resolv.conf
#输出如下:
nameserver 10.64.34.80
nameserver 114.114.114.114
以容器方式启动bind服务(注意绑定到本机IP,以免与ubuntu默认dns服务53端口冲突)
#创建bind9目录
root@bastion:~# mkdir bind9

#切换目录
root@bastion:~# cd bind9/

#编写docker-compose.yaml
root@bastion:~/bind9# vim docker-compose.yaml

#docker-compose.yaml内容如下:
version: '3.9'
services:
    bind9:
        image: 'internetsystemsconsortium/bind9:9.18'
        volumes:
            - '/var/log/bind:/var/log'
            - '/var/lib/bind:/var/lib/bind'
            - '/var/cache/bind:/var/cache/bind'
            - '/etc/bind:/etc/bind'
        ports:
            - '10.64.34.80:953:953/tcp'
            - '10.64.34.80:53:53/tcp'
            - '10.64.34.80:53:53/udp'
        environment:
            - TZ=Asia/Shanghai
        container_name: bind9
        restart: always

#启动容器:
root@bastion:~/bind9# docker-compose up -d
查看容器是否启动:
docker ps -a | grep bind9输出如下:
 使用dig命令来验证正向域名解析:
dig +noall +answer @10.64.34.80 registry.example.com
dig +noall +answer @10.64.34.80 api.okd4.example.com
dig +noall +answer @10.64.34.80 api-int.okd4.example.com
dig +noall +answer @10.64.34.80 console-openshift-console.apps.okd4.example.com
dig +noall +answer @10.64.34.80 bootstrap.okd4.example.com
dig +noall +answer @10.64.34.80 master0.okd4.example.com
dig +noall +answer @10.64.34.80 master1.okd4.example.com
dig +noall +answer @10.64.34.80 master2.okd4.example.com
dig +noall +answer @10.64.34.80 worker0.okd4.example.com
dig +noall +answer @10.64.34.80 worker1.okd4.example.com
验证反向域名解析:
dig +noall +answer @10.64.34.80-x 10.64.34.81
dig +noall +answer @10.64.34.80-x 10.64.34.82
dig +noall +answer @10.64.34.80-x 10.64.34.83
dig +noall +answer @10.64.34.80-x 10.64.34.84
dig +noall +answer @10.64.34.80-x 10.64.34.85
dig +noall +answer @10.64.34.80-x 10.64.34.86
输出结果都能正确解析
1.2:安装Haproxy
使用haproxy创建负载均衡器,负载machine-config、kube-apiserver和集群ingress controller
创建haproxy配置目录:
mkdir -p  /etc/haproxy
cd /etc/haproxy/
创建haproxy配置文件:
cat >/etc/haproxy/haproxy.cfg<<EOF
global
  log         127.0.0.1 local2
  maxconn     4000
  daemon
defaults
  mode                    http
  log                     global
  option                  dontlognull
  option http-server-close
  option                  redispatch
  retries                 3
  timeout http-request    10s
  timeout queue           1m
  timeout connect         10s
  timeout client          1m
  timeout server          1m
  timeout http-keep-alive 10s
  timeout check           10s
  maxconn                 3000
frontend stats
  bind *:1936
  mode            http
  log             global
  maxconn 10
  stats enable
  stats hide-version
  stats refresh 30s
  stats show-node
  stats show-desc Stats for openshift cluster
  stats auth admin:openshift
  stats uri /stats
frontend openshift-api-server
    bind *:6443
    default_backend openshift-api-server
    mode tcp
    option tcplog
backend openshift-api-server
    balance source
    mode tcp
    server bootstrap 10.64.34.81:6443 check
    server master0 10.64.34.82:6443 check
    server master1 10.64.34.83:6443 check
    server master2 10.64.34.84:6443 check
frontend machine-config-server
    bind *:22623
    default_backend machine-config-server
    mode tcp
    option tcplog
backend machine-config-server
    balance source
    mode tcp
    server bootstrap 10.64.34.81:22623 check
    server master0 10.64.34.82:22623 check
    server master1 10.64.34.83:22623 check
    server master2 10.64.34.84:22623 check
frontend ingress-http
    bind *:80
    default_backend ingress-http
    mode tcp
    option tcplog
backend ingress-http
    balance source
    mode tcp
    server worker0 10.64.34.85:80 check
    server worker1 10.64.34.86:80 check
frontend ingress-https
    bind *:443
    default_backend ingress-https
    mode tcp
    option tcplog
backend ingress-https
    balance source
    mode tcp
    server worker0 10.64.34.85:443 check
    server worker1 10.64.34.86:443 check
EOF
以容器方式启动haproxy服务:
vim docker-compose.yaml

#yaml文件如下
version: '3.9'
services:
    haproxy:
        image: 'haproxy:2.5.5-alpine3.15'
        volumes:
            - '/etc/haproxy/:/usr/local/etc/haproxy:ro'
        sysctls:
            - net.ipv4.ip_unprivileged_port_start=0
        ports:
            - '443:443'
            - '80:80'
            - '22623:22623'
            - '6443:6443'
            - '1936:1936'
        restart: always
        container_name: haproxy

#启动容器
docke-compose up -d

#检查容器
docker ps -a | grep  haproxy

1.3:安装Nginx
OpenShift 集群部署时需要从 web服务器下载 CoreOS Image 和 Ignition 文件,这里使用nginx提供文件下载
创建nginx相关目录:
mkdir -p /etc/nginx/templates
mkdir -p /usr/share/nginx/html/{ignition,install}
创建nginx配置文件,打开目录浏览功能:
cat >/etc/nginx/templates/default.conf.template<<EOF
server {
    listen       80;
    listen  [::]:80;
    server_name  localhost;
    location / {
        root   /usr/share/nginx/html;
        index  index.html index.htm;
        autoindex on;
        autoindex_exact_size off;
        autoindex_format html;
        autoindex_localtime on;
    }
    error_page   500 502 503 504  /50x.html;
    location = /50x.html {
        root   /usr/share/nginx/html;
    }
}
EOF
修改文件权限,允许容器内部读写:
chmod -R a+rwx /etc/nginx/
chmod -R a+rwx /usr/share/nginx/
以容器方式启动nginx服务:
#在root目录下创建nginx目录并编写docker-compose.yaml
mkdir nginx
cd nginx
vim docker-compose.yaml
#内容如下
services:
    nginx:
        image: 'nginx:1.21.6-alpine'
        volumes:
            - '/usr/share/nginx/html:/usr/share/nginx/html:ro'
            - '/etc/nginx/templates:/etc/nginx/templates'
        ports:
            - '8088:80'      #修改端口,避免冲突
        restart: always
        container_name: nginx-okd

#启动
docker-compose  up -d

#检查容器:
docker ps -a | grep nginx-okd
浏览器访问:

1.4:安装OpenShift CLI
OpenShift CLI ( oc) 用于从命令行界面与 OKD 交互,可以在 Linux、Windows 或 macOS 上安装oc。
下载地址:Releases · okd-project/okd · GitHub
下载openshift-client到本地
如果网络不好可以使用浏览器下载后在上传到bastion节点
wget https://github.com/openshift/okd/releases/download/4.10.0-0.okd-2022-03-07-131213/openshift-client-linux-4.10.0-0.okd-2022-03-07-131213.tar.gz
解压到/usr/local/bin目录下:
tar -zxvf openshift-client-linux-4.10.0-0.okd-2022-03-07-131213.tar.gz
cp oc /usr/local/bin/
cp kubectl /usr/local/bin/
检查版本,后续拉取镜像需要该版本信息:
[root@bastion ~]# oc version
Client Version: 4.10.0-0.okd-2022-03-07-131213
配置oc命令补全:
oc completion bash > oc_completion.sh


#编辑bashrc文件,追加一行
cat >>.bashrc <<EOF
source ~/oc_completion.sh
EOF
1.5:安装OpenShift安装程序
openshift-install是OpenShift 4.x cluster的安装程序,是openshift集群的安装部署工具。
下载地址:Releases · okd-project/okd · GitHub
下载openshift-install:
下载openshift-install到本地,版本与openshift CLI要一致:
wget https://github.com/openshift/okd/releases/download/4.10.0-0.okd-2022-03-07-131213/openshift-install-linux-4.10.0-0.okd-2022-03-07-131213.tar.gz
解压到/usr/local/bin目录下:
tar -zxvf openshift-install-linux-4.10.0-0.okd-2022-03-07-131213.tar.gz
cp openshift-install /usr/local/bin/

#检查版本
root@bastion:~# openshift-install version
openshift-install 4.10.0-0.okd-2022-03-07-131213
built from commit 3b701903d96b6375f6c3852a02b4b70fea01d694
release image quay.io/openshift/okd@sha256:2eee0db9818e22deb4fa99737eb87d6e9afcf68b4e455f42bdc3424c0b0d0896
release architecture amd64
1.6:安装harbor镜像仓库
使用harbor作为openshift镜像仓库,提前将对应版本镜像同步到本地仓库,加快后续安装过程。
下载harbor并解压:
curl -L https://github.com/goharbor/harbor/releases/download/v2.4.2/harbor-offline-installer-v2.4.2.tgz -o ./harbor-offline-installer-v2.4.2.tgz
tar -zxf harbor-offline-installer-v2.4.2.tgz -C /opt/
如果下载较慢,可以考虑使用国内清华源地址:
https://mirrors.tuna.tsinghua.edu.cn/github-release/goharbor/harbor/v2.4.2/harbor-offline-installer-v2.4.2.tgz
生成harbor https证书,注意修改域名信息,参考自harbor官方文档:
mkdir -p /opt/harbor/cert
cd /opt/harbor/cert

openssl genrsa -out ca.key 4096

openssl req -x509 -new -nodes -sha512 -days 3650 \
 -subj "/C=CN/ST=Beijing/L=Beijing/O=example/OU=Personal/CN=registry.example.com" \
 -key ca.key \
 -out ca.crt

openssl genrsa -out registry.example.com.key 4096

openssl req -sha512 -new \
    -subj "/C=CN/ST=Beijing/L=Beijing/O=example/OU=Personal/CN=registry.example.com" \
    -key registry.example.com.key \
    -out registry.example.com.csr

cat > v3.ext <<-EOF
authorityKeyIdentifier=keyid,issuer
basicConstraints=CA:FALSE
keyUsage = digitalSignature, nonRepudiation, keyEncipherment, dataEncipherment
extendedKeyUsage = serverAuth
subjectAltName = @alt_names
[alt_names]
DNS.1=registry.example.com
DNS.2=registry.example
DNS.3=registry
EOF

openssl x509 -req -sha512 -days 3650 \
    -extfile v3.ext \
    -CA ca.crt -CAkey ca.key -CAcreateserial \
    -in registry.example.com.csr \
    -out registry.example.com.crt
查看生成的证书:
root@bastion:/opt/harbor/cert# ll
total 40
drwxr-xr-x 2 root root 4096 Jul 18 02:02 ./
drwxr-xr-x 4 root root 4096 Jul 18 02:10 ../
-rw-r--r-- 1 root root 2069 Jul 18 01:58 ca.crt
-rw------- 1 root root 3243 Jul 18 01:57 ca.key
-rw-r--r-- 1 root root   41 Jul 18 01:59 ca.srl
-rw-r--r-- 1 root root 2151 Jul 18 02:02 registry.example.com.cert
-rw-r--r-- 1 root root 2151 Jul 18 01:59 registry.example.com.crt
-rw-r--r-- 1 root root 1716 Jul 18 01:58 registry.example.com.csr
-rw------- 1 root root 3247 Jul 18 01:58 registry.example.com.key
-rw-r--r-- 1 root root  276 Jul 18 01:58 v3.ext
复制证书到操作系统目录:
cp ca.crt registry.example.com.crt /usr/local/share/ca-certificates/
update-ca-certificates
复制证书到harbor运行目录:
mkdir -p /data/cert/
cp registry.example.com.crt /data/cert/
cp registry.example.com.key /data/cert/
将证书提供给docker:
openssl x509 -inform PEM -in registry.example.com.crt -out registry.example.com.cert

mkdir -p /etc/docker/certs.d/registry.example.com:8443
cp registry.example.com.cert /etc/docker/certs.d/registry.example.com:8443/
cp registry.example.com.key /etc/docker/certs.d/registry.example.com:8443/
cp ca.crt /etc/docker/certs.d/registry.example.com:8443/
修改harbor配置文件,调整以下内容,注意修改为以下端口,以免与haproxy冲突:
cd /opt/harbor
cp harbor.yml.tmpl harbor.yml

# vi harbor.yml
hostname: registry.example.com
http:
  port: 8080
https:
  port: 8443
  certificate: /data/cert/registry.example.com.crt
  private_key: /data/cert/registry.example.com.key
安装并启动harbor:
./install.sh配置harbor开机自启动:
cat >/etc/systemd/system/harbor.service<<EOF
[Unit]
Description=Harbor
After=docker.service systemd-networkd.service systemd-resolved.service
Requires=docker.service
Documentation=http://github.com/goharbor/harbor
[Service]
Type=simple
Restart=on-failure
RestartSec=5
ExecStart=/usr/local/bin/docker-compose -f /opt/harbor/docker-compose.yml up
ExecStop=/usr/local/bin/docker-compose -f /opt/harbor/docker-compose.yml down
[Install]
WantedBy=multi-user.target
EOF

systemctl enable harbor
查看harbor的运行状态:
root@bastion:/opt/harbor# docker-compose ps
      Name                     Command                  State                                             Ports
------------------------------------------------------------------------------------------------------------------------------------------------------
harbor-core         /harbor/entrypoint.sh            Up (healthy)
harbor-db           /docker-entrypoint.sh 96 13      Up (healthy)
harbor-jobservice   /harbor/entrypoint.sh            Up (healthy)
harbor-log          /bin/sh -c /usr/local/bin/ ...   Up (healthy)   127.0.0.1:1514->10514/tcp
harbor-portal       nginx -g daemon off;             Up (healthy)
nginx               nginx -g daemon off;             Up (healthy)   0.0.0.0:8080->8080/tcp,:::8080->8080/tcp, 0.0.0.0:8443->8443/tcp,:::8443->8443/tcp
redis               redis-server /etc/redis.conf     Up (healthy)
registry            /home/harbor/entrypoint.sh       Up (healthy)
registryctl         /home/harbor/start.sh            Up (healthy)
浏览器访问Harbor,注意,本地配置好hosts解析或指定dns服务器:
https://registry.example.com:8443
用户名为admin,默认密码为Harbor12345
手动创建一个openshift项目:

1.7:同步okd镜像到harbor仓库
harbor镜像仓库准备就绪后,开始将quay.io中的openshit okd容器镜像同步到本地。
创建一个openshift临时安装目录:
mkdir -p /opt/okd-install/4.10.0/
cd /opt/okd-install/4.10.0/
下载pull-secret
在红帽网站注册账号,下载pull-secret:console.redhat.com,(理论上可选,以下pull-secret内容仅为演示不可用,需要自行下载)
root@bastion:/opt/okd-install/4.10.0# cat pull-secret.txt
{"auths":{"cloud.openshift.com":{"auth":"b3BlbnNoaWZ0LXJlbGVhc2UtZGV2K29jbV9hY2Nlc3NfZjBjYmJiMDgyN2QyNGI0NDhjM2NkYjFiNTg0Y2M5MTY6VVBPRjZVTFRUQUpDTVhMSzFaNElNQkxWRUQwVjQ0VUFQOFVBSzZIR0pQWVNONUtZUDdETk1YMlZWWkw4M1A3TQ==","email":"willzhmic@outlook.com"},"quay.io":{"auth":"b3BlbnNoaWZ0LXJlbGVhc2UtZGV2K29jbV9hY2NsdfasdfsafMDgyN2QyNGI0NDhjM2NkYjFiNTg0Y2M5MTY6VVBPRjZVTFRUQUpDTVhMSzFaNElNQkxWRUQwVjQ0VUFQOFVBSzZIR0pQWVNONUtZUDdETk1YMlZWWkw4M1A3TQ==","email":"willzhmic@outlook.com"},"registry.connect.redhat.com":{"auth":"fHVoYy1wb29sLWExMWJiZjQ5LWExMzktNDBhNC1hZjM3LTViMWU1MzkyNjg2MzpleUpoYkdjaU9pSlNVelV4TWlKOS5leUp6ZFdJaU9pSXlaREUzTkdWall6WXpaalUwTkRZMkasdfsadfsafUzWkNKOS5oOUN2ZXNrbGJfaTM1TXVfMXhtWWdwMW91YzhYNHQxM2lNQW1ESk40M0dlQ1lKQlpBVXFQYVZGN09aeXNuSHBYaHprNWpYZWc4MzAwUUFRaTNBVnBNNFIxZ2VaeElVQjQ5S2lDbzVTWXRibHVPWGhRc2xXcUdFRklzbnJMSkxwS0hPNXUzX1BaWVNRNWxGNDFIWks5MERPdlo4YVAwMmpIMmZmZ0x4MXFmZFBkUXIxdTNDc3pCYTlWcFBzQjRMWlNzQkQwQWVCYmZibHNpUkRXbDBUSWx4bnFiTWItSFMydlBnSHZQbWs0ZENub2Q5TDdWek5FMVpJNkdPOC1LM0NCb1NacFVNTm9JdlFFWHpBZVJoRnZVZlF2RlJYRDJUblJQSHg2UzdOemM4SnRja3R1OE1FSmJmV0ZvQ2NyeE9uejNsaXpsSkVYYzdjLTA2V0NpVmZndVpfTXpOU1dmSlhWOW9QMlBxQV94eFhELS1hWE84OUhUczdmNWQ4VXgtTEhqczQybWhSMU9jeWYyT2ZYbUloSkRGaVRIaENqUGVSTHBDbEFSeDI1ZzN4NVBXSzdWYXdRMEFodlgtSlhvRXJLMlNreGcxdGxFclVfS3NSblpMYkIyTm82Q3IySVN0aUZ3WUxMSHl6LUp3QWdsel92VnBzeVF2eExtNFNCcy1BdUpPdjFqRjVGQnc4VzNCSG9sX0ZrUEVVZnZTQWRqaG5odXRXMVM3TlFYZ3FJR1lkRGEzTERFRWxta3FwYlVELWZCSzBQa0MwQTA4a3FscGROUmhyNG5PSGZCRFJVdjJMamppUEtSbFU5d012WjhuNGRkcVFLOXNEMGpYaW1UV3hpLTduanlvOEJKaTBrTDF6VGVzMmh4d0RweS1lTFdWSlJYZFdlRE9OZEVucw==","email":"willzhmic@outlook.com"},"registry.redhat.io":{"auth":"fHVoYy1wb29sLWExMWJiZjQ5LWExMzktNDBhNC1hZjM3LTViMWU1MzkyNjg2MzpleUpoYkdjaU9pSlNVelV4TWlKOS5leUp6ZFdJaU9pSXlaREUzTkdWall6WXpaalUwTkRZMk9EZasdfsadfasdfS5oOUN2ZXNrbGJfaTM1TXVfMXhtWWdwMW91YzhYNHQxM2lNQW1ESk40M0dlQ1lKQlpBVXFQYVZGN09aeXNuSHBYaHprNWpYZWc4MzAwUUFRaTNBVnBNNFIxZ2VaeElVQjQ5S2lDbzVTWXRibHVPWGhRc2xXcUdFRklzbnJMSkxwS0hPNXUzX1BaWVNRNWxGNDFIWks5MERPdlo4YVAwMmpIMmZmZ0x4MXFmZFBkUXIxdTNDc3pCYTlWcFBzQjRMWlNzQkQwQWVCYmZibHNpUkRXbDBUSWx4bnFiTWItSFMydlBnSHZQbWs0ZENub2Q5TDdWek5FMVpJNkdPOC1LM0NCb1NacFVNTm9JdlFFWHpBZVJoRnZVZlF2RlJYRDJUblJQSHg2UzdOemM4SnRja3R1OE1FSmJmV0ZvQ2NyeE9uejNsaXpsSkVYYzdjLTA2V0NpVmZndVpfTXpOU1dmSlhWOW9QMlBxQV94eFhELS1hWE84OUhUczdmNWQ4VXgtTEhqczQybWhSMU9jeWYyT2ZYbUloSkRGaVRIaENqUGVSTHBDbEFSeDI1ZzN4NVBXSzdWYXdRMEFodlgtSlhvRXJLMlNreGcxdGxFclVfS3NSblpMYkIyTm82Q3IySVN0aUZ3WUxMSHl6LUp3QWdsel92VnBzeVF2eExtNFNCcy1BdUpPdjFqRjVGQnc4VzNCSG9sX0ZrUEVVZnZTQWRqaG5odXRXMVM3TlFYZ3FJR1lkRGEzTERFRWxta3FwYlVELWZCSzBQa0MwQTA4a3FscGROUmhyNG5PSGZCRFJVdjJMamppUEtSbFU5d012WjhuNGRkcVFLOXNEMGpYaW1UV3hpLTduanlvOEJKaTBrTDF6VGVzMmh4d0RweS1lTFdWSlJYZFdlRE9OZEVucw==","email":"willzhmic@outlook.com"}}}
转换为json格式:
apt install -y jq
cat ./pull-secret.txt | jq . > pull-secret.json


#生成本地harbor镜像仓库base64位的加密口令

echo -n 'admin:Harbor12345' | base64 -w0
创建harbor镜像仓库登录文件:
cat >pull-secret-local.json<<EOF
{
    "auths":{
        "registry.example.com:8443":{
            "auth":"YWRtaW46SGFyYm9yMTIzNDU=",
            "email":""
        }
    }
}
EOF
将harbor镜像仓库登录文件内容追加到pull-secret.json中,最终示例如下::

查看oc版本号:
root@bastion:/opt/okd-install/4.10.0# oc version
Client Version: 4.10.0-0.okd-2022-03-07-131213
Server Version: 4.10.0-0.okd-2022-03-07-131213
Kubernetes Version: v1.23.3-2003+e419edff267ffa-dirty

#配置以下变量

export OKD_RELEASE="4.10.0-0.okd-2022-03-07-131213"
export LOCAL_REGISTRY='registry.example.com:8443'
export LOCAL_REPOSITORY='openshift/okd'
export PRODUCT_REPO='openshift'
export LOCAL_SECRET_JSON='/opt/okd-install/4.10.0/pull-secret.json'
export RELEASE_NAME="okd"
开始从quay.io拉取okd镜像并同步到本地harbor仓库:
oc adm release mirror -a ${LOCAL_SECRET_JSON}  \
     --from=quay.io/${PRODUCT_REPO}/${RELEASE_NAME}:${OKD_RELEASE} \
     --to=${LOCAL_REGISTRY}/${LOCAL_REPOSITORY} \
--to-release-image=${LOCAL_REGISTRY}/${LOCAL_REPOSITORY}:${OKD_RELEASE}查看执行过程,执行完成后如下,记录末尾imageContentSources内容,后续需要添加到安装配置文件中。:
sha256:f70bce9d6de9c5e3cb5d94ef9745629ef0fb13a8873b815499bba55dd7b8f04b registry.example.com:8443/openshift/okd:4.10.0-0.okd-2022-03-07-131213-x86_64-multus-whereabouts-ipam-cni
sha256:d4e2220f04f6073844155a68cc53b93badfad700bf3da2da1a9240dff8ba4984 registry.example.com:8443/openshift/okd:4.10.0-0.okd-2022-03-07-131213-x86_64-csi-external-attacher
info: Mirroring completed in 6m5.16s (2.9MB/s)

Success
Update image:  registry.example.com:8443/openshift/okd:4.10.0-0.okd-2022-03-07-131213
Mirror prefix: registry.example.com:8443/openshift/okd
Mirror prefix: registry.example.com:8443/openshift/okd:4.10.0-0.okd-2022-03-07-131213

To use the new mirrored repository to install, add the following section to the install-config.yaml:

imageContentSources:
- mirrors:
  - registry.example.com:8443/openshift/okd
  source: quay.io/openshift/okd
- mirrors:
  - registry.example.com:8443/openshift/okd
  source: quay.io/openshift/okd-content


To use the new mirrored repository for upgrades, use the following to create an ImageContentSourcePolicy:

apiVersion: operator.openshift.io/v1alpha1
kind: ImageContentSourcePolicy
metadata:
  name: example
spec:
  repositoryDigestMirrors:
  - mirrors:
    - registry.example.com:8443/openshift/okd
    source: quay.io/openshift/okd
  - mirrors:
    - registry.example.com:8443/openshift/okd
    source: quay.io/openshift/okd-content
登录harbor仓库
登录harbor仓库,确认镜像已经存在,当前版本共169个镜像,占用磁盘空间约12.5GB

1.8:创建OpenShift安装配置文件
为集群节点 SSH 访问生成密钥对: 在 OKD 安装期间,可以向安装程序提供 SSH 公钥。密钥通过其 Ignition 配置文件传递给 Fedora CoreOS (FCOS) 节点,并用于验证对节点的 SSH 访问,将密钥传递给节点后,您可以使用密钥对以core用户身份 SSH 进入 FCOS 节点。
[root@bastion ~]# ssh-keygen -t rsa -b 4096 -N '' -f ~/.ssh/id_rsa

#将 SSH 私钥添加到 ssh-agent
[root@bastion ~]# ssh-add ~/.ssh/id_rsa

#查看生成的ssh公钥,后续需要复制到install-config.yaml文件的sshKey字段:
[root@bastion ~]# cat /root/.ssh/id_rsa.pub
1.9:查看harbor CA证书信息,后续需要复制到install-config.yaml文件的additionalTrustBundle字段
[root@bastion ~]# cat /opt/harbor/cert/ca.crt

#查看harbor仓库登录密钥,使用jq将密钥压缩为一行,后续需要复制到install-config.yaml文件的pullSecret字段:

root@bastion:~# cat /opt/okd-install/4.10.0/pull-secret.json|jq -c

#手动创建安装配置文件,必须命名为install-config.yaml
[root@bastion ~]# vi /opt/okd-install/4.10.0/install-config.yaml

#配置如下内容:
apiVersion: v1
baseDomain: example.com
compute:
- hyperthreading: Enabled
  name: worker
  replicas: 0
controlPlane:
  hyperthreading: Enabled
  name: master
  replicas: 3
metadata:
  name: okd4
networking:
  clusterNetwork:
  - cidr: 10.128.0.0/14
    hostPrefix: 23
  networkType: OVNKubernetes
  serviceNetwork:
  - 172.30.0.0/16
platform:
  none: {}
fips: false
pullSecret: '{"auths":{"cloud.openshift.com":{"auth":"b3BlbnNoaWZ0LXJlbGVhc2UtasdfasfdasfasfsadfasfdasfDF0NDhjM2NkYjFiNTg0Y2M5MTY6VVBPRjZVTFRUQUpDTVhMSzFaNElNQkxWRUQwVjQ0VUFQOFVBSzZIR0pQWVNONUtZUDdETk1YMlZWWkw4M1A3TQ==","email":"willzhmic@outlook.com"},"quay.io":{"auth":"b3BlbnNoaWZ0LXJlbGVhc2UtZGV2K29jbV9hY2Nlc3NfZjBjYmJiMDgyN2QyNGI0NDhjM2NkYjFiNTg0Y2M5MTY6VVBPRjZVTFRUQUpDTVhMSzFaNElNQkxWRUQwVjQ0VUFQOFVBSzZIR0pQWVNONUtZUDdETk1YMlZWWkw4M1A3TQ==","email":"example@outlook.com"},"registry.connect.redhat.com":{"auth":"fHVoYy1wb29sLWExMWJiZjQ5LWExMzktNDBhNC1hZjM3LTViMWU1MzkyNjg2MzpleUpoYkdjaU9pSlNVelV4TWlKOS5leUp6ZFdJaU9pSXlaREUzTkdWall6WXpaalUwTkRZMk9EZ3dOekZrWVRjME9UYzRPR0UzWkNKOS5oOUN2ZXNrbGJfaTM1TXVfMXhtWWdwMW91YzhYNHQxM2lNQW1ESk40M0dlQ1lKQlpBVXFQYVZGN09aeXNuSHBYaHprNWpYZWc4MzAwUUFRaTNBVnBNNFIxZ2VaeElVQjQ5S2lDbzVTWXRibHVPWGhRc2xXcUdFRklzbnJMSkxwS0hPNXUzASDFASDFASFSAFDAIMmZmZ0x4MXFmZFBkUXIxdTNDc3pCYTlWcFBzQjRMWlNzQkQwQWVCYmZibHNpUkRXbDBUSWx4bnFiTWItSFMydlBnSHZQbWs0ZENub2Q5TDdWek5FMVpJNkdPOC1LM0NCb1NacFVNTm9JdlFFWHpBZVJoRnZVZlF2RlJYRDJUblJQSHg2UzdOemM4SnRja3R1OE1FSmJmV0ZvQ2NyeE9uejNsaXpsSkVYYzdjLTA2V0NpVmZndVpfTXpOU1dmSlhWOW9QMlBxQV94eFhELS1hWE84OUhUczdmNWQ4VXgtTEhqczQybWhSMU9jeWYyT2ZYbUloSkRGaVRIaENqUGVSTHBDbEFSeDI1ZzN4NVBXSzdWYXdRMEFodlgtSlhvRXJLMlNreGcxdGxFclVfS3NSblpMYkIyTm82Q3IySVN0aUZ3WUxMSHl6LUp3QWdsel92VnBzeVF2eExtNFNCcy1BdUpPdjFqRjVGQnc4VzNCSG9sX0ZrUEVVZnZTQWRqaG5odXRXMVM3TlFYZ3FJR1lkRGEzTERFRWxta3FwYlVELWZCSzBQa0MwQTA4a3FscGROUmhyNG5PSGZCRFJVdjJMamppUEtSbFU5d012WjhuNGRkcVFLOXNEMGpYaW1UV3hpLTduanlvOEJKaTBrTDF6VGVzMmh4d0RweS1lTFdWSlJYZFdlRE9OZEVucw==","email":"example@outlook.com"},"registry.redhat.io":{"auth":"fHVoYy1wb29sLWExMWJiZjQ5LWExMzktNDBhNC1hZjM3LTViMWU1MzkyNjg2MzpleUpoYkdjaU9pSlNVelV4TWlKOS5leUp6ZFdJaU9pSXlaREUzTkdWall6WXpaalUwTkRZMk9EZ3dOekZrWVRjME9UYzRPR0UzWkNKOS5oOUN2ZXNrbGJfaTM1TXVfMXhtWWdwMW91YzhYNHQxM2lNQW1ESk40M0dlQ1lKQlpBVXFQYVZGN09aeXNuSHBYaHprNWpYZWc4MzAwUUFRaTNBVnBNNFIxZ2VaeElVQjQ5S2lDbzVTWXRibHVPWGhRc2xXcUdFRklzbnJMSkxwS0hPNXUzX1BaWWQREQWERREQWERQWERQWERWQERQWERWQRQWRQWRPOC1LM0NCb1NacFVNTm9JdlFFWHpBZVJoRnZVZlF2RlJYRDJUblJQSHg2UzdOemM4SnRja3R1OE1FSmJmV0ZvQ2NyeE9uejNsaXpsSkVYYzdjLTA2V0NpVmZndVpfTXpOU1dmSlhWOW9QMlBxQV94eFhELS1hWE84OUhUczdmNWQ4VXgtTEhqczQybWhSMU9jeWYyT2ZYbUloSkRGaVRIaENqUGVSTHBDbEFSeDI1ZzN4NVBXSzdWYXdRMEFodlgtSlhvRXJLMlNreGcxdGxFclVfS3NSblpMYkIyTm82Q3IySVN0aUZ3WUxMSHl6LUp3QWdsel92VnBzeVF2eExtNFNCcy1BdUpPdjFqRjVGQnc4VzNCSG9sX0ZrUEVVZnZTQWRqaG5odXRXMVM3TlFYZ3FJR1lkRGEzTERFRWxta3FwYlVELWZCSzBQa0MwQTA4a3FscGROUmhyNG5PSGZCRFJVdjJMamppUEtSbFU5d012WjhuNGRkcVFLOXNEMGpYaW1UV3hpLTduanlvOEJKaTBrTDF6VGVzMmh4d0RweS1lTFdWSlJYZFdlRE9OZEVucw==","email":"example@outlook.com"},"registry.example.com:8443":{"auth":"YWRtaW46SGFyYm9yMTIzNDU=","email":""}}}'
sshKey: 'ssh-rsa AAAAB3NzaC1yc2EAAAADAQABAAACAQCviB7Wuuzwfdv5Ax81bYpbTFNHu9ZIHF9VflnFcYxoV7clzP5YNRYkZ4wi0CMTIWCO/wVG2Vi5EkuhrUwJpAKtY0z/ahx7Nv64XOZq2JSXYdgGwgKemB0gknLDLwBAlUYRrik0t4dihmbSXdIqaWHjUskG3EwIXLod5nEMrB7R0I9C/Hl7xLNVuGbBrLsUlGNW0k7HWFMejXcwZ7wTjvMQFys7iwNOfcDOsIis8pU7EkwfG5PfLBRTl5zojtSXe6CxVTFtnlXawBKzT35ALopYX2dumejfNU3QdkMOv0AmhSe2H50xpN18VcaA8v+Tu70iHuLQWERQWERQWERQWERWQERWQERvbVkFyCHnE3BvFs/gl7rJ9Y3gMP0+YRSbrY/GxtYx++4Ha0zp30K7Zgbtvc7y8vJrGvcjcsNgMFz2J+HbNLXwFuRh4C8HW6mCoC3VjMYC4BCHhtOLkvDtQ06uRm9IGxvLmSfDOw87xMv1eBD7lyfnUW5XqjYNU8/6TfXwtvf/H8lpEPB5wg2/m0rKc068xqUQApyiF8Pm4C2mbhSFAN0s0GpMTwlRJICQnu/v6ml1nnLRKmLo850ggwiweYKWbEaMO7llcGblDVJzdmUtLBcQUV5dhr+Wz9zY0RJeR1mTOLy+p40qISS1CqnWXUwQ== root@bastion.okd4.example.com'
additionalTrustBundle: |
  -----BEGIN CERTIFICATE-----
  MIIFyzCCA7OgAwIBAgIUTnWem/2tfnp3D1iHVG80CJ1NS6UwDQYJKoZIhvcNAQEN
  BQAwdTELMAkGA1UEBhMCQ04xEDAOBgNVBAgMB0JlaWppbmcxEDAOBgNVBAcMB0Jl
  aWppbmcxEDAOBgNVBAoMB2V4YW1wbGUxETAPBgNVBAsMCFBlcnNvbmFsMR0wGwYD
  VQQDDBRyZWdpc3RyeS5leGFtcGxlLmNvbTAeFw0yMjA0MDMxMzQ5NDlaFw0zMjAz
  MzExMzQ5NDlaMHUxCzAJBgNVBAYTAkNOMRAwDgYDVQQIDAdCZWlqaW5nMRAwDgYD
  VQQHDAdCZWlqaW5nMRAwDgYDVQQKDAdleGFtcGxlMREwDwYDVQQLDAhQZXJzb25h
  bDEdMBsGA1UEAwwUcmVnaXN0cnkuZXhhbXBsZS5jb20wggIiMA0GCSqGSIb3DQEB
  AQUAA4ICDwAwggIQWREWEQE5HrJrtWERQWQRQWERWREQ3OEDQrGWO5zXYBbeMgDw
  6wTPrQXErApKT28eLzDbgSQlNqzooYcq3SF93TWUMyDZpA8iIKiUChayueymcSA4
  AYpOOJGDGIDC3mFXUSuc8Lflm7snj7OjqEEsyP9NX3DuNfxzhf1/OaXKX0KPgQck
  xTZNiddeb+PAg8fWXuw2mWpVLbijGAK2bE4Y0Gs3LTp1AbeI5uRrJeRe6WLElXmy
  QS9kwVFqto8qzRwVnXZw0YC6AiiDwIGsQ0NZWnfABy6qG4f350NwsF7pSCY2Dw5N
  z46lrlIWPy1ZhXCiHpPI9A1dQRphHqTPJXRoOso/H+2QW9TjBxeWflXiXF9GwMvr
  nFM0bJe/6WMBVHmo5r8cV09SdjJyd42+Ufd56KRBpQOeZBOMrE0+6HrpZj7OKwAj
  dgWiwlzKlyyP6YcAbw2tPqKiwA6O9sDw4szyrAr6PvpgCE+HnJYli24s1d1QofYE
  12J+c1wbq/g3uQLw6nGYVH5RQrrXu1XghkTfqBaHsW6l1lFHchS0E7NHulf37SpS
  sgh814sQ8hGTsElu5jZaDC+74lG63SlZuDBBFFZpIwUWnhpq2LmGQRFtrbCinelj
  EhnK/ngjmuXtIvOxKB7BaYX0DOUtG7AK2mNrkjNBY89mLXz5WbeZS2/cyyz1y+2Z
  swIDAQABo1MwUTAdBgNVHQ4EFgQUvYXyYIJcm1IdXJEyQp+7jvvKHNowHwYDVR0j
  BBgwFoAUvYXyYIJcm1IdXJEyQp+7jvvKHNowDwYDVR0TAQH/BAUwAwEB/zANBgkq
  hkiG9w0BAQ0FAAOCAgEAFPbMq6lq34uq2Oav2fhjeV6h/C5QCUhs/7+n4RAgO1+s
  8QrRwLBRyyZ3K0Uqkw64kUq3k4QxeSC9svOA7pyt14Z2KJRlZ2bNZ1vYJVDd9ZUQ
  lQGdXgGg1l/PloQWERWQWEQRQWRQWREQWWQRWQEErgZHlVueJvuxl/e//D1XQ/Et
  JEQpisUQR+Knhp85kQpg91GBXBkSaX5z76HiSkFHopEaUXORO13rdIqg/QeixVtG
  5WXU14QLkYYoIyalbZ0oPawsFicAbBPEDQzfoWl/g2Jk+r+AMpYA2s2Q9UwMpc7H
  96s2q7sDRQKrzBL//ypo4wRAEwd8mSmg756ZuDcltbYvl4roLw7VYlfvUvUSsaQT
  EoE7cMarQZrss48nKRtCUoLbrjcPFG7AbwiU8J/Uz52IV7EdaJ1/2s07G7sclAgX
  TQNA0E/wDMPZSHat+RaLDBjHGhLINF6ey/J2rJ+bHbKq49CT07RshOfs0a287RqM
  U00XNCi+ujyIQmfiI0Lg6vgm6lm6HLw1B66jzdC9K07J6LNPE1125hdxFr04UH6b
  CP/oiH6v/aJenQe+E0EypdK15dA2ozRD0zXcEZcVbEgr+jXSK3rXDi3UlQ21IAN6
  WPmLWepuCyQLI6bKSPxWC/a8FL7WJiBnSS1bzzh9TYGHw7iS0EqdHdtLVzWWzM4=
  -----END CERTIFICATE-----
imageContentSources:
- mirrors:
  - registry.example.com:8443/openshift/okd
  source: quay.io/openshift/okd
- mirrors:
  - registry.example.com:8443/openshift/okd
  source: quay.io/openshift/okd-content
配置文件说明:
- baseDomain: example.com ##配置基础域名,OpenShift 所有DNS 记录必须是此基础域名的子域,并包含集群名称
- compute.hyperthreading : ##表示启用同步多线程或超线程。默认启用同步多线程,可以提高机器内核的性能
- compute.replicas: ## 配置 Worker Node 数量,UPI模式手动创建 Worker Node,这里必须设置为 0
- controlPlane. replicas:: ##集群master节点数量
- metadata.name ##集群名称,必须与DNS 记录中指定的集群名称一致
- networking. clusterNetwork: ##Pod的IP地址池配置,不能与物理网络冲突
- networking. serviceNetwork: ##Service的IP地址池配置,不能与物理网络冲突
- platform: ##平台类型 ,使用裸金属安装类别,配置为none
- pullSecret: ‘text’ ##这里的text即上文中registry登录密钥格式中的内容
- sshKey: ‘text’ ##这里的text即上文中远程登录rsa公钥获取中的内容
- additionalTrustBundle: ## 镜像仓库CA证书,注意缩进两个空格
- imageContentSources: ##指定自建registry仓库地址
2.0 创建k8s清单和ignition配置文件
创建安装目录并复制配置文件:
mkdir -p /opt/openshift/
cp /opt/okd-install/4.10.0/install-config.yaml /opt/openshift/
生成 Kubernetes 清单
切换到包含 OKD 安装程序目录,并为集群生成 Kubernetes 清单
cd /opt/openshift/
openshift-install create manifests --dir=/opt/openshift

#修改 manifests/cluster-scheduler-02-config.yml 文件
#修改 manifests/cluster-scheduler-02-config.yml 文件,将mastersSchedulable的值设为flase,以防止将 Pod 调度到 Master Node,如果仅安装三节点集群,可以跳过以下步骤以允许控制平面节点可调度。

sed -i 's/mastersSchedulable: true/mastersSchedulable: False/' /opt/openshift/manifests/cluster-scheduler-02-config.yml
创建 Ignition 配置文件
创建 Ignition 配置文件,OKD 安装程序生成的 Ignition 配置文件包含 24 小时后过期的证书,建议在证书过期之前完成集群安装,避免安装失败。
openshift-install create ignition-configs --dir=/opt/openshift

#查看生成的相关配置文件
root@bastion:/opt/openshift# tree
.
├── auth
│   ├── kubeadmin-password
│   └── kubeconfig
├── bootstrap.ign
├── master.ign
├── metadata.json
└── worker.ign


#复制点火配置文件到nginx目录

cp /opt/openshift/*.ign /usr/share/nginx/html/ignition
chmod -R a+rwx /usr/share/nginx/html/ignition

#配置bastion节点使用oc和kubectl命令,每次在bastion更新新版本oc时,以及install新的ign点火文件后,都需要更新这个目录,确保kube的正常使用。

mkdir -p /root/.kube
cp /opt/openshift/auth/kubeconfig ~/.kube/config
如果后续部署失败,需要清理bastion节点以下内容,重新执行上面步骤后再进行引导部署(从创建安装目录并复制配置文件开始):
rm -rf /opt/openshift/*
rm -rf /opt/openshift/.openshift_install*
rm -rf /usr/share/nginx/html/ignition/*
rm -rf ~/.kube/config
2.1:下载CoresOS引导ISO
下载fedora-coreos镜像
下载fedora-coreos镜像到nginx目录,下载地址:Download Fedora CoreOS
cd /usr/share/nginx/html/install
wget https://builds.coreos.fedoraproject.org/prod/streams/stable/builds/35.20220313.3.1/x86_64/fedora-coreos-35.20220313.3.1-metal.x86_64.raw.xz
wget https://builds.coreos.fedoraproject.org/prod/streams/stable/builds/35.20220313.3.1/x86_64/fedora-coreos-35.20220313.3.1-metal.x86_64.raw.xz.sig

mv fedora-coreos-35.20220313.3.1-metal.x86_64.raw.xz fcos.raw.xz
mv fedora-coreos-35.20220313.3.1-metal.x86_64.raw.xz.sig fcos.xz.sig
chmod -R a+rwx /usr/share/nginx/html/install
下载Fedora coreos livecd iso
wget https://builds.coreos.fedoraproject.org/prod/streams/stable/builds/35.20220313.3.1/x86_64/fedora-coreos-35.20220313.3.1-live.x86_64.iso
2.2:创建虚拟机
使用上面下载的Fedora coreos livecd iso挂载到虚拟机的CD/DVD中,需要1个bootstrap节点,3个master节点及2个worker节点。先创建不开机
集群节点部署:
1.火种节点部署:
1.1:引导boostrap节点
开始启动boostrap节点,看到启动画面后快速按下 tab 键,进入 Kernel 参数配置页面,填写引导信息。
备注:vmware workstation支持对接vcenter并管理其中的虚拟机,vmware workstation编辑选项中支持粘贴文本功能,可以省略手动输入的繁琐操作。
进入Tab后 编写IP信息(我已部署完成,新建了一个机器演示,IP不同请注意修改)
ip=10.64.34.81::10.64.32.1:255.255.248.0:bootstrap.okd4.example.com:ens192:none nameserver=10.64.34.80如下:点击确定

进到系统后输入一下命令:
sudo coreos-installer install --ignition-url=http://10.64.34.80:8088/ignition/worker.ign /dev/sda --image-url=http://10.64.34.80:8088/install/fcos.raw.xz --insecure-ignition --insecure --copy-network
参数说明:
- ip=本机ip地址::网关地址:子网掩码:本机主机名:网卡名:none
- nameserver=dns地址
- --image-url:手动指定镜像 URL。
- --ignition-url: 从 URL 嵌入 Ignition 配置
- /dev/sda : 镜像安装位置
- --insecure-ignition 允许没有 HTTPS 或 hash 的 Ignition URL。
- --insecure 跳过 RHCOS 镜像签名验证。
- --copy-network 从安装环境中复制网络配置。
copy-network选项仅复制在/etc/NetworkManager/system-connections下找到的网络配置。特别是,它不会复制系统主机名。
查看bootstrap引导日志
root@bastion:~# openshift-install --dir=/opt/openshift wait-for bootstrap-complete --log-level=debug
DEBUG OpenShift Installer 4.10.0-0.okd-2022-03-07-131213
......


#从bastion节点SSH连接到bootstrap节点

root@bastion:~# ssh -i ~/.ssh/id_rsa core@bootstrap.okd4.example.com
[core@bootstarp ~]$ sudo -i

#查看bootstrap服务运行日志
[root@bootstrap ~]# journalctl -b -f -u release-image.service -u bootkube.service
等待一段时间查看运行以下容器,并处于Running状态,说明bootstrap节点已经就绪,等待下一阶段引导master节点
[root@bootstrap ~]# crictl ps
CONTAINER           IMAGE                                                                                           CREATED             STATE               NAME                             ATTEMPT             POD ID
6d6934f426cea       57cb23b4dd54b86edec76c373b275d336d22752d2269d438bd96fbb1676641bc                                10 minutes ago      Running             kube-controller-manager          2                   d6574a4a417e4
e2bd2c3e23c54       57cb23b4dd54b86edec76c373b275d336d22752d2269d438bd96fbb1676641bc                                10 minutes ago      Running             kube-scheduler                   2                   da8455e61b32d
92f06a438fc25       2dcba596e247eb8940ba59e48dd079facb3a17beae00b3a7b1b75acb1c782048                                10 minutes ago      Running             kube-apiserver-insecure-readyz   18                  d47dd0ff6e586
b066e0b17df23       57cb23b4dd54b86edec76c373b275d336d22752d2269d438bd96fbb1676641bc                                10 minutes ago      Running             kube-apiserver                   18                  d47dd0ff6e586
7ab95cc1d0ed8       quay.io/openshift/okd@sha256:2eee0db9818e22deb4fa99737eb87d6e9afcf68b4e455f42bdc3424c0b0d0896   11 minutes ago      Running             cluster-version-operator         1                   a63ac0c9a1e72
f4443fc71a580       ae99f186ae09868748a605e0e5cc1bee0daf931a4b072aafd55faa4bc0d918df                                11 minutes ago      Running             cluster-policy-controller        1                   d6574a4a417e4
75dfba68b1c74       194a3e4cff36cd53d443e209ca379da2017766e6c8d676ead8e232c4361a41ed                                11 minutes ago      Running             cloud-credential-operator        1                   03305d772455d
ea634f3723b20       f4c2fcf0b6e255c7b96298ca39b3c08f60d3fef095a1b88ffaa9495b8b301f13                                6 hours ago         Running             machine-config-server            0                   1dbe3ff66be8a
ad902a32559ec       4e1485364a88b0d4dab5949b0330936aa9863fe5f7aa77917e85f72be6cea3ad                                6 hours ago         Running             etcd                             0                   af73d75d8da46
6cce15d64f5fb       4e1485364a88b0d4dab5949b0330936aa9863fe5f7aa77917e85f72be6cea3ad                                6 hours ago         Running             etcdctl                          0                   af73d75d8da46
2.引导启动Master节点
同样的,从fedora-coreos-live.iso引导启动3个master节点,按tab键进入内核参数配置界面,输入以下内容,注意修改ignition_url,改为使用master.ign点火文件(方式与火种节点部署一致)
三台master创建完成后:
在bastion节点查看所有master节点是否正常启动
root@bastion:/opt/okd-install/4.10.0# oc get nodes
NAME                       STATUS   ROLES    AGE   VERSION
master0.okd4.example.com   Ready    master   18h   v1.23.3+759c22b
master1.okd4.example.com   Ready    master   18h   v1.23.3+759c22b
master2.okd4.example.com   Ready    master   18h   v1.23.3+759c22b
3.引导启动Worker节点
master节点就绪后,可以开始从fedora-coreos-live.iso引导启动2个worker节点,按tab键进入内核参数配置界面,输入以下内容,注意修改ignition_url,改为使用worker.ign点火文件
两台Worker节点创建好后:
4.批准机器的证书签名请求
将机器添加到集群时,会为添加的每台机器生成两个待处理的证书签名请求 (CSR)。必须确认这些 CSR 已获得批准,或在必要时自行批准。必须首先批准客户端请求,然后是服务器请求。
在某些 CSR 获得批准之前,前面的输出可能不包括计算节点,也称为工作节点。
#查看待处理的 CSR,并确保看到添加到集群的每台机器的客户端请求为Pending或状态
root@bastion:~# oc get csr
NAME                                             AGE     SIGNERNAME                                    REQUESTOR                                                                         REQUESTEDDURATION   CONDITION
csr-5mklm                                        33m     kubernetes.io/kube-apiserver-client-kubelet   system:serviceaccount:openshift-machine-config-operator:node-bootstrapper         <none>              Approved,Issued
csr-9dh5q                                        33m     kubernetes.io/kube-apiserver-client-kubelet   system:serviceaccount:openshift-machine-config-operator:node-bootstrapper         <none>              Approved,Issued
csr-bdmjm                                        28m     kubernetes.io/kube-apiserver-client-kubelet   system:serviceaccount:openshift-machine-config-operator:node-bootstrapper         <none>              Approved,Issued
csr-bsdwv                                        35m     kubernetes.io/kubelet-serving                 system:node:master0.okd4.example.com                                              <none>              Approved,Issued
csr-ddgpl                                        113s    kubernetes.io/kube-apiserver-client-kubelet   system:serviceaccount:openshift-machine-config-operator:node-bootstrapper         <none>              Pending
csr-ld97n                                        36m     kubernetes.io/kube-apiserver-client-kubelet   system:serviceaccount:openshift-machine-config-operator:node-bootstrapper         <none>              Approved,Issued
csr-nbqqm                                        27m     kubernetes.io/kubelet-serving                 system:node:master2.okd4.example.com                                              <none>              Approved,Issued
csr-nrd89                                        2m32s   kubernetes.io/kube-apiserver-client-kubelet   system:serviceaccount:openshift-machine-config-operator:node-bootstrapper         <none>              Pending
csr-qnv96                                        33m     kubernetes.io/kubelet-serving                 system:node:master1.okd4.example.com                                              <none>              Approved,Issued
csr-slqcv                                        97s     kubernetes.io/kube-apiserver-client-kubelet   system:serviceaccount:openshift-machine-config-operator:node-bootstrapper         <none>              Pending
csr-tccqf                                        36m     kubernetes.io/kube-apiserver-client-kubelet   system:serviceaccount:openshift-machine-config-operator:node-bootstrapper         <none>              Approved,Issued
csr-vp8j5                                        28m     kubernetes.io/kube-apiserver-client-kubelet   system:serviceaccount:openshift-machine-config-operator:node-bootstrapper         <none>              Approved,Issued
csr-wbhdk                                        2m16s   kubernetes.io/kube-apiserver-client-kubelet   system:serviceaccount:openshift-machine-config-operator:node-bootstrapper         <none>              Pending
system:openshift:openshift-authenticator-48cmp   27m     kubernetes.io/kube-apiserver-client           system:serviceaccount:openshift-authentication-operator:authentication-operator   <none>              Approved,Issued
system:openshift:openshift-monitoring-x6l9v      24m     kubernetes.io/kube-apiserver-client           system:serviceaccount:openshift-monitoring:cluster-monitoring-operator            <none>              Approved,Issued
在此示例中,两台机器正在加入集群。可能会在列表中看到更多已批准的 CSR。如果 CSR 未获批准,则在添加的机器的所有待处理 CSR 都处于Pending状态后,批准集群机器的 CSR:
oc get csr -o go-template='{{range .items}}{{if not .status}}{{.metadata.name}}{{"\n"}}{{end}}{{end}}' | xargs --no-run-if-empty oc adm certificate approve


#输出结果如下:
certificatesigningrequest.certificates.k8s.io/csr-ddgpl approved
certificatesigningrequest.certificates.k8s.io/csr-nrd89 approved
certificatesigningrequest.certificates.k8s.io/csr-slqcv approved
certificatesigningrequest.certificates.k8s.io/csr-wbhdk approved

#查看节点状态,等待片刻两个新的worker节点处于Ready状态
root@bastion:/opt/okd-install/4.10.0# oc get nodes
NAME                       STATUS   ROLES    AGE   VERSION
master0.okd4.example.com   Ready    master   18h   v1.23.3+759c22b
master1.okd4.example.com   Ready    master   18h   v1.23.3+759c22b
master2.okd4.example.com   Ready    master   18h   v1.23.3+759c22b
worker0.okd4.example.com   Ready    worker   18h   v1.23.3+759c22b
worker1.okd4.example.com   Ready    worker   18h   v1.23.3+759c22b

#Worker的csr会处于pending状态,再次执行命令
oc get csr -o go-template='{{range .items}}{{if not .status}}{{.metadata.name}}{{"\n"}}{{end}}{{end}}' | xargs oc adm certificate approve
5.查看Operator运行状态
控制平面初始化后,您必须立即配置一些 Operator,以便它们都可用。列出在集群中运行的 Operator。输出包括 Operator 版本、可用性和正常运行时间信息,确认AVAILABLE列状态全部为True:
root@bastion:/opt/okd-install/4.10.0# oc get clusteroperators
NAME                                       VERSION                          AVAILABLE   PROGRESSING   DEGRADED   SINCE   MESSAGE
authentication                             4.10.0-0.okd-2022-03-07-131213   True        False         False      18h
baremetal                                  4.10.0-0.okd-2022-03-07-131213   True        False         False      18h
cloud-controller-manager                   4.10.0-0.okd-2022-03-07-131213   True        False         False      18h
cloud-credential                           4.10.0-0.okd-2022-03-07-131213   True        False         False      19h
cluster-autoscaler                         4.10.0-0.okd-2022-03-07-131213   True        False         False      18h
config-operator                            4.10.0-0.okd-2022-03-07-131213   True        False         False      18h
console                                    4.10.0-0.okd-2022-03-07-131213   True        False         False      18h
csi-snapshot-controller                    4.10.0-0.okd-2022-03-07-131213   True        False         False      18h
dns                                        4.10.0-0.okd-2022-03-07-131213   True        False         False      18h
etcd                                       4.10.0-0.okd-2022-03-07-131213   True        False         False      18h
image-registry                             4.10.0-0.okd-2022-03-07-131213   True        False         False      18h
ingress                                    4.10.0-0.okd-2022-03-07-131213   True        False         False      18h
insights                                   4.10.0-0.okd-2022-03-07-131213   True        False         False      18h
kube-apiserver                             4.10.0-0.okd-2022-03-07-131213   True        False         False      18h
kube-controller-manager                    4.10.0-0.okd-2022-03-07-131213   True        False         False      18h
kube-scheduler                             4.10.0-0.okd-2022-03-07-131213   True        False         False      18h
kube-storage-version-migrator              4.10.0-0.okd-2022-03-07-131213   True        False         False      18h
machine-api                                4.10.0-0.okd-2022-03-07-131213   True        False         False      18h
machine-approver                           4.10.0-0.okd-2022-03-07-131213   True        False         False      18h
machine-config                             4.10.0-0.okd-2022-03-07-131213   True        False         False      18h
marketplace                                4.10.0-0.okd-2022-03-07-131213   True        False         False      18h
monitoring                                 4.10.0-0.okd-2022-03-07-131213   True        False         False      18h
network                                    4.10.0-0.okd-2022-03-07-131213   True        False         False      18h
node-tuning                                4.10.0-0.okd-2022-03-07-131213   True        False         False      18h
openshift-apiserver                        4.10.0-0.okd-2022-03-07-131213   True        False         False      18h
openshift-controller-manager               4.10.0-0.okd-2022-03-07-131213   True        False         False      18h
openshift-samples                          4.10.0-0.okd-2022-03-07-131213   True        False         False      18h
operator-lifecycle-manager                 4.10.0-0.okd-2022-03-07-131213   True        False         False      18h
operator-lifecycle-manager-catalog         4.10.0-0.okd-2022-03-07-131213   True        False         False      18h
operator-lifecycle-manager-packageserver   4.10.0-0.okd-2022-03-07-131213   True        False         False      18h
service-ca                                 4.10.0-0.okd-2022-03-07-131213   True        False         False      18h
storage                                    4.10.0-0.okd-2022-03-07-131213   True        False         False      18h
查看所有的pod状态,确认全部为Running或Completed状态:
6.登录OpenShift Console
修改本地hosts文件,添加以下几条映射关系,或配置dns服务器地址
10.64.34.80 registry.example.com console-openshift-console.apps.okd4.example.com oauth-openshift.apps.okd4.example.com superset-openshift-operators.apps.okd4.example.com
然后打开浏览器,输入:https://console-openshift-console.apps.okd4.example.com
在bastion节点上输入以下命令获得账户和密码
root@bastion:/opt/okd-install/4.10.0# openshift-install --dir=/opt/openshift wait-for install-complete --log-level=debug
.........
INFO Access the OpenShift web-console here: https://console-openshift-console.apps.okd4.example.com
INFO Login to the console with user: "kubeadmin", and password: "4hpTF-yP9ud-Qh87g-qzoxR"
.........
7.登陆web页面: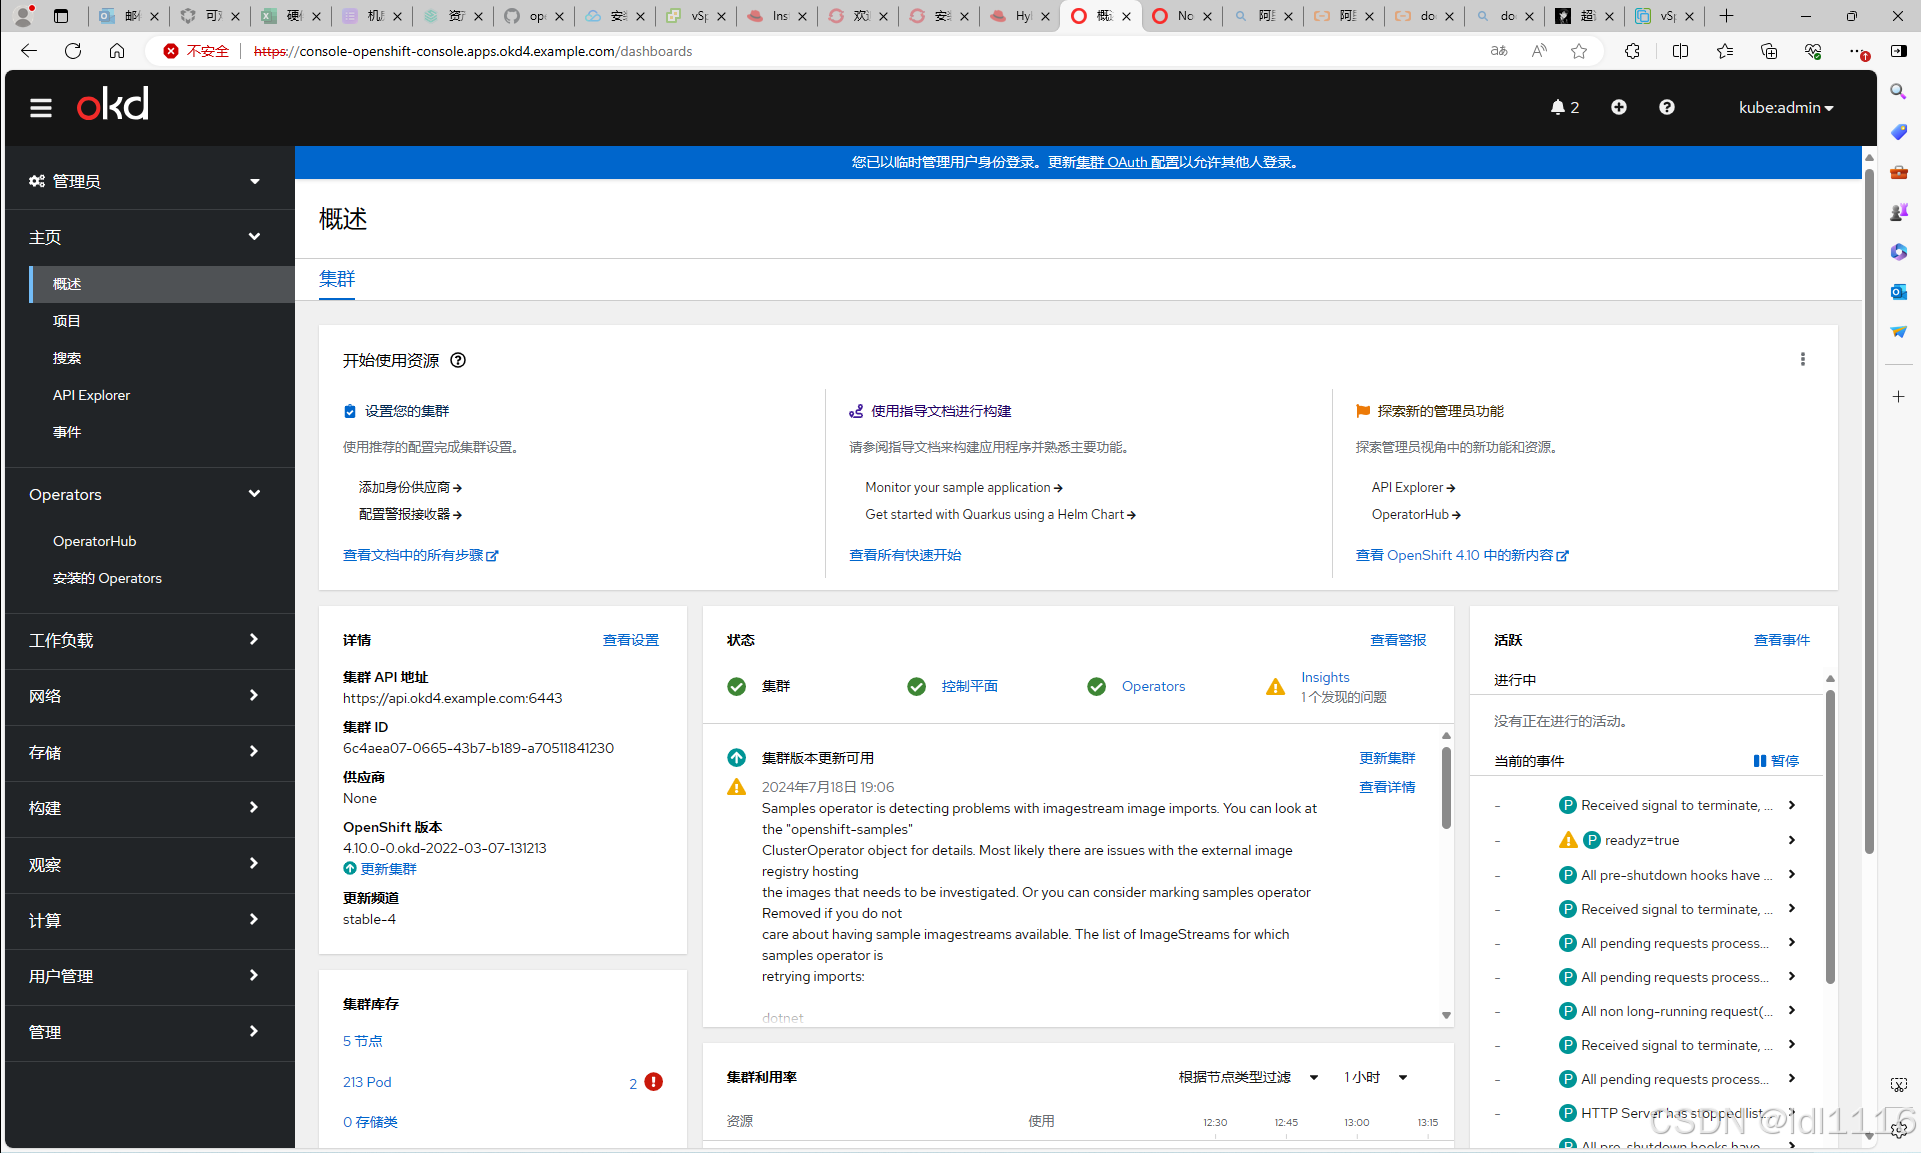
到此部署完成!!!
参考:
官方文档:10.2. 在裸机上安装用户置备的集群 | Red Hat Product Documentation
OpenShift 容器平台社区版 OKD 4.10.0部署--基于VSphere_okd安装-CSDN博客
OpenShift 容器平台社区版 OKD 4.10.0部署-CSDN博客
openshift 4.5.9 离线安装 · zhangguanzhang's Blog


 4740
4740

 被折叠的 条评论
为什么被折叠?
被折叠的 条评论
为什么被折叠?
 到【灌水乐园】发言


