


- 本章:将展示SpringBoot集成Redis三种客户端的配置要点和常见应用示例;
- 下章:自行实现一个方法级的缓存注解,简化版的Cacheable,使初学者加深对Spring缓存框架的理解。
一、Lettuce客户端
Lettuce 是一种可扩展的、线程安全的 Redis 高级客户端。
从 Spring Boot 2.x 开始, Lettuce 已取代 Jedis 成为SpringBoot 默认的 Redis 客户端。
- 相比于 Jedis,Lettuce更加全面,并且解决了 Jedis 客户端实例存在非线程安全的问题
- 支持同步编程,异步编程,响应式编程,自动重新连接,主从模式,集群模块,哨兵模式,管道和编码器等等高级的 Redis 特性
- Lettuce 底层基于 Netty 框架的事件驱动与 redis 通信,采用了非阻塞的 I/O 操作,可异步调用,相比 Jedis,性能高
- Lettuce 的 API 是线程安全的,如果不是执行阻塞和事务操作,如 BLPOP 和MULTI/EXEC 等命令,多个线程就可以共享一个连接,性能方面不会衰减。
1.1 pom.xml引入依赖
	<parent>
        <groupId>org.springframework.boot</groupId>
        <artifactId>spring-boot-starter-parent</artifactId>
        <version>2.1.3.RELEASE</version>
        <relativePath/>
    </parent>

<dependencies>
        <!-- redis 缓存操作  默认使用 Lettuce 客户端-->
        <dependency>
            <groupId>org.springframework.boot</groupId>
            <artifactId>spring-boot-starter-data-redis</artifactId>
        </dependency>

        <!-- pool 对象池 Lettuce客户端依赖的插件-->
        <dependency>
            <groupId>org.apache.commons</groupId>
            <artifactId>commons-pool2</artifactId>
        </dependency>

        <!-- 阿里JSON解析器 -->
        <dependency>
            <groupId>com.alibaba.fastjson2</groupId>
            <artifactId>fastjson2</artifactId>
            <version>2.0.34</version>
        </dependency>

        <!-- 方便等会写单元测试 -->
        <dependency>
            <groupId>org.springframework.boot</groupId>
            <artifactId>spring-boot-starter-test</artifactId>
            <scope>test</scope>
        </dependency>

        <!-- 单元测试 -->
        <dependency>
            <groupId>junit</groupId>
            <artifactId>junit</artifactId>
            <version>4.12</version>
            <scope>test</scope>
        </dependency>
    </dependencies>
1.2 application.yml
配置redis服务器配置
spring:
    redis:
        # 地址
        host: localhost
        # 端口,默认为6379
        port: 6379
        # 数据库索引
        database: 0
        # 密码
        password: 123456
        # 连接超时时间
        timeout: 10s
        lettuce:
            pool:
                # 连接池中的最小空闲连接
                min-idle: 0
                # 连接池中的最大空闲连接
                max-idle: 8
                # 连接池的最大数据库连接数
                max-active: 8
                # #连接池最大阻塞等待时间(使用负值表示没有限制)
                max-wait: -1ms
1.3 redis缓存应用
UserService.java
@Service
public class UserService {

	//由于引入redis-starter包,spring已经完成了RedisTemplate 对象创建,什么都不用做就可以直接使用了。
    @Autowired
    RedisTemplate redisTemplate;

	/**
     * 最简单的使用,通过key-value方式存取变量;
     * @param username
     * @return
     */
    public Object getUserInfo(String username) {
    	//通过用户名从缓存获取用户信息,如果没有即新建并存缓存起来;
        if (redisTemplate.opsForValue().get(username) == null) {
            System.out.println("未获取到缓存,新建用户信息.............");
            Map<String, Object> user = new HashMap<>();
            user.put("username", username);
            user.put("usercode", "zhangsan");
            user.put("sex", "男");
            user.put("createtime", new Date());
            redisTemplate.opsForValue().set(username, user);
        }
        return redisTemplate.opsForValue().get(username);
    }

	//从缓存获取,如果没有则新建,并设置了过期时间为10秒。
    public Object getUserInfo2(String username) {
        if (redisTemplate.opsForValue().get(username) == null) {
            System.out.println("未获取到缓存,新建用户信息.............");
            Map<String, Object> user = new HashMap<>();
            user.put("username", username);
            user.put("usercode", "zhangsan");
            user.put("sex", "男");
            user.put("createtime", DateUtils.format(new Date()));
            redisTemplate.opsForValue().set(username, user);
            //10秒后过期
            redisTemplate.expire(username, 10, TimeUnit.SECONDS);
        }
        return redisTemplate.opsForValue().get(username);
    }
}
1.3测试
UserServiceTest.java
    @Test
    public void testRedis() {
        Object user = userService.getUserInfo("2");
        System.out.println(user);
    }
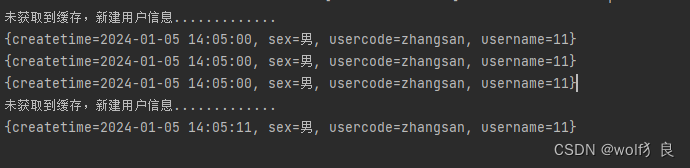
输出:

给缓存设置过期时间,再来存取。
@Test
    public void testRedisExpire() throws InterruptedException {
        System.out.println(userService.getUserInfo2("11"));
        Thread.sleep(1000);
        System.out.println(userService.getUserInfo2("11"));
        Thread.sleep(1000);
        System.out.println(userService.getUserInfo2("11"));
        Thread.sleep(9000);
        System.out.println(userService.getUserInfo2("11"));
    }
输出:
缓存过期时间设置为10秒,当第4次取值时,发现已经过期,自然需要新建对象了。
二、Redis客户端
Jedis 是一款老牌 Redis 的 Java 客户端,提供了比较全面的 Redis 命令的操作支持,也是目前使用最广泛的客户端。
优点如下:
- Jedis 的 API 提供了比较全面的 Redis 命令的支持
- Jedis 中的 Java 方法基本和 Redis 的 API 保持着一致,也就是说了解 Redis 的API,可以熟练的使用 Jedis
- 支持 pipelining、事务、LUA Scripting、Redis Sentinel、Redis Cluster等等 redis 提供的高级特性
- 客户端轻量,简洁,便于集成和改造
缺点如下:
- 使用阻塞的 I/O 操作,且其方法调用都是同步的,程序流需要等到 sockets 处理完 I/O 才能执行,不支持异步
- Jedis 在实现上是直接连接的 redis server,如果在多线程环境下是非线程安全的,这个时候可以使用连接池来管理 Jedis,已解决 Jedis 客户端实例存在非线程安全的问题
- 不支持读写分离,需要自己实现
2.1 pom.xml依赖引入
在实际SpringBoot项目中绝大多数情况都不会要求说使用Redis客户端,只有遇到变态需求时可能才会用到吧。不论是用Lettuce 还是用Redis,SpringBoot提供给我们使用的RedisTemplate 接口都是一致的。和Lettuce的差异只是引入的包的差异,SpringBoot已经默认帮我们引入Letucce了,如果要用Redis,那还得排除Letucce的引入,而指定引入Redis。如下:
 <!-- 实现对 Spring Data Redis 的自动化配置 -->
        <dependency>
            <groupId>org.springframework.boot</groupId>
            <artifactId>spring-boot-starter-data-redis</artifactId>
            <exclusions>
                <!-- 去掉对 Lettuce 的依赖,因为 Spring Boot 优先使用 Lettuce 作为 Redis 客户端 -->
                <exclusion>
                    <groupId>io.lettuce</groupId>
                    <artifactId>lettuce-core</artifactId>
                </exclusion>
            </exclusions>
        </dependency>

        <!-- 引入 Jedis 的依赖,这样 Spring Boot 实现对 Jedis 的自动化配置 -->
        <dependency>
            <groupId>redis.clients</groupId>
            <artifactId>jedis</artifactId>
        </dependency>
代码中使用方法与Lettuce是完成一致的。
三、Redisson
Redisson 是一个在 Redis 的功能基础上实现的 Java 驻内存数据网格客户端。实现了分布式和可扩展的 Java 数据结构,提供很多分布式相关操作服务,例如分布式锁,分布式集合,可通过 Redis 支持延迟队列。
Redisson和前两兄弟的区别就像一个用鼠标操作图形化界面,一个用命令行操作文件。Redisson是更高层的抽象,Jedis和Lettuce是Redis命令的封装。
Reddisson 的出现不是又来干一次Redis和Lettuce干过的事儿,而是站在巨人肩膀上干更大的事儿:让猿猿们在分布式场景下也能少掉些头发。
优点如下:
- 实现了分布式特性和可扩展的 Java 数据结构,例如分布式锁,分布式集合,分布式对象,分布式远程调度等等高级功能,适合分布式开发
- 与 Lettuce 一样,基于 Netty 框架的事件驱动与 redis 通信,支持异步调用,性能高
- Redisson 的 API 是线程安全的,所以可以使用单个 Redisson 连接来完成各种操作。
- 支持读写分离,支持读负载均衡,在主从复制和 Redis Cluster 架构下都可以使用
- 内建 Tomcat Session Manager,为 Tomcat 6/7/8 提供了会话共享功能,可以与 Spring Session 集成,实现基于 Redis 的会话共享
- 相比于 Jedis、Lettuce 等基于 redis 命令封装的客户端,Redisson 提供的功能更加高端和抽象,Redisson 可以类比 Spring 框架,这些框架搭建了应用程序的基础框架和功能,可以显著提升开发效率,让开发者有更多的时间来关注业务逻辑
所以从应用上讲,Redis和Lettuce能做的是Redisson都能做,其次还能干分布式下的粗活累活。
3.1 依赖引入
Redisson本身是基于Redis做的延伸,所以引入Redisson的时候就已经引入Redis包了,所以只需引入Redisson依赖就可以使用Redis的相关功能了。只是使用上与前面会有差异,效果都一样。
		<dependency>
            <groupId>org.springframework.boot</groupId>
            <artifactId>spring-boot-starter </artifactId>

        </dependency>
        <!--使用redisson作为缓存-->
        <dependency>
            <groupId>org.redisson</groupId>
            <artifactId>redisson</artifactId>
            <version>3.17.3</version>
        </dependency>
3.2Redisson对象配置
由于没有引入SpringBoot对Redisson的自动配置,这里进行手动配置一下,创建RedissonConfiguration.java
package com.luo.chengrui.labs.lab03.config;

import org.redisson.Redisson;
import org.redisson.config.Config;
import org.springframework.beans.factory.annotation.Value;
import org.springframework.boot.autoconfigure.condition.ConditionalOnProperty;
import org.springframework.cache.annotation.CachingConfigurerSupport;
import org.springframework.context.annotation.Bean;
import org.springframework.context.annotation.Configuration;

/**
 * redis配置
 */
@Configuration
public class RedissonConfig extends CachingConfigurerSupport {

	//创建redisson对象,这是单机版,另外还支持哨兵,和集群。
    @Bean(name = "redisson")
    @ConditionalOnProperty(prefix = "spring.redis", name = "host")
    public Redisson redissonSingleServer(@Value("${spring.redis.host}") String host, @Value("${spring.redis.port}") String port, @Value("${spring.redis.password}") String password) {
        Config config = new Config();
        config.useSingleServer().setAddress("redis://" + host + ":" + port);
        config.useSingleServer().setPassword(password);
        return (Redisson) Redisson.create(config);
    }

}
3.3 redis服务器配置
与前面的配置一毛一样。。。。
3.4 Redisson的应用:(一)作为缓存
@Service
public class UserService {

    @Autowired
    Redisson redisson;
    @Resource
    private RedissonClient redissonClient;

    private static final String USER_CACHE = "USER_CACHE";

	//与Redis、Lettuce相似的功能,这里使用MapCache,还提供了如对列、链表等对象
    public Object getUser(String username) {
        if (redissonClient.getMapCache(USER_CACHE).get(username) == null) {
            System.out.println("未获取到缓存,新建用户信息.............");
            Map<String, Object> user = new HashMap<>();
            user.put("username", username);
            user.put("usercode", "zhangsan");
            user.put("sex", "男");
            user.put("createtime", new Date());
            redissonClient.getMapCache(USER_CACHE).put(username, user);
        }
        return redissonClient.getMapCache(USER_CACHE).get(username);
    }
 }
代码验证:
 @Test
    public void mapCache() {
        System.out.println(userService.getUser("11"));
        System.out.println(userService.getUser("2"));
    }
输出:

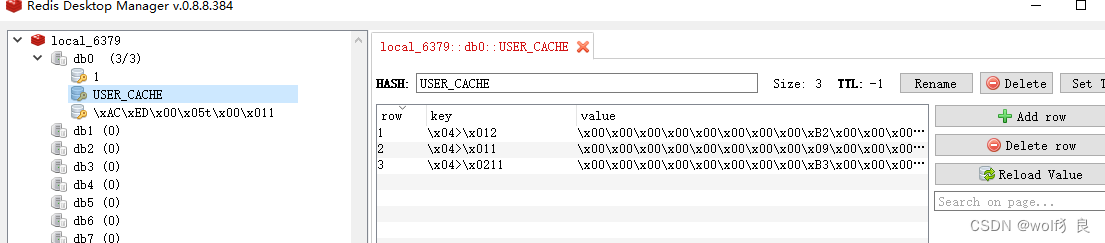
Redis服务器端存储数据展示,这里由于没有配置序列化,所以键和值都编码过了,不太识别。
3.5 Redisson应用:(二)分布式锁
测试代码为两个方法:处理用户消息打印。一个加了分布式锁,一个没有加锁的方法,测试时使用多线程模拟分布式效果。
- 加了分布式锁,即希望所有服务端同一时间仅一人能说话,其他人必须 等待说了“完毕”后,才能说话;
- 不加分布式锁,不加分布式锁,但同一时间仅一人能说话,实际也应该加锁。但对于分布式来说,单机加不加锁都不影响。为了测试就不加锁。
不用分布式锁:
    public void print(String user, String content) {
        try {

            System.out.println(String.format("收到%s的消息", user));
            System.out.println(String.format("%s说:%s", user, content));
            Thread.sleep(3000);
            System.out.println(String.format("%s说完了", user));
        } catch (Exception ex) {
            throw new RuntimeException(ex);
        } finally {

        }
    }
    @Test
    public void print() {
        new Thread(() -> {
            userService.print("张三", "你好");
        }).start();
        new Thread(() -> {
            userService.print("李四", "你好");
        }).start();

        try {
            Thread.sleep(5000);
        } catch (InterruptedException e) {
            e.printStackTrace();
        }

    }
输出:
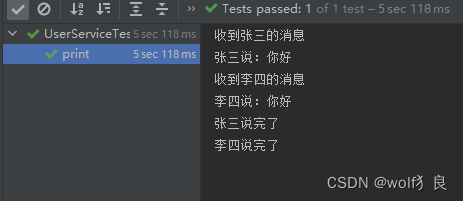
都没有等张三说“完毕”时,李四已经开始说话了。如果是在做秒杀、抢购。那只能快点提桶跑路!
加了分布式锁的情况:
public void printLock(String user, String content) {
        RLock lock = null;
        try {
            lock = redisson.getLock("printNow");
            lock.lock();
            System.out.println(String.format("收到%s的消息", user));
            System.out.println(String.format("%s说:%s", user, content));
             for (int i = 0; i < 3; i++) {
                System.out.println("思考中....");
                Thread.sleep(1000);
            }
            System.out.println("完毕....");
        } catch (Exception ex) {
            throw new RuntimeException(ex);
        } finally {
            if (lock != null) {
                lock.unlock();
            }
        }
    }
 @Test
    public void printLock() {
        new Thread(() -> {
            userService.printLock("张三", "你好");
        }).start();
        new Thread(() -> {
            userService.printLock("李四", "你好");
        }).start();

        try {
            Thread.sleep(50000);
        } catch (InterruptedException e) {
            e.printStackTrace();
        }
    }
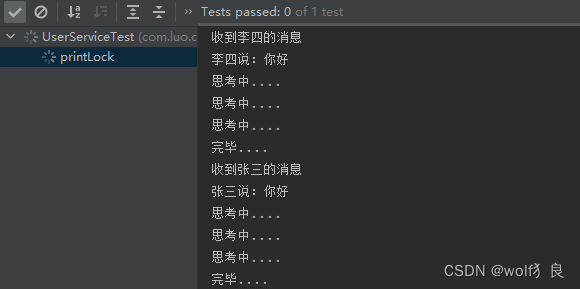
输出:加了分布式锁之后,只要没有说完毕,张三就必须一直等待。
综上,本章内容完毕了。
总结
- Lettuce是SpringBoot自带的Redis客户端,性能比Redis要好, 是线程安全的,支持同步编程,异步编程,响应式编程,自动重新连接,主从模式,集群模块,哨兵模式
- Redisson 是一个在 Redis 的功能基础上实现的 Java 驻内存数据网格客户端。实现了分布式和可扩展的 Java 数据结构,提供很多分布式相关操作服务,例如分布式锁,分布式集合,可通过 Redis 支持延迟队列。
1、Lettuce的自动配置
	<!-- redis 缓存操作自动配置  使用 Lettuce 客户端-->
        <dependency>
            <groupId>org.springframework.boot</groupId>
            <artifactId>spring-boot-starter-data-redis</artifactId>
        </dependency>

        <!-- pool 对象池 Lettuce 要依赖这个-->
        <dependency>
            <groupId>org.apache.commons</groupId>
            <artifactId>commons-pool2</artifactId>
        </dependency>
代码中使用自动注入即可
@Service
public class UserService {
    @Autowired
    RedisTemplate redisTemplate;
    //redisTemplate.opsForValue().get("zhangsan")
    //redisTemplate.opsForValue().set("zhangsan", "李四");
}
2、Redisson的自动配置
引入redisson的自动配置后,我们上面示例中的RedissonConfiguration类也不需要写了,直接用就行。
        <dependency>
            <groupId>org.redisson</groupId>
            <artifactId>redisson-spring-boot-starter</artifactId>
            <version>3.17.3</version>
        </dependency>
代码中直接注入即可:
@Service
public class UserService {

    @Autowired
    Redisson redisson;
    @Resource
    private RedissonClient redissonClient;
}


 2701
2701


 被折叠的 条评论
为什么被折叠?
被折叠的 条评论
为什么被折叠?
 到【灌水乐园】发言


