


背景
由于捣鼓一些项目需要用到React,找了一些文档入门实践了一番。本篇文章以一个学生成绩录入的表单为例子,记录React 入门的一些基础操作。
入门
该操作的前提是本地安装了NodeJS环境。根据官网给的例子,我们使用如下命令初始化项目。
npx create-react-app react4j
目录结构如下:
react-practice
├── react4j
│   ├── public
│   │   ├── favicon.ico
│   │   ├── index.html
│   │   ├── logo192.png
│   │   ├── logo512.png
│   │   ├── manifest.json
│   │   └── robots.txt
│   ├── src
│   │   ├── App.css
│   │   ├── App.js
│   │   ├── App.test.js
│   │   ├── index.css
│   │   ├── index.js
│   │   ├── logo.svg
│   │   ├── reportWebVitals.js
│   │   └── setupTests.js
│   ├── README.md
│   ├── package-lock.json
│   ├── package.json
└── list.md
● 目录 src :React 应用源码存放的目录。
● 目录 public 包含了开发应用时浏览器会读取的文件,其中最重要的就是 index.html。React 将目录 src 中的代码嵌入这个文件,从而浏览器才能运行此文件。
● 文件 package.json 包含了 Node.js/npm 为了建立该应用程序所管理着的文件信息
● manifest.json 文件定义了应用的名称、简称、图标、启动 URL、显示模式、主题颜色和背景色
启动项目,这里我们可以预览:
npm start
关于 index.html,是项目的主页面,这里只定义一个id为root的标签:
<body>
    <noscript>You need to enable JavaScript to run this app.</noscript>
    <div id="root"></div>
    <!--
      This HTML file is a template.
      If you open it directly in the browser, you will see an empty page.

      You can add webfonts, meta tags, or analytics to this file.
      The build step will place the bundled scripts into the <body> tag.

      To begin the development, run `npm start` or `yarn start`.
      To create a production bundle, use `npm run build` or `yarn build`.
    -->
  </body>
</html>
关于index.js,这里引入我们的App组件,App组件定义在App.js文件里。
import React from 'react';
import ReactDOM from 'react-dom/client';
import './index.css';
import App from './App';
import reportWebVitals from './reportWebVitals';

const root = ReactDOM.createRoot(document.getElementById('root'));
root.render(
  // <React.StrictMode>
  //   <App />
  // </React.StrictMode>
  <App subject="Clarice" />
);
关于App.js,由三部分组成:顶部的 import 语句,中间的 App 组件,以及底部的 export 语句。通过export ,我们可以在项目入口的 index.js文件里用 <APP /> 标签直接使用该组件。
这里的函数命名 App 也是React 特殊的命名方式,它使用帕斯卡命名法,如“HelloWorld”,来帮助用户辨认一个 JSX 元素是 React 组件而非普通的 HTML 标签。如果你将函数名“App”改为“app”,你的浏览器会显示错误。
import React from "react";
import logo from "./logo.svg";
import "./App.css";

function App() {
  return (
    <div className="App">
      <header className="App-header">
        <img src={logo} className="App-logo" alt="logo" />
        <p>
          Edit <code>src/App.js</code> and save to reload.
        </p>
        <a
          className="App-link"
          href="https://reactjs.org"
          target="_blank"
          rel="noopener noreferrer">
          Learn React
        </a>
      </header>
    </div>
  );
}
export default App;
学生成绩录入的表单
- 删除多余的文件 App.test.js App.css logo.svg serviceWorker.js setupTests.js
- 在App.js 编写UI,这里存储数据先暂时用localStorage存储录入的数据。
import React, { useState, useEffect } from 'react';


const ScoreTable = () => {
  console.log(111)
  const [scores, setScores] = useState([]);
  const [studentName, setStudentName] = useState('');
  const [studentScore, setStudentScore] = useState('');

  useEffect(() => {
    // 从localStorage中读取数据,并设置为初始state值
    const storedScores = localStorage.getItem('scores');
    if (storedScores) {
      setScores(JSON.parse(storedScores));
    }
  }, []);

  useEffect(() => {
    // 每次scores更新后,将数据保存到localStorage中
    localStorage.setItem('scores', JSON.stringify(scores));
  }, [scores]);

  const handleNameChange = (e) => {
    setStudentName(e.target.value);
  };

  const handleScoreChange = (e) => {
    setStudentScore(e.target.value);
  };

  const handleAddScore = () => {
    if (studentName && studentScore) {
      const newScore = {
        name: studentName,
        score: studentScore
      };
      setScores([...scores, newScore]);
      setStudentName('');
      setStudentScore('');
    }
  };


  return (
    <div className="todoapp stack-large">
      <h1>学生成绩录入</h1>
      <form>
        <label htmlFor="new-todo-input" className="label__lg">
          学生姓名:
        </label>
        <input
          type="text"
          id="new-todo-input"
          className="input input__lg"
          name="text"
          value={studentName}
          autoComplete="off"
          onChange={handleNameChange}
        />
        <label htmlFor="new-todo-input" className="label__lg">
          学生成绩:
        </label>

        <input
          type="text"
          id="new-todo-input"
          className="input input__lg"
          name="text"
          value={studentScore}
          autoComplete="off"
          onChange={handleScoreChange}
        />

        <button type="submit" className="btn btn__primary btn__lg" onClick={handleAddScore}>
          新增
        </button>
      </form>

      <h2 id="list-heading">名单列表</h2>
      <table>
        <thead>
          <tr>
            <th>姓名</th>
            <th>成绩</th>
          </tr>
        </thead>
        <tbody>
          {scores.map((score, index) => (
            <tr key={index}>
              <td>{score.name}</td>
              <td>{score.score}</td>
            </tr>
          ))}
        </tbody>
      </table>
    </div>
  );
}


function App(props) {
  console.log(props)

  return (
    <ScoreTable />
  );
}

export default App;
- 编写CSS样式,可以直接copy如下的CSS样式,取代原来的index.css文件:
/* RESETS */
*,
*::before,
*::after {
  box-sizing: border-box;
}
*:focus {
  outline: 3px dashed #228bec;
  outline-offset: 0;
}
html {
  font: 62.5% / 1.15 sans-serif;
}
h1,
h2 {
  margin-bottom: 0;
}
ul {
  list-style: none;
  padding: 0;
}
button {
  border: none;
  margin: 0;
  padding: 0;
  width: auto;
  overflow: visible;
  background: transparent;
  color: inherit;
  font: inherit;
  line-height: normal;
  -webkit-font-smoothing: inherit;
  -moz-osx-font-smoothing: inherit;
  -webkit-appearance: none;
}
button::-moz-focus-inner {
  border: 0;
}
button,
input,
optgroup,
select,
textarea {
  font-family: inherit;
  font-size: 100%;
  line-height: 1.15;
  margin: 0;
}
button,
input {
  overflow: visible;
}
input[type="text"] {
  border-radius: 0;
}
body {
  width: 100%;
  max-width: 68rem;
  margin: 0 auto;
  font:
    1.6rem/1.25 Arial,
    sans-serif;
  background-color: #f5f5f5;
  color: #4d4d4d;
}
@media screen and (min-width: 620px) {
  body {
    font-size: 1.9rem;
    line-height: 1.31579;
  }
}
/*END RESETS*/
/* GLOBAL STYLES */
.form-group > input[type="text"] {
  display: inline-block;
  margin-top: 0.4rem;
}
.btn {
  padding: 2px;
  margin-left: 5px;
  border: 0.2rem solid #4d4d4d;
  cursor: pointer;
  text-transform: capitalize;
}
.btn.toggle-btn {
  border-width: 1px;
  border-color: #d3d3d3;
}
.btn.toggle-btn[aria-pressed="true"] {
  text-decoration: underline;
  border-color: #4d4d4d;
}
.btn__danger {
  color: #fff;
  background-color: #ca3c3c;
  border-color: #bd2130;
}
.btn__filter {
  border-color: lightgrey;
}
.btn__primary {
  color: #fff;
  background-color: #000;
}
.btn-group {
  display: flex;
  justify-content: space-between;
}
.btn-group > * {
  flex: 1 1 49%;
}
.btn-group > * + * {
  margin-left: 0.8rem;
}

.visually-hidden {
  position: absolute !important;
  height: 1px;
  width: 1px;
  overflow: hidden;
  clip: rect(1px 1px 1px 1px);
  clip: rect(1px, 1px, 1px, 1px);
  white-space: nowrap;
}
[class*="stack"] > * {
  margin-top: 0;
  margin-bottom: 0;
}
.stack-small > * + * {
  margin-top: 1.25rem;
}
.stack-large > * + * {
  margin-top: 2.5rem;
}
@media screen and (min-width: 550px) {
  .stack-small > * + * {
    margin-top: 1.4rem;
  }
  .stack-large > * + * {
    margin-top: 2.8rem;
  }
}
.stack-exception {
  margin-top: 1.2rem;
}
/* END GLOBAL STYLES */
.todoapp {
  background: #fff;
  margin: 2rem 0 4rem 0;
  padding: 1rem;
  position: relative;
  box-shadow:
    0 2px 4px 0 rgba(0, 0, 0, 0.2),
    0 2.5rem 5rem 0 rgba(0, 0, 0, 0.1);
}
@media screen and (min-width: 550px) {
  .todoapp {
    padding: 4rem;
  }
}
.todoapp > * {
  max-width: 50rem;
  margin-left: auto;
  margin-right: auto;
}
.todoapp > form {
  max-width: 100%;
}
.todoapp > h1 {
  display: block;
  max-width: 100%;
  text-align: center;
  margin: 0;
  margin-bottom: 1rem;
}
.label__lg {
  display: inline-block;
  line-height: 1.01567;
  font-weight: 300;
  padding: 0.8rem;
  margin-bottom: 1rem;
  text-align: center;
}
.input__lg {
  padding: 1px;
  border: 2px solid #000;
}
.input__lg:focus {
  border-color: #4d4d4d;
  box-shadow: inset 0 0 0 2px;
}
[class*="__lg"] {
  display: inline-block;

  font-size: 14px;
}
[class*="__lg"]:not(:last-child) {
  font-size: 14px;
}
@media screen and (min-width: 620px) {
  [class*="__lg"] {
    font-size: 14px;
  }
}
.filters {
  width: 100%;
  margin: unset auto;
}

table {
  width: 100%;
  border-collapse: collapse;
  font-family: Arial, sans-serif;
  color: #333;
}

table th, table td {
  padding: 8px;
  text-align: left;
  border-bottom: 1px solid #ddd;
}

table th {
  background-color: #f2f2f2;
  font-weight: bold;
}

table tr:nth-child(even) {
  background-color: #f9f9f9;
}

table tr:hover {
  background-color: #e6e6e6;
  cursor: pointer;
}

input[type="text"] {
  padding: 8px;
  border: 1px solid #ddd;
  border-radius: 4px;
}
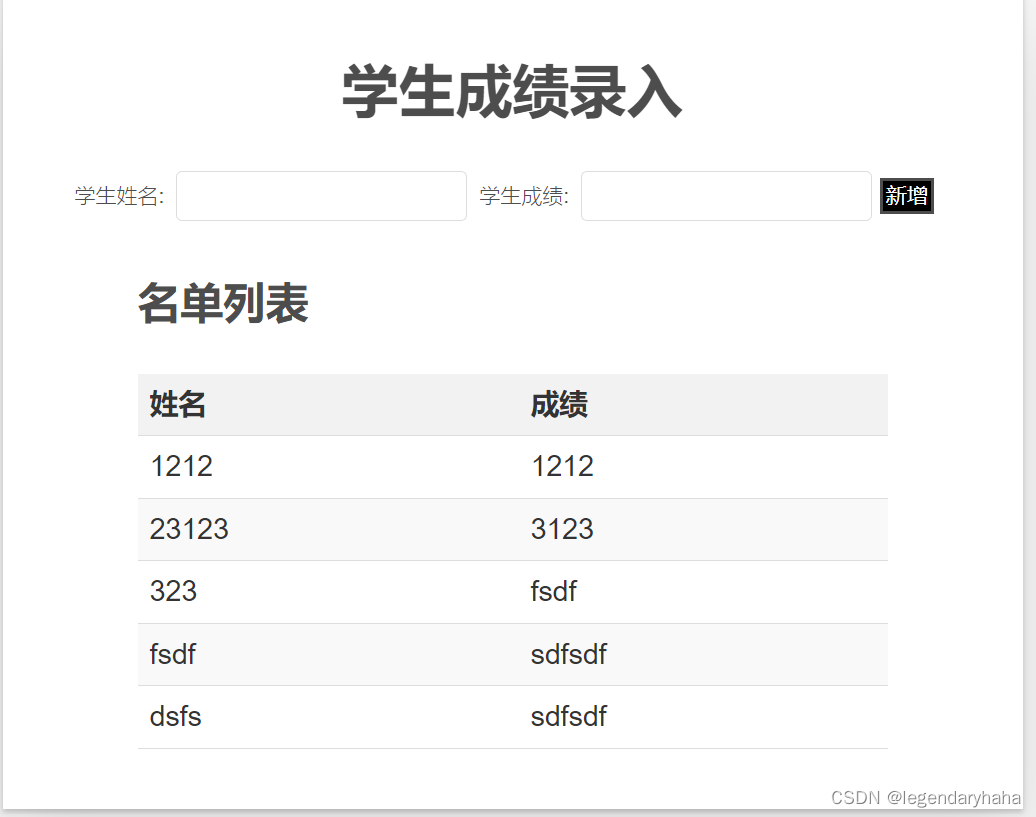
- npm start 预览:
小结
-
本人实践下来,跟原来HTML + JavaScript 最明显的区别就是,React把UI封装到一个个JS函数里面去了。这跟它官网的描述也挺相符的, 通过使用组件最大程度地减少开发人员构建 UI 时发生的错误。。
-
React 与 JavaScript 的最大区别在于 JSX 语法的使用上。JSX 是在 JavaScript 语法上的拓展,因此类似于 HTML 的代码可以和 JSX 共存。更多资料可以看看官方文档。


 2万+
2万+


 被折叠的 条评论
为什么被折叠?
被折叠的 条评论
为什么被折叠?
 到【灌水乐园】发言


