


一,CALayer简介
1、CALayer一般作为UIView的容器而使用
2、CALayer是一个管理着图片载体(image-based content)的层结构
3、直接修改单独创建出的CALayer的属性可以触发隐式动画
4、UIView中的CALayer动画必须显式触发才能生效
二,用CALayer创建下载进度条
1、单独创建出CALayer
2、直接修改CALayer的frame值执行隐式动画,实现进度条效果
3、用定时器(NSTimer)模拟网络下载时提供的百分比数据
4、将CALayer封装进UIView子类中定制进度条控件
用CALayer做进度条,主要以修改其frame触发其隐式动画以达到目的,如图所示:
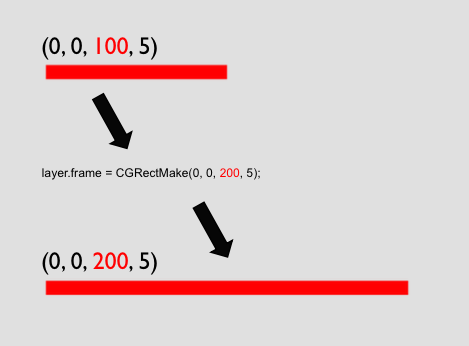
// 创建layer并添加layer
CALayer *layer = [CALayer layer];
layer.frame = CGRectMake(0, 0, 100, 5); [self.view.layer addSublayer:layer];
// 执⾏行隐式动画(直接触发动画效果) layer.frame = CGRectMake(0, 0, 200, 5);
最后将CALayer封装进UIView子类,实现定制进度条控件,以达到代码复用的目的
ProgressView.h文件
#import <UIKit/UIKit.h>
@interface ProgressView : UIView
@property (nonatomic, assign) CGFloat  progress;   // 进度参数(取值范围为 %0 ~ %100)
@property (nonatomic, strong) UIColor *layerColor; // 修改layer的颜色
@end
ProgressView.m文件
#import "ProgressView.h"

@interface ProgressView ()

@property (nonatomic, strong) CALayer *progressLayer;
@property (nonatomic, assign) CGFloat  currentViewWidth;

@end

@implementation ProgressView

- (instancetype)initWithFrame:(CGRect)frame
{
    self = [super initWithFrame:frame];
    if (self) {
        self.progressLayer       = [CALayer layer];
        self.progressLayer.frame = CGRectMake(0, 0, 0, frame.size.height);
        self.progressLayer.backgroundColor = [UIColor redColor].CGColor;
        [self.layer addSublayer:self.progressLayer];

        // 存储当前view的宽度值
        self.currentViewWidth = frame.size.width;
    }
    return self;
}

#pragma mark - 重写setter,getter方法
@synthesize progress = _progress;
- (void)setProgress:(CGFloat)progress {
    _progress = progress;

    if (progress <= 0) {
        self.progressLayer.frame = CGRectMake(0, 0, 0, self.frame.size.height);
    } else if (progress <= 1) {
        self.progressLayer.frame = CGRectMake(0, 0,
                                              progress * self.currentViewWidth,
                                              self.frame.size.height);
    } else {
        self.progressLayer.frame = CGRectMake(0, 0, self.currentViewWidth,
                                              self.frame.size.height);
    }
}
- (CGFloat)progress {
    return _progress;
}

@synthesize layerColor = _layerColor;
- (void)setLayerColor:(UIColor *)layerColor {
    _layerColor = layerColor;
    self.progressLayer.backgroundColor = layerColor.CGColor;
}
- (UIColor *)layerColor {
    return _layerColor;
}

@end
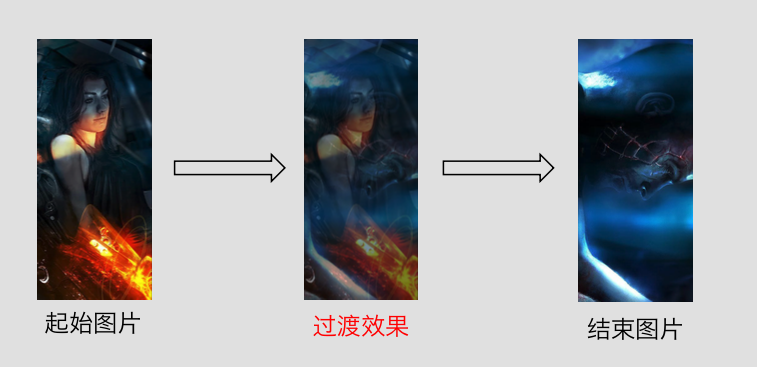
三,用CALayer定制UIImageView淡入淡出切换图片效果
用CALayer定制UIImageView淡入淡出切换图片效果,需要有中间图片作为过度帧,如下图所示,使用核心的动画切换图片,就会达到一种淡入淡出的效果。
1、操作UIImageView的CALayer修改其bounds值进行显式动画
 // 设定基本动画参数
CABasicAnimation *contentsAnimation = [CABasicAnimation animationWithKeyPath:@"contents"];
contentsAnimation.fromValue         =  self.imageLayer.contents;
contentsAnimation.toValue           =  (__bridge id)([UIImage imageNamed:@"结束图片"].CGImage);
contentsAnimation.duration          = 3.f;

// 设定layer动画结束后的contents值
self.imageLayer.contents         = (__bridge id)([UIImage imageNamed:@"结束图片"].CGImage);

// 让layer开始执行动画
[self.imageLayer addAnimation:contentsAnimation forKey:nil];
2、修改UIImageView的CALayer中的contents属性实现切换图片的动画
 // 基于bounds的动画
CABasicAnimation *boundsAnimation = [CABasicAnimation animationWithKeyPath:@"bounds"];
boundsAnimation.fromValue         = [NSValue valueWithCGRect:self.imageLayer.bounds];
boundsAnimation.toValue           = [NSValue valueWithCGRect:CGRectMake(0, 0, 302/2.f, 707/2.f)];
boundsAnimation.duration          = 0.5f;
3、用CAAnimationGroup将bounds动画与contents动画组合起来
// 将基于图片的动画与基于bounds的动画组合起来
CAAnimationGroup *groupAnimation = [CAAnimationGroup animation];
groupAnimation.animations        = @[contentsAnimation, boundsAnimation];
groupAnimation.duration          = 0.5f;

// 设定layer动画结束后的contents值
self.imageLayer.contents = (__bridge id)([UIImage imageNamed:@"结束图片"].CGImage);
self.imageLayer.bounds   = CGRectMake(0, 0, 302/2.f, 707/2.f);

// 让layer开始执行动画
[self.imageLayer addAnimation:groupAnimation forKey:nil];
4、将上述效果封装进UIView的子类中生成控件
FadeImageView.h文件
#import <UIKit/UIKit.h>

@interface FadeImageView : UIView

@property (nonatomic, strong) UIImage *image;

@end
FadeImageView.m文件
#import "FadeImageView.h"
@implementation FadeImageView
@synthesize image = _image;
- (void)setImage:(UIImage *)image {
_image = image;
NSLog(@"测试");
if (self.layer.contents != nil) {
CABasicAnimation *contentsAnimation = [CABasicAnimation animationWithKeyPath:@"contents"];
contentsAnimation.fromValue = self.layer.contents;
contentsAnimation.toValue = (__bridge id)(image.CGImage);
contentsAnimation.duration = 1.f;
self.layer.contents = (__bridge id)(image.CGImage);
}
}
- (UIImage *)image {
return _image;
}
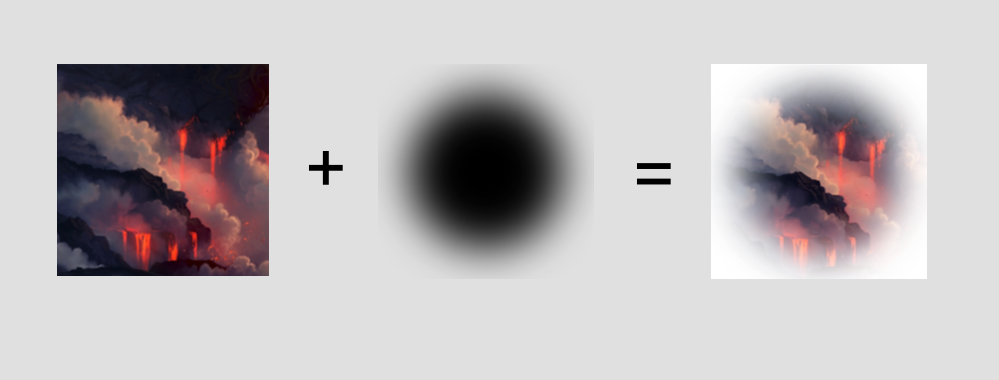
@end四,用CALayer实现复杂遮罩效果
1、遮罩原理的分析
遮罩的原理如图所示,第一张图为原始图片,第二张图为具有alpha通道的图片,黑色可以穿透,边缘白色无法穿透,叠加到原始图片上时候,就会有第三张图的效果,以此达到遮罩的目的。
2、用png图片作为CALayer中mask属性的遮罩Layer
// 处理图片
    self.contentImage = [UIImage imageNamed:@"原始图片"];
    self.maskImage    = [UIImage imageNamed:@"遮罩图片"];

    // 生成maskLayer
    self.maskLayer          = [CALayer layer];
    self.maskLayer.frame    = CGRectMake(0, 0, 427/2.f, 427/2.f);
    self.maskLayer.contents = (__bridge id)(self.maskImage.CGImage);

    // 生成contentsLayer
    self.imageLayer          = [CALayer layer];
    self.imageLayer.frame    = CGRectMake(0, 0, 427/2.f, 427/2.f);
    self.imageLayer.contents = (__bridge id)(self.contentImage.CGImage);

    // 给contentsLayer设定mask值
    self.imageLayer.mask     = self.maskLayer;

    // 将contentsLayer添加到layer中
    [self.view.layer addSublayer:self.imageLayer];
3、移动该CALayer的mask的frame值实现遮罩动画效果
self.maskLayer.frame = CGRectMake(50, 50, 200, 200);简单修改遮罩的frame值可以实现许多动画效果。


 1098
1098


 被折叠的 条评论
为什么被折叠?
被折叠的 条评论
为什么被折叠?
 到【灌水乐园】发言


