


目录
运行原理探究
之前写的HelloSpringBoot,到底是怎么运行的呢,Maven项目,我们一般从pom.xml文件探究起;
第一个配置文件:pom.xml
图片分析: 运行原理探究.
配置文件内容1:父依赖
其中它主要是依赖一个父项目,主要是管理项目的资源过滤及插件!
<parent>
    <groupId>org.springframework.boot</groupId>
    <artifactId>spring-boot-starter-parent</artifactId>
    <version>2.4.4</version>
    <relativePath/> <!-- lookup parent from repository -->
</parent>
点进去,发现还有一个父依赖
<parent>
  <groupId>org.springframework.boot</groupId>
  <artifactId>spring-boot-dependencies</artifactId>
  <version>2.4.4</version>
</parent>
这里才是真正管理SpringBoot应用里面所有依赖版本的地方,SpringBoot的版本控制中心;
以后我们导入依赖默认是不需要写版本;但是如果导入的包没有在依赖中管理着就需要手动配置版本了;
配置文件内容2:启动器 spring-boot-starter【导进依赖 】
<!--web依赖 tomcat  .xml 前端控制器-->
<dependency>
    <groupId>org.springframework.boot</groupId>
    <artifactId>spring-boot-starter-web</artifactId>
</dependency>
- 启动器:springboot-boot-starter-xxx,就是spring-boot的场景启动器
- spring-boot-starter-web:帮我们导入了web模块正常运行所依赖的组件;
- SpringBoot将所有的功能场景都抽取出来,做成一个个的starter(启动器),只需要在项目中引入这些starter即可,所有相关的依赖都会导入进来
- 我们要用什么功能就导入什么样的场景启动器即可 ;我们未来也可以自己自定义 starter;
- 这个启动器也就是把我们之前spring配置依赖都整合了起来,如果要用就只需要找到他的一个场景启动器就可以使用了。
第二个配置文件:主启动类
分析完了 pom.xml 来看看这个启动类
默认的主启动类
//本身就是spring的一个组件

//程序的主入口    @SpringBootApplication:标注这个类是一个springboot的应用
@SpringBootApplication
public class SpringbootstudyApplication {

    public static void main(String[] args) {
        //将springboot应用启动
        SpringApplication.run(SpringbootstudyApplication.class, args);
    }

}
但是一个简单的启动类并不简单!我们来分析一下这些注解都干了什么
配置内容1:@SpringBootApplication 【标注到的类就是主配置类】
作用:
标注在某个类上就说明这个类是SpringBoot的主配置类 , SpringBoot就应该运行这个类的main方法来启动SpringBoot应用;
进入这个注解:可以看到上面还有很多其他注解!
@Target({ElementType.TYPE})
@Retention(RetentionPolicy.RUNTIME)
@Documented
@Inherited
@SpringBootConfiguration
@EnableAutoConfiguration
@ComponentScan(
    excludeFilters = {@Filter(
    type = FilterType.CUSTOM,
    classes = {TypeExcludeFilter.class}
), @Filter(
    type = FilterType.CUSTOM,
    classes = {AutoConfigurationExcludeFilter.class}
)}
)
配置内容1.1:@ComponentScan 【自动扫描,将bean加入到IOC容器里面】
这个注解在Spring中很重要 ,它对应XML配置中的元素。
作用:
自动扫描并加载符合条件的组件或者bean , 将这个bean定义加载到IOC容器中。
【相当于在xml里面配置了bean的注入,然后可以自动扫描】
配置内容1.2:@SpringBootConfiguration 【表示这是一个SpringBoot配置类】
作用:
SpringBoot的配置类 ,标注在某个类上 , 表示这是一个SpringBoot的配置类;
我们继续进去这个注解查看
// 点进去得到下面的代码
@Target({ElementType.TYPE})
@Retention(RetentionPolicy.RUNTIME)
@Documented
@Configuration
public @interface SpringBootConfiguration {
    @AliasFor(
        annotation = Configuration.class
    )
    boolean proxyBeanMethods() default true;
}
配置内容1.2.1 这里的 @Configuration【说明这是一个配置类】
作用:
配置类就是对应Spring的xml 配置文件。
@Target({ElementType.TYPE})
@Retention(RetentionPolicy.RUNTIME)
@Documented
@Configuration
public @interface SpringBootConfiguration {
    @AliasFor(
        annotation = Configuration.class
    )
    boolean proxyBeanMethods() default true;
}
@SpringBootApplication里面的 @Component 这就说明,启动类本身也是Spring中的一个组件而已,负责启动应用!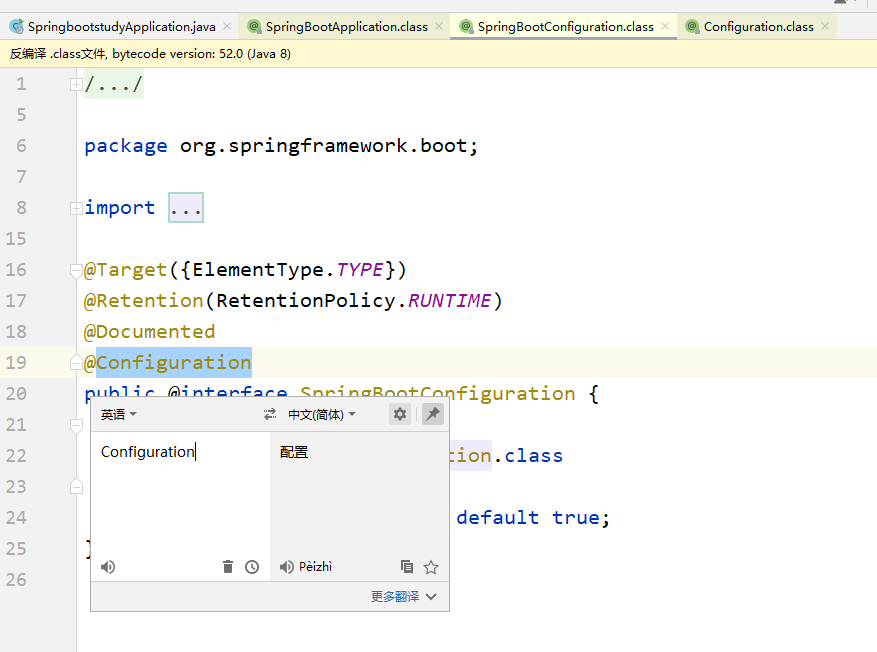
我们回到 SpringBootApplication 注解中继续看。
配置内容1.3:@EnableAutoConfiguration 【开启自动配置】
@EnableAutoConfiguration :开启自动配置功能,以前我们需要自己配置的东西,而现在SpringBoot可以自动帮我们配置 ;
@EnableAutoConfiguration 告诉SpringBoot开启自动配置功能,这样自动配置才能生效;
点进注解接续查看:
配置内容1.3.1 @AutoConfigurationPackage :【自动配置包】

点进去:查看到@Import({Registrar.class})
@Target({ElementType.TYPE})
@Retention(RetentionPolicy.RUNTIME)
@Documented
@Inherited
@Import({Registrar.class})
public @interface AutoConfigurationPackage {
    String[] basePackages() default {};

    Class<?>[] basePackageClasses() default {};
}
配置内容1.3.1.1 @import :Spring底层注解@import , 给容器中导入一个组件
Registrar.class 作用:将主启动类的所在包及包下面所有子包里面的所有组件**扫描到Spring容器** ;
【扫描组件到spring容器中】
这个分析完了,退到上一步,继续看
配置内容1.3.2:@Import({AutoConfigurationImportSelector.class}) :【给容器导入组件 】
AutoConfigurationImportSelector :自动配置导入选择器,那么它会导入哪些组件的选择器呢?我们点进去这个类看源码: 
【自动导入选择器】

发现一个多次出现的文件:spring.factories,全局搜索它
配置内容1.4.1【spring.factories】 自动配置我们的配置信息
我们根据源头打开spring.factories , 看到了很多自动配置的文件;这就是自动配置根源所在!

WebMvcAutoConfiguration
我们在上面的自动配置类随便找一个打开看看,比如 :WebMvcAutoConfiguration

可以看到这些一个个的都是JavaConfig配置类,而且都注入了一些Bean,可以找一些自己认识的类,看着熟悉一下!
【也就是使用java配置类的方式进行spring的组件注入】
总结:
所以,自动配置真正实现是从classpath中搜寻所有的META-INF/spring.factories配置文件 ,并将其中对应的 org.springframework.boot.autoconfigure. 包下的配置项,通过反射实例化为对应标注了 ==@==Configuration的JavaConfig形式的IOC容器配置类 ,然后将这些都汇总成为一个实例并加载到IOC容器中。
结论:
- SpringBoot在启动的时候从类路径下的META-INF/spring.factories中获取EnableAutoConfiguration指定的值
- 将这些值作为自动配置类导入容器 , 自动配置类就生效 , 帮我们进行自动配置工作;
- 整个J2EE的整体解决方案和自动配置都在springboot-autoconfigure的jar包中;
- 它会给容器中导入非常多的自动配置类 (xxxAutoConfiguration), 就是给容器中导入这个场景需要的所有组件 , 并配置好这些组件 ;
- 有了自动配置类 , 免去了我们手动编写配置注入功能组件等的工作;
自己理解:也就是通过开启一个注解,然后检查是否满足约束,满足就扫描配置类下面的包,然后在META-INF/spring.factories下获得需要的包,再注入spring容器里面,就完成了自动装配,这就相当于配置好了环境。一个注解就完成我们以前配置的xml文件了,就不用去配置了。导包也可以不用了,只需要开启我们的启动器。
第三步程序的主入口配置文件:
SpringbootApplication
以为就是运行了一个main方法,没想到开启了一个服务;
//本身就是spring的一个组件

//程序的主入口    @SpringBootApplication:标注这个类是一个springboot的应用
@SpringBootApplication
public class SpringbootstudyApplication {
    public static void main(String[] args) {
        //将springboot应用启动
        SpringApplication.run(SpringbootstudyApplication.class, args);

    }

}
配置内容1:SpringApplication.run
分析该方法主要分两部分,一部分是SpringApplication的实例化,二是run方法的执行;
      SpringApplication springApplication = new SpringApplication();   先实例化
       springApplication.run(SpringbootstudyApplication.class, args);    run方法执行
SpringApplication
这个类主要做了以下四件事情:
- 推断应用的类型是普通的项目还是Web项目
- 查找并加载所有可用初始化器 , 设置到initializers属性中
- 找出所有的应用程序监听器,设置到listeners属性中
- 推断并设置main方法的定义类,找到运行的主类
查看构造器:

run方法流程分析:

springboot:就是自动装配和run()方法
总结图

SpringBoot自动化配置关键组件关系图
mybatis-spring-boot-starter、spring-boot-starter-web等组件的META-INF文件下均含有spring.factories文件,自动配置模块中,SpringFactoriesLoader收集到文件中的类全名并返回一个类全名的数组,返回的类全名通过反射被实例化,就形成了具体的工厂实例,工厂实例来生成组件具体需要的bean。
补充:配置类


 4228
4228

 被折叠的 条评论
为什么被折叠?
被折叠的 条评论
为什么被折叠?
 到【灌水乐园】发言


