传送门 ☞ 轮子的专栏 ☞ 转载请注明 ☞ http://blog.csdn.net/leverage_1229
1布局(Layout)
简单的说,Activity就是布满整个窗口或者悬浮于其他窗口上的交互界面。在一个应用程序中通常由多个Activity构成,都会在AndroidManifest.xml中指定一个主的Activity,如下设置:
<activity android:label="@string/app_name" android:name=".MainActivity">
	<intent-filter>
		<action android:name="android.intent.action.MAIN" />
		<category android:name="android.intent.category.LAUNCHER" />
	</intent-filter>
</activity>FrameLayout(框架布局)、LinearLayout(线性布局)、RelativeLayout(相对布局)、TableLayout(表格布局)、AbsoluteLayout(绝对布局)等。
利用以上5种布局我们可以再手机屏幕上随心所欲的摆放各种控件。
2Android视图的创建
在Android系统中,何的可视化控件都是从android.view.View继承的。开发人员可以使用两种方法来创建视图。(1)使用XML方式来配置View的相关属性,然后装载这些View;
(2)完全使用java代码来创建View。
3使用XML布局文件定义视图
(1)xml布局文件是android系统中定义视图的常用方法,所有的布局文件必须包含在res/layout目录中。定义xml布局的命名和定义注意事项如下:xml布局文件必须是以xml文件名结束,命名必须是符合java的规范
每一个xml布局文件的根节点可以是任意的控件标签
xml布局文件的根节点必须是包含android的命名空间,命名空间必须是xmlns:android=http://schemas.android.com/apk/res/android
为xml文件布局中的标签指定的id需要使用这样的格式:android:id="@+id/标签名称" 该标记会保存在R文件中
每一个视图的id都会在R类中生成与之对应的变量,因此视图ID的值必须是符合java规范的
(2)如果需要使用xml布局文件,通常需要oncreate方法中使用setContentView来加载指定的xml布局文件
    @Override
    public void onCreate(Bundle savedInstanceState) {
        super.onCreate(savedInstanceState);
        setContentView(R.layout.main);
        ...
}使用findViewById()方法之前需要调用setContentView()方法加载xml文件,否则布局文件会抛出异常信息。也就是说findViewById()方法要在setContentView()方法执行之后才能使用。所有的的xml文件布局文件的视图id都在R类生成相对应的变量。
4Android中长度单位
(1)px:屏幕实际的像素。例如,320*480的屏幕在横向有320个象素,在纵向有480个象素。(2)dp:屏幕的物理尺寸,与密度有关的像素。大小为1英寸的1/72。
(3)sp:与密度、刻度无关的像素。与dp类似,但是可以根据用户的字体大小首选项进行缩放。
5Android布局中常用属性
(1)layout_margin设置控件边缘相对于父控件的边距(2)layout_padding设置控件内容相对于控件边缘的边距
(3)android:gravity设置View组件的对齐方式
(4)android:layout_gravity设置Container组件的对齐方式
6线性布局(LinearLayout)
(1)线性布局是最常用的布局线性布局在xml文件中使用<LinearLayout>来定义。(2)线性布局可以分为水平和垂直的方向的布局,可以通过android:orientation="vertical"来定义方向,该属性可以有horizontal和vertical两个方向。
(3)<LinearLayout>标签中有一个很重要的属性gravity,该属性用于控制布局中视图的位置,如果设置多个值需要使用 | 进行分隔。
(4)android:layout_width和android_layout_height属性
wrap_content 包裹内容
fill_parent 填满父控件
match_parent 与fill_parent一样,在Android2.2中启动match_parent,不用fill_parent
(5)android:layout_weight属性
设置一个线性布局中诸多视图的重要度赋值。
所有的视图都有一个layout_weight值,默认为零,也就是说需要显示多大的视图就占据多大的屏幕空间。如果赋一个高于零的值,则会将父视图中的可用空间进行分割,分割大小具体取决于每一个视图的layout_weight值以及该值在当前屏幕布局的整体layout_weight值和在其它视图屏幕布局的layout_weight值中所占的比率而定。
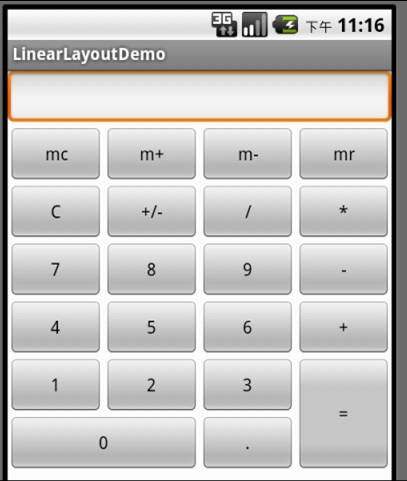
(6)线性布局案例(模拟计算器界面)a案例代码陈列
<?xml version="1.0" encoding="utf-8"?>
<LinearLayout xmlns:android="http://schemas.android.com/apk/res/android"
    android:orientation="vertical"
    android:layout_width="match_parent"
	android:layout_height="match_parent"
	android:background="#FFFFFF">
	<LinearLayout android:orientation="horizontal"
		android:layout_width="match_parent"
		android:layout_height="wrap_content">
    	<EditText
        	android:id="@+id/msg"
        	android:layout_width="match_parent"
        	android:layout_height="wrap_content" />
	</LinearLayout>
	<LinearLayout android:orientation="horizontal"
		android:layout_width="match_parent"
		android:layout_height="wrap_content">
		<Button android:layout_width="match_parent"
			android:layout_height="wrap_content"
			android:text="mc"
			androud:layout_weight="1" />
		<Button android:layout_width="match_parent"
			android:layout_height="wrap_content"
			android:text="m+"
			androud:layout_weight="1" />
		<Button android:layout_width="match_parent"
			android:layout_height="wrap_content"
			android:text="m-"
			androud:layout_weight="1" />
		<Button android:layout_width="match_parent"
			android:layout_height="wrap_content"
			android:text="mr"
			androud:layout_weight="1" />
	</LinearLayout>
	<LinearLayout android:orientation="horizontal"
		android:layout_width="match_parent"
		android:layout_height="wrap_content">
		<Button android:layout_width="match_parent"
			android:layout_height="wrap_content"
			android:text="C"
			androud:layout_weight="1" />
		<Button android:layout_width="match_parent"
			android:layout_height="wrap_content"
			android:text="+/-"
			androud:layout_weight="1" />
		<Button android:layout_width="match_parent"
			android:layout_height="wrap_content"
			android:text="/"
			androud:layout_weight="1" />
		<Button android:layout_width="match_parent"
			android:layout_height="wrap_content"
			android:text="*"
			androud:layout_weight="1" />
	</LinearLayout>
	<LinearLayout android:orientation="horizontal"
		android:layout_width="match_parent"
		android:layout_height="wrap_content">
		<Button android:layout_width="match_parent"
			android:layout_height="wrap_content"
			android:text="7"
			androud:layout_weight="1" />
		<Button android:layout_width="match_parent"
			android:layout_height="wrap_content"
			android:text="8"
			androud:layout_weight="1" />
		<Button android:layout_width="match_parent"
			android:layout_height="wrap_content"
			android:text="9"
			androud:layout_weight="1" />
		<Button android:layout_width="match_parent"
			android:layout_height="wrap_content"
			android:text="-"
			androud:layout_weight="1" />
	</LinearLayout>
	<LinearLayout android:orientation="horizontal"
		android:layout_width="match_parent"
		android:layout_height="wrap_content">
		<Button android:layout_width="match_parent"
			android:layout_height="wrap_content"
			android:text="4"
			androud:layout_weight="1" />
		<Button android:layout_width="match_parent"
			android:layout_height="wrap_content"
			android:text="5"
			androud:layout_weight="1" />
		<Button android:layout_width="match_parent"
			android:layout_height="wrap_content"
			android:text="6"
			androud:layout_weight="1" />
		<Button android:layout_width="match_parent"
			android:layout_height="wrap_content"
			android:text="+"
			androud:layout_weight="1" />
	</LinearLayout>
	<LinearLayout android:orientation="horizontal"
		android:layout_width="match_parent"
		android:layout_height="wrap_content">
		<LinearLayout android:orientation="vertical"
			android:layout_width="wrap_content"
			android:layout_height="wrap_content"
			android:layout_weight="3">
			<LinearLayout android:orientation="horizontal"
				android:layout_width="match_parent"
				android:layout_height="wrap_content">
				<Button android:layout_width="match_parent"
					android:layout_height="wrap_content"
					android:text="1"
					androud:layout_weight="1" />
				<Button android:layout_width="match_parent"
					android:layout_height="wrap_content"
					android:text="2"
					androud:layout_weight="1" />
				<Button android:layout_width="match_parent"
					android:layout_height="wrap_content"
					android:text="3"
					androud:layout_weight="1" />
			</LinearLayout>
			<LinearLayout android:orientation="horizontal"
				android:layout_width="match_parent"
				android:layout_height="wrap_content">
				<Button android:layout_width="0px"
					android:layout_height="wrap_content"
					android:text="0"
					androud:layout_weight="2" />
				<Button android:layout_width="0px"
					android:layout_height="wrap_content"
					android:text="."
					androud:layout_weight="1" />
			</LinearLayout>
		</LinearLayout>
		<LinearLayout android:orientation="horizontal"
			android:layout_width="wrap_content"
			android:layout_height="match_parent"
			android:layout_weight="1">
			<Button android:layout_width="match_parent"
				android:layout_height="match_parent"
				android:text="="
				androud:layout_weight="1" />
		</LinearLayout>
	</LinearLayout>
</LinearLayout>
b案例效果展示


 本文详细介绍了Android应用开发中的五种布局方式:框架布局、线性布局、相对布局、表格布局及绝对布局。重点讲解了线性布局的使用方法,包括水平和垂直布局、布局属性设置、权重分配等内容,并通过一个计算器界面的案例展示了线性布局的实际应用。


 4877
4877

 被折叠的 条评论
为什么被折叠?


