


直接先上gitee!!! 基于go-cqhttp的qqbot: java实现基于cqhttp,ws连接 由于当前chatgpt热度不断,网上众多的基于chatgpt提供的api做到chat网站层出不穷,但这些网址每次都得找,有些麻烦,我就在想能不能直接QQ接入chatgpt,想法一出,开始找资料开干!
1.申请一个openai官网的key
这一步首先你得有一个翻墙梯子,去openai官网来注册一个账号,这一步不会的猿猿先去找找这种注册的教程。 注册完毕后,我们去openai官网个人首页去申请一个API keys
到此,就拿到了openai的APIkey
2.go-cqhttp的使用
使用 mirai 以及 MiraiGo 开发的 cqhttp golang 原生实现, 并在 cqhttp 原版 的基础上做了部分修改和拓展。 使用这个的目的是为了接入qq。 直接上它的git: GitHub - Mrs4s/go-cqhttp: cqhttp的golang实现,轻量、原生跨平台. 之后下载它 Releases · Mrs4s/go-cqhttp · GitHub
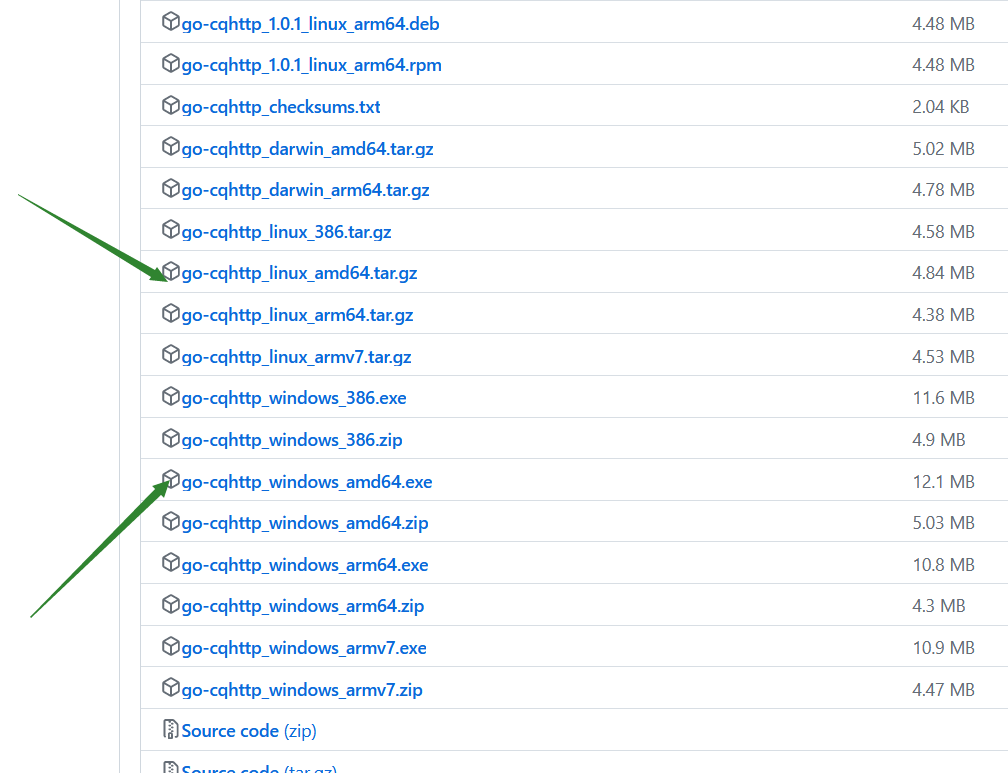
| 系统类型 | 可执行文件 | 压缩文件 |
|---|---|---|
| Intel 版 Macos | Not available | go-cqhttp_darwin_amd64.tar.gz |
| M1 版 Macos | Not available | go-cqhttp_darwin_arm64.tar.gz |
| 32 位 Linux | Not available | go-cqhttp_linux_386.tar.gz |
| 64 位 Linux | Not available | go-cqhttp_linux_amd64.tar.gz |
| arm64 Linux | Not available | go-cqhttp_linux_arm64.tar.gz |
| armv7 Linux | Not available | go-cqhttp_linux_armv7.tar.gz |
| 32 位 Windows | go-cqhttp_windows_386.exe | go-cqhttp_windows_386.zip |
| 64 位 Windows | go-cqhttp_windows_amd64.exe | go-cqhttp_windows_amd64.zip |
| arm64 Windows | go-cqhttp_windows_arm64.exe | go-cqhttp_windows_arm64.zip |
| armv7 Windows | go-cqhttp_windows_armv7.exe | go-cqhttp_windows_armv7.zip |
我先用window来进行讲解了:

cmd运行它,我们先使用正向websocket连接 选择完毕,我们可以看到一个config.yml配置文件 我们来进行配置: 修改device.json文件: 将这个protocol设为2(手表)或0(mac)才可以扫码登录! 修改完后,重新启动该程序,完成qq的登录验证,正常完成验证的情况下,就会出现登录成功! 注意一定要用扫码登录!由于QQ风控越来越严了,所以用密码登录会报错45或235 到此,这个go-cqhttp服务就已经启动成功了! 由于我们采用的是websocket正向连接,所以,我们就需要写一个websocket客户端来进行接收:
@ClientEndpoint
@Slf4j
public class BotClient {
private Session session;
public static BotClient instance;
public static boolean isOpen = false;
/*
* 提供一个spring context上下文(解决方案)
*/
private static ApplicationContext applicationContext;
public static Count count;
// 单例模式,只生成一个客户端连接对象
private BotClient(String url) {
try {
session = ContainerProvider.getWebSocketContainer().connectToServer(this, URI.create(url));
} catch (Exception e) {
e.printStackTrace();
}
}
public static void setApplicationContext(ApplicationContext applicationContext) {
BotClient.applicationContext = applicationContext;
count = applicationContext.getBean(Count.class);
}
/**
* 创建连接
* @param url
* @return
*/
public synchronized static boolean connect(String url) {
instance = new BotClient(url);
return true;
}
/**
* 连接前处理
* @param session
*/
@OnOpen
public void onOpen(Session session) {
isOpen = true;
log.info("连接成功!");
}
/**
* 连接关闭处理
* @param session
*/
@OnClose
public void onClose(Session session) {
isOpen = false;
log.info("连接关闭!");
}
/**
* 错误时处理
* @param session
* @param throwable
*/
@OnError
public void onError(Session session, Throwable throwable) {
log.info("连接错误!");
}
/**
* 接收到消息时处理
* @param message
*/
@OnMessage
public void onMessage(String message) {
// 加好友
if (message.contains("\"request_type\":\"friend\"")) {
sendFriend(message);
}
// 私信
if (message.contains("\"post_type\":\"message\"") && message.contains("\"message_type\":\"private\"")) {
sendMsg(message);
}
// 群消息
if (message.contains("\"post_type\":\"message\"")&& message.contains("\"message_type\":\"group\"")) {
sendGroupMsg(message);
}
}
/**
* 好友请求
*/
private synchronized void sendFriend(String msg) {
Friend parseObject = JSONObject.parseObject(msg, Friend.class);
log.info("收到好友请求:" + parseObject.getUser_id() + ",验证消息:" + parseObject.getComment());
Request<Object> paramsRequest = new Request<>();
paramsRequest.setAction(BotActionEnum.ADD_FRIEND_ACTION.getAction());
Map<String, Object> params = new HashMap<>();
params.put("flag", parseObject.getFlag());
if (parseObject.getComment().equals(count.getAuthor())) {
params.put("approve", true);
log.info("已同意好友请求:" + parseObject.getUser_id());
} else {
params.put("approve", false);
log.info("已拒绝好友请求:" + parseObject.getUser_id());
}
paramsRequest.setParams(params);
instance.session.getAsyncRemote().sendText(JSONObject.toJSONString(paramsRequest));
}
/**
* 群消息
*/
public synchronized void sendGroupMsg(String msg) {
System.out.println(msg);
Message parseObject = JSONObject.parseObject(msg, Message.class);
log.info("收到群消息" + parseObject.getGroupId() + "的消息,发送者"+parseObject.getUserId()+"消息:"
+ parseObject.getMessage()+"消息id:"+parseObject.getMessageId()
);
System.out.println(parseObject.getMessage());
String mes = parseObject.getMessage();
if(mes.contains("[CQ:at,qq="+count.getBot_count()+"]")) {
Request<Object> paramsRequest = new Request<>();
paramsRequest.setAction(BotActionEnum.SEND_GROUP_MESSAGE.getAction());
Map<String, Object> params = new HashMap<>();
params.put("group_id", parseObject.getGroupId());
String ai = AiOne(parseObject.getMessage(),parseObject.getMessageId());
if (ai == null) {
ai = "宝,回复失败!重新试试吧!";
}
params.put("message", ai);
params.put("message_type", "group");
params.put("auto_escape", false);
paramsRequest.setParams(params);
msg = JSONObject.toJSONString(paramsRequest);
// 回复
instance.session.getAsyncRemote().sendText(msg);
}
}
/**
* 私信好友消息
*/
public synchronized void sendMsg(String msg) {
Message parseObject = JSONObject.parseObject(msg, Message.class);
log.info("收到好友" + parseObject.getUserId() + "的消息:" + parseObject.getMessage());
System.out.println("消息:"+parseObject.getMessage());
Request<Object> paramsRequest = new Request<>();
paramsRequest.setAction(BotActionEnum.SEND_PRIVATE_MESSAGE.getAction());
Map<String, Object> params = new HashMap<>();
params.put("user_id", parseObject.getUserId());
String ai = AiOne(parseObject.getMessage(),null);
if (ai == null) {
ai = "宝,回复失败!重新试试吧!";
}
params.put("message", ai);
params.put("message_type", "private");
params.put("auto_escape", false);
paramsRequest.setParams(params);
msg = JSONObject.toJSONString(paramsRequest);
// 回复
instance.session.getAsyncRemote().sendText(msg);
}
public String AiOne(String sendMsg,String mes_id) {
CloseableHttpClient httpClient = null;
try {
httpClient= HttpClientBuilder.create().build();
GptUtils gptUtils = applicationContext.getBean(GptUtils.class);
if(sendMsg.contains("画一幅图:")){
log.info("进入到绘图......");
String initBody = gptUtils.getImageURl(httpClient,sendMsg);
if(Objects.isNull(mes_id)){
String body =initBody;
log.info("body:"+body);
return body;
}
String body = "[CQ:reply,id="+mes_id+"]"+initBody;
log.info("body:"+body);
return body;
}
String initBody = gptUtils.getAnswer(httpClient,sendMsg);
String body = null;
if(Objects.isNull(mes_id)){
body=initBody;
log.info("body:"+body);
return body;
}
body = "[CQ:reply,id="+mes_id+"]"+initBody;
log.info("body:"+body);
return body;
} catch (Exception e) {
log.error(e.toString());
return null;
}finally {
try {
httpClient.close();
} catch (IOException e) {
log.error("httpclient关闭失败");
}
}
}
}
对于ws连接,我们也可以根据go-cqhttp的api文档来自行定制 api文档:API | go-cqhttp 帮助中心 目前我实现的是群聊,私信的聊天,及生成图片,以及好友请求同意。 项目的技术栈: websocket:连接go-cqhttp httpclient: 请求chatgptapi fastjson:进行序列化/反序列化 oss:图片存储
<dependencies> <dependency> <groupId>org.springframework.boot</groupId> <artifactId>spring-boot-starter</artifactId> </dependency> <dependency> <groupId>org.springframework.boot</groupId> <artifactId>spring-boot-devtools</artifactId> <scope>runtime</scope> <optional>true</optional> </dependency> <dependency> <groupId>org.springframework.boot</groupId> <artifactId>spring-boot-configuration-processor</artifactId> <optional>true</optional> </dependency> <dependency> <groupId>org.projectlombok</groupId> <artifactId>lombok</artifactId> <optional>true</optional> </dependency> <dependency> <groupId>org.springframework.boot</groupId> <artifactId>spring-boot-starter-test</artifactId> <scope>test</scope> </dependency> <!-- websocket--> <dependency> <groupId>org.springframework.boot</groupId> <artifactId>spring-boot-starter-websocket</artifactId> </dependency> <!-- fastjson--> <dependency> <groupId>com.alibaba</groupId> <artifactId>fastjson</artifactId> <version>1.2.76</version> </dependency> <!-- httpclient用来请求自动回复API --> <dependency> <groupId>org.apache.httpcomponents</groupId> <artifactId>httpclient</artifactId> <version>4.5.13</version> </dependency> <!-- 阿里云 OSS--> <dependency> <groupId>com.aliyun.oss</groupId> <artifactId>aliyun-sdk-oss</artifactId> <version>3.10.2</version> </dependency> </dependencies>
3.openAIAPI的使用
这里重点来说说使用openai提供的API的使用: 先到openai官网上,我们先看看官方给的api文档:
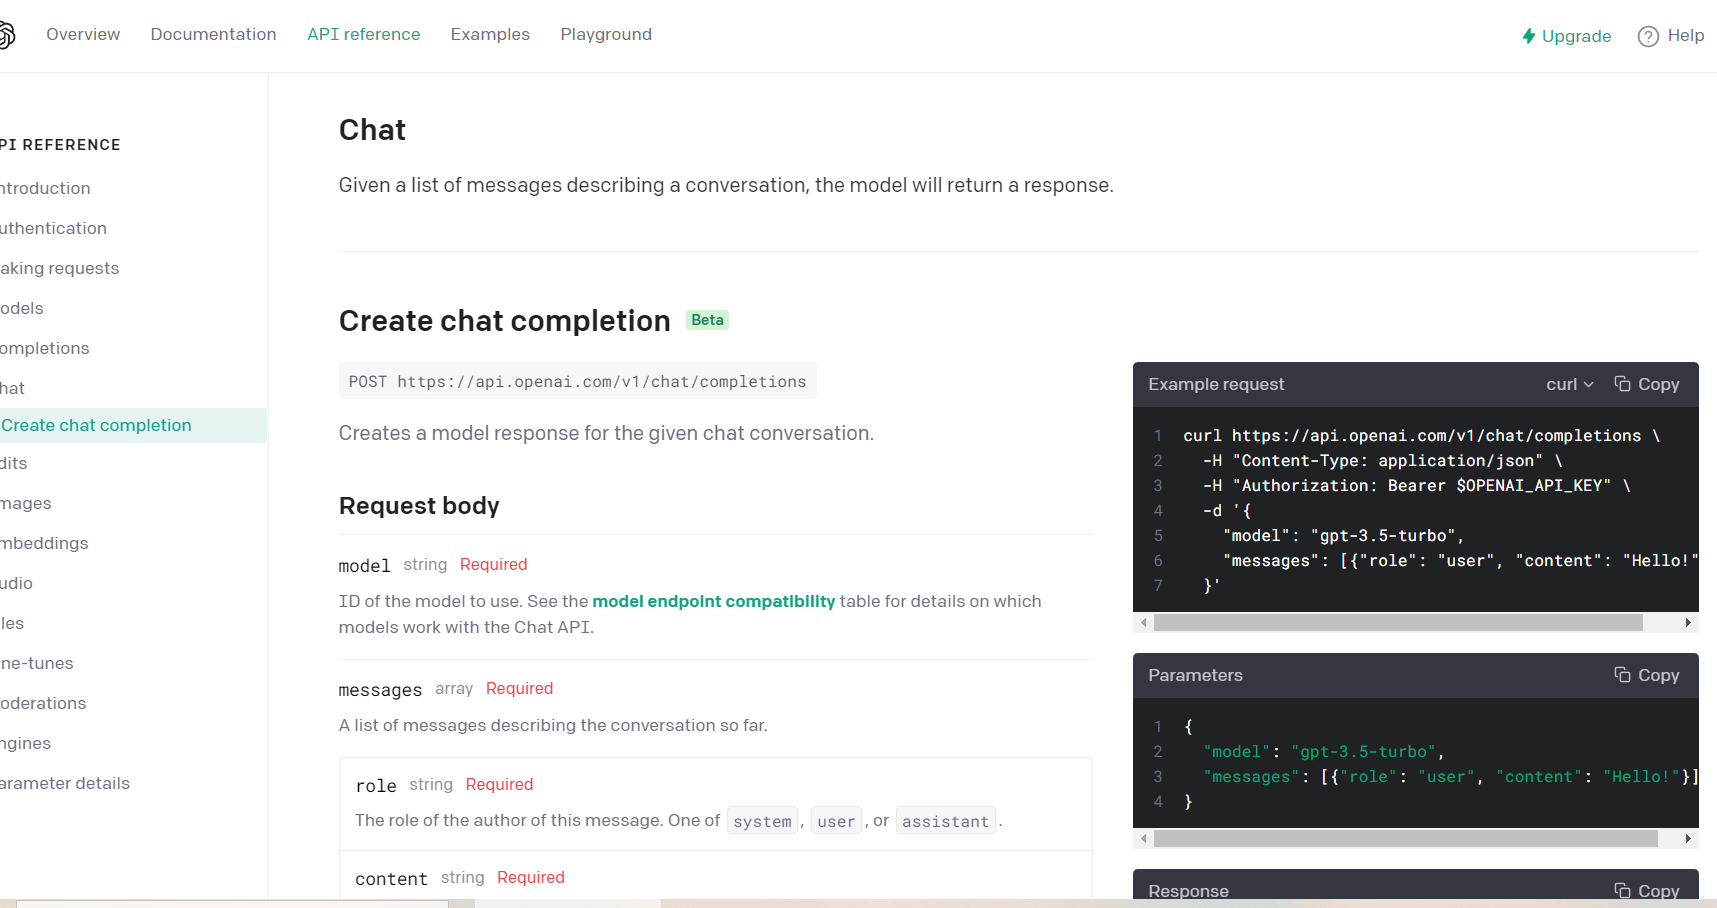
请求:
curl https://api.openai.com/v1/chat/completions \
  -H "Content-Type: application/json" \
  -H "Authorization: Bearer $OPENAI_API_KEY" \
  -d '{
    "model": "gpt-3.5-turbo",
    "messages": [{"role": "user", "content": "Hello!"}]
  }'
参数:
{
  "model": "gpt-3.5-turbo",
  "messages": [{"role": "user", "content": "Hello!"}]
}
响应:
{
  "id": "chatcmpl-123",
  "object": "chat.completion",
  "created": 1677652288,
  "choices": [{
    "index": 0,
    "message": {
      "role": "assistant",
      "content": "\n\nHello there, how may I assist you today?",
    },
    "finish_reason": "stop"
  }],
  "usage": {
    "prompt_tokens": 9,
    "completion_tokens": 12,
    "total_tokens": 21
  }
}
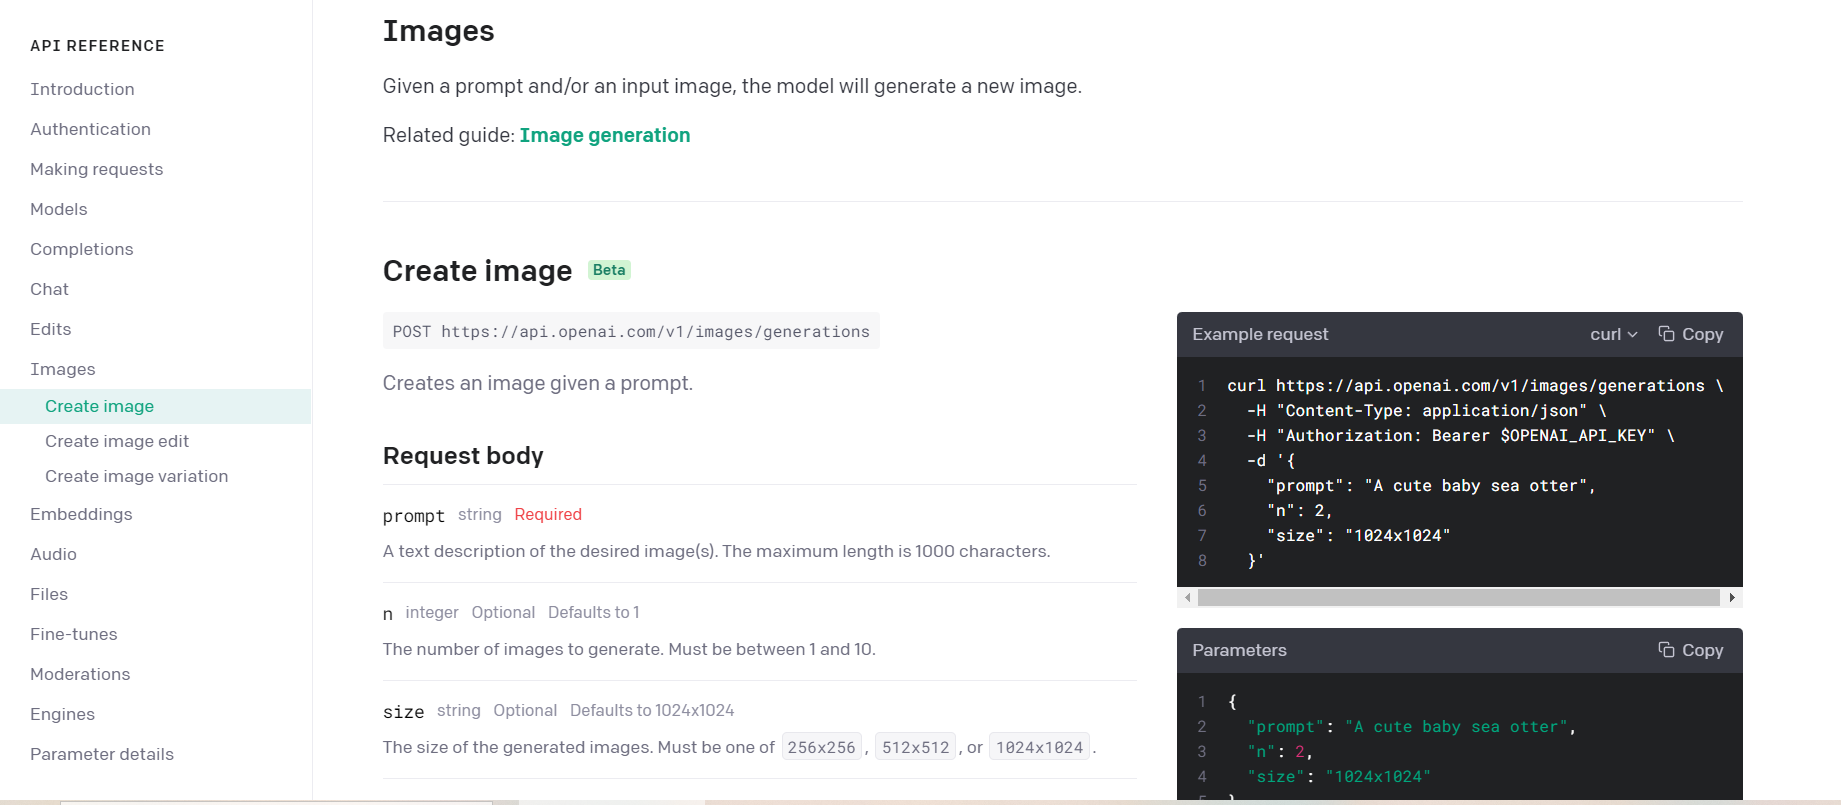
请求:
curl https://api.openai.com/v1/images/generations \
  -H "Content-Type: application/json" \
  -H "Authorization: Bearer $OPENAI_API_KEY" \
  -d '{
    "prompt": "A cute baby sea otter",
    "n": 2,
    "size": "1024x1024"
  }'
参数:
{
  "prompt": "A cute baby sea otter",
  "n": 2,
  "size": "1024x1024"
}
响应:
{
  "created": 1589478378,
  "data": [
    {
      "url": "https://..."
    },
    {
      "url": "https://..."
    }
  ]
}
根据上面的请求响应,第一步肯定是编写VO,之后我们使用httpclient来进行请求的发送,和接收响应 VO类代码就不放这了,直接git上下载源码查看 由于 OpenAI 及 GFW 的双重限制,国内开发者无法访问 OpenAI 的 API,现提供代理服务地址供开发者免费使用. 教程:OpenAI API 代理 完毕,之后就能正常请求该接口了。 编写请求chat聊天的方法:
/**
     * 创建一个ChatGptRequestParameter,用于携带请求参数
     */
    private static ChatGptRequestParameter chatGptRequestParameter = new ChatGptRequestParameter();

    public String getAnswer(CloseableHttpClient client, String question) {
        // 创建一个HttpPost
        HttpPost httpPost = new HttpPost(chatUrl);

        // 设置请求参数
        chatGptRequestParameter.addMessages(new ChatGptMessage(role, question));
        chatGptRequestParameter.setModel(model);
        HttpEntity httpEntity = null;
        try {
            // 对象转换为json字符串
            httpEntity = new StringEntity(JSON.toJSONString(chatGptRequestParameter), charset);
        } catch (Exception e) {
            log.info(question + "->json转换异常");
            return null;
        }
        httpPost.setEntity(httpEntity);
        // 设置请求头
        httpPost.setHeader(HttpHeaders.CONTENT_TYPE, "application/json");
        // 设置登录凭证
        httpPost.setHeader(HttpHeaders.AUTHORIZATION, "Bearer " + apiKey);

        // 用于设置超时时间
        RequestConfig config = RequestConfig
                .custom()
                .setConnectTimeout(responseTimeout)
                .build();
        httpPost.setConfig(config);
//        接收返回值
        CloseableHttpResponse response = null;
        HttpEntity entity = null;
        try {
            response = client.execute(httpPost);
            entity = response.getEntity();
//            反序列化
            String responseMes = EntityUtils.toString(entity);
//            转为对象
            ChatGptResponseParameter responseParameter = JSON.parseObject(responseMes, ChatGptResponseParameter.class);
            // 遍历所有的Choices(一般都只有一个)
            String ans = "";
            for (Choices choice : responseParameter.getChoices()) {
                log.info("size:" + responseParameter.getChoices().size());
                ChatGptMessage message = choice.getMessage();
                chatGptRequestParameter.addMessages(new ChatGptMessage(message.getRole(), message.getContent()));
                String s = message.getContent().replaceAll("\n+", "\n");
                ans += s;
            }
            return ans;
        } catch (Exception e) {
            e.printStackTrace();
        }finally {
            try {
                response.close();
            } catch (IOException e) {
                e.printStackTrace();
            }
        }
//        发生异常重置会话
        chatGptRequestParameter = new ChatGptRequestParameter();
        ;
        return "您当前的网络无法访问,会话已重置";
    }
编写按描述生成图片接口:
public String getImageURl(CloseableHttpClient client, String describe) {
        HttpPost httpPost = new HttpPost(imageGPTUrl);
        ImageGptMessage imageGptMessage = new ImageGptMessage(describe, size, num);
        String jsonString = JSON.toJSONString(imageGptMessage);
        HttpEntity httpEntity = new StringEntity(jsonString,charset);
        //        设置请求参数
        httpPost.setEntity(httpEntity);
        // 设置请求头
        httpPost.setHeader(org.apache.http.HttpHeaders.CONTENT_TYPE, "application/json");
        // 设置登录凭证
        httpPost.setHeader(HttpHeaders.AUTHORIZATION, "Bearer " + apiKey);
        //        设置请求超时时间
        RequestConfig timeOut = RequestConfig.custom().setConnectTimeout(responseTimeout).build();
        httpPost.setConfig(timeOut);
        //        发送请求
        CloseableHttpResponse response = null;
        InputStream stream = null;
        try{
            response = client.execute(httpPost);
            HttpEntity entity = response.getEntity();
//            反序列化
            String responseMes = EntityUtils.toString(entity);
//            转为对象
            ImageGptResponseParameter responseParameter = JSON.parseObject(responseMes, ImageGptResponseParameter.class);
            // 遍历所有的image(一般都只有一个)
            for (Image image : responseParameter.getData()) {
                HttpGet httpGet = new HttpGet(image.getUrl());
                response = client.execute(httpGet);
                HttpEntity en = response.getEntity();
                stream= en.getContent();
                String fileName = UUID.randomUUID()+".png";
                String lastUrl = uploadStrategyContext.executeUploadStrategy(fileName, stream, FilePathEnum.GPTIMG.getPath());
                String url = "[CQ:image,file="+lastUrl+"]";
//                String url = "[CQ:image,file=https://leyasuzhou-blog.oss-cn-beijing.aliyuncs.com/img/test.png]";
//                String url = image.getUrl();
                System.out.println(url);
                return url;
            }
        }catch (Exception e){
           log.info("图片生成出错了");
        }finally {
            try {
                stream.close();
                response.close();
            } catch (IOException e) {
                e.printStackTrace();
            }
        }
        return null;
    }

}
这里原本可以直接使用cq码来进行url封装,但直接用该接口生成图片的url会报错cq码解析超时,最后我想了个办法是先将图片放到oss上,之后再从oss上拿。但这样该方法就执行的很慢,如果有人知道这个cq码解析超时咋解决私信博主!
4.lunix部署
-
通过 SSH 连接到服务器
-
cd到解压目录
-
输入 ./go-cqhttp, Enter运行 , 此时将提示
[WARNING]: 尝试加载配置文件 config.yml 失败: 文件不存在
[INFO]: 默认配置文件已生成,请编辑 config.yml 后重启程序.
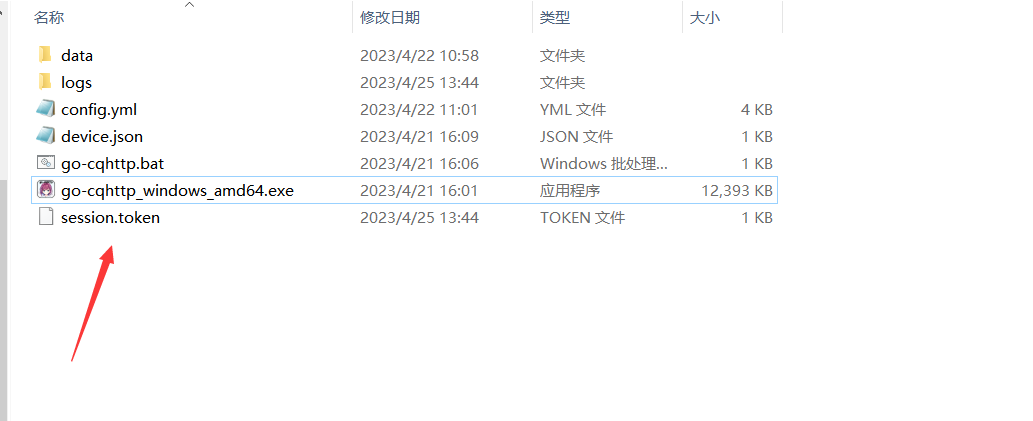
之后继续像windows一样修改config.xml和device.json文件。 这里会有一个小问题,就是在扫码登录时,会出现风控,不让你登录,这时候怎么办呢? 首先,我们先在windows上扫码登录账号,登录成功后我们发现出现了一个session.token文件
这个文件保存了我们的登录信息,这时候,我们将这个文件页上传到lunix服务器上同样位置,就不用扫码登录了 到此,整个项目就跑起来了。 本项目是一个client单会话的,如果一个回复错误,我这边采取的是重置会话。 欢迎交流技术问题 来体验你的qqbot吧!!!


 2万+
2万+

 被折叠的 条评论
为什么被折叠?
被折叠的 条评论
为什么被折叠?
 到【灌水乐园】发言


