


前言
MyBatis 是一个优秀的持久层框架,用于与数据库进行交互。它可以帮助你轻松地执行数据库操作,包括查询、插入、更新和删除。
Vue Element Plus Tree 树形控件 是一个功能强大且易于使用的前端组件,用于展示具有层次结构的数据。你可以在其中显示树状数据,支持节点选择、自定义节点内容、懒加载、拖拽等功能。
Java Servlet 是用于处理 Web 请求和响应的 Java 技术。你可以使用它来创建后端 API,与前端进行数据交互。
提示:以下是本篇文章正文内容,下面案例可供参考
一、准备工作?
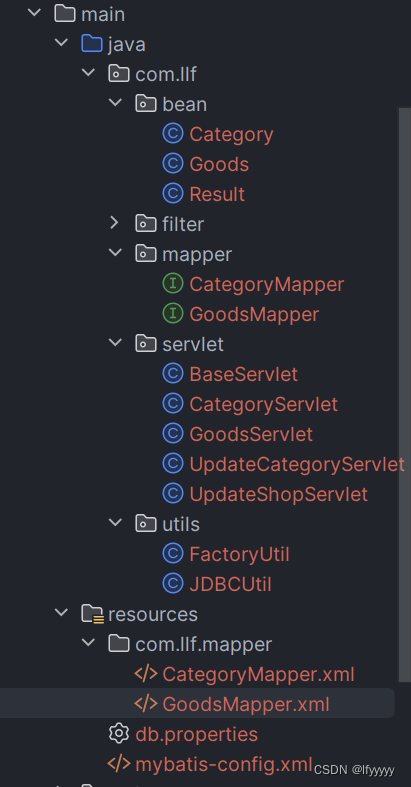
首先创建一个Vue3项目和一个后端Maven的webapp项目。
然后在vue中添加elment plus的依赖,并且在一个vue组件中加入Tree组件的基础模板
<template>
  <div class="custom-tree-container">
    <el-tree
      style="max-width: 600px"
      :data="dataSource"
      show-checkbox
      node-key="id"
      default-expand-all
      :expand-on-click-node="false"
    >
      <template #default="{ node, data }">
        <span class="custom-tree-node">
          <span>{{ node.label }}</span>
          <span>
            <a @click="append(data)"> Append </a>
            <a style="margin-left: 8px" @click="remove(node, data)"> Delete </a>
          </span>
        </span>
      </template>
    </el-tree>
  </div>
</template>

<script lang="ts" setup>
import { ref } from 'vue'
import type Node from 'element-plus/es/components/tree/src/model/node'

interface Tree {
  id: number
  label: string
  children?: Tree[]
}
let id = 1000

const append = (data: Tree) => {
  const newChild = { id: id++, label: 'testtest', children: [] }
  if (!data.children) {
    data.children = []
  }
  data.children.push(newChild)
  dataSource.value = [...dataSource.value]
}

const remove = (node: Node, data: Tree) => {
  const parent = node.parent
  const children: Tree[] = parent.data.children || parent.data
  const index = children.findIndex((d) => d.id === data.id)
  children.splice(index, 1)
  dataSource.value = [...dataSource.value]
}

const renderContent = (
  h,
  {
    node,
    data,
    store,
  }: {
    node: Node
    data: Tree
    store: Node['store']
  }
) => {
  return h(
    'span',
    {
      class: 'custom-tree-node',
    },
    h('span', null, node.label),
    h(
      'span',
      null,
      h(
        'a',
        {
          onClick: () => append(data),
        },
        'Append '
      ),
      h(
        'a',
        {
          style: 'margin-left: 8px',
          onClick: () => remove(node, data),
        },
        'Delete'
      )
    )
  )
}

const dataSource = ref<Tree[]>([
])
</script>

<style>
.custom-tree-node {
  flex: 1;
  display: flex;
  align-items: center;
  justify-content: space-between;
  font-size: 14px;
  padding-right: 8px;
}
</style>
还要创建一个数据库表,我已经创建好了,可以直接使用
/*
 Navicat Premium Data Transfer

 Source Server         : RpWn
 Source Server Type    : MySQL
 Source Server Version : 50735 (5.7.35)
 Source Host           : localhost:3306
 Source Schema         : demo

 Target Server Type    : MySQL
 Target Server Version : 50735 (5.7.35)
 File Encoding         : 65001

 Date: 16/03/2024 15:44:31
*/

SET NAMES utf8mb4;
SET FOREIGN_KEY_CHECKS = 0;

-- ----------------------------
-- Table structure for category
-- ----------------------------
DROP TABLE IF EXISTS `category`;
CREATE TABLE `category`  (
  `id` int(11) NOT NULL AUTO_INCREMENT,
  `code` varchar(7) CHARACTER SET utf8mb4 COLLATE utf8mb4_general_ci NULL DEFAULT NULL,
  `name` varchar(10) CHARACTER SET utf8mb4 COLLATE utf8mb4_general_ci NULL DEFAULT NULL,
  `sorts` tinyint(4) NULL DEFAULT 0,
  `parentId` int(11) NULL DEFAULT 0,
  `isdel` bit(1) NULL DEFAULT b'0',
  PRIMARY KEY (`id`) USING BTREE
) ENGINE = InnoDB AUTO_INCREMENT = 35 CHARACTER SET = utf8mb4 COLLATE = utf8mb4_general_ci ROW_FORMAT = Dynamic;

-- ----------------------------
-- Records of category
-- ----------------------------
INSERT INTO `category` VALUES (1, '101', '家用电器', 1, 0, b'0');
INSERT INTO `category` VALUES (2, '102', '手机', 2, 0, b'0');
INSERT INTO `category` VALUES (3, '103', '电脑', 3, 0, b'0');
INSERT INTO `category` VALUES (4, '104', '服装', 4, 0, b'0');
INSERT INTO `category` VALUES (5, '10101', '电视', 1, 1, b'0');
INSERT INTO `category` VALUES (6, '10102', '空调', 2, 1, b'0');
INSERT INTO `category` VALUES (7, '10103', '冰箱', 3, 1, b'0');
INSERT INTO `category` VALUES (8, '10104', '洗衣机', 4, 1, b'0');
INSERT INTO `category` VALUES (9, '10201', '手机', 1, 2, b'0');
INSERT INTO `category` VALUES (10, '10202', '配件', 2, 2, b'0');
INSERT INTO `category` VALUES (11, '10203', '摄像', 3, 2, b'0');
INSERT INTO `category` VALUES (12, '10204', '音响', 4, 2, b'0');
INSERT INTO `category` VALUES (13, '10301', '电脑整机', 1, 3, b'0');
INSERT INTO `category` VALUES (14, '10302', '外设配件', 2, 3, b'0');
INSERT INTO `category` VALUES (15, '10401', '男装', 1, 4, b'0');
INSERT INTO `category` VALUES (16, '10402', '女装', 2, 4, b'0');
INSERT INTO `category` VALUES (17, '1010101', '游戏电视', 1, 5, b'0');
INSERT INTO `category` VALUES (18, '1010102', '艺术电视', 2, 5, b'0');
INSERT INTO `category` VALUES (19, '1010103', 'K歌电视', 3, 5, b'0');
INSERT INTO `category` VALUES (20, '1010201', '新风空调', 1, 6, b'0');
INSERT INTO `category` VALUES (21, '1010202', '空调挂机', 2, 6, b'0');
INSERT INTO `category` VALUES (22, '1010203', '空调柜机', 3, 6, b'0');
INSERT INTO `category` VALUES (23, '1010301', '多门', 1, 7, b'0');
INSERT INTO `category` VALUES (24, '1010302', '三门', 2, 7, b'0');
INSERT INTO `category` VALUES (25, '1020101', '游戏手机', 1, 9, b'0');
INSERT INTO `category` VALUES (26, '1020102', '5G手机', 2, 9, b'0');
INSERT INTO `category` VALUES (27, '1030101', '笔记本', 1, 13, b'0');
INSERT INTO `category` VALUES (28, '1030102', '游戏本', 2, 13, b'0');
INSERT INTO `category` VALUES (29, '1040101', '短袖', 1, 15, b'0');
INSERT INTO `category` VALUES (30, '1040102', '裤子', 2, 15, b'0');
INSERT INTO `category` VALUES (31, '1040201', '袜子', 1, 16, b'0');
INSERT INTO `category` VALUES (34, '1040202', '靴子', 1, 16, b'0');

SET FOREIGN_KEY_CHECKS = 1;
二、使用步骤
1.引入库
代码如下(示例):
import numpy as np
import pandas as pd
import matplotlib.pyplot as plt
import seaborn as sns
import warnings
warnings.filterwarnings('ignore')
import  ssl
ssl._create_default_https_context = ssl._create_unverified_context
目前页面就是下图这个样子

2.读入数据
接着我们在后端创建mapper.xml 和javaBean类以及mybatis.cofig.xml和实体类对性的BeanMapper,并在pom.xml引入servlet ,lombok ,mybatis的依赖坐标
<dependency>
            <groupId>javax.servlet</groupId>
            <artifactId>javax.servlet-api</artifactId>
            <version>4.0.1</version>
            <scope>provided</scope>
        </dependency>
        <dependency>
            <groupId>org.mybatis</groupId>
            <artifactId>mybatis</artifactId>
            <version>3.5.15</version>
        </dependency>
        <dependency>
            <groupId>org.projectlombok</groupId>
            <artifactId>lombok</artifactId>
            <version>1.18.30</version>
        </dependency>
在CategoryMapper接口中写入 查询的方法List<Category> queryAllCategory();
最重要的是在映射文件中书写高级映射
<resultMap id="categoryMap" type="category">
        <id property="id" column="id"/>
        <result property="code" column="code"/>
        <result property="name" column="name"/>
        <collection property="children" javaType="list" ofType="category">
            <id property="id" column="twoId"/>
            <result property="code" column="code"/>
            <result property="name" column="twoName"/>
            <collection property="children" javaType="list" ofType="category">
                <id property="id" column="threeId"/>
                <result property="code" column="code"/>
                <result property="name" column="threeName"/>
            </collection>
        </collection>
    </resultMap>

    <select id="queryAllCategory" resultMap="categoryMap" flushCache="true">
        SELECT c1.id,
               c1.code,
               c1.`name`,
               c2.id     twoId,
               c2.`name` twoName,
               c2.code   twoCode,
               c3.id     threeId,
               c3.`name` threeName,
               c3.code   threeeCode
        FROM category c1
                 LEFT JOIN category c2 ON c1.id = c2.parentId
            AND c2.isdel = 0
                 LEFT JOIN category c3 ON c2.id = c3.parentId
            AND c3.isdel = 0
        WHERE c1.parentId = 0
        ORDER BY c1.sorts
    </select>
在CategoryServlet中继承HttpServlet并重写doPost和doGet方法,因为我们是查询所有的分类所以使用doGet
    protected void doGet(HttpServletRequest req, HttpServletResponse resp) throws ServletException, IOException {
        req.setCharacterEncoding("UTF-8");
        resp.setCharacterEncoding("UTF-8");
        SqlSession session = FactoryUtil.getFactory().openSession(true);
        CategoryMapper categoryMapper = session.getMapper(CategoryMapper.class);
        List<Category> list = categoryMapper.queryAllCategory();
        resp.getWriter().write("11", list, 0);
        session.close();
    }
最后我们就可以在前端发送请求并且接收相应:
<template>
    <div class="custom-tree-container">
        <el-tree style="max-width: 600px" :data="treeData" show-checkbox node-key="id" default-expand-all
            :expand-on-click-node="false" :render-content="renderContent" @node-click="handleNodeClick" />
        <el-divider />
    </div>
</template>

<script setup>
import axios from 'axios';
import { ref, onMounted, watch } from 'vue'
import { ElMessage } from 'element-plus';
import { useRouter } from 'vue-router';
const router = useRouter();
const treeData = ref([])
const initData = () => {
    axios.get('http://localhost:8080/category')
        .then((res) => {
            console.log(res)
            if (res.status === 200 && res.data.code === 200) {
                const categories = res.data.data
                const formattedData = categories.map(category => formatCategory(category))
                treeData.value = formattedData
            } else {
                console.error('Failed to fetch category data')
            }
        })
        .catch(err => {
            console.error('Error fetching category data:', err)
        })
}

const formatCategory = (category) => {
    const formattedCategory = {
        id: category.id,
        label: category.name,
        children: category.children ? category.children.map(child => formatCategory(child)) : []
    }
    return formattedCategory
}

const remove = (node, data) => {
    let id = data.id;
    axios.delete('http://localhost:8080/category', {
        params: {
            id
        }
    }).then((res) => {
        if (res.status == 200) {
            let rs = res.data;
            if (rs.code == 200) {
                ElMessage({
                    message: '删除成功',
                    type: 'success',
                })
                initData()
            }
        }
    }).catch((err) => {
        console.log(err);
    })
}

const renderContent = (
    h,
    {
        node,
        data,
        store,
    }
) => {
    return h(
        'span',
        {
            class: 'custom-tree-node',
        },
        h('span', null, node.label),
        h(
            'span',
            null,
            h(
                'a',
                {
                    onClick: () => append(data),
                },
                '添加子分类 '
            ),
            h(
                'a',
                {
                    style: 'margin-left: 8px',
                    onClick: () => remove(node, data),
                },
                '删除'
            )
        )
    )
}
...
//初始化挂载运行并渲染数据
onMounted(() => {
    initData()
})
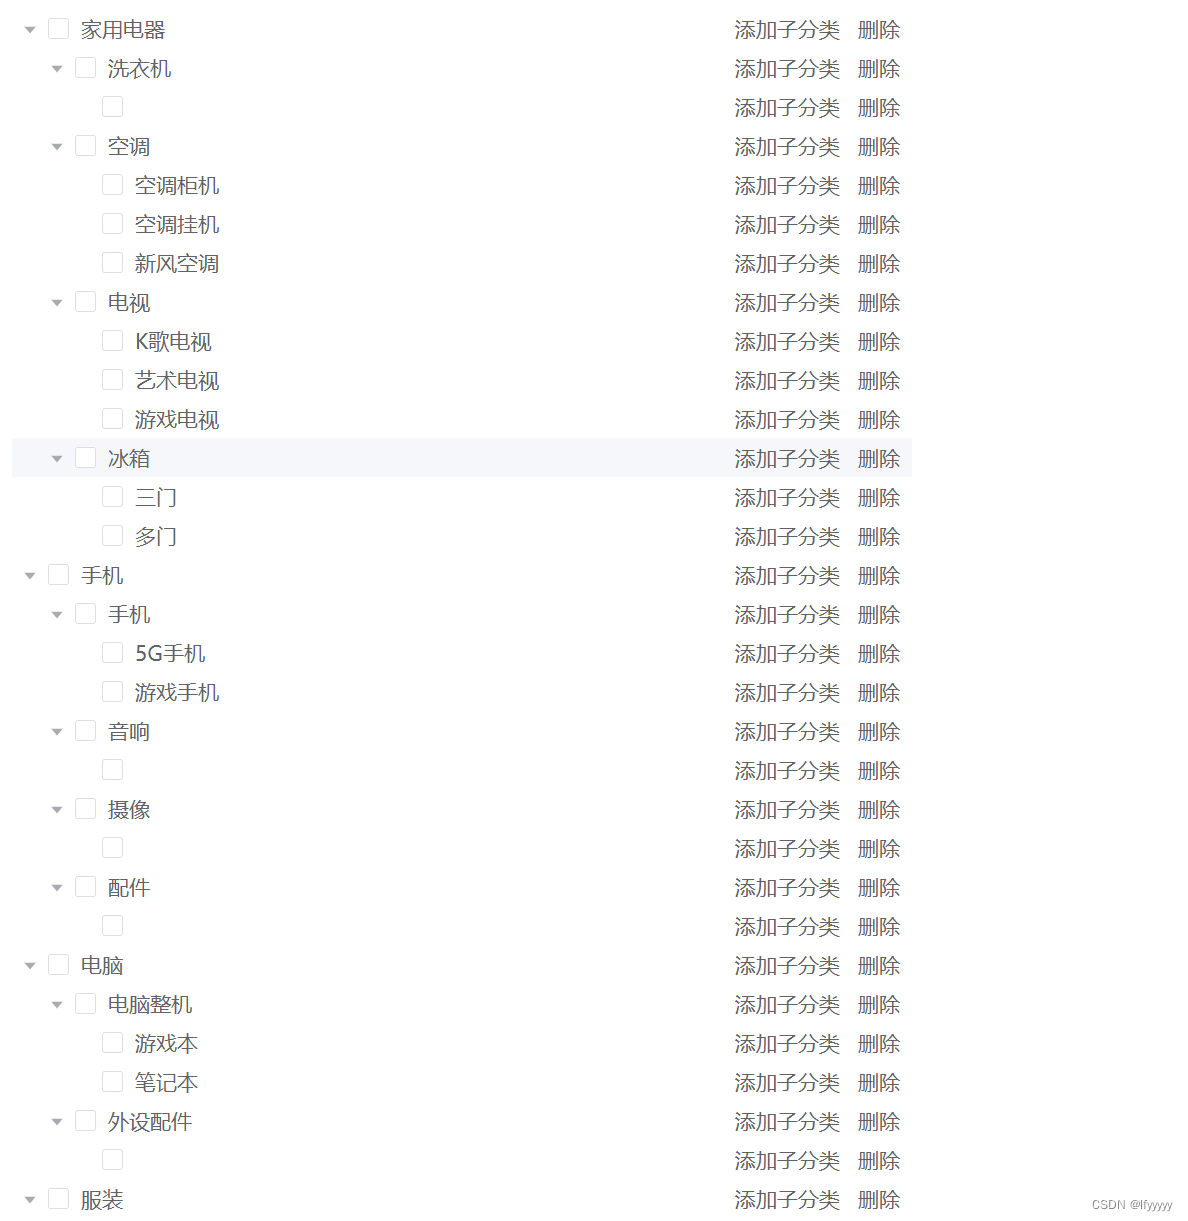

树状分类结构图,并且可以
总结
在配置MyBatis高级映射时,一定要注意resultType和resultMap的用法,千万不要用混淆了。在使用resultMap时需要我们自己去配置高级映射。
提示:①当提供的返回类型属性是resultType时,MyBatis会将Map里面的键值对取出赋给resultType所指定的对象对应的属性。所以其实MyBatis的每一个查询映射的返回类型都是ResultMap,只是当提供的返回类型属性是resultType的时候,MyBatis对自动的给把对应的值赋给resultType所指定对象的属性。 ②当提供的返回类型是resultMap时,因为Map不能很好表示领域模型,就需要自己再进一步的把它转化为对应的对象,这常常在复杂查询中很有作用。


 9920
9920

 被折叠的 条评论
为什么被折叠?
被折叠的 条评论
为什么被折叠?
 到【灌水乐园】发言


