第一模块:DataGridView 的数据绑定
通常我们的做法就是从数据库里面将数据以DataTable 的格式取出来,直接赋值到DataGridView控件上即可,具体赋值代码:
this.DataGridView .DataSource = dt;第二模块:DataGridView 的美化问题
1.数据单元格内容居中显示问题:
标题居中:
DataGridView1.ColumnHeadersDefaultCellStyle.Alignment = DataGridViewContentAlignment.MiddleCenter; 内容居中:
DataGridView1.RowsDefaultCellStyle.Alignment = DataGridViewContentAlignment.MiddleCenter 2.整体布局居中问题(修改属性):
自适应宽度:AutoSizeColumnsMode:AllCells
NotSet:列的大小调整行为从DataGridView.AutoSizeColumnsMode 属性继承。
None:列宽不会自动调整。
AllCells:调整列宽,以适合该列中的所有单元格的内容,包括标题单元格。
AllCellsExceptHeader:调整列宽,以适合该列中的所有单元格的内容,不包括标题单元格。
DisplayedCells:调整列宽,以适合当前屏幕上显示的行的列中的所有单元格的内容,包括标题单元格。
DisplayedCellsExceptHeader:调整列宽,以适合当前屏幕上显示的行的列中的所有单元格的内容,不包括标题单元格。
ColumnHeader:调整列宽,以适合列标题单元格的内容。
Fill:调整列宽,使所有列的宽度正好填充控件的显示区域,只需要水平滚动保证列宽在DataGridViewColumn.MinimumWidth属性值以上。相对列宽由相对DataGridViewColumn.FillWeight属性值决定。
数据居中显示:
属性-杂项-Columns-选定列-列属性-DefaultCellStyle-布局-Alignment-MiddleCenter
第三模块 数据行斑马线显示
1.显示处理
设置DataGridView控件的RowPrePaint事件,该事件在发生任何单元格绘制之前,执行行绘制时引发的事件。
直接上代码:
private void DataGridView_RowPrePaint(object sender, DataGridViewRowPrePaintEventArgs e)
        {
            if (sender is DataGridView)
            {
                DataGridView dgv = (DataGridView)sender;
                if((e.RowIndex+1)%2==0)//如果该行为2的倍数 则上色
                {
                    dgv.Rows[e.RowIndex].DefaultCellStyle.BackColor = Color.LightBlue;
                }

            }
        }
上述代码直接复制粘贴即可!
2.细节处理
使用上述代码后,可以看到DataGridView的样式已经为斑马线了。 但是,我们还要注意一个细节。当我们点击表头行时,往往会按照当前点击的列排序,这就打乱了我们已经画好的斑马线,所以我们应该在点击表头行时做点什么!
点击表头单元格时有两个事件共我们使用。一个是CellClick,另一个是CellMouseClick。简单说一下这两个的区别。
这里引用一段话:
“The CellClick event does not receive information about the mouse position. If the event handler needs information about the mouse position, use the CellMouseClick event”.
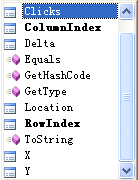
这个是CellMouseClick的DataGridViewCellMouseEventArgs的内容

这个是CellClick的DataGridViewCellEventArgs的内容

CellMouseClick事件包含了鼠标位置的相关信息。
这里采用CellMouseClick事件,当然也完全可以使用CellClick事件。
上代码:
private void DataGridView_CellMouseClick(object sender, DataGridViewCellMouseEventArgs e)
        {
            if(sender is DataGridView)
            {
                DataGridView dgv = (DataGridView) sender;
                if (e.RowIndex == -1)//如果该行为表头
                {
                    foreach (DataGridViewRow row in dgv.Rows)/*把所有行背景色职位白色*/
                    {
                        row.DefaultCellStyle.BackColor = Color.White;
                    }
                }
            }
        }
这样就是说,点击表头也可以了!
3.其他方法
其实DataGridView控件中已经实现了斑马线效果,就是AlternatingRowDefaultCellStyle属性,只要修改其属性的BackColor即可实现该效果。
第四模块 行号的添加
1.显示处理
设置DataGridView控件的RowPostPaint事件,该事件在发生任何单元格绘制之前,执行行绘制时引发的事件。
直接上代码:
private void dataGridView1_RowPostPaint(object sender, DataGridViewRowPostPaintEventArgs e)
        {
            Color color = dataGridView1.RowHeadersDefaultCellStyle.ForeColor;
            if (dataGridView1.Rows[e.RowIndex].Selected)
                color = dataGridView1.RowHeadersDefaultCellStyle.SelectionForeColor;
            else
                color = dataGridView1.RowHeadersDefaultCellStyle.ForeColor;
            using (SolidBrush b = new SolidBrush(color))
            {
                e.Graphics.DrawString((e.RowIndex + 1).ToString(), e.InheritedRowStyle.Font, b, e.RowBounds.Location.X + 20, e.RowBounds.Location.Y + 6);
            }
        }
这样咱们就可以在界面上看见以1开头的数据列顺序号了!


 811
811


 被折叠的 条评论
为什么被折叠?


