


目录
前言:
在CSS中有一种特殊的选择器:伪类选择器,可以使用伪类设置元素的动态状态,比如点击,或者鼠标在元素上方,或者是让其他选择器不能选择这些元素(没有ID或者class).伪类的名称不区分大小写,但使用时需要用:冒号开头初识CSS-CSDN博客 0基础看这一篇就够了HTML教程(详细汇总)-CSDN博客
除此之外伪类还需要跟CSS中的选择器结合一起使用,其语法为:
selector:pseudo-class{
    property:value;
}
上述示例中:selector是选择器的名称,pseudo-class是伪类的名称。
在CSS中提供了多种多样的伪类选择器,让我们可以根据元素的特定状态或属性来选择和样式化元素。以下是一些常见的CSS伪类以及它们的使用:
链接伪类:
:link:选择所有未被访问的链接。:visited:选择用户已访问的链接。
代码示例如下:
<!DOCTYPE html>
<html lang="en">

<head>
    <meta charset="UTF-8">
    <meta name="viewport" content="width=device-width, initial-scale=1.0">
    <title>Document</title>
    <style>
        /* 未访问的链接 */
        a:link {
            color: rgb(255, 179, 0);
        }

        /* 访问过的链接 */
        a:visited {
            color: rgb(11, 128, 0);
        }
    </style>
</head>

<body>
    <a href="https://www.bilibili.com/" target="_blank">点击此链接跳转到B站</a>
</body>

</html>上述代码:如果没有访问过<a>标签那么此时链接的为color: rgb(255, 179, 0);类似橘黄色,如果点击了链接访问后就会变成color: rgb(11, 128, 0);类似绿色,如果你一运行html就是访问过的样式可能是因为历史记录中访问过。

用户行为伪类:
:hover:当用户将鼠标指针悬停在元素上时选择该元素。:active:当用户与元素交互(如点击一个链接或按钮)时选择该元素。:focus:选择获得焦点的元素,例如输入框。
代码示例如下:
<!DOCTYPE html>
<html lang="en">

<head>
    <meta charset="UTF-8">
    <meta name="viewport" content="width=device-width, initial-scale=1.0">
    <title>Document</title>
    <style>
        button {
            width: 50px;
            height: 30px;
        }

        /* 鼠标悬停时改变按钮背景色 */
        button:hover {
            background-color: rgb(21, 194, 64);
        }

        /* 点击按钮时改变其颜色 */
        button:active {
            color: rgb(224, 38, 38);
        }

        /* 输入框获取焦点时改变边框颜色 */
        button:focus {
            border-color: rgb(18, 197, 39);
            border: 5px solid red;
        }
    </style>
</head>

<body>
    <button>2</button>
    <button>1</button>
    <button>63</button>
</body>
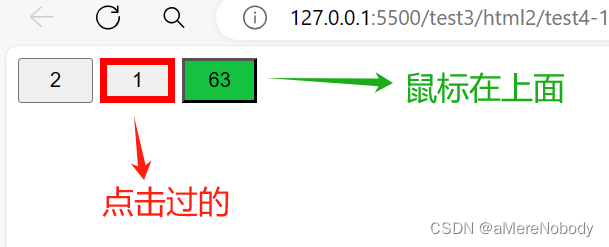
</html>代码运行示例如下:其中第一个为正常的样式,第二个被点击过之后边框颜色变为了border-color: rgb(18, 197, 39); 其中第三个鼠标正在其上方然后其颜色变为了 border-color: rgb(18, 197, 39);
元素状态伪类:
:enabled:选择所有启用的表单元素。<!DOCTYPE html> <html lang="en"> <head> <meta charset="UTF-8"> <meta name="viewport" content="width=device-width, initial-scale=1.0"> <title>Document</title> <style> /* 样式化所有启用的表单元素 */ input:enabled { background-color: lightgreen; } </style> </head> <body> <input type="text" placeholder="启用的输入框"> <input type="text" placeholder="启用的输入框" disabled> </body> </html>:disabled:选择所有禁用的表单元素。<!DOCTYPE html> <html lang="en"> <head> <meta charset="UTF-8"> <meta name="viewport" content="width=device-width, initial-scale=1.0"> <title>Document</title> <style> /* 样式化所有禁用的表单元素 */ input:disabled { background-color: lightgray; } </style> </head> <body> <input type="text" placeholder="禁用的输入框" disabled> <input type="text" placeholder="启用的输入框"> </body> </html>:checked:选择被选中的表单元素,如单选按钮或复选框。<!DOCTYPE html> <html lang="en"> <head> <meta charset="UTF-8"> <meta name="viewport" content="width=device-width, initial-scale=1.0"> <title>Document</title> <style> /* 样式化被选中的表单元素 */ input:checked+label { color: red; text-decoration: underline; } </style> </head> <body> <input type="radio" id="option1" name="option" checked> <label for="option1">选项 1 (选中)</label><br> <input type="radio" id="option2" name="option"> <label for="option2">选项 2</label><br> </body> </html>
结构化伪类:
:first-child:选择其父元素的第一个子元素。:last-child:选择其父元素的最后一个子元素。:nth-child(n):选择其父元素的第n个子元素。:nth-last-child(n):选择其父元素的倒数第n个子元素。:only-child:如果元素是其父元素的唯一子元素,则选择该元素。:first-of-type:选择一组兄弟元素中其类型的第一个元素。:last-of-type:选择一组兄弟元素中其类型的最后一个元素。:nth-of-type(n):选择一组兄弟元素中其类型的第n个元素。:nth-last-of-type(n):选择一组兄弟元素中其类型的倒数第n个元素。:only-of-type:如果元素是其父元素中唯一具有该类型的子元素,则选择该元素。
部分示例如下:
<!DOCTYPE html>
<html lang="en">
<head>
<meta charset="UTF-8">
<meta name="viewport" content="width=device-width, initial-scale=1.0">
<title>Document</title>
<style>
li:first-child {
color: red;
font-weight: 900;
font-size: large;
}
li:last-child {
color: aqua;
font-size: larger;
font-weight: 100;
}
p:only-child,
a:only-child {
background-color: bisque;
}
li:nth-child(3) {
color: blueviolet;
}
p:only-of-type {
background-color: rgb(35, 194, 38);
}
li:last-of-type {
background-color: rgb(238, 191, 63);
}
</style>
</head>
<body>
<ul>
<li>第一个元素</li>
<li>第二个元素</li>
<li>第三个元素</li>
<li>第四个元素</li>
<li>第五个元素</li>
<li>第六个元素</li>
<li>第七个元素</li>
<p>啥也没得个</p>
</ul>
<p>
<a href="">这里啥都没得没有连接</a>
</p>
<p>最后一个元素</p>
</body>
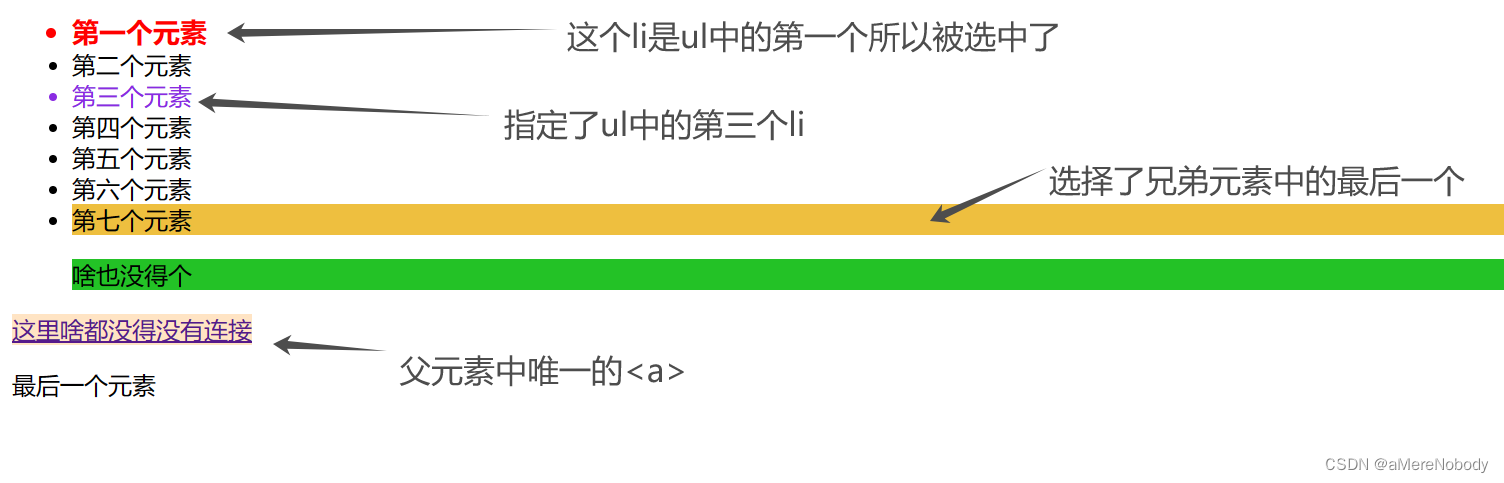
</html>上述代码的运行结果如:其ul中第一个li元素被li:first-child类伪类选择器选中,ul中的第三个元素使用了li:nth-child(3)其中指定了第三个所以被选中了,最后一个元素根据文档流所以被li:last-of-type选中,而其中ul中唯一的p标签被p;only-of-type选中因为p标签是ul标签中唯一的p,而倒数第二行的a因为其是它父元素中唯一的元素所以被选中了。
否定伪类:
:not(selector):选择不符合指定选择器的所有元素。
代码示例如下:
<!DOCTYPE html>
<html lang="en">

<head>
    <meta charset="UTF-8">
    <meta name="viewport" content="width=device-width, initial-scale=1.0">
    <title>Document</title>
    <style>
        /* 选择除了.excluded-class之外的所有p元素 */
        p:not(.excluded-class) {
            color: blue;
        }
    </style>
</head>

<body>
    <p>这段文字将会是蓝色。</p>
    <p class="excluded-class">这段文字将不会被样式化,因为它有.excluded-class。</p>
</body>

</html>上述代码中的第一个p变为了蓝色而class属性为excluded-class则没有因为使用的是not伪类选择器所以被去除掉了。

目标伪类:
:target:选择当前活动的目标元素(例如,URL中带有片段标识符的元素)。
代码示例如下:
<!DOCTYPE html>
<html lang="en">
<head>
<meta charset="UTF-8">
<meta name="viewport" content="width=device-width, initial-scale=1.0">
<title>Target Pseudo-class Example</title>
<style>
/* 通用样式 */
body {
font-family: Arial, sans-serif;
margin: 0;
padding: 20px;
}
h2 {
color: #333;
}
p {
margin-bottom: 20px;
}
/* 目标伪类样式 */
:target {
background-color: lightyellow;
padding: 10px;
border: 1px solid #ccc;
}
</style>
</head>
<body>
<h1>Welcome to the Target Pseudo-class Example Page</h1>
<h2 id="section1">Section 1</h2>
<p>This is the content for section 1.</p>
<p>Scroll down to see more sections or use the links below to navigate.</p>
<h2 id="section2">Section 2</h2>
<p>This is the content for section 2.</p>
<h2 id="section3">Section 3</h2>
<p>This is the content for section 3.</p>
<!-- 页脚导航 -->
<footer style="position: fixed; bottom: 0; left: 0; width: 100%; background: #f5f5f5; padding: 10px;">
<nav>
<ul>
<li><a href="#section1">Go to Section 1</a></li>
<li><a href="#section2">Go to Section 2</a></li>
<li><a href="#section3">Go to Section 3</a></li>
</ul>
</nav>
</footer>
</body>
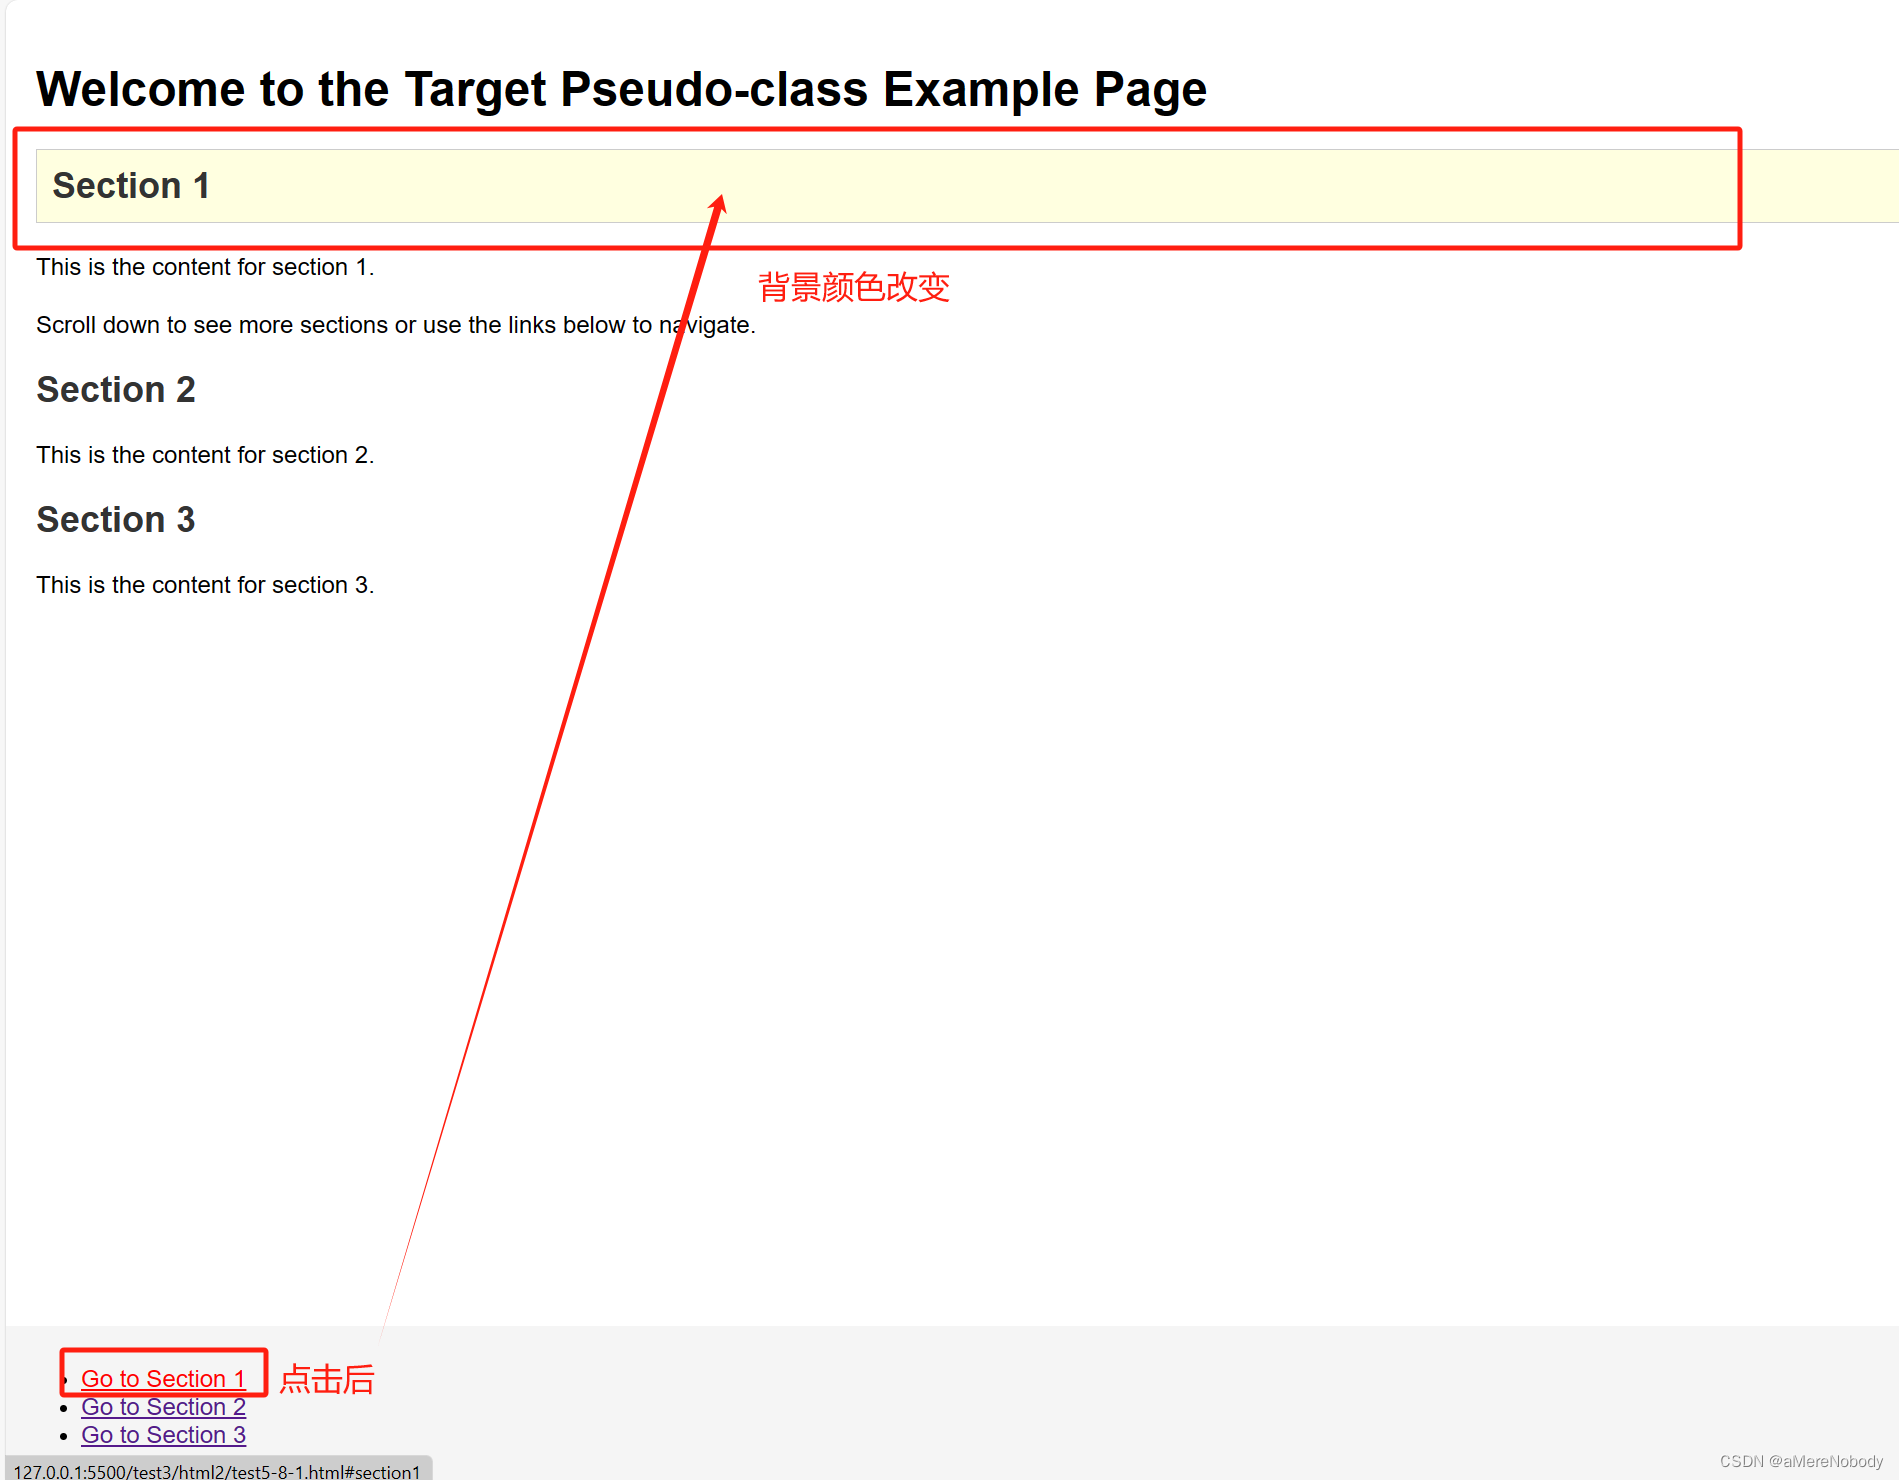
</html>每个链接都与上面的h2标签一一相连点击链接之后相关的h2标签的背景也会随之改变。
输入伪类:
:valid:选择所有有效的输入元素。:invalid:选择所有无效的输入元素。:required:选择设置有"required"属性的元素。:optional:选择没有"required"属性的元素。:in-range:选择值在指定范围内的元素。:out-of-range:选择值不在指定范围内的元素。:read-only:选择只读的输入元素。:read-write:选择非只读的输入元素。
代码示例如下:
<!DOCTYPE html>
<html lang="en">

<head>
    <meta charset="UTF-8">
    <meta name="viewport" content="width=device-width, initial-scale=1.0">
    <title>Document</title>
    <style>
        input[type="email"]:valid {
            border: 2px solid green;
        }

        input[type="number"]:out-of-range {
            border: 2px solid red;
            /* 当输入值超出范围时,输入框边框变为红色 */
        }

        input:optional {
            background-color: aquamarine;
        }

        input:read-only {
            color: rgb(18, 101, 224);
        }
    </style>
</head>

<body>
    <form>
        <label for="email">Email:</label>
        <input type="email" id="email" required>
        <input type="submit" value="Submit">


    </form>

    <form>
        <label for="numberInput">请输入一个1到100之间的数字:</label>
        <input type="number" id="numberInput" name="numberInput" min="1" max="100" required>
        <input type="submit" value="提交">
    </form>
    <form>
        <label for="numberInput">请输入一个1到100之间的数字:</label>
        <input type="number" id="numberInput" name="numberInput" min="1" max="100" required>
        <input type="submit" value="提交">
    </form>
</body>
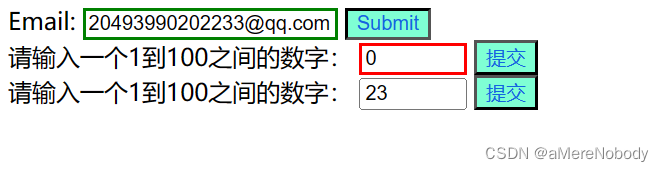
</html>第一个input输入框被选中了因为其输入的值是一个有效值(有效QQ号),第二个输入框被选中了是因为其输入了一个无效值,最后一个输入框没有被选中,其次又设置了input:optional让后续的input提交按钮被选中背景变为aquamarine,后续又选择了只读的input元素将其元素的字体设置为color: rgb(18, 101, 224);
这些伪类提供了强大的选择能力,使我们能够精确地控制和样式化页面上的元素,基于它们的状态、位置、属性或其他条件。


 1181
1181


 被折叠的 条评论
为什么被折叠?
被折叠的 条评论
为什么被折叠?
 到【灌水乐园】发言


