


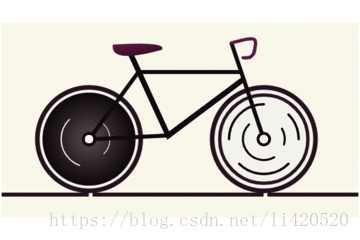
手把手教你如何绘制一辆,“单身自行车”,哈哈哈!
过程解析:
效果已经看了到,有没有感觉很牛B??其实也就一般般啦~,接下来就让我带大家一起分解一下它的实现过程吧

canvas中文名中:画布,它就跟我们在纸上画画一样,画某样东西之前,我们要先学会构思、拆解你要画的东西,就跟汽车、手机等东西一样,一个成品都是由很多零件组成的,当你拆解开来,一点点完成再组装的,就会变的容易的多。
绘制地平线 :
首先我们基于画布的高度取一定的比例,在底部画一条线;
从观察动画,它还有几个点,这个是用于视差滚动的时候,来欺骗我们的眼睛的,直接一条线肯定再怎么动也没有用,点的移动可以形成一个动画的效果;
再加一点修饰,几个点移动有点太单调了,大家可以想像一下,当你骑车的时候,车的速度与周围的事物、建筑、人产生一个交差,那种感觉是很刺激的,那么我们也来加一点东西,让动画看起来更丰富一些,我选择了 三条线,线本身有个渐变过渡的效果,比纯色要灵动些动画看起来更逼真,而且初始它是不在画布范围内的,这个点要注意一下;
下面的两张图,第二张是生成gif工具里截出来的,它就是动画的分解,其实所谓的动画,也是由一张张静态图组成,然后快速过渡,让视觉形成了视差,最后欺骗了大脑,我看见动画了……
知识点:lineTo、strokeStyle、stroke、restore等,这里不一一讲解了,如有不了解可自行查看 w3school API,
手把手教你如何绘制一辆,“单身自行车”,哈哈哈!
手把手教你如何绘制一辆,“单身自行车”,哈哈哈!
horizon(){
/**
- 轮子的底部,也称地平线:
1.清除画布
2.画一条直线,且高度6px
this.wheelPos = [];
this.ctx.save();
this.ctx.clearRect(0, 0, this.canvasW, this.canvasH);
let horizonX = 0,horizonY = this.canvasH-100;
this.ctx.beginPath();
this.ctx.strokeStyle = this.color;
this.ctx.lineWidth=6;
this.ctx.moveTo(horizonX,horizonY);
this.ctx.lineTo(this.canvasW,horizonY);
this.ctx.closePath();
this.ctx.stroke();
Array.from({length:5}).map((k,v)=>{
let dotProportion = (this.canvasW*0.49)v-this.oneCent;
this.wheelPos.push({x:dotProportion,y:horizonY-this.wheelRadius});
let startX = dotProportion-(this.animateNum2); //用于动画滚动移动
this.ctx.beginPath();
this.ctx.strokeStyle = “#f9f8ef”;
this.ctx.lineWidth=6;
this.ctx.moveTo(startX,horizonY);
this.ctx.lineTo(startX+5,horizonY);
this.ctx.closePath();
this.ctx.stroke();
});
this.ctx.restore();
this.shuttle();
// this.wheel();
}
shuttle(){
/**
- 画几根横线,有点视差,感觉骑车在飞速穿梭的感觉:
let shuttleX = this.canvasW+100,
shuttleY = this.canvasH/6;
let shuttleW = shuttleX+100;
[0,40,0].map((k,v)=>{
let random = Math.random()+2;
let x = shuttleX+k-(this.animateNum*(2.2random));
let y = shuttleY+v24;
let w = shuttleW+k-(this.animateNum*(2.2random));
let grd=this.ctx.createLinearGradient(x,y,w,y);
grd.addColorStop(0,"#30212c");
grd.addColorStop(1,"#fff");
this.ctx.beginPath();
this.ctx.lineCap=“round”;
this.ctx.strokeStyle = grd;
this.ctx.lineWidth=3;
this.ctx.moveTo(x,y);
this.ctx.lineTo(w,y);
this.ctx.stroke();
this.ctx.closePath();
});
}
绘制车轮 :
接下来我们来画车的两个轮子,轮子的位置在哪里呢?我也是观察了有一会才发现的,其实刚才的地平线,两点的位置,就是车轮的中心点;
所以在刚才绘制点的时候,就记录了5个点的坐标,这样就省去了一次计算,中间有两次是我们需要的
知识点:arc、fill
手把手教你如何绘制一辆,“单身自行车”,哈哈哈!
console.log(this.wheelPos);
this.wheelPos = this.wheelPos.slice(1,3); //这里取1-3
console.log(this.wheelPos);
this.wheelPos.map((wheelItem,v)=>{
let wheelItemX = wheelItem.x,
wheelItemY= wheelItem.y-this.wheelBorder/1.5;
//外胎
this.ctx.beginPath();
this.ctx.lineWidth=this.wheelBorder;
this.ctx.fillStyle = “#f5f5f0”;
this.ctx.strokeStyle = this.color;
this.ctx.arc(wheelItemX,wheelItemY,this.wheelRadius,0,Math.PI2,false);
this.ctx.closePath();
this.ctx.stroke();
this.ctx.fill();
//最后两轮胎中心点圆轴承
this.axisDot(wheelItemX,wheelItemY);
this.ctx.restore();
});
this.ctx.restore();
同理,上面画好了两个圆,但车轮肯定有轴承,前后轮我做了些汪样的处理,后轮是实心的加了个填充;
前轮是画了一点断点的圆,用于动画的转动,
在外轮的半径上进行缩小一定比较,画内圈,这里我取了外圈的.94,作为内圆的半径,
还加了两个半圆的描边修饰,让动画跑起来的时候,车轮有动起来的感觉,半圆 Math.PI 就是一个180,(Math.PI * degrees) / 180; degrees 就是我们想要绘制的起始/结束角度;
从下图可以看出,圆的填充用了 放射性渐变,createRadialGradient-创建放射状/环形的渐变(用在画布内容上)
手把手教你如何绘制一辆,“单身自行车”,哈哈哈!
手把手教你如何绘制一辆,“单身自行车”,哈哈哈!
手把手教你如何绘制一辆,“单身自行车”,哈哈哈!
context.createRadialGradient(x0,y0,r0,x1,y1,r1);
- createRadialGradient API 说明:
x0 = 渐变的开始圆的 x 坐标
y0 = 渐变的开始圆的 y 坐标
r0 = 开始圆的半径
x1 = 渐变的结束圆的 x 坐标
y1 = 渐变的结束圆的 y 坐标
r1 = 结束圆的半径
详细使用请看下面代码的实例
let scaleMultiple = this.wheelRadius*.94;
let speed1 = this.animateNum2; //外圈半圆速度
let speed2 = this.animateNum3; //内小圈半圆速度
//后轮
if(v === 0){
//内圆
this.ctx.beginPath();
let circleGrd=this.ctx.createRadialGradient(wheelItemX,wheelItemY,18,wheelItemX,wheelItemY,scaleMultiple);
circleGrd.addColorStop(0,"#584a51");
circleGrd.addColorStop(1,"#11090d");
this.ctx.fillStyle = circleGrd;
this.ctx.arc(wheelItemX,wheelItemY,scaleMultiple,0,Math.PI*2,false);
this.ctx.fill();
this.ctx.closePath();
//两个半圆线
[
{lineW:2,radius:scaleMultiple*.6,sAngle:getRads(-135+speed1) , eAngle:getRads(110+speed1)},
{lineW:1.2,radius:scaleMultiple*.45,sAngle:getRads(45+speed2) , eAngle:getRads(-50+speed2)}
].map((k,v)=>{
this.ctx.beginPath();
this.ctx.lineCap=“round”;
this.ctx.strokeStyle ="#fff";
this.ctx.lineWidth=k.lineW;
this.ctx.arc(wheelItemX,wheelItemY,k.radius,k.sAngle,k.eAngle,true);
this.ctx.stroke();
this.ctx.closePath();
});
this.ctx.restore();
}
拉下来我们就拿前轮开刀 :
前轮也是画了几个半圆,大概就是以某个角度为起点,然后分别画几个半圆,整体是一个半径,中间有断开,如: eAngle = [0,135,270], sAngle = [-45,0,180];就能画出如下图的圆:
582735936
]全栈交流学习
手把手教你如何绘制一辆,“单身自行车”,哈哈哈!
手把手教你如何绘制一辆,“单身自行车”,哈哈哈!
具体实现请看下面代码 :
//两个圆,再缩小一圈,画线圆
Array.from({length:3}).map((k,v)=>{
let prevIndex = v-1 <= 0 ? 0 : v-1;
let eAngle = v135, sAngle = -45+(prevIndex45)+v90;
let radius = scaleMultiple.75;
let color = “#120008”;
this.ctx.beginPath();
this.ctx.lineCap=“round”;
this.ctx.strokeStyle = color;
this.ctx.lineWidth=3.5;
this.ctx.arc(wheelItemX,wheelItemY,radius,getRads(sAngle+speed1),getRads(eAngle+speed1),false);
this.ctx.stroke();
this.ctx.closePath();
if(v<2){
//再缩小一圈
let eAngleSmaller = 15+ v210, sAngleSmaller = -30+v90;
let radiusSmaller = scaleMultiple*.45;
this.ctx.beginPath();
this.ctx.lineCap=“round”;
this.ctx.strokeStyle = color;
this.ctx.lineWidth=3;
this.ctx.arc(wheelItemX,wheelItemY,radiusSmaller,getRads(sAngleSmaller+speed2),getRads(eAngleSmaller+speed2),false);
this.ctx.stroke();
this.ctx.closePath();
}
this.ctx.restore();
});
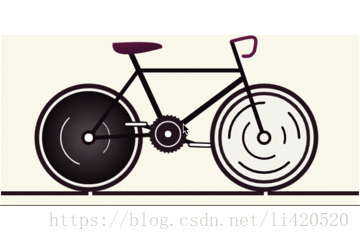
绘制车身车架 :
车架,应该也是本次分享中较大的难点之一,刚开始我也是这么认为的,但认真冷静、冷静、静静之后分析也还好,
最开始是用了最笨的办法,lineTO、moveTo、一根一根线的画,画到一半时发现画两个三角或者一个菱形即可,然后再把几根主轴重新画一下,于是两种方法都尝试了一下,
先说三角的吧,配合下面画的一个图讲解一下,
找到圆盘的中心点,介于后轮半径之上;
分析车架的结构,我们可以看为是一个菱形,也可以看着是两个三角形,这里以三角为例,菱形可以看 carBracket2方法;
首先算出三角形的起点、再算出三角形的角度、高度,请看下面示图;
最后在后轮的中心点盖上一个圆点 用于遮挡三角的部分
菱形 就要简单些的,但看起来逼格没有这么高端,就是用lineTo点对点的划线,
以上就是车架的绘制过程,其实感觉菱形是是要简单、代码量也少些的,有兴趣的同学可以自己尝试一下,大家可以看下面的主要代码,新手上路,如果有更好的方式,欢迎老司机指点:
结论 :使用moveTo把画布坐标从O移动到A点 x/y,lineTo从A开始画到B结束,再从B到C点,闭合,即一个三角完成
手把手教你如何绘制一辆,“单身自行车”,哈哈哈!
手把手教你如何绘制一辆,“单身自行车”,哈哈哈!
手把手教你如何绘制一辆,“单身自行车”,哈哈哈!
手把手教你如何绘制一辆,“单身自行车”,哈哈哈!
//方法二:三角形
…………此处省略N行代码
[
{
moveX:triangleX1,
moveY:triangleY1,
lineX1:coordinateX,
lineY1:triangleH1,
lineX2:discX,
lineY2:discY,
},
{
moveX:triangleX2+15,
moveY:triangleY2,
lineX1:triangleX1,
lineY1:triangleY1,
lineX2:discX,
lineY2:triangleH2,
},
].map((k,v)=>{
this.ctx.beginPath();
this.ctx.moveTo(k.moveX,k.moveY); //把坐标移动到A点,从A开始
this.ctx.strokeStyle = this.gearColor;
this.ctx.lineWidth=coordinateW;
this.ctx.lineTo(k.lineX1,k.lineY1);//从A开始,画到B点结束
this.ctx.lineTo(k.lineX2,k.lineY2); //再从B到C点,闭合
this.ctx.closePath();
this.ctx.stroke();
this.ctx.restore();
});
……
//方法一:菱形
…………此处省略N行代码
this.ctx.beginPath();
this.ctx.strokeStyle = this.gearColor;
this.ctx.lineWidth=coordinateW;
this.ctx.moveTo(polygon1X,polygon1Y);
this.ctx.lineTo(coordinateX,height);
this.ctx.lineTo(discX,discY);
this.ctx.lineTo(polygon2X,polygon1Y+5);
this.ctx.lineTo(polygon2X-5,polygon1Y);
this.ctx.lineTo(polygon1X,polygon1Y);
this.ctx.closePath();
this.ctx.stroke();
……
手把手教你如何绘制一辆,“单身自行车”,哈哈哈!
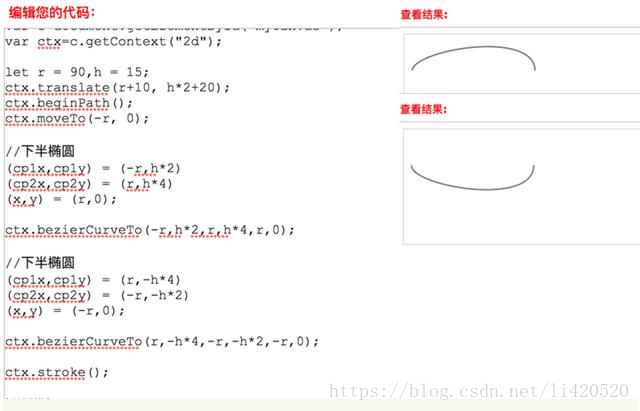
绘制车的豪华宝坐、扶手 :
坐位一开始是比较懵逼的,不知道如何下手,圆也不圆、方也不方,后面又去复习一下canvas的API,发现了quadraticCurveTo能满足这个需求,—— 二次贝塞尔曲线
画完之后,思考了很久,也没有发现什么技巧,或者规律,可能数学学的不好,没办法只能这样慢慢描了
扶手也是一样的,开始尝试quadraticCurveTo,半天也没画成功,后面尝试去找了它邻居bezierCurveTo,—— 三次贝塞尔曲线
提示:三次贝塞尔曲线需要三个点。前两个点是用于三次贝塞尔计算中的控制点,第三个点是曲线的结束点。曲线的开始点是当前路径中最后一个点
知识点:quadraticCurveTo、bezierCurveTo、createLinearGradient
582735936
全栈交流学习
手把手教你如何绘制一辆,“单身自行车”,哈哈哈!
手把手教你如何绘制一辆,“单身自行车”,哈哈哈!
手把手教你如何绘制一辆,“单身自行车”,哈哈哈!
//坐位
this.ctx.restore();
let seatX = (discX-85),seatY=discY-140;
let curve1Cpx = [seatX-5,seatY+30,seatX+75,seatY+8];
let curve2Cpx =[seatX+85,seatY-5,seatX,seatY];
this.ctx.beginPath();
// this.ctx.fillStyle = this.gearColor;
let grd=this.ctx.createLinearGradient(seatX,seatY,seatX+10,seatY+60); //渐变的角度
grd.addColorStop(0,"#712450");
grd.addColorStop(1,"#11090d");
this.ctx.fillStyle = grd;
this.ctx.moveTo(seatX,seatY);
this.ctx.quadraticCurveTo(…curve1Cpx);
this.ctx.quadraticCurveTo(…curve2Cpx);
this.ctx.fill();
//车前轴上的手柄
let steeringX = lever1X-20,steeringY = lever1Y-45;
let steeringStep1 = [steeringX+40,steeringY-10,steeringX+40,steeringY-10,steeringX+35,steeringY+15]
let steeringStep2 = [steeringX+30,steeringY+25,steeringX+25,steeringY+23,steeringX+18,steeringY+23]
this.ctx.beginPath();
this.ctx.lineCap=“round”;
this.ctx.strokeStyle = “#712450”;
this.ctx.lineWidth=coordinateW;
this.ctx.moveTo(steeringX,steeringY); //40 60;
this.ctx.bezierCurveTo(…steeringStep1);
this.ctx.bezierCurveTo(…steeringStep2);
this.ctx.stroke();
this.ctx.closePath();
绘制车的发动机、脚踏板 :
到了这里,也快接近本文的尾声了,接下来要讲的是是车辆中最重要的部分,车中间齿轮盘,一辆车没有它,你做的再好也是白搭了;
前面多次讲到齿轮的中心点,包括两个三角都是以它的中心计算的三角角度,知道了位置那就容易了,一样的先画几个圆,每个按一定的比例缩小;
然后外围再画一圈锯齿,这样齿轮大概就画好了,齿轮的技巧在于以圆盘为中心点,画一圈线,它跟时钟的刻度原理是一样的;
脚踏板,这个好理解,就是用lineTo画两跟线,其中一根进行一个90度的旋转就ok了,但重点是它在动画过程中的一个过程呢,我的分析过程是这样:
竖着的这根轴是,以圆盘齿轮的中点为基点 N* (Math.PI / 180)转动;
横着的这根轴,也就是脚踏板,它是以竖着的轴底部为Y轴中心点,以自身宽度的二分之一为X轴为中心点,同样以 N* (Math.PI / 180)的 rotate角度旋转。
说了这么多,我们来看几张动态图吧,顺便贴上代码:
手把手教你如何绘制一辆,“单身自行车”,哈哈哈!
手把手教你如何绘制一辆,“单身自行车”,哈哈哈!
discGear(coordinateX,coordinateY,coordinateW){
//车中间齿轮盘 disc
let discX = coordinateX,discY = coordinateY;
let discRadius = this.wheelRadius*.36;//车轮的3.6;
let discDotX = discX+discRadius+8,discDotY = discRadius/.98;
this.ctx.restore();
this.ctx.save();
this.ctx.translate(discX,discY);
// this.ctx.rotate(-(Math.PI/2));
Array.from({length:30}).map((v,index)=>{
let radian = (Math.PI / 15) ;
this.ctx.beginPath();
this.ctx.lineCap=“round”;
this.ctx.strokeStyle = this.color;
this.ctx.rotate(radian);
this.ctx.lineWidth=3;
this.ctx.moveTo(0,discDotY);
this.ctx.lineTo(1.5,discDotY);
// ctx.arc(discDotX,discDotY,6,0,Math.PI*2,false);
this.ctx.closePath();
this.ctx.stroke();
});
this.pedal(discX,discY,discRadius);
this.pedal(discX,discY,discRadius,1);
this.ctx.restore();
}
pedal(coordinateX,coordinateY,discRadius,turnAngle=0){
//脚踏板,分两次初始化,一次在中心齿轮绘制之前,一次在之后,
let pedalX = coordinateX, pedalY = coordinateY - discRadius*.7;
let pedalW = 6,
pedalH = discRadius1.9;
let radian = (this.animateNum)(Math.PI / 180) ;
let radianHor = (this.animateNum)(Math.PI / 180) ;
let turnAngleNum = 1;
let moveY = 28;
if(turnAngle !== 0){
this.ctx.rotate(-180(Math.PI/180));
turnAngleNum = (Math.PI/180);
};
this.ctx.beginPath();
this.ctx.rotate(radian*turnAngleNum);
this.ctx.lineCap=“round”;
this.ctx.strokeStyle = this.gearColor;
this.ctx.lineWidth=pedalW;
this.ctx.moveTo(-1,moveY);
this.ctx.lineTo(0,pedalH);
this.ctx.closePath();
this.ctx.stroke();
this.ctx.save();
let pedalHorW = pedalH/1.5,pedalHorH=pedalW;
this.ctx.translate(0,pedalH);
this.ctx.beginPath();
this.ctx.rotate(-radianHor);
this.ctx.lineCap=“round”;
this.ctx.fillStyle = “#fff”;
this.ctx.strokeStyle = this.gearColor;
this.ctx.lineWidth =2;
this.ctx.roundRect(-pedalHorW/2,-2,pedalHorW,pedalHorH,5);
this.ctx.closePath();
this.ctx.fill();
this.ctx.stroke();
this.ctx.restore();
}
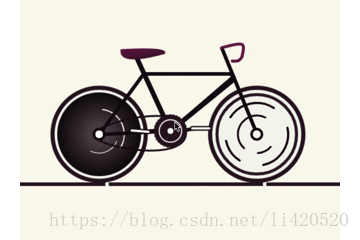
绘制车的链条 :
链条用的是 bezierCurveTo ,cp1x,cp1y,cp2x,cp2y,x,y等参数画出来的,具体看下面代码吧,其实就是两个半椭圆的拼接……
手把手教你如何绘制一辆,“单身自行车”,哈哈哈!
//链条
let chainW = ( coordinateX+discRadius - this.wheelPos[0].x) / 2;
let chainX = this.wheelPos[0].x +chainW-5 ;
let chainY = coordinateY;
this.ctx.save();
this.ctx.translate(chainX,chainY+4.8);
this.ctx.rotate(-2*(Math.PI/180));
let r = chainW+chainW*.06,h = discRadius/2;
this.ctx.beginPath();
this.ctx.moveTo(-r, -1);
this.ctx.lineWidth=3;
this.ctx.strokeStyle = “#1e0c1a”;
this.ctx.bezierCurveTo(-r,h1.5,r,h4,r,0);
this.ctx.bezierCurveTo(r,-h4,-r,-h1.5,-r,0);
this.ctx.closePath();
this.ctx.stroke();
this.ctx.restore();
尾声

手把手教你如何绘制一辆,“单身自行车”,哈哈哈!
手把手教你如何绘制一辆,“单身自行车”,哈哈哈!
欢迎大家来交流哦!!!!


 3057
3057


 被折叠的 条评论
为什么被折叠?
被折叠的 条评论
为什么被折叠?
 到【灌水乐园】发言


