


Fragment 基础
Fragment 介绍
Fragment ,碎片的意思, Android在3.0版本 后引入的功能. 有点类似于Activity,有自己的布局,有自己的生命周期,可以处理用户事件。 初期是为了解决平板的用户体验问题(经典的案例就是 list和detail 数据的展示及交互问题), 由于Fragment 与Activity具有相似性,而且能在Activity中进行灵活切换,现在fragment大量的应用在手机平板间.
Fragment 版本
由于Fragment是在 3.0 后才有的,要使用 Fragment SDK 版本需要 大于 11; 由于Fragment的广泛使用,google 后期在V4包中提供了 Fragment的支持.
在实际开发过程中,V4 包中Fragment 得到广泛使用
Fragment 的创建
新建Class 继承
android.app.Fragment(sdk >= 11) 或android.support.v4.app.Fragment(通用,建议使用)重写
onCreateView方法:@Override public View onCreateView(LayoutInflater inflater, ViewGroup container, Bundle savedInstanceState) { /** * 为此fragment 加载 你定义的布局文件 */ return inflater.inflate(R.layout.your_fragment_layout, container, false); }注意:
inflater.inflate(R.layout.your_fragment_layout, container, false);
中的 参数 必须为 false.
Fragment 的生命周期
生命周期图
生命周期的含义
onAttach()fragment 与 宿主Activity 关联时调用。
onCreate()在创建fragment时系统会调用此方法。
onCreateView()fragment 的视图 挂载到到宿主Activity的视图上时调用。
onActivityCreated()宿主Activity 的onCreate()方法执行完成返回后调用。
onStart()当 fragment 相对于用户而言,往可见方向的过程中,此时用户可见但不可操作时 调用。
onResume()当 fragment 相对于用户而言,往可见方向的过程中,此时用户可见也可操作时 调用。
onPause()当 fragment 相对于用户而言,往不可见方向的过程中,此时用户可见但不可操作时 调用。
onStop()当 fragment 相对于用户而言,往不可见方向的过程中,此时用户不可见也不可操作时 调用。
onDestroyView()fragment 的视图 从到宿主Activity的视图中 移除 时调用。
onDestroy()fragment 销毁时调用。
onDetach()fragment 与 宿主Activity 解除关联时调用。
![Fragment生命周期]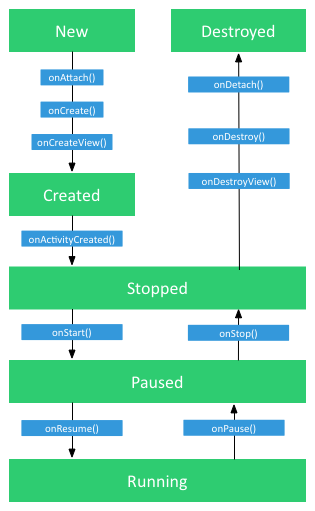
Fragment 和 Activity 间的关系
与 Activity 类似,Fragment 的设计是用来提供 用户交互 接口的;
但是Fragment 不能单独存在,必须寄宿在Activity中;
一个Activity实例 中 可以寄宿多个Fragment实例;
一个Fragment实例 只能 有一个 Activity实例作为 宿主;
Activity通过 FragmentManager来管理Fragment;
Fragment 的加载方式
XML配置加载
配置的步骤
创建 Activity
MainActivity.java
public class MainActivity extends FragmentActivity {

    @Override
    protected void onCreate(Bundle savedInstanceState) {
        super.onCreate(savedInstanceState);
        setContentView(R.layout.activity_main);
    }
}
创建 Fragment
LeftFragment.java
public class LeftFragment extends Fragment {
    @Override
    public View onCreateView(LayoutInflater inflater, ViewGroup container,Bundle savedInstanceState) {
    /**
     * Inflate the layout for this fragment
     */
    return inflater.inflate(R.layout.left_fragment, container, false);
    }
}
RightFragment.java
public class RightFragment extends Fragment {
    @Override
    public View onCreateView(LayoutInflater inflater, ViewGroup container,Bundle savedInstanceState) {
    /**
     * Inflate the layout for this fragment
     */
    return inflater.inflate(R.layout.right_fragment, container, false);
    }
}
创建 Fragment 的XML布局
left_fragment.xml
<?xml version="1.0" encoding="utf-8"?>
<LinearLayout xmlns:android="http://schemas.android.com/apk/res/android"
    android:layout_width="fill_parent"
    android:layout_height="fill_parent"
    android:background="#77777777"
    android:gravity="center"
    android:orientation="vertical" >

    <TextView
        android:layout_width="wrap_content"
        android:layout_height="wrap_content"
        android:layout_gravity="center"
        android:text="Left"
        android:textColor="#000000"
        android:textSize="30sp" />

    <!-- More GUI components go here -->

</LinearLayout>
right_fragment.xml
<?xml version="1.0" encoding="utf-8"?>
<LinearLayout xmlns:android="http://schemas.android.com/apk/res/android"
    android:layout_width="fill_parent"
    android:layout_height="fill_parent"
    android:background="#FF123456"
    android:gravity="center"
    android:orientation="vertical" >

    <TextView
        android:layout_width="wrap_content"
        android:layout_height="wrap_content"
        android:layout_gravity="center"
        android:text="Right"
        android:textColor="#FFFFFFFF"
        android:textSize="30sp" />

    <!-- More GUI components go here -->

</LinearLayout>
创建 Activity的布局
<?xml version="1.0" encoding="utf-8"?>
<LinearLayout
    xmlns:android="http://schemas.android.com/apk/res/android"
    xmlns:tools="http://schemas.android.com/tools"
    android:layout_width="fill_parent"
    android:layout_height="fill_parent"
    android:orientation="horizontal">

    <fragment
        android:id="@+id/left_fragment"
        class="org.heima.fragment.LeftFragment"
        android:layout_width="0dp"
        android:layout_height="match_parent"
        android:layout_weight="1" />

    <fragment
        android:id="@+id/right_fragment"
        class="org.heima.fragment.RightFragment"
        android:layout_width="0dp"
        android:layout_height="match_parent"
        android:layout_weight="2" />

</LinearLayout>
配置过程中注意事项
在Activity 的布局文件 中,必须指定 fragment的class或android:name为对应的Fragment的全包名类名。通过XML方式配置Fragment的不足
fragment的类型必须指定,因此通用性,灵活性不强。
动态加载
FragmentManager
作用
将Fragment 添加到 Activity的 视图中来,或是从Activity中移除。
如何拿到FragmentMannager
由 FragmentManager 的作用可以 了解到,FragmentManager 是 Activity的一个工具,用来添加和移除 Fragment的 工具,因此 FragmentManager 是 在Activity中用的,也是在Activity中获得的。
SDK >= 11
FragmentManager fm = getFragmentManager();通用V4包:(Activity 必须继承 FragmentActivity)
FragmentManager fm = getSupportFragmentManager();
Fragment 的添加,移除
Fragment添加
步骤:
为 Activity 新建 布局文件
<?xml version="1.0" encoding="utf-8"?>
<FrameLayout xmlns:android="http://schemas.android.com/apk/res/android"
    android:id="@+id/activity_add_container"
    android:layout_width="match_parent"
    android:layout_height="match_parent" />
采用FrameLayout;
给布局一个唯一id;
在 Activity 的 onCreate()方法中 加载Fragment
@Override
protected void onCreate(Bundle bundle) {
super.onCreate(bundle);
setContentView(R.layout.activity_add);

FragmentManager fm = getSupportFragmentManager();

FragmentTransaction ft = fm.beginTransaction();
ft.add(R.id.activity_add_container, new LeftFragment(), "left");
ft.commit();
}


 89万+
89万+

 被折叠的 条评论
为什么被折叠?
被折叠的 条评论
为什么被折叠?
 到【灌水乐园】发言


