SpringBoot配置swagger2过程和详解

pom文件

首先pom文件中引入依赖

        <!--swagger2 依赖-->
        <dependency>
            <groupId>io.springfox</groupId>
            <artifactId>springfox-swagger2</artifactId>
        </dependency>
        <dependency>
            <groupId>io.springfox</groupId>
            <artifactId>springfox-swagger-ui</artifactId>
        </dependency>

配置文件

enable作为swagger开关放在配置文件中,可以通过更改配置文件来控制Swagger-ui的显示和隐藏

#swagger开关
swagger2.enable=true

SwaggerConfig

config包下创建SwaggerConfig类

@Configuration
@EnableSwagger2
public class SwaggerConfig {
    //读取配置文件中的enable,true为显示,false为隐藏
    @Value("${swagger2.enable}")
    private boolean enable;

    @Bean
    public Docket createDocke(){
        return new Docket(DocumentationType.SWAGGER_2)
                //进入swagger-ui的信息
                .apiInfo(apiInfo())
                .select()
                //暴露所有controller类的所在的包路径
                .apis(RequestHandlerSelectors.basePackage("com.liang.web.controller"))
                .paths(PathSelectors.any())
                .build()
                .enable(enable);
    }
    //进入swagger-ui的信息
    private ApiInfo apiInfo(){
        return new ApiInfoBuilder()
                //该项目的名字
                .title("Spring Boot 2.x教程")
                //该项目的描述
                .description("spring boot2.x 描述")
                .version("1.0")
                .build();
    }
}

此时运行项目便可以进入到Swagger页面

在网页中输入"本机地址:端口号/swagger-ui.html"

经常用的Swagger注解

实体Model中注解

@Data
//实体路径和描述
@ApiModel(value = "com.liang.web.Model.UpdateUserModel",description = "接收更新用户数据")
public class UpdateUserModel {
    //字段描述
    @ApiModelProperty(value = "用户id")
    private String id;
    @ApiModelProperty(value = "账号")
    private String username;
    @ApiModelProperty(value = "密码")
    private String password;
    @ApiModelProperty(value = "性别")
    private String sex;
    @ApiModelProperty(value = "手机号")
    private String phone;
    @ApiModelProperty(value = "地区")
    private String createWhere;
    @ApiModelProperty(value = "邮件")
    private String email;
    @ApiModelProperty(value = "昵称")
    private String nickName;
}

controller层注解

@RestController()
@RequestMapping("/api")
//接口模块描述信息
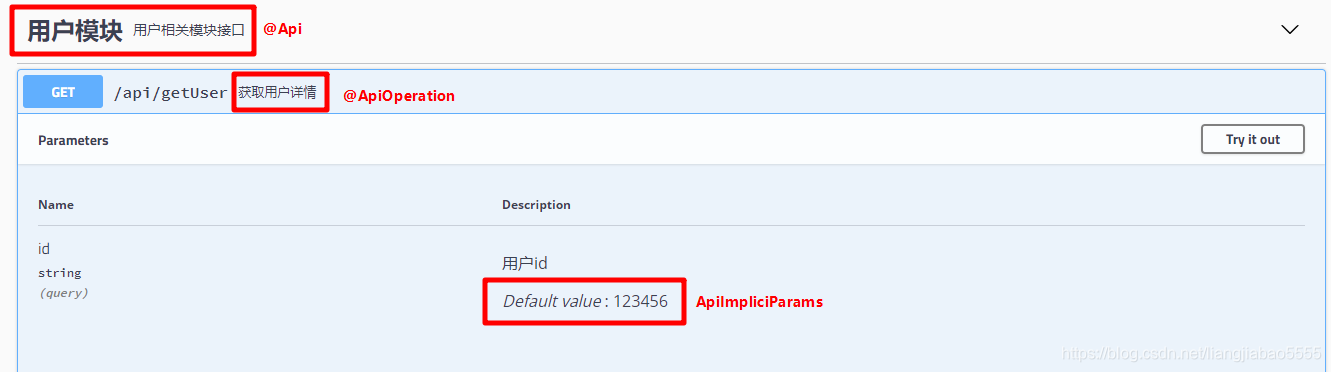
@Api(tags = "用户模块",description = "用户相关模块接口")
public class UserController {
    @Autowired
    private UserService userService;

    @GetMapping("/getUser")
    //接口描述信息
    @ApiOperation(value = "获取用户详情")
    @ApiImplicitParams({
            //给Swagger-UI中的输入框中设置默认值
            @ApiImplicitParam(name = "id",value = "用户id",defaultValue = "123456")
    })
    public SysUser getUserDetail(@ApiParam(value = "用户id",required = true) @RequestParam String id) {
        return userService.getUserInfo(id);
    }

    @PutMapping("/user")
    //接口描述信息
    @ApiOperation(value = "获取用户详情")
    public String updateUserInfo(@RequestBody UpdateUserModel userModel) {
        return userService.updateUserInfo(userModel);
    } 
}

接口过期

如果有新的接口代替本接口,但是本接口还要为之前对接的提供服务可以在Controller中的方法上添加@Deprecated注解来表示,该方法的swagger标签就会变灰。

    @ApiOperation("获取首页信息")
    @GetMapping("/getHomeInfo")
    @Deprecated
    public Map<String,Object> getHomeInfo(){
        return homeService.getHomeInfo();
    }


  • 7
    点赞
  • 19
    收藏
    觉得还不错? 一键收藏
  • 打赏
    打赏
  • 9
    评论
### 回答1: 要在Spring Boot应用程序中配置Swagger2,您可以按照以下步骤进行操作: 1.添加Swagger2依赖项:在pom.xml文件中,添加以下依赖项: ``` <dependency> <groupId>io.springfox</groupId> <artifactId>springfox-swagger2</artifactId> <version>2.9.2</version> </dependency> ``` 2.添加Swagger2配置类:创建一个Swagger2配置类,该类应该包含@Configuration和@EnableSwagger2注释,并提供有关API文档的信息,例如标题,描述和版本号。 ``` @Configuration @EnableSwagger2 public class SwaggerConfig { @Bean public Docket api() { return new Docket(DocumentationType.SWAGGER_2) .select() .apis(RequestHandlerSelectors.any()) .paths(PathSelectors.any()) .build() .apiInfo(apiInfo()); } private ApiInfo apiInfo() { return new ApiInfoBuilder() .title("My API") .description("API for My Application") .version("1.0") .build(); } } ``` 3.启用Swagger2 UI:在您的应用程序类中,添加@EnableSwagger2注释,以便启用Swagger2 UI。 ``` @SpringBootApplication @EnableSwagger2 public class MyApp { public static void main(String[] args) { SpringApplication.run(MyApp.class, args); } } ``` 4.测试API文档:运行应用程序并访问http://localhost:8080/swagger-ui.html,您将看到Swagger2 UI,其中包含您的API文档的详细信息。 希望这可以帮助您配置Spring Boot中的Swagger2。 ### 回答2: Swagger2是现今广泛使用的RESTful API文档自动生成工具,它可以帮助我们生成美观易懂的API文档,并提供了一系列交互式的API测试工具。Spring Boot是一款开箱即用的轻量级框架,能够帮助您快速搭建Java Web应用程序。本篇文章将介绍如何在Spring Boot项目中集成Swagger2来生成API文档,以及如何快速测试我们的API。 第一步: 添加相应依赖 首先,在您的Spring Boot项目的pom文件中添加以下依赖: ```xml <dependency> <groupId>io.springfox</groupId> <artifactId>springfox-swagger2</artifactId> <version>2.9.2</version> </dependency> <dependency> <groupId>io.springfox</groupId> <artifactId>springfox-swagger-ui</artifactId> <version>2.9.2</version> </dependency> ``` 第二步: 配置Swagger2 接下来,在您的Spring Boot项目的配置类中添加以下代码: ```java @Configuration @EnableSwagger2 public class SwaggerConfig { @Bean public Docket api() { return new Docket(DocumentationType.SWAGGER_2) .select() .apis(RequestHandlerSelectors.basePackage("<your package name>")) .paths(PathSelectors.any()) .build() .apiInfo(apiInfo()); } private ApiInfo apiInfo() { return new ApiInfoBuilder() .title("<Your API Title>") .version("<Your API version>") .description("<Your API description>") .termsOfServiceUrl("<Your terms of service URL>") .contact("<Your contact details>") .license("<Your license>") .licenseUrl("<Your license URL>") .build(); } } ``` 请注意,您需要在“<your package name>”处提供包名,该包名包含您要暴露为RESTful API的类。 此外,您还需要设置API的基本信息,例如名称,版本,描述等。 第三步: 可选配置 现在您已经成功添加了Swagger2依赖项并配置Swagger2的基本信息,现在您可以添加一些可选配置来改进生成的API文档。例如,您可以通过以下方法来解决API文档中显示“/error”的问题: ```java @Configuration @EnableSwagger2 public class SwaggerConfig { // ... @Bean public UiConfiguration uiConfiguration() { return UiConfigurationBuilder.builder().displayRequestDuration(true).build(); } @Bean public ErrorModelBuilder errorModelBuilder() { return new DefaultErrorModelBuilder(); } } ``` 这将生成更好的API文档。 第四步:快速测试API 已经成功地将Swagger2集成到Spring Boot项目中!现在可以使用Swagger界面,以交互方式测试您的API。 在“http://localhost:8080/swagger-ui.html”上启动项目,以查看自动生成的API文档页面。 自动生成的UI界面上有完整的API信息,UI有7大模块: - Swagger UI界面展示了 API 文档中的所有接口。 - Model展示了定义的模型。 - Model Schema是对每个模型对象的结构定义,其包含模型对象的属性、类型以及描述信息。 - Parameters显示模型中的所有模板参数。 - Response Messages显示所有返回的消息。 - Authorizations中定义了API的访问需要的身份验证信息。 - 外部文档文档页面可以添加外部文档或链接以供使用者查看。 您可以点击任何API并使用交互式工具进行测试。 例如,您可以点击“/users”接口,然后使用swagger UI的“Try it out”按钮,输入查询参数,然后点击“Execute”进行测试。您还可以通过在请求正文中指定JSON或XML等有效负载,并将其发送到API来测试其余功能。自动测试将显示返回的响应,并显示响应的HTTP状态代码。 ### 回答3: SpringBoot是一个开源的Java框架,可以快速搭建Web应用程序。Swagger2是一个开源的API框架,可以帮助Java开发人员快速构建RESTful Web服务,并生成API文档。SpringBootSwagger2相结合,可以大大简化Web应用程序的开发过程,并生成易于使用和阅读的API文档。 一、 pom.xml文件添加Swagger2依赖 在pom.xml文件中添加Swagger2依赖: ```xml <dependency> <groupId>io.springfox</groupId> <artifactId>springfox-swagger2</artifactId> <version>2.9.2</version> </dependency> <dependency> <groupId>io.springfox</groupId> <artifactId>springfox-swagger-ui</artifactId> <version>2.9.2</version> </dependency> ``` 二、 配置Swagger2 在SpringBoot的主应用程序类中添加Swagger2的配置信息: ```java @Configuration @EnableSwagger2 public class SwaggerConfig { @Bean public Docket createRestApi() { return new Docket(DocumentationType.SWAGGER_2) .apiInfo(apiInfo()) .select() .apis(RequestHandlerSelectors.basePackage("com.example.demo.controller")) .paths(PathSelectors.any()) .build(); } private ApiInfo apiInfo() { return new ApiInfoBuilder() .title("SpringBoot集成Swagger2") .description("详细信息......") .version("1.0.0") .build(); } } ``` 其中,@Configuration注解告诉SpringBoot这是一个配置文件;@EnableSwagger2注解启用Swagger2;createRestApi()方法返回一个Docket类实例,这个类用来配置Swagger2的基本信息;apiInfo()方法用来配置API文档的基本信息。 三、 使用Swagger2 启动SpringBoot应用程序,访问http://localhost:端口号/swagger-ui.html,就可以看到自动生成的API文档了。 总结: SpringBootSwagger2相结合,可以大大简化Web应用程序的开发过程,并生成易于使用和阅读的API文档。其中,Swagger2的配置非常简单,只需要在pom.xml文件中添加Swagger2依赖,并在SpringBoot应用程序的主应用程序类中添加Swagger2的配置信息即可。

“相关推荐”对你有帮助么?

  • 非常没帮助
  • 没帮助
  • 一般
  • 有帮助
  • 非常有帮助
提交
评论 9
添加红包

请填写红包祝福语或标题

红包个数最小为10个

红包金额最低5元

当前余额3.43前往充值 >
需支付:10.00
成就一亿技术人!
领取后你会自动成为博主和红包主的粉丝 规则
hope_wisdom
发出的红包

打赏作者

lllllLiangjia

你的鼓励将是我创作的最大动力

¥1 ¥2 ¥4 ¥6 ¥10 ¥20
扫码支付:¥1
获取中
扫码支付

您的余额不足,请更换扫码支付或充值

打赏作者

实付
使用余额支付
点击重新获取
扫码支付
钱包余额 0

抵扣说明:

1.余额是钱包充值的虚拟货币,按照1:1的比例进行支付金额的抵扣。
2.余额无法直接购买下载,可以购买VIP、付费专栏及课程。

余额充值