


【摘要】本文分析了linux内核中的list_head数据结构的底层实现及其相关的各种调用源码,有助于理解内核中链表对象的使用。
二、内核中的队列/链表对象
-
在内核中存在4种不同类型的列表数据结构:
- singly-linked lists
- singly-linked tail queues
- doubly-linked lists
- doubly-linked tail queues
-
linux内核中的链表有如下特点:
-
尽可能的代码重用,化大堆的链表设计为单个链表
-
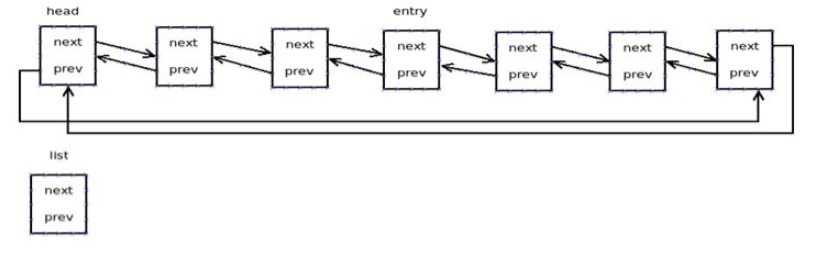
内核中大部分都是"双向循环链表",因为"双向循环链表"的效率是最高的,找头节点,尾节点,直接前驱,直接后继时间复杂度都是O(1) ,而使用单链表,单向循环链表或其他形式的链表是不能完成的。
-
如果需要构造某类对象的特定列表,则在其结构中定义一个类型为"list_head"的成员,通过这个成员将这类对象连接起来,形成所需列表,并通过通用链表函数对其进行操作(list_head内嵌在原始结构中就像一个钩子,将原始对象串起来)。在这种架构设计下,内核开发人员只需编写通用链表函数,即可构造和操作不同对象的列表,而无需为每类对象的每种列表编写专用函数,实现了代码的重用。
/* * linux-2.6.32.63\include\linux\list.h */ struct list_head { struct list_head *next, *prev; }; -
如果想对某种类型创建链表,就把一个list_head类型的变量嵌入到该类型中,用list_head中的成员和相对应的处理函数来对链表进行遍历
-
-
内核是怎么初始化并使用这些数据结构的呢?linux内核为这些链表数据结构配套了相应的"操作宏"、以及内嵌函数。
2.1 链表基本操作
位linux-2.6.32.63\include\linux\list.h中定义:
2.1.1 链表初始化
-
LIST_HEAD_INIT
#define LIST_HEAD_INIT(name) { &(name), &(name) }LIST_HEAD_INIT这个宏的作用是初始化当前链表节点,即将头指针和尾指针都指向自己。
-
LIST_HEAD(name)——静态初始化
#define LIST_HEAD(name) struct list_head name = LIST_HEAD_INIT(name)从代码可以看出,LIST_HEAD这个宏的作用是定义了一个双向链表的头,并调用LIST_HEAD_INIT进行"链表头初始化",将头指针和尾指针都指向自己,因此可以得知在Linux中用头指针的next是否指向自己来判断链表是否为空。
-
INIT_LIST_HEAD(struct list_head *list)——动态初始化
除了LIST_HEAD宏在编译时静态初始化,还可以使用内嵌函数INIT_LIST_HEAD(struct list_head *list)在运行时进行初始化:static inline void INIT_LIST_HEAD(struct list_head *list) { list->next = list; list->prev = list; }无论是采用哪种方式,新生成的链表头的指针next,prev都初始化为指向自己
2.1.2 链表判空
-
list_empty(const struct list_head *head)
static inline int list_empty(const struct list_head *head) { return head->next == head; } -
list_empty_careful(const struct list_head *head)
static inline int list_empty_careful(const struct list_head *head) { struct list_head *next = head->next; return (next == head) && (next == head->prev); }- 和list_empty()的差别在于:
函数使用的检测方法是判断表头的前一个结点和后一个结点是否为其本身,如果同时满足则返回0,否则返回值为1。这主要是为了应付另一个cpu正在处理同一个链表而造成next、prev不一致的情况。但代码注释也承认,这一安全保障能力有限:除非其他cpu的链表操作只有list_del_init(),否则仍然不能保证安全,也就是说,还是需要加锁保护
- 和list_empty()的差别在于:
2.1.3 链表插入
-
list_add(struct list_head *new, struct list_head *head)
-
在head和head->next之间加入一个新的节点。即头插法(即先插入的后输出,可以用来实现一个栈)
static inline void list_add(struct list_head *new, struct list_head *head)
{
    __list_add(new, head, head->next);
}
-
-
list_add_tail(struct list_head *new, struct list_head *head)
- 在head->prev(双向循环链表的最后一个结点)和head之间添加一个新的结点。即尾插法(先插入的先输出,可以用来实现一个队列)
static inline void list_add_tail(struct list_head *new, struct list_head *head)
{
    __list_add(new, head->prev, head);
}

#ifndef CONFIG_DEBUG_LIST
static inline void __list_add(struct list_head *new, struct list_head *prev, struct list_head *next)
{
    next->prev = new;
    new->next = next;
    new->prev = prev;
    prev->next = new;
}
#else
extern void __list_add(struct list_head *new, struct list_head *prev, struct list_head *next);
#endif
2.1.4 链表删除
-
list_del(struct list_head *entry)
- list_del()函数将删除后的prev、next指针分别被设为LIST_POSITION2和LIST_POSITION1两个特殊值,这样设置是为了保证不在链表中的节点项不可访问。对LIST_POSITION1和LIST_POSITION2的访问都将引起"页故障"。
/* __list_del(entry->prev, entry->next)表示将entry的前一个和后一个之间建立关联(即架空中间的元素) */ #ifndef CONFIG_DEBUG_LIST static inline void __list_del(struct list_head *entry->prev, struct list_head *entry->next) { entry->prev->next = entry->next; entry->next->prev = entry->prev; } #else extern void __list_del(struct list_head *entry->prev, struct list_head *entry->next); #endif #ifndef CONFIG_DEBUG_LIST static inline void list_del(struct list_head *entry) { __list_del(entry->prev, entry->next); entry->next = LIST_POISON1; entry->prev = LIST_POISON2; } #else extern void list_del(struct list_head *entry); #endif -
list_del_init(struct list_head *entry)
- list_del_init这个函数首先将entry从双向链表中删除之后,并且将entry初始化为一个空链表。
要注意区分和理解的是:list_del(entry)和list_del_init(entry)唯一不同的是对entry的处理,前者是将entry设置为不可用,后者是将其设置为一个空的链表的开始。
static inline void list_del_init(struct list_head *entry) { __list_del(entry->prev, entry->next); INIT_LIST_HEAD(entry); } - list_del_init这个函数首先将entry从双向链表中删除之后,并且将entry初始化为一个空链表。
2.1.5 链表节点的替换
-
list_replace(struct list_head *old, struct list_head *new)
-
list_repleace()函数只是改变new和old的指针关系,然而old指针并没有释放
static inline void list_replace(struct list_head *old, struct list_head *new)
 {
     new->next = old->next;
     new->next->prev = new;
     new->prev = old->prev;
     new->prev->next = new;
 }
-
-
list_replace_init(struct list_head *old, struct list_head *new)
- list_repleace_init()函数不仅改变new和old的指针关系,还将old节点置空。
 static inline void list_replace_init(struct list_head *old, struct list_head *new)
 {
     list_replace(old, new);
     INIT_LIST_HEAD(old);
 }
2.1.6 分割链表
-
list_cut_position(struct list_head *list, struct list_head *head, struct list_head *entry)
-
函数将head(不包括head结点)到entry结点之间的所有结点截取下来添加到list链表中。该函数完成后就产生了两个链表head和list。
static inline void list_cut_position(struct list_head *list, \
                                     struct list_head *head, \
                                     struct list_head *entry)
    {
        if (list_empty(head))
            return;
        if (list_is_singular(head) &&
            (head->next != entry && head != entry))
            return;
        if (entry == head)
            INIT_LIST_HEAD(list);
        else
            __list_cut_position(list, head, entry);
    }


static inline void __list_cut_position(struct list_head *list, \
                                       struct list_head *head, \
                                       struct list_head *entry)
    {
        struct list_head *new_first = entry->next;
        list->next = head->next;
        list->next->prev = list;
        list->prev = entry;
        entry->next = list;
        head->next = new_first;
        new_first->prev = head;
    }
-
2.1.7 链表的遍历
-
list_entry(ptr, type, member)
-
Linux链表中仅保存了数据项结构中list_head成员变量的地址,可以通过list_entry宏通过list_head成员访问到作为它的所有者的的起始基地址。(思考结构体的成员偏移量的概念,只有知道了结构体基地址才能通过offset得到成员地址,之后才能继续遍历)
-
这里的ptr是一个链表的头结点,这个宏就是取的这个链表"头结点”(注意不是第一个元素,是头结点,要得到第一个元素还得继续往下走一个)所指结构体的首地址。
#define list_entry(ptr, type, member) container_of(ptr, type, member)
-
-
list_first_entry(ptr, type, member)
-
这里的ptr是一个链表的头结点,这个宏就是取的这个链表"第一元素"所指结构体的首地址。
#define list_first_entry(ptr, type, member) list_entry((ptr)->next, type, member)
-
-
list_for_each(pos, head)
-
得到了链表的第一个元素的基地址之后,才可以开始元素的遍历。
#define list_for_each(pos, head) \
	for (pos = (head)->next; prefetch(pos->next), pos != (head); pos = pos->next)
-
-
__list_for_each(pos, head)
-
__list_for_each没有采用pretetch来进行预取
#define __list_for_each(pos, head) \
	for (pos = (head)->next; pos != (head); pos = pos->next)
-
-
list_for_each_prev(pos, head)
-
实现方法与list_for_each相同,不同的是用head的前趋结点进行遍历。实现链表的逆向遍历。
#define list_for_each_prev(pos, head) \
    for (pos = (head)->prev; prefetch(pos->prev), pos != (head); pos = pos->prev)
-
-
list_for_each_entry(pos, head, member)
-
用链表外的结构体地址来进行遍历,而不用链表的地址进行遍历
#define list_for_each_entry(pos, head, member)                \
    for (pos = list_entry((head)->next, typeof(*pos), member);    \
         prefetch(pos->member.next), &pos->member != (head);     \
         pos = list_entry(pos->member.next, typeof(*pos), member))
-
2.2 linux内核用到的队列和链表结构
2.2.1 内核LKM模块的链表
我们知道,在命令行输入: lsmod可以得到当前系统加载的LKM内核模块,我们来分析一下这个功能通过内核代码要怎么实现。
/*
 * mod_ls.c
 */

#include <linux/module.h>
#include <linux/kernel.h>
#include <linux/init.h>
#include <linux/version.h>
#include <linux/list.h>

MODULE_LICENSE("Dual BSD/GPL");

struct module *m = &__this_module;

static void list_module_test(void)
{
        struct module *mod;
        list_for_each_entry(mod, m->list.prev, list)
                printk ("%s\n", mod->name);

}
static int list_module_init (void)
{
        list_module_test();
        return 0;
}

static void list_module_exit (void)
{
        printk ("unload listmodule.ko\n");
}

module_init(list_module_init);
module_exit(list_module_exit);
Makefile文件:
#
# Variables needed to build the kernel module
#
name      = mod_ls

obj-m += $(name).o

all: build

.PHONY: build install clean

build:
    make -C /lib/modules/$(shell uname -r)/build M=$(PWD) modules CONFIG_DEBUG_SECTION_MISMATCH=y

install: build
    -mkdir -p /lib/modules/`uname -r`/kernel/arch/x86/kernel/
    cp $(name).ko /lib/modules/`uname -r`/kernel/arch/x86/kernel/
    depmod /lib/modules/`uname -r`/kernel/arch/x86/kernel/$(name).ko

clean:
    [ -d /lib/modules/$(shell uname -r)/build ] && \
    make -C /lib/modules/$(shell uname -r)/build M=$(PWD) clean
- 编译并加载运行,使用
dmesg tail命令可以看到我们的内核代码使用list_for_each_entry将当前系统内核中的"LKM内核模块双链表"给遍历出来了。
2.2.2 进程链表
- trave_process.c
#include <linux/module.h>
#include <linux/init.h>
#include <linux/list.h>
#include <linux/sched.h>
#include <linux/time.h>
#include <linux/fs.h>
#include <asm/uaccess.h>
#include <linux/mm.h>


MODULE_AUTHOR( "Along" ) ;
MODULE_LICENSE( "GPL" ) ;

struct task_struct * task = NULL , * p = NULL ;
struct list_head * pos = NULL ;
struct timeval start, end;
int count = 0;

/*function_use表示使用哪一种方法测试,
 * 0:三个方法同时使用,
 * 1:list_for_each,
 * 2:list_for_each_entry,
 * 3:for_each_process
 */
int function_use = 0;
char * method;
char * filename= "testlog" ;

void print_message( void ) ;
void writefile( char * filename, char * data ) ;
void traversal_list_for_each( void ) ;
void traversal_list_for_each_entry( void ) ;
void traversal_for_each_process( void ) ;


static int init_module_list( void )
{
    switch ( function_use) {
        case 1:
            traversal_list_for_each( ) ;
            break ;
        case 2:
            traversal_list_for_each_entry( ) ;
            break ;
        case 3:
            traversal_for_each_process( ) ;
            break ;
        default :
            traversal_list_for_each( ) ;
            traversal_list_for_each_entry( ) ;
            traversal_for_each_process( ) ;
            break ;
    }
    return 0;
}

static void exit_module_list( void )
{
    printk( KERN_ALERT "GOOD BYE!!/n" ) ;
}

module_init( init_module_list ) ;
module_exit( exit_module_list ) ;
module_param( function_use, int , S_IRUGO) ;

void print_message( void )
{
    char * str1 = "the method is: " ;
    char * str2 = "系统当前共 " ;
    char * str3 = " 个进程/n" ;
    char * str4 = "开始时间: " ;
    char * str5 = "/n结束时间: " ;
    char * str6 = "/n时间间隔: " ;
    char * str7 = "." ;
    char * str8 = "ms" ;
    char data[ 1024] ;
    char tmp[ 50] ;
    int cost;

    printk( "系统当前共 %d 个进程!!/n" , count ) ;
    printk( "the method is : %s/n" , method) ;
    printk( "开始时间:%10i.%06i/n" , (int)start.tv_sec, (int)start.tv_usec);
    printk( "结束时间:%10i.%06i/n" , (int)end.tv_sec, (int)end.tv_usec);
    printk( "时间间隔:%10i/n" , (int)end.tv_usec - (int)start.tv_usec);

    memset (data, 0, sizeof(data));
    memset (tmp, 0, sizeof(tmp));

    strcat (data, str1);
    strcat (data, method);
    strcat (data, str2);
    snprintf(tmp, sizeof(count), "%d", count);
    strcat (data, tmp);
    strcat (data, str3);
    strcat (data, str4);

    memset (tmp, 0, sizeof(tmp)) ;
    /*
     * 下面这种转换秒的方法是错误的,因为sizeof最终得到的长度实际是Int类型的
     * 长度,而实际的秒数有10位数字,所以最终存到tmp中的字符串也就只有三位数字
     * snprintf(tmp, sizeof((int)start.tv_sec),"%d",(int)start.tv_usec );
    */

    /*取得开始时间的秒数和毫秒数*/

    snprintf( tmp, 10, "%d" , (int)start.tv_sec);
    strcat ( data, tmp);
    snprintf( tmp, sizeof(str7), "%s" ,str7);
    strcat ( data, tmp);
    snprintf( tmp, 6, "%d", (int)start.tv_usec);
    strcat ( data, tmp);
    strcat ( data, str5);

    /*取得结束时间的秒数和毫秒数*/

    snprintf( tmp, 10, "%d", (int)end.tv_sec );
    strcat ( data, tmp);
    snprintf( tmp, sizeof(str7), "%s", str7);
    strcat ( data, tmp);
    snprintf( tmp, 6, "%d" , (int)end.tv_usec);
    strcat ( data, tmp);

    /*计算时间差,因为可以知道我们这个程序花费的时间是在
     *毫秒级别的,所以计算时间差时我们就没有考虑秒,只是
     *计算毫秒的差值
     */
    strcat( data, str6);
    cost = (int)end.tv_usec - (int)start.tv_usec;
    snprintf( tmp, sizeof(cost), "%d", cost);

    strcat(data, tmp);
    strcat(data, str8);
    strcat(data, "/n/n");

    writefile( filename, data);
    printk( "%d/n" , sizeof(data));
}

void writefile( char * filename, char * data )
{
    struct file * filp;
    mm_segment_t fs;

    filp = filp_open( filename, O_RDWR| O_APPEND| O_CREAT, 0644);
    if ( IS_ERR( filp) ) {
        printk( "open file error.../n" ) ;
        return ;
    }
    fs = get_fs() ;
    set_fs(KERNEL_DS) ;
    filp->f_op->write(filp, data, strlen(data) , &filp->f_pos);
    set_fs(fs) ;
    filp_close( filp, NULL ) ;
}

void traversal_list_for_each( void )
{

    task = &init_task;
    count = 0;
    method= "list_for_each/n" ;

    do_gettimeofday( &start) ;
    list_for_each( pos, &task->tasks ) {
        p = list_entry( pos, struct task_struct, tasks ) ;
        count++ ;
        printk( KERN_ALERT "%d/t%s/n" , p->pid, p->comm ) ;
    }
    do_gettimeofday( &end) ;

    print_message() ;
}

void traversal_list_for_each_entry( void )
{

    task = & init_task;
    count = 0;
    method= "list_for_each_entry/n" ;

    do_gettimeofday( & start) ;
    list_for_each_entry( p, &(task->tasks), tasks ) {
        count++ ;
        printk( KERN_ALERT "%d/t%s/n" , p->pid, p->comm ) ;
    }
    do_gettimeofday( & end) ;

    print_message( ) ;
}

void traversal_for_each_process( void )
{
    count = 0;
    method= "for_each_process/n" ;

    do_gettimeofday( & start) ;
    for_each_process( task) {
        count++;
        printk( KERN_ALERT "%d/t%s/n" , task->pid, task->comm ) ;
    }
    do_gettimeofday( & end) ;

    print_message( ) ;
}
-
Makefile文件
# ## Variables needed to build the kernel module # # name = trave_process obj-m += $(name).o all: build .PHONY: build install clean build: make -C /lib/modules/$(shell uname -r)/build M=$(PWD) modules CONFIG_DEBUG_SECTION_MISMATCH=y install: build -mkdir -p /lib/modules/`uname -r`/kernel/arch/x86/kernel/ cp $(name).ko /lib/modules/`uname -r`/kernel/arch/x86/kernel/ depmod /lib/modules/`uname -r`/kernel/arch/x86/kernel/$(name).ko clean: [ -d /lib/modules/$(shell uname -r)/build ] && \ make -C /lib/modules/$(shell uname -r)/build M=$(PWD) clean -
编译、加载并运行后,可以根据进程链表(task_struct链表)遍历出当前系统内核中存在的进程。
-
拓展链接:
- http://blog.csdn.net/tigerjibo/article/details/8299599
- http://www.cnblogs.com/chengxuyuancc/p/3376627.html
- http://blog.csdn.net/tody_guo/article/details/5447402


 271
271


 被折叠的 条评论
为什么被折叠?
被折叠的 条评论
为什么被折叠?
 到【灌水乐园】发言


