


如何使用Prism库和MVVM架构模式开发WPF应用程序。无论您的应用程序有多大或多么复杂,这个基础对于所有类型的项目都是一样的。这就是为什么理解它的行为非常重要的原因。我们将学习如何使用UnityContainer以及如何使用Prism在WPF应用程序中实现模块化。
Prism是一个框架,用于在WPF中构建松散耦合、可维护和可测试的XAML应用程序。
注意:附有项目下载供您参考。源代码是免费使用和开发的,仅用于学习目的。
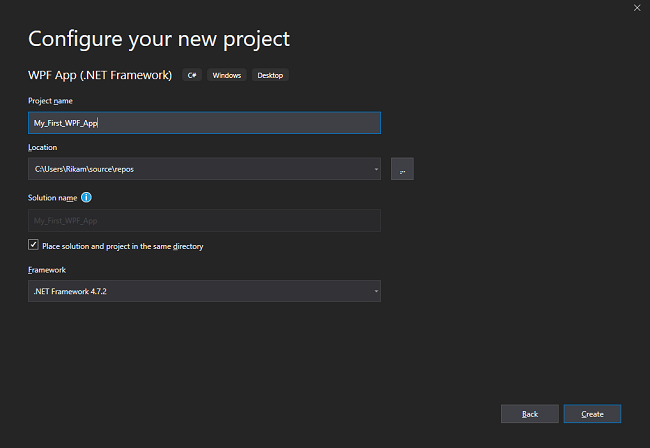
启动VisualStudio,单击createWPFAPP(.NetFramework):根据需要为您的应用程序命名。由于这是一个演示项目,我选择了My_First_WPF_App
右键单击您的项目(不是解决方案)并将新窗口添加到您的 My_First_WPF_App 项目中。将您的窗口命名为 Shell.xaml。Shell 是您的主布局:它将为您的 WPF 应用程序加载区域。您可以删除 MainWindow.xaml 或重命名为 Shell.xaml
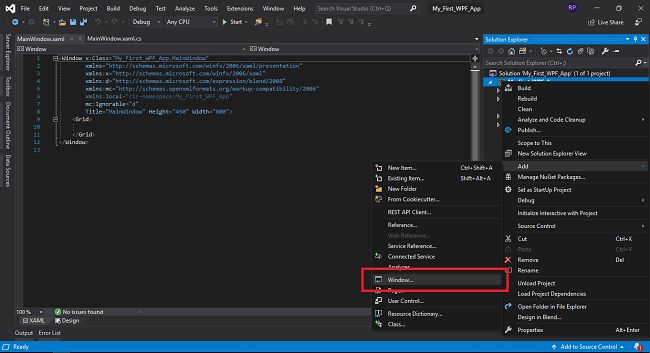
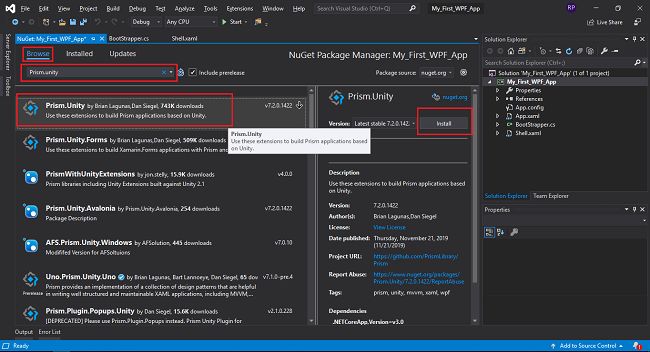
让我们从 Prism 的安装开始:使用 Nuget 包管理器将 Prism.Unity 添加到您的 shell 项目中。右键单击项目并单击 Nuget 包管理器(请参阅下图)。然后点击安装。这会将 Prism 库安装到您的项目中。
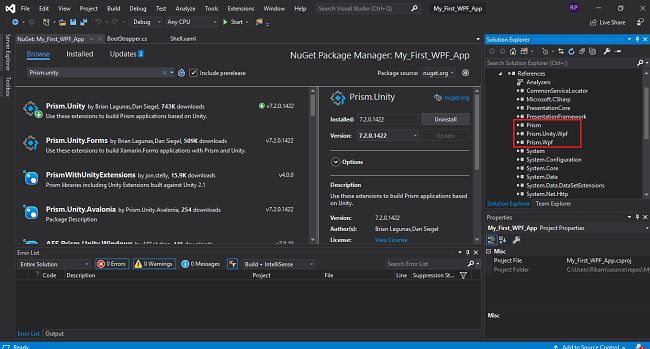
Prism.unity安装成功后。展开项目的引用以检查是否添加了prism库。
- 现在我们有了一个入口点——Shell.Xaml,我们将从那里开始加载我们的模块,我们需要一个类来加载 shell。为此,我们将把类添加到 My_First_WPF_App 项目中,并将其命名为 BootStrapper。
- 注意:将 BootStrapper 类设为 Public 并从 UnityBootStapper 类继承,
UnityBootStapper 类来自命名空间:使用 Prism.Unity;
using System;
using System.Windows;
using Prism.Unity;

namespace My_First_WPF_App
{
    /// <summary>
    /// BootStrapper is responsible for loading prism and initializing Shell.
    /// </summary>
    [Obsolete]
    public class BootStrapper : UnityBootstrapper
    {
        #region Overridden Methods
        /// <summary>
        /// Entry point to the application
        /// </summary>
        /// <param name="runWithDefaultConfiguration"></param>
        public override void Run(bool runWithDefaultConfiguration)
        {
            base.Run(runWithDefaultConfiguration);
        }

        /// <summary>
        /// Initializes shell.xaml
        /// </summary>
        /// <returns></returns>
        protected override DependencyObject CreateShell()
        {
            return Container.TryResolve<Shell>();
        }

        /// <summary>
        /// loads the Shell.xaml
        /// </summary>
        protected override void InitializeShell()
        {
            App.Current.MainWindow = (Window)Shell;
            App.Current.MainWindow.Show();
        }

        /// <summary>
        /// Add view(module) from other assemblies and begins with modularity
        /// </summary>
        protected override void ConfigureModuleCatalog()
        {
            base.ConfigureModuleCatalog();
        }
        #endregion
    }
}

using System.Windows;

namespace My_First_WPF_App
{
    /// <summary>
    /// Interaction logic for App.xaml
    /// </summary>
    public partial class App : Application
    {
        protected override void OnStartup(StartupEventArgs e)
        {
            base.OnStartup(e);
            BootStrapper bootStrapper = new BootStrapper();
            bootStrapper.Run();
        }
    }
}
- 运行你的项目,看看它的神奇之处。您的项目将加载到 Shell 窗口中,现在我们已将 Shell 作为入口点。
- 现在我们已经控制了 Shell.xaml,是时候为您的项目添加一些模块化了。
- 转到 Shell.xaml
- 首先添加 Prism 命名空间: xmlns:prism="http://prismlibrary.com/"
- 在您的网格中创建 ItemsControl : <ItemsControl prism:RegionManager.RegionName="Shell"/>
<Window x:Class="My_First_WPF_App.Shell"
xmlns="http://schemas.microsoft.com/winfx/2006/xaml/presentation"
xmlns:d="http://schemas.microsoft.com/expression/blend/2008"
xmlns:x="http://schemas.microsoft.com/winfx/2006/xaml"
xmlns:mc="http://schemas.openxmlformats.org/markup-compatibility/2006"
mc:Ignorable="d"
xmlns:prism="http://prismlibrary.com/"
Title="Shell" Height="450" Width="800">
<Grid>
<ItemsControl prism:RegionManager.RegionName="Shell"/>
</Grid>
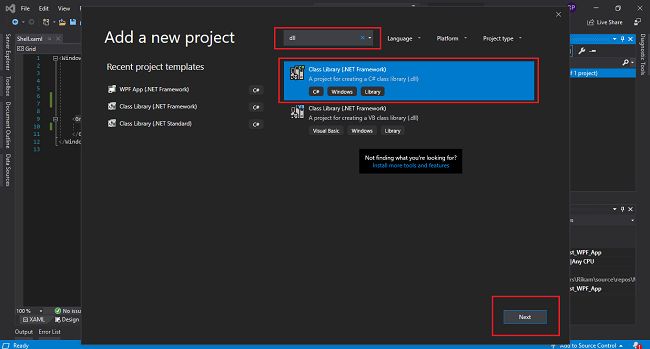
</Window> 现在我们已经设置了我们的主项目,是时候添加一些模块了。由于 3 层架构有 3 个基本模块。这是一个演示项目,因此我们将只创建一个演示模块,即类库 (DLL)。右键单击解决方案并将 DLL 添加到您的解决方案文件。命名您的 DLL 演示文稿。
让我们在这个 DLL 中创建 View 和 ViewModels 文件夹。(方法相同,右键单击演示文稿,从子菜单中添加新文件夹,重命名为 View。ViewModel 也是如此)
-
- 将我们的第一个 UserControl.xaml 添加到 View 文件夹中,并将其命名为 WelcomePageView.Xaml(WPF)。
- 同样的方法,我们将 C# 类文件添加到 ViewModel 文件夹中,并将其命名为 WelcomePageViewModel.cs
- 将 Prism 添加到新创建的 Presentation.dll 中。
- 打开 WelcomePageView :添加命名空间,并在 UserControl 标记内将 AutoWireViewModel 设置为 true
(请参阅下面代码片段的粗体部分。)
<UserControl x:Class="Presentation.View.WelcomePageView"
             xmlns="http://schemas.microsoft.com/winfx/2006/xaml/presentation"
             xmlns:d="http://schemas.microsoft.com/expression/blend/2008"
             xmlns:x="http://schemas.microsoft.com/winfx/2006/xaml"
             xmlns:mc="http://schemas.openxmlformats.org/markup-compatibility/2006"
             xmlns:prism="http://prismlibrary.com/"
             prism:ViewModelLocator.AutoWireViewModel="True"
             mc:Ignorable="d"
d:DesignHeight="450" d:DesignWidth="800"> - 现在我们需要模块定位器,所以在 Presentation.dll 项目中添加一个 C# 类并将其命名为 ModuleLocators.cs
- 使用 Prism.Modularity 从 Imodule 接口继承类;
- 实现接口
- 创建 IRegionManager 的实例
- 创建参数化构造函数并分配给实例
- 重写 OnInitialized 方法,现在可以将 RegisterTypes 留空。
using Prism.Ioc;
using Prism.Modularity;
using Prism.Regions;

namespace Presentation
{
    /// <summary>
    /// Responsible for mapping modules
    /// </summary>
    public class ModuleLocators : IModule
    {
        #region private properties
        /// <summary>
        /// Instance of IRegionManager
        /// </summary>
        private IRegionManager _regionManager;

        #endregion

        #region Constructor
        /// <summary>
        /// parameterized constructor initializes IRegionManager
        /// </summary>
        /// <param name="regionManager"></param>
        public ModuleLocators(IRegionManager regionManager)
        {
            _regionManager = regionManager;
        }
        #endregion

        #region Interface methods
        /// <summary>
        /// Initializes Welcome page of your application.
        /// </summary>
        /// <param name="containerProvider"></param>
        public void OnInitialized(IContainerProvider containerProvider)
        {
            _regionManager.RegisterViewWithRegion("Shell", typeof(ModuleLocators));  //ModuleLocators is added for testing purpose,
//later we'll replace it with WelcomePageView
        }

        /// <summary>
        /// RegisterTypes used to register modules
        /// </summary>
        /// <param name="containerRegistry"></param>
        public void RegisterTypes(IContainerRegistry containerRegistry)
        {
        }
        #endregion
    }
}
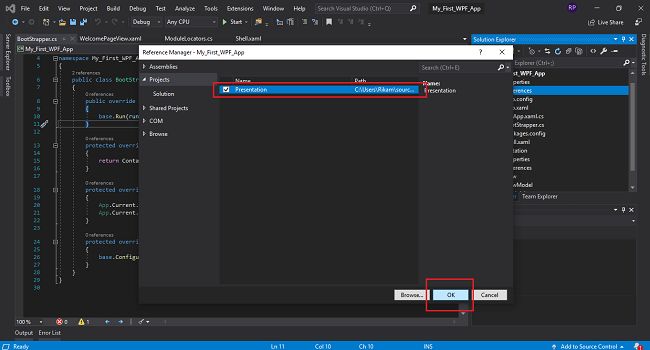
让我们将演示模块的引用添加到 (My_First_WPF_App) 项目中。右键单击 My_First_WPF_App 的引用并单击添加引用,然后转到项目并选择 Presentation。点击确定。
现在是时候告诉 BootStrapper 它应该寻找哪个模块了。打开 BootStapper.cs,在 ConfigureModuleCatalog 中。
using System;
using System.Windows;
using Prism.Unity;

namespace My_First_WPF_App
{
    /// <summary>
    /// BootStrapper is responsible for loading prism and initializing Shell.
    /// </summary>
    [Obsolete]
    public class BootStrapper : UnityBootstrapper
    {
        #region Overridden Methods
        /// <summary>
        /// Entry point to the application
        /// </summary>
        /// <param name="runWithDefaultConfiguration"></param>
        public override void Run(bool runWithDefaultConfiguration)
        {
            base.Run(runWithDefaultConfiguration);
        }

        /// <summary>
        /// Initializes shell.xaml
        /// </summary>
        /// <returns></returns>
        protected override DependencyObject CreateShell()
        {
            return Container.TryResolve<Shell>();
        }

        /// <summary>
        /// loads the Shell.xaml
        /// </summary>
        protected override void InitializeShell()
        {
            App.Current.MainWindow = (Window)Shell;
            App.Current.MainWindow.Show();
        }

        /// <summary>
        /// Add view(module) from other assemblies and begins with modularity
        /// </summary>
        protected override void ConfigureModuleCatalog()
        {
            base.ConfigureModuleCatalog();
            Type ModuleLocatorType = typeof(Presentation.ModuleLocators);
            ModuleCatalog.AddModule(new Prism.Modularity.ModuleInfo
            {
                ModuleName = ModuleLocatorType.Name,
                ModuleType = ModuleLocatorType.AssemblyQualifiedName
            });
        }
        #endregion
    }
}
现在转到 Presentation 模块的 ModuleLocators 类。在内部方法 OnInitialized() 中,将类型从 NewlyCreatedView 更改为 WelcomePageView。
using Prism.Ioc;
using Prism.Modularity;
using Prism.Regions;

namespace Presentation
{
    /// <summary>
    /// Responsible for mapping modules
    /// </summary>
    public class ModuleLocators : IModule
    {
        #region properties
        /// <summary>
        /// Instance of IRegionManager
        /// </summary>
        private IRegionManager _regionManager;

        #endregion

        #region Constructor
        /// <summary>
        /// parameterized constructor initializes IRegionManager
        /// </summary>
        /// <param name="regionManager"></param>
        public ModuleLocators(IRegionManager regionManager)
        {
            _regionManager = regionManager;
        }
        #endregion

        #region Interface methods
        /// <summary>
        /// Initializes Welcome page of your application.
        /// </summary>
        /// <param name="containerProvider"></param>
        public void OnInitialized(IContainerProvider containerProvider)
        {
            _regionManager.RegisterViewWithRegion("Shell", typeof(View.WelcomePageView));
        }

        /// <summary>
        /// RegisterTypes used to register modules
        /// </summary>
        /// <param name="containerRegistry"></param>
        public void RegisterTypes(IContainerRegistry containerRegistry)
        {
        }
        #endregion
    }
}
在 WelcomePageView 中添加一个 Textblock 以查看它是否正常工作。
<UserControl x:Class="Presentation.View.WelcomePageView"
             xmlns="http://schemas.microsoft.com/winfx/2006/xaml/presentation"
             xmlns:prism="http://prismlibrary.com/"
             xmlns:d="http://schemas.microsoft.com/expression/blend/2008"
             xmlns:x="http://schemas.microsoft.com/winfx/2006/xaml"
             xmlns:mc="http://schemas.openxmlformats.org/markup-compatibility/2006"
             mc:Ignorable="d"
             prism:ViewModelLocator.AutoWireViewModel="True"
             d:DesignHeight="450" d:DesignWidth="800">
    <Grid>
    <TextBlock Text="You successfully have configured Prism into your APP" />
    </Grid>
</UserControl> 
我们已经将 Prism 添加到我们的项目中,并且我们终于实现了模块化。最后一步是让视图使用 MVVM 模式与视图模型进行通信。我们将通过 DataContext 实现这一点。
让我们在 WelcomePageView 中再添加一个文本块,并使用 WelcomePageViewModel 中的字符串属性绑定它。
<UserControl x:Class="Presentation.View.WelcomePageView"
             xmlns="http://schemas.microsoft.com/winfx/2006/xaml/presentation"
             xmlns:prism="http://prismlibrary.com/"
             xmlns:d="http://schemas.microsoft.com/expression/blend/2008"
             xmlns:x="http://schemas.microsoft.com/winfx/2006/xaml"
             xmlns:mc="http://schemas.openxmlformats.org/markup-compatibility/2006"
             mc:Ignorable="d"
             prism:ViewModelLocator.AutoWireViewModel="True"
             d:DesignHeight="450" d:DesignWidth="800">
    <Grid>
        <Grid.RowDefinitions>
            <RowDefinition/>
            <RowDefinition/>
        </Grid.RowDefinitions>
        <TextBlock Text="You successfully have configured Prism into your APP" />
        <TextBlock Text="{Binding ImGoodByeText}" Grid.Row="1"/>
    </Grid>
</UserControl>
using System;
namespace Presentation.ViewModel
{
/// <summary>
/// View Model of WelcomePage, responsible for logic for respected view.
/// </summary>
public class WelcomePageViewModel
{
#region Properties
/// <summary>
/// This string property will have default text for demo purpose.
/// </summary>
private string _imGoodByeText = "This is binded from WelcomePageViewModel, Thank you for being part of this Blog!";
/// <summary>
/// This string property will be binded with Textblock on view
/// </summary>
public string ImGoodByeText
{
get { return _imGoodByeText; }
set { _imGoodByeText = value; }
}
#endregion
}
}

using Presentation.ViewModel;
using System.Windows.Controls;

namespace Presentation.View
{
    /// <summary>
    /// Interaction logic for WelcomePageView.xaml
    /// </summary>
    public partial class WelcomePageView : UserControl
    {
        public WelcomePageView()
        {
            InitializeComponent();
            this.DataContext = new WelcomePageViewModel();
        }
    }
} 


 2032
2032


 被折叠的 条评论
为什么被折叠?
被折叠的 条评论
为什么被折叠?
 到【灌水乐园】发言


