


背景
在学习SurfaceFlinger或者说input课程时候,经常发现每个Activity都会有如下这个ActivityRecordSink图层
比如SurfaceFlinger

在看看input
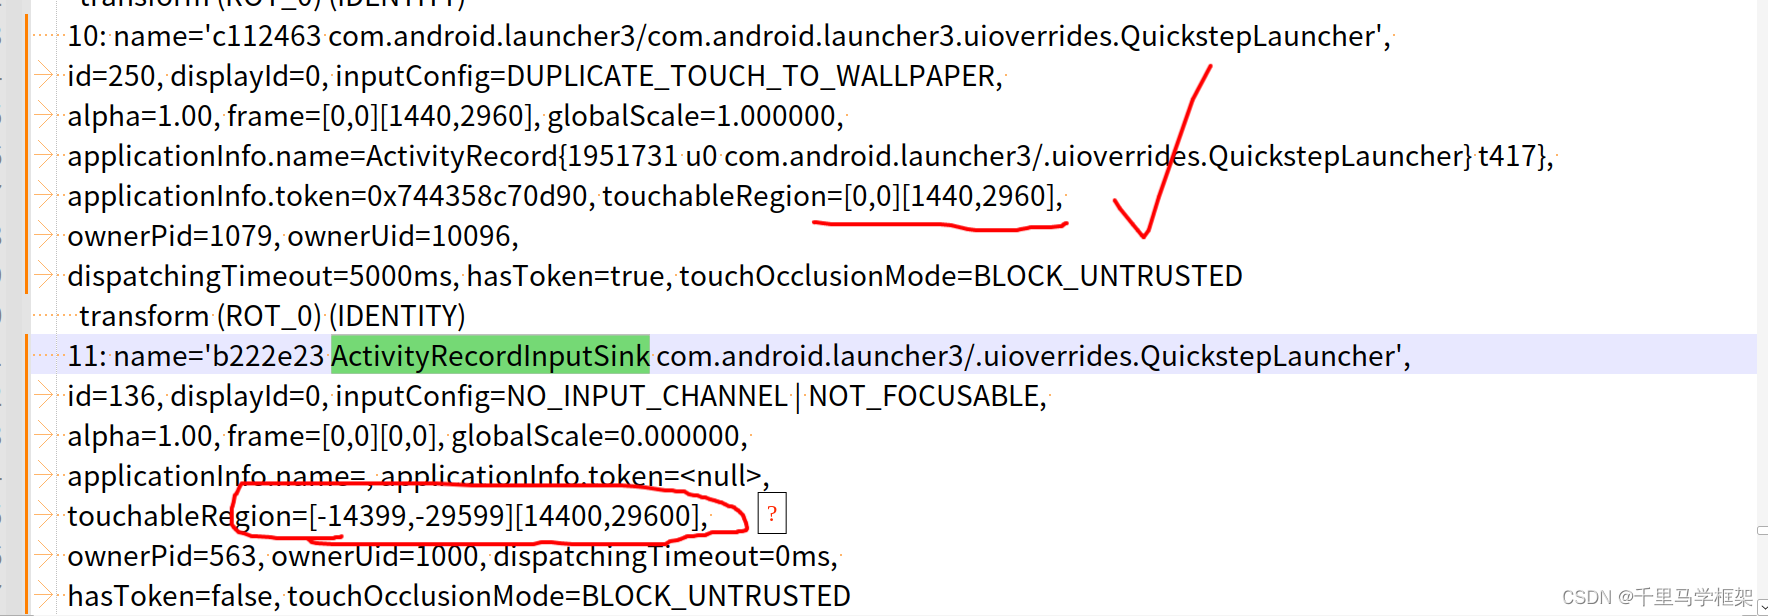
可以看到桌面Activity的窗口touchRegion=[0,0][1440,2960],,这个属于正常就是全屏Activity的大小
但是明显看到了ActivityRecordInputSink这个inputWindow的大小却是touchableRegion=[-14399,-29599][14400,29600]
明显是一个巨大的数字,应该是正常长宽的10倍,而且还支持负数。
那么恨这个巨大的TouchRegion到底是在哪里设置的呢???
源码追踪:
上面dumpsys input看到了TouchRegion一般情况下传递流程是:
WMS —> SurfaceFlinger ----> input
即正常情况下TouchRegion都是wms触摸在InputMonitor进行传递的,比如如下堆栈:

上面是针对普通的WindowState来说都是这样一个设置流程,最后的input相关信息都是上面流程设置到sf的。
但是ActivityRecordSink明显较为特殊,因为他不是个WindowState,所以这里看看他的源码:
frameworks/base/services/core/java/com/android/server/wm/ActivityRecordInputSink.java
    private SurfaceControl createSurface(SurfaceControl.Transaction t) {
        SurfaceControl surfaceControl = mActivityRecord.makeChildSurface(null)
                .setName(mName)
                .setHidden(false)
                .setCallsite("ActivityRecordInputSink.createSurface")
                .build();
        // Put layer below all siblings (and the parent surface too)
        t.setLayer(surfaceControl, Integer.MIN_VALUE);
        return surfaceControl;
    }
他只是在sf中创建的一个Layer而已,那么他的inputwindow信息呢?
    private InputWindowHandleWrapper getInputWindowHandleWrapper() {
        if (mInputWindowHandleWrapper == null) {
            mInputWindowHandleWrapper = new InputWindowHandleWrapper(createInputWindowHandle());
        }
        // Don't block touches from passing through to an activity below us in the same task, if
        // that activity is either from the same uid or if that activity has launched an activity
        // in our uid.
        final ActivityRecord activityBelowInTask = mActivityRecord.getTask() != null
                ? mActivityRecord.getTask().getActivityBelow(mActivityRecord) : null;
        final boolean allowPassthrough = activityBelowInTask != null && (
                activityBelowInTask.mAllowedTouchUid == mActivityRecord.getUid()
                        || activityBelowInTask.isUid(mActivityRecord.getUid()));
        if (allowPassthrough || !mIsCompatEnabled || mActivityRecord.isInTransition()) {
            // Set to non-touchable, so the touch events can pass through.
            mInputWindowHandleWrapper.setInputConfigMasked(InputConfig.NOT_TOUCHABLE,
                    InputConfig.NOT_TOUCHABLE);
        } else {
            // Set to touchable, so it can block by intercepting the touch events.
            mInputWindowHandleWrapper.setInputConfigMasked(0, InputConfig.NOT_TOUCHABLE);
        }
        mInputWindowHandleWrapper.setDisplayId(mActivityRecord.getDisplayId());
        return mInputWindowHandleWrapper;
    }
可以看到这里并没又看到有对这个InputWindowHandle对象进行TouchRegion的设置,但是大家注意点,有对replaceTouchableRegionWithCrop进行设置为true。
那这里没有设置这个TouchRegion,但是input中又有TouchRegion,那么难道是Sf或者input中设置的??
那么再从input入手试试:
在input和sf交互的接口中加入日志

查看Sink相关打印如下:
06-18 16:06:22.350 12660 14044 E InputDispatcher: name 8e3471b ActivityRecordInputSink com.android.messaging/.ui.conversationlist.ConversationListActivity  setInputWindowsLocked touchableRegion
06-18 16:06:22.350 12660 14044 D Region  :   Region  (this=0x758b86dba8, count=1)
06-18 16:06:22.351 12660 14044 D Region  :     [-10799, -19199, 10800, 19200]
可以看出sf传递过来的Region就是放大很大的,那么下面主要精力就要放在sf部分。
frameworks/native/services/surfaceflinger/SurfaceFlinger.cpp
void SurfaceFlinger::buildWindowInfos(std::vector<WindowInfo>& outWindowInfos,
                                      std::vector<DisplayInfo>& outDisplayInfos) {
    static size_t sNumWindowInfos = 0;
    outWindowInfos.reserve(sNumWindowInfos);
    sNumWindowInfos = 0;

    if (mLayerLifecycleManagerEnabled) {
        mLayerSnapshotBuilder.forEachInputSnapshot(
                [&outWindowInfos](const frontend::LayerSnapshot& snapshot) {
                    outWindowInfos.push_back(snapshot.inputInfo);
                });
    } else {
        mDrawingState.traverseInReverseZOrder([&](Layer* layer) {
            if (!layer->needsInputInfo()) return;
            const auto opt =
                    mFrontEndDisplayInfos.get(layer->getLayerStack())
                            .transform([](const frontend::DisplayInfo& info) {
                                return Layer::InputDisplayArgs{&info.transform, info.isSecure};
                            });
				  //核心就是这里调用了layer的fillInputInfo
            outWindowInfos.push_back(layer->fillInputInfo(opt.value_or(Layer::InputDisplayArgs{})));
        });
    }

    sNumWindowInfos = outWindowInfos.size();

    outDisplayInfos.reserve(mFrontEndDisplayInfos.size());
    for (const auto& [_, info] : mFrontEndDisplayInfos) {
        outDisplayInfos.push_back(info.info);
    }
}
那么接下来重点看看layer->fillInputInfo
WindowInfo Layer::fillInputInfo(const InputDisplayArgs& displayArgs) {
//省略部分
//这里就是replaceTouchableRegionWithCrop作用的核心部分
    if (info.replaceTouchableRegionWithCrop) {
        Rect inputBoundsInDisplaySpace;
        if (!cropLayer) {
            FloatRect inputBounds = getInputBounds(/*fillParentBounds=*/true).first;
            inputBoundsInDisplaySpace = getInputBoundsInDisplaySpace(inputBounds, displayTransform);
            ALOGE("name %s !cropLayer  replaceTouchableRegionWithCrop inputBounds left  %f  inputBoundsInDisplaySpace %s"
            ,getName().c_str(),inputBounds.left,android::to_string(inputBoundsInDisplaySpace).c_str());
        } else {
            FloatRect inputBounds = cropLayer->getInputBounds(/*fillParentBounds=*/true).first;
            inputBoundsInDisplaySpace =
                    cropLayer->getInputBoundsInDisplaySpace(inputBounds, displayTransform);
              ALOGE("name %s   replaceTouchableRegionWithCrop inputBounds left  %f  inputBoundsInDisplaySpace %s"
            ,getName().c_str(),inputBounds.left,android::to_string(inputBoundsInDisplaySpace).c_str());

        }
        info.touchableRegion = Region(inputBoundsInDisplaySpace);
         info.touchableRegion.dump(str);
        ALOGE("name %s  replaceTouchableRegionWithCrop touchableRegion  %s",getName().c_str(),str);
    } else if (cropLayer != nullptr) {
        FloatRect inputBounds = cropLayer->getInputBounds(/*fillParentBounds=*/true).first;
        Rect inputBoundsInDisplaySpace =
                cropLayer->getInputBoundsInDisplaySpace(inputBounds, displayTransform);
        info.touchableRegion = info.touchableRegion.intersect(inputBoundsInDisplaySpace);
        ALOGE("name %s no replaceTouchableRegionWithCrop touchableRegion  %s",getName().c_str(),str);
    }


    return info;
}
这个时候就看到了ActivityRecordInputSink那个时候设置的replaceTouchableRegionWithCrop为true的作用了,这里加了相关打印如下:
06-18 16:06:22.349 16704 16704 E Layer   : name 8e3471b ActivityRecordInputSink com.android.messaging/.ui.conversationlist.ConversationListActivity#1647 !cropLayer
  replaceTouchableRegionWithCrop inputBounds left  -10800.000000
inputBoundsInDisplaySpace Rect(-10799, -19199, 10800, 19200)
06-18 16:06:22.349 16704 16704 D Region  :   Region  (this=0x7ff49f4b08, count=1)
06-18 16:06:22.349 16704 16704 D Region  :     [-10799, -19199, 10800, 19200]
可以看出这里本质就是getInputBounds获取的inputBounds就是很大的数字,那么再看看getInputBounds方法:
std::pair<FloatRect, bool> Layer::getInputBounds(bool fillParentBounds) const {
    Rect croppedBufferSize = getCroppedBufferSize(getDrawingState());
    FloatRect inputBounds = croppedBufferSize.toFloatRect();
    if (hasBufferOrSidebandStream() && croppedBufferSize.isValid() &&
        mDrawingState.transform.getType() != ui::Transform::IDENTITY) {
        inputBounds = mDrawingState.transform.transform(inputBounds);
    }
    ALOGE("getInputBounds 1 inputBounds.left %f ",inputBounds.left);
    bool inputBoundsValid = croppedBufferSize.isValid();
    if (!inputBoundsValid) {
        /**
         * Input bounds are based on the layer crop or buffer size. But if we are using
         * the layer bounds as the input bounds (replaceTouchableRegionWithCrop flag) then
         * we can use the parent bounds as the input bounds if the layer does not have buffer
         * or a crop. We want to unify this logic but because of compat reasons we cannot always
         * use the parent bounds. A layer without a buffer can get input. So when a window is
         * initially added, its touchable region can fill its parent layer bounds and that can
         * have negative consequences.
         */
        inputBounds = fillParentBounds ? mBounds : FloatRect{};
    }
    ALOGE("getInputBounds 2 inputBounds.left %f  mBounds left %f",inputBounds.left,mBounds.left);
    // Clamp surface inset to the input bounds.
    const float inset = static_cast<float>(mDrawingState.inputInfo.surfaceInset);
    const float xSurfaceInset = std::clamp(inset, 0.f, inputBounds.getWidth() / 2.f);
    const float ySurfaceInset = std::clamp(inset, 0.f, inputBounds.getHeight() / 2.f);

    // Apply the insets to the input bounds.
    inputBounds.left += xSurfaceInset;
    inputBounds.top += ySurfaceInset;
    inputBounds.right -= xSurfaceInset;
    inputBounds.bottom -= ySurfaceInset;
    ALOGE("getInputBounds 3 inputBounds.left %f xSurfaceInset = %f",inputBounds.left,xSurfaceInset);

    return {inputBounds, inputBoundsValid};
}
分别也加入了日志,最后打印如下:
06-18 16:06:22.349 16704 16704 E Layer   : getInputBounds 1 inputBounds.left 0.000000
06-18 16:06:22.349 16704 16704 E Layer   : getInputBounds 2 inputBounds.left -10800.000000  mBounds left -10800.000000
06-18 16:06:22.349 16704 16704 E Layer   : getInputBounds 3 inputBounds.left -10800.000000 xSurfaceInset = 0.000000
可以看到这里inputBounds其实就是Layer的mBounds,那么mBounds来自哪里呢?
这里的mBounds又是哪里设置的呢?其实是parentBounds设置的,最后是如下这个代码设置的

这里的maxBounds,可以看看获取的它的方法getMaxDisplayBounds
FloatRect SurfaceFlinger::getMaxDisplayBounds() {
    const ui::Size maxSize = [this] {
        ftl::FakeGuard guard(mStateLock);

        // The LayerTraceGenerator tool runs without displays.
        if (mDisplays.empty()) return ui::Size{5000, 5000};

        return std::accumulate(mDisplays.begin(), mDisplays.end(), ui::kEmptySize,
                               [](ui::Size size, const auto& pair) -> ui::Size {
                                   const auto& display = pair.second;
                                   return {std::max(size.getWidth(), display->getWidth()),
                                           std::max(size.getHeight(), display->getHeight())};
                               });
    }();

    // Ignore display bounds for now since they will be computed later. Use a large Rect bound
    // to ensure it's bigger than an actual display will be.
    const float xMax = maxSize.getWidth() * 10.f; //变大10倍
    const float yMax = maxSize.getHeight() * 10.f;

    return {-xMax, -yMax, xMax, yMax};
}
哈哈上面是不是看到久违的宽高放大10倍的Region {-xMax, -yMax, xMax, yMax};
到这里就完美解释清楚了ActivityRecordInputSink巨大区域是哪里来的,本质还是因为replaceTouchableRegionWithCrop设置成了true,在sf计算时候会使用getMaxDisplayBounds作为Region
本文章更多详细代码和资料需要购买课程获取
hal+perfetto+surfaceflinger
https://mp.weixin.qq.com/s/LbVLnu1udqExHVKxd74ILg

其他课程七件套专题:
点击这里
https://mp.weixin.qq.com/s/Qv8zjgQ0CkalKmvi8tMGaw


 731
731


 被折叠的 条评论
为什么被折叠?
被折叠的 条评论
为什么被折叠?
 到【灌水乐园】发言


