


mysql 从从(主主)复制(故障转移)
- 安装好mysql数据库先授权ip访问。
- 配置
- 同步
- 测试同步
- 问题排查:
- 原文-https://www.cnblogs.com/wade-lt/p/9008058.html
- (3)在master上设置数据同步权限 mysql> grant replication slave,replication client on *.* to repl@'192.168.0.104' identified by "repl123"; #只允许192.168.0.104使用repl,且密码为"repl123"连接从库做数据同步 Query OK, 0 rows affected (0.02 sec) #若要所有网段则设置repl@'%' ;部分网段:repl@'192.168.0.%' mysql> flush privileges; Query OK, 0 rows affected (0.00 sec)
- 温馨提示: 权限查看方式 mysql> show grants; mysql> show grants for repl@'192.168.0.104';
- (1)设置slave数据库的my.cnf配置文件 [root@master ~]# vim /etc/my.cnf ....... [mysqld] server-id=2 #设置从服务器id,必须于从服务器不同 log-bin=mysql-bin #启动MySQ二进制日志系统 replicate-do-db=liting #需要同步的数据库名。如果不指明同步哪些库,就去掉这行,表示所有库的同步(除了ignore忽略的库)。 replicate-ignore-db=mysql #不同步test数据库 slave-skip-errors = all #跳过所有的错误,继续执行复制操作
- 温馨提示: 当只针对某些库的某张表进行同步时,如下,只同步liting库的haha表和test库的heihei表: replicate-do-db = liting replicate-wild-do-table = liting.haha //当只同步几个或少数表时,可以这样设置。注意这要跟上面的库指定配合使用; replicate-do-db = test replicate-wild-do-table = test.heihei //如果同步的库的表比较多时,就不能这样一一指定了,就把这个选项配置去掉,直接根据指定的库进行同步。
- 根据上面的从从环境部署,master和slave已经实现同步,即在master上写入新数据,自动同步到slave。而从库只能读不能写,一旦从库有写入数据,就会造成从从数据不一致! 下面就说下Mysql从从复制环境,在slave上更新数据时,master也能自动同步过来。
更新说明
5.7
配置:
主:
1.my.ini 配置:
[mysqld]
## 设置server_id,注意要唯一
server-id=1
--如果binlog 没开, 需要添加以下
## 开启binlog
log-bin=mysql-bin
## binlog缓存
binlog_cache_size=1M
## binlog格式(mixed、statement、row,默认格式是statemenshowt)
binlog_format=mixed
binlog-ignore-db = mysql,information_schema //忽略的库(在这些库有更新的时候,不会同步)
2. CREATE USER 'root1'@'10.172.201.13' IDENTIFIED BY '123456';
GRANT REPLICATION SLAVE ON . TO ‘root1’@‘10.172.201.13’;
4. flush privileges; 刷新
5. show master status; (给丛机提供 master_log_file=‘binlog.000008’,master_log_pos=35079152; )
从:
  1.show variables like '%log_bin%';  查看binlog 是否开启, 如没有开启 如上开启
  2.   stop slave;
- change master to
master_host=‘10.172.201.13’,
master_user=‘root1’,
master_password=‘123456’,
master_log_file=‘binlog.000005’,
master_log_pos=489693978; - start slave;
- show slave status;
- 2345 看sql 没报错即可
--------------------------------------------------------------------------------------------------------------上 5.7
8.0
2021-12-24更新:
mysql 8。0 跟5。7差异很大:
所谓主主,其实是从从:
0.修改两个数据库my.cnf 中 server-id=2 #设置server-id,必须唯一 一个1 一个2,如需配置数据库配置,请看下面my.cnf配置
1.先看状态,是否开启binlog(13从1 14从2)show variables like ‘%log_bin%’;
开启binlog
[mysqld]
log_bin=mysql-bin
#binlog的格式也有三种:STATEMENT,ROW,MIXED。
binlog-format=mixed
#binlog过期清理时间
expire_logs_days=3
#binlog每个日志文件大小
max_binlog_size=100m
#binlog缓存大小
binlog_cache_size=10m
max_binlog_cache_size=512m
#发生事务时非事务语句的缓存的大小
binlog_stmt_cache_size=100m
max_binlog_stmt_cache_size=100m
1.1 show master status; 拿到给丛机的 master_log_file, master_log_pos
2.13创建一个账号密码给给14用:
CREATE USER ‘root1’@‘10.172.201.14’ IDENTIFIED WITH ‘mysql_native_password’ BY ‘123456’; 创建用户
GRANT REPLICATION SLAVE ON . TO ‘root1’@‘10.172.201.14’; 分配权限
flush privileges; 刷新
3.在14上指定从13上复制
stop slave;
change master to
master_host=‘10.172.201.13’,
master_user=‘root1’,
master_password=‘123456’,
master_log_file=‘binlog.000005’,
master_log_pos=489693978;
start slave;
show slave status;
············································································································
drop user ‘root1’@‘10.172.201.14’;
flush privileges;
CREATE USER ‘root1’@‘10.172.201.14’ IDENTIFIED WITH ‘mysql_native_password’ BY ‘123456’; 创建用户
GRANT REPLICATION SLAVE ON . TO ‘root1’@‘10.172.201.14’; 分配权限
flush privileges; 刷新
SHOW VARIABLES LIKE ‘validate_password%’;
set global validate_password.length=1;
set global validate_password.policy=0;
从:
   CREATE USER 'root1'@'10.172.201.13' IDENTIFIED BY '123456';
   GRANT REPLICATION SLAVE ON *.* TO 'root1'@'10.172.201.13';

   stop slave;
    change master to
     master_host='10.172.201.13',
     master_user='root1',
     master_password='123456',
     master_log_file='binlog.000008',
     master_log_pos=35079152;

   start slave;

    show slave status;


   update user set host='%' where user='host';


   use mysql;
select  * from user where user='root';
update user set Host = '%' where user ='root';
flush privileges;
select 'host'   from user where user='root';


 SET SQL_SAFE_UPDATES = 0;

  use mysql;
   update user set host='%' where user='root';
   grant all privileges on *.* to root@'10.172.201.13';
数据库版本
2021-12-23更新:
数据库版本 5.7.26
从1
1.数据库配置
log-bin=mysql-bin
binlog_format=mixed
server-id = 1(从1是1)
expire_logs_days = 10
slow_query_log=1
slow-query-log-file=/www/server/data/mysql-slow.log
long_query_time=3
#log_queries_not_using_indexes=on
early-plugin-load = ""

这些配置都是需要变化的
binlog-ignore-db = mysql,information_schema //忽略的库(在这些库有更新的时候,不会同步)
auto-increment-offset = 1  //默认从键的值。
auto-increment-increment = 2    //从键增量
slave-skip-errors = all
sync_binlog = 1
 binlog_checksum = none
 binlog-ignore-db = mysql
2.重启数据库
3.设置从从
 grant replication slave,replication client on *.* to root@'192.168.64.129' identified by '123456';
  flush privileges;
   show master status;
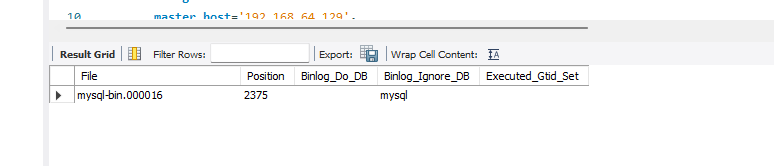
4.开启数据同步功能
下面最后两两个配置来自上图并且是从库的参数
 change master to
     master_host='192.168.64.129',
     master_user='root',
     master_password='123456',
     master_log_file='mysql-bin.000010',
     master_log_pos=612;

start slave;
5.在linux系统中mysql -u root -p 登录执行:
show slave status\G;
如下:
*************************** 1. row ***************************
               Slave_IO_State: Waiting for master to send event
                  Master_Host: 192.168.64.129
                  Master_User: root
                  Master_Port: 3306
                Connect_Retry: 60
              Master_Log_File: mysql-bin.000011
          Read_Master_Log_Pos: 470
               Relay_Log_File: 192-relay-bin.000004
                Relay_Log_Pos: 675
        Relay_Master_Log_File: mysql-bin.000011
             Slave_IO_Running: Yes
            Slave_SQL_Running: Yes
              Replicate_Do_DB:
          Replicate_Ignore_DB:
           Replicate_Do_Table:
       Replicate_Ignore_Table:
      Replicate_Wild_Do_Table:
  Replicate_Wild_Ignore_Table:
                   Last_Errno: 0
                   Last_Error:
                 Skip_Counter: 0
          Exec_Master_Log_Pos: 470
              Relay_Log_Space: 1034
              Until_Condition: None
               Until_Log_File:
                Until_Log_Pos: 0
           Master_SSL_Allowed: No
           Master_SSL_CA_File:
           Master_SSL_CA_Path:
              Master_SSL_Cert:
            Master_SSL_Cipher:
               Master_SSL_Key:
        Seconds_Behind_Master: 0
Master_SSL_Verify_Server_Cert: No
                Last_IO_Errno: 0
                Last_IO_Error:
               Last_SQL_Errno: 0
               Last_SQL_Error:
  Replicate_Ignore_Server_Ids:
             Master_Server_Id: 2
                  Master_UUID: 9dd00416-5d4b-11ec-863a-000c29ab9f24
             Master_Info_File: /www/server/data/master.info
                    SQL_Delay: 0
          SQL_Remaining_Delay: NULL
      Slave_SQL_Running_State: Slave has read all relay log; waiting for more updates
           Master_Retry_Count: 86400
                  Master_Bind:
      Last_IO_Error_Timestamp:
     Last_SQL_Error_Timestamp:
               Master_SSL_Crl:
           Master_SSL_Crlpath:
           Retrieved_Gtid_Set:
            Executed_Gtid_Set:
                Auto_Position: 0
         Replicate_Rewrite_DB:
                 Channel_Name:
           Master_TLS_Version:
1 row in set (0.00 sec)

ERROR:
No query specified

没有错就证明当前的备机设置好了。
从2
1.数据库配置
log-bin=mysql-bin
binlog_format=mixed
server-id = 2(从2是2)
expire_logs_days = 10
slow_query_log=1
slow-query-log-file=/www/server/data/mysql-slow.log
long_query_time=3
#log_queries_not_using_indexes=on
early-plugin-load = ""

这些配置都是需要变化的
binlog-ignore-db = mysql,information_schema //忽略的库(在这些库有更新的时候,不会同步)
auto-increment-offset = 2  //默认从键的值。
auto-increment-increment = 2    //从键增量
slave-skip-errors = all
sync_binlog = 1
 binlog_checksum = none
 binlog-ignore-db = mysql
2.重启数据库
3.设置从从
 grant replication slave,replication client on *.* to root@'192.168.64.128' identified by '123456';
  flush privileges;
   show master status;
4.开启数据同步功能
下面最后两两个配置来自上图,并且是从库的参数
 change master to
     master_host='192.168.64.128',
     master_user='root',
     master_password='123456',
     master_log_file='mysql-bin.000010',
     master_log_pos=612;

start slave;
5.在linux系统中mysql -u root -p 登录执行:
show slave status\G;
如下:
*************************** 1. row ***************************
               Slave_IO_State: Waiting for master to send event
                  Master_Host: 192.168.64.128
                  Master_User: root
                  Master_Port: 3306
                Connect_Retry: 60
              Master_Log_File: mysql-bin.000011
          Read_Master_Log_Pos: 470
               Relay_Log_File: 192-relay-bin.000004
                Relay_Log_Pos: 675
        Relay_Master_Log_File: mysql-bin.000011
             Slave_IO_Running: Yes
            Slave_SQL_Running: Yes
              Replicate_Do_DB:
          Replicate_Ignore_DB:
           Replicate_Do_Table:
       Replicate_Ignore_Table:
      Replicate_Wild_Do_Table:
  Replicate_Wild_Ignore_Table:
                   Last_Errno: 0
                   Last_Error:
                 Skip_Counter: 0
          Exec_Master_Log_Pos: 470
              Relay_Log_Space: 1034
              Until_Condition: None
               Until_Log_File:
                Until_Log_Pos: 0
           Master_SSL_Allowed: No
           Master_SSL_CA_File:
           Master_SSL_CA_Path:
              Master_SSL_Cert:
            Master_SSL_Cipher:
               Master_SSL_Key:
        Seconds_Behind_Master: 0
Master_SSL_Verify_Server_Cert: No
                Last_IO_Errno: 0
                Last_IO_Error:
               Last_SQL_Errno: 0
               Last_SQL_Error:
  Replicate_Ignore_Server_Ids:
             Master_Server_Id: 2
                  Master_UUID: 9dd00416-5d4b-11ec-863a-000c29ab9f24
             Master_Info_File: /www/server/data/master.info
                    SQL_Delay: 0
          SQL_Remaining_Delay: NULL
      Slave_SQL_Running_State: Slave has read all relay log; waiting for more updates
           Master_Retry_Count: 86400
                  Master_Bind:
      Last_IO_Error_Timestamp:
     Last_SQL_Error_Timestamp:
               Master_SSL_Crl:
           Master_SSL_Crlpath:
           Retrieved_Gtid_Set:
            Executed_Gtid_Set:
                Auto_Position: 0
         Replicate_Rewrite_DB:
                 Channel_Name:
           Master_TLS_Version:
1 row in set (0.00 sec)

ERROR:
No query specified

没有错就证明当前的备机设置好了。
【弃用,可参考配置】
安装好mysql数据库先授权ip访问。
grant all on . to root@‘%’ identified by ‘root密码’ with grant option;
flush privileges;
配置
从1设置:
server-id = 1        ///默认配置中有
log-bin = mysql-bin   //默认配置中有。
binlog-ignore-db = mysql,information_schema //忽略的库(在这些库有更新的时候,不会同步)
sync_binlog = 1
binlog_checksum = none
binlog_format = mixed
auto-increment-increment = 2    //从键增量
auto-increment-offset = 1   //默认从键的值。
slave-skip-errors = all
这样才可以避免两台服务器同时做更新时自增长字段的值之间发生冲突。(针对的是有自增长属性的字段)
重启数据库
数据同步授权
mysql> grant replication slave,replication client on . to test@‘192.168.0.217’ identified by “test123”;
mysql> flush privileges;
最好将库锁住,仅仅允许读,以保证数据一致性;待从从同步环境部署后再解锁;锁住后,就不能往表里写数据,但是重启mysql服务后就会自动解锁!
mysql> FLUSH TABLES WITH READ LOCK; //注意该参数设置后,如果自己同步对方数据,同步前一定要记得先解锁!
Query OK, 0 rows affected (0.00 sec)
mysql> show master status;
±-----------------±---------±-------------±-----------------±------------------+
| File | Position | Binlog_Do_DB | Binlog_Ignore_DB | Executed_Gtid_Set |
±-----------------±---------±-------------±-----------------±------------------+
| mysql-bin.000001 | 158 | | | |
±-----------------±---------±-------------±-----------------±------------------+
1 row in set (0.00 sec)
从2设置:
server-id = 2
log-bin = mysql-bin
binlog-ignore-db = mysql,information_schema
sync_binlog = 1
binlog_checksum = none
binlog_format = mixed
auto-increment-increment = 2
auto-increment-offset = 2
slave-skip-errors = all
重启数据库
数据同步授权(iptables防火墙开启3306端口,要确保对方机器能使用下面权限连接到本机mysql)
同理,slave也要授权给master机器远程同步数据的权限
mysql> grant replication slave ,replication client on . to test@‘192.168.3.81’ identified by “test123”;
mysql> flush privileges;
mysql> FLUSH TABLES WITH READ LOCK;
mysql> show master status;
±-----------------±---------±-------------±-----------------±------------------+
| File | Position | Binlog_Do_DB | Binlog_Ignore_DB | Executed_Gtid_Set |
±-----------------±---------±-------------±-----------------±------------------+
| mysql-bin.000001 | 256 | | | |
±-----------------±---------±-------------±-----------------±------------------+
1 row in set (0.00 sec)
同步
从从同步:(如果是新系统部署,此操作可以酌情忽略)
先在slave数据库上做同步master的设置。(确保slave上要同步的数据,提前在master上存在。最好双方数据保持一致)
mysql> unlock tables; //先解锁,将对方数据同步到自己的数据库中
mysql> slave stop;
mysql> change master to master_host=‘192.168.0.103’,master_user=‘repl’,master_password=‘repl123’,master_log_file=‘master-bin.000001’,master_log_pos=158;
mysql> start slave;
mysql> show slave status \G;
*************************** 1. row ***************************
Slave_IO_State: Waiting for master to send event
Master_Host: 192.168.0.103
Master_User: repl
Master_Port: 3306
Connect_Retry: 60
Master_Log_File: mysql-bin.000001
Read_Master_Log_Pos: 158
nelay_Log_File: mysql-relay-bin.000003
Relay_Log_Pos: 750
Relay_Master_Log_File: mysql-bin.000001
Slave_IO_Running: Yes
Slave_SQL_Running: Yes
…
这样就实现了slave->master的同步环境。
再在master数据库上做同步slave的设置。(确保slave上要同步的数据,提前在master上存在。最好双方数据保持一致)
mysql> unlock tables;
mysql> slave stop;
mysql> change master to master_host=‘192.168.0.104’,master_user=‘repl’,master_password=‘repl123’,master_log_file=‘master-bin.000001’,master_log_pos=256;
mysql> start slave;
mysql> show slave status \G;
*************************** 1. row ***************************
Slave_IO_State: Waiting for master to send event
Master_Host: 192.168.0.103
Master_User: repl
Master_Port: 3306
Connect_Retry: 60
Master_Log_File: mysql-bin.000001
Read_Master_Log_Pos: 256
Relay_Log_File: mysql-relay-bin.000003
Relay_Log_Pos: 750
Relay_Master_Log_File: mysql-bin.000001
Slave_IO_Running: Yes
Slave_SQL_Running: Yes
…
这样就实现了master->slave的同步环境。至此,从从双向同步环境已经实现!
测试同步
测试效果:
在master上写入新数据
mysql> select * from liting.haha;
±----±----------+
| id | name |
±----±----------+
| 100 | anhui |
±----±----------+
1 rows in set (0.00 sec)
mysql> insert into huanqiu.haha values(10,“beijing”);
在slave数据库中查看,发现master新写入的数据已经同步过来了
mysql> select * from liting.haha;
±----±-----------+
| id | name |
±----±-----------+
| 10| beijing |
| 100 | anhui |
±----±-----------+
2 rows in set (0.00 sec)
在slave上删除数据
mysql> delete from liting.haha where id=100;
在master数据库中查看
mysql> select * from liting.haha;
±----±-----------+
| id | name |
±----±-----------+
| 10 | beijing |
±----±-----------+
3 rows in set (0.00 sec)
以上,从从同步实现
问题排查:
Last_SQL_Errno: 1594
mysql>stop slave;

mysql>change master to Master_Log_File='mysql-bin.005121', Master_Log_Pos=4;
  //Master_Log_File对面从机的bin编号。
  //Master_Log_Pos 从过去的某个节点恢复。
mysql>start slave;

mysql>show slave status\G;
Got fatal error 1236
stop slave;
reset slave;
start slave;
原文-https://www.cnblogs.com/wade-lt/p/9008058.html
MySQL从从同步与从从同步
MySQL复制:
MySQL内建的复制功能是构建大型,高性能应用程序的基础。将MySQL的数据分布到多个系统上去,这种分布的机制,是通过将mysql的某一台从机的数据复制到其它从机(slave)上,并重新执行一遍来实现。
复制过程中一个服务器充当从服务器,而一个或多个其它服务器充当从服务器。从服务器将更新写入二进制日志文件,并维护文件的一个索引以跟踪日志循坏,这些日志可以记录发送到从服务器的更新。当一个从服务器
连接从服务器时,它通知从服务器从服务器在日志中读取的最后一次成功更新的位置。从服务器接收从那时起发生的任何更新,然后封锁并等待从服务器通知的更新。
需注意的是:
在进行mysql复制时,所有对复制中的表的更新必须在从服务器上进行。否则必须要小心,以避免用户对从服器上的表进行更新与对从服务器上的表所进行更新之间的冲突。
(1)mysql支持哪些复制
 a.基于语句的复制:在从服务器上执行的sql语句,在从服务器上执行同样的语句。mysql默认采用基于语句的复制,效率边角高。一旦发现没法精确复制时,会自动选着基于行的复制。

 b.基于行的复制:把改变的内容复制过去,而不是把命令在从服务器上执行一遍。从mysql 5.0开始支持

 c.混合类型的复制:默认采用基于语句的复制,一旦发现基于语句的无法精确复制时,就会采用基于行的复制。
(2)mysql复制解决的问题
 a.数据分布(data distribution)

 b.负载平衡(load balancing)

 c.数据备份(backup),保证数据安全

 d.高可用性与容错行(high availability and failover)

 e.实现读写分离,缓解数据库压力
(3)mysql从从复制原理
master服务器将数据的改变记录二进制binlog日志,当master上的数据发生改变时,则将其改变写入二进制日志中;slave服务器会在一定时间间隔内对master二进制日志进行探测其是否发生改变,
如果发生改变,则开始一个I/O Thread请求master二进制事件,同时从节点为每个I/O线程启动一个dump线程,用于向其发送二进制事件,并保存至从节点本地的中继日志中,从节点将启动SQL线程从中继日志
中读取二进制日志,在本地重放,使得其数据和从节点的保持一致,最后I/O Thread和SQL Thread将进入睡眠状态,等待下一次被唤醒。
注意几点:
 1--master将操作语句记录到binlog日志中,然后授予slave远程连接的权限(master一定要开启binlog二进制日志功能;通常为了数据安全考虑,slave也开启binlog功能)。
 2--slave开启两个线程:IO线程和SQL线程。其中:IO线程负责读取master的binlog内容到中继日志relay log里;SQL线程负责从relay log日志里读出binlog内容,并更新到slave的数据库里,这样就能保证slave数据和 master数据保持一致了。
 3--Mysql复制至少需要两个Mysql的服务,当然Mysql服务可以分布在不同的服务器上,也可以在一台服务器上启动多个服务。
 4--Mysql复制最好确保master和slave服务器上的Mysql版本相同(如果不能满足版本一致,那么要保证master从节点的版本低于slave从节点的版本)
 5--master和slave两节点间时间需同步
Mysql复制的流程图如下:

如上图所示:
Mysql复制过程的第一部分就是master记录二进制日志。在每个事务更新数据完成之前,master在二日志记录这些改变。MySQL将事务串行的写入二进制日志,即使事务中的语句都是交叉执行的。在事件写入二进制日志完成后,master通知存储引擎提交事务。
第二部分就是slave将master的binary log拷贝到它自己的中继日志。首先,slave开始一个工作线程——I/O线程。I/O线程在master上打开一个普通的连接,然后开始binlog dump process。Binlog dump process从master的二进制日志中读取事件,如果已经跟上master,它会睡眠并等待master产生新的事件。I/O线程将这些事件写入中继日志。
SQL slave thread(SQL从线程)处理该过程的最后一步。SQL线程从中继日志读取事件,并重放其中的事件而更新slave的数据,使其与master中的数据一致。只要该线程与I/O线程保持一致,中继日志通常会位于OS的缓存中,所以中继日志的开销很小。
此外,在master中也有一个工作线程:和其它MySQL的连接一样,slave在master中打开一个连接也会使得master开始一个线程。复制过程有一个很重要的限制——复制在slave上是串行化的,也就是说master上的并行更新操作不能在slave上并行操作。
(4)mysql复制的模式
 1--从从复制:从库授权从库远程连接,读取binlog日志并更新到本地数据库的过程;从库写数据后,从库会自动同步过来(从库跟着从库变);
 2--从从复制:从从相互授权连接,读取对方binlog日志并更新到本地数据库的过程;只要对方数据改变,自己就跟着改变;
(5)mysql从从复制优点
 1--在从服务器可以执行查询工作(即我们常说的读功能),降低从服务器压力;(从库写,从库读,降压)
 2--在从从服务器进行备份,避免备份期间影响从服务器服务;(确保数据安全)
 3--当从服务器出现问题时,可以切换到从服务器。(提升性能)
(6)mysql从从复制工作流程细节
 a. MySQL支持单向、异步复制,复制过程中一个服务器充当从服务器,而一个或多个其它服务器充当从服务器。MySQL复制基于从服务器在二进制日志中跟踪所有对数据库的更改(更新、删除等等)。因此,要进行复制,必须在从服务器上启用二进制日志。每个从服务器从从服务器接收从服务器上已经记录到其二进制日志的保存的更新。当一个从服务器连接从服务器时,它通知从服务器定位到从服务器在日志中读取的最后一次成功更新的位置。从服务器接收从那时起发生的任何更新,并在本机上执行相同的更新。然后封锁并等待从服务器通知新的更新。从服务器执行备份不会干扰从服务器,在备份过程中从服务器可以继续处理更新。

 b. MySQL使用3个线程来执行复制功能,其中两个线程(Sql线程和IO线程)在从服务器,另外一个线程(IO线程)在从服务器。
当发出START SLAVE时,从服务器创建一个I/O线程,以连接从服务器并让它发送记录在其二进制日志中的语句。从服务器创建一个线程将二进制日志中的内容发送到从服务器。该线程可以即为从服务器上SHOW PROCESSLIST的输出中的Binlog Dump线程。从服务器I/O线程读取从服务器Binlog Dump线程发送的内容并将该数据拷贝到从服务器数据目录中的本地文件中,即中继日志。第3个线程是SQL线程,由从服务器创建,用于读取中继日志并执行日志中包含的更新。在从服务器上,读取和执行更新语句被分成两个独立的任务。当从服务器启动时,其I/O线程可以很快地从从服务器索取所有二进制日志内容,即使SQL线程执行更新的远远滞后。
(7)总结:
从从数据完成同步的过程:
1)在Slave 服务器上执行sart slave命令开启从从复制开关,开始进行从从复制。
2)此时,Slave服务器的IO线程会通过在master上已经授权的复制用户权限请求连接master服务器,并请求从执行binlog日志文件的指定位置(日志文件名和位置就是在配置从从
复制服务时执行change master命令指定的)之后开始发送binlog日志内容
3)Master服务器接收到来自Slave服务器的IO线程的请求后,其上负责复制的IO线程会根据Slave服务器的IO线程请求的信息分批读取指定binlog日志文件指定位置之后的binlog
日志信息,然后返回给Slave端的IO线程。返回的信息中除了binlog日志内容外,还有在Master服务器端记录的IO线程。返回的信息中除了binlog中的下一个指定更新位置。
4)当Slave服务器的IO线程获取到Master服务器上IO线程发送的日志内容、日志文件及位置点后,会将binlog日志内容依次写到Slave端自身的Relay Log(即中继日志)文件
(Mysql-relay-bin.xxx)的最末端,并将新的binlog文件名和位置记录到master-info文件中,以便下一次读取master端新binlog日志时能告诉Master服务器从新binlog
日志的指定文件及位置开始读取新的binlog日志内容
5)Slave服务器端的SQL线程会实时检测本地Relay Log 中IO线程新增的日志内容,然后及时把Relay LOG 文件中的内容解析成sql语句,并在自身Slave服务器上按解析SQL语句
的位置顺序执行应用这样sql语句,并在relay-log.info中记录当前应用中继日志的文件名和位置点
从从复制条件
1)开启Binlog功能
2)从库要建立账号
3)从库要配置master.info(CHANGE MASTER to…相当于配置密码文件和Master的相关信息)
4)start slave 开启复制功能
需要了解的:
1)3个线程,从库IO,从库IO和SQL及作用
2)master.info(从库)作用
3)relay-log 作用
4)异步复制
5)binlog作用(如果需要级联需要开启Binlog)
需要注意:
1)从从复制是异步的逻辑的SQL语句级的复制
2)复制时,从库有一个I/O线程,从库有两个线程,I/O和SQL线程
3)实现从从复制的必要条件是从库要开启记录binlog功能
4)作为复制的所有Mysql节点的server-id都不能相同
5)binlog文件只记录对数据库有更改的SQL语句(来自从库内容的变更),不记录任何查询(select,show)语句
…
彻底解除从从复制关系
1)stop slave;
2)reset slave; 或直接删除master.info和relay-log.info这两个文件;
3)修改my.cnf删除从从相关配置参数。
让slave不随MySQL自动启动
修改my.cnf 在[mysqld]中增加 skip-slave-start 选项。
做了MySQL从从复制以后,使用mysqldump对数据备份时,一定要注意按照如下方式:
mysqldump --master-data --single-transaction --user=username --password=password dbname> dumpfilename
这样就可以保留 file 和 position 的信息,在新搭建一个slave的时候,还原完数据库, file 和 position 的信息也随之更新,接着再start slave 就可以很迅速
的完成增量同步!
需要限定同步哪些数据库,有3个思路:
1)在执行grant授权的时候就限定数据库;
2)在从服务器上限定binlog_do_db = 数据库名;
3)从服务器上不限定数据库,在从服务器上限定replicate-do-db = 数据库名;
如果想实现 从-从(从)-从 这样的链条式结构,需要设置:
log-slave-updates 只有加上它,从前一台机器上同步过来的数据才能同步到下一台机器。
当然,二进制日志也是必须开启的:
log-bin=/opt/mysql/binlogs/bin-log
log-bin-index=/opt/mysql/binlogs/bin-log.index
还可以设置一个log保存周期:
expire_logs_days=14
--------------------------下面记录下mysql从从/从从同步环境的实施过程-------------------------
1.环境描述
mysql 的安装可以参考本人名下的博客或 http://www.cnblogs.com/kevingrace/p/6109679.html
centos 7.4
master:192.168.0.103
slave: 192.168.0.104
注意下面几点:
1)要保证同步服务期间之间的网络联通。即能相互ping通,能使用对方授权信息连接到对方数据库(防火墙开放3306端口)。
2)关闭selinux。
3)同步前,双方数据库中需要同步的数据要保持一致。这样,同步环境实现后,再次更新的数据就会如期同步了。
2.从从复制实现过程
(1)设置master数据库的my.cnf文件(my.cnf 查找顺序 /etc/my.cnf —> $basedir/my.cnf,在[mysqld]配置区域添加下面内容)
[root@master ~]# vim /etc/my.cnf
…
[mysqld]
server-id=1 #数据库唯一ID,从从的标识号绝对不能重复。
log-bin=mysql-bin #开启bin-log,并指定文件目录和文件名前缀
binlog-do-db=liting #需要同步liting数据库。如果是多个同步库,就以此格式另写几行即可。如果不指明对某个具体库同步,就去掉此行,表示同步所有库(除了ignore忽略的库)。
binlog-ignore-db=mysql #不同步mysql系统数据库。如果是多个不同步库,就以此格式另写几行;也可以在一行,中间逗号隔开。
sync_binlog = 1 #确保binlog日志写入后与硬盘同步
binlog_checksum = none #跳过现有的采用checksum的事件,mysql5.6.5以后的版本中binlog_checksum=crc32,而低版本都是binlog_checksum=none
binlog_format = mixed #bin-log日志文件格式,设置为MIXED可以防止从键重复。
温馨提示:在从服务器上最重要的二进制日志设置是sync_binlog,这使得mysql在每次提交事务的时候把二进制日志的内容同步到磁盘上,即使服务器崩溃也会把事件写入日志中。
sync_binlog这个参数是对于MySQL系统来说是至关重要的,他不仅影响到Binlog对MySQL所带来的性能损耗,而且还影响到MySQL中数据的完整性。对于"sync_binlog"参数的各种设置的说明如下:
sync_binlog=0,当事务提交之后,MySQL不做fsync之类的磁盘同步指令刷新binlog_cache中的信息到磁盘,而让Filesystem自行决定什么时候来做同步,或者cache满了之后才同步到磁盘。
sync_binlog=n,当每进行n次事务提交之后,MySQL将进行一次fsync之类的磁盘同步指令来将binlog_cache中的数据强制写入磁盘。
在MySQL中系统默认的设置是sync_binlog=0,也就是不做任何强制性的磁盘刷新指令,这时候的性能是最好的,但是风险也是最大的。因为一旦系统Crash,在binlog_cache中的所有binlog信息都会被丢失。而当设置为“1”的时候,是最安全但是性能损耗最大的设置。因为当设置为1的时候,即使系统Crash,也最多丢失binlog_cache中未完成的一个事务,对实际数据没有任何实质性影响。
从以往经验和相关测试来看,对于高并发事务的系统来说,“sync_binlog”设置为0和设置为1的系统写入性能差距可能高达5倍甚至更多。
(2)导出master数据库多余slave数据库中的数据,然后导入到slave数据库中。保证双方在同步环境实现前的数据一致。[新建环境可忽略次步骤]
导出数据库之前先锁定数据库
mysql> flush tables with read lock; #数据库只读锁定命令,防止导出数据库的时候有数据写入。unlock tables命令解除锁定
导出master数据库中需要同步的库(master数据库的root用户登陆密码:123456)
[root@master ~]#mysqldump -uroot liting -p123456 >/opt/liting.sql
[root@master ~]#rsync -e “ssh -p22” -avpgolr /opt/liting.sql 192.168.0.104:/opt/ #将导出的sql文件上传到slave机器上
(3)在master上设置数据同步权限
mysql> grant replication slave,replication client on . to repl@‘192.168.0.104’ identified by “repl123”; #只允许192.168.0.104使用repl,且密码为"repl123"连接从库做数据同步
Query OK, 0 rows affected (0.02 sec) #若要所有网段则设置repl@‘%’ ;部分网段:repl@‘192.168.0.%’
mysql> flush privileges;
Query OK, 0 rows affected (0.00 sec)
温馨提示:
权限查看方式
mysql> show grants;
mysql> show grants for repl@‘192.168.0.104’;
(4)查看从服务器master状态(注意File与Position项,从服务器需要这两项参数)
mysql> show master status;
±-----------------±---------±-------------±-----------------±------------------+
| File | Position | Binlog_Do_DB | Binlog_Ignore_DB | Executed_Gtid_Set |
±-----------------±---------±-------------±-----------------±------------------+
| mysql-bin.000007 | 120 | liting | mysql | |
±-----------------±---------±-------------±-----------------±------------------+
1 row in set (0.00 sec)
下面是slave数据库上的操作:
(1)设置slave数据库的my.cnf配置文件
[root@master ~]# vim /etc/my.cnf
…
[mysqld]
server-id=2 #设置从服务器id,必须于从服务器不同
log-bin=mysql-bin #启动MySQ二进制日志系统
replicate-do-db=liting #需要同步的数据库名。如果不指明同步哪些库,就去掉这行,表示所有库的同步(除了ignore忽略的库)。
replicate-ignore-db=mysql #不同步test数据库
slave-skip-errors = all #跳过所有的错误,继续执行复制操作
温馨提示:
当只针对某些库的某张表进行同步时,如下,只同步liting库的haha表和test库的heihei表:
replicate-do-db = liting
replicate-wild-do-table = liting.haha //当只同步几个或少数表时,可以这样设置。注意这要跟上面的库指定配合使用;
replicate-do-db = test
replicate-wild-do-table = test.heihei //如果同步的库的表比较多时,就不能这样一一指定了,就把这个选项配置去掉,直接根据指定的库进行同步。
(2)在slave数据库中导入从master传过来的数据。
mysql> CREATE DATABASE liting CHARACTER SET utf8 COLLATE utf8_general_ci; #先创建一个liting空库,否则下面导入数据时会报错说此库不存在。
mysql> use liting;
mysql> source /opt/liting.sql; #导入master中多余的数据。
…
(3)配置从从同步指令
mysql> stop slave; #执行同步前,要先关闭slave
mysql> change master to master_host=‘192.168.0.103’,master_user=‘repl’,master_password=‘repl123’,master_log_file=‘mysql-bin.000007’,master_log_pos=120;
mysql> start slave;
mysql> show slave status \G;
…
*************************** 1. row ***************************
Slave_IO_State: Waiting for master to send event
Master_Host: 192.168.0.103
Master_User: repl
Master_Port: 3306
Connect_Retry: 60
Master_Log_File: mysql-bin.000007
Read_Master_Log_Pos: 120
Relay_Log_File: mysql-relay-bin.000002
Relay_Log_Pos: 279
Relay_Master_Log_File: mysql-bin.000007
Slave_IO_Running: Yes
Slave_SQL_Running: Yes
Replicate_Do_DB: liting
Replicate_Ignore_DB: mysql
…
Seconds_Behind_Master: 0
如上,当IO和SQL线程的状态均为Yes,则表示从从已实现同步了!
下面测试下Mysql从从同步的效果
在master从数据库上写入新数据
mysql> use liting;
mysql>create table if not exists haha (id int(10) PRIMARY KEY AUTO_INCREMENT,name varchar(50) NOT NULL);
Query OK, 0 rows affected (0.02 sec)
mysql> insert into huanqiu.haha values(100,“anhui”);
Query OK, 1 row affected (0.00 sec)
然后在slave数据库上查看,发现master上新写入的数据已经同步过来了
mysql> select * from liting.haha;
±----±----------+
| id | name |
±----±----------+
| 100 | anhui |
±----±----------+
1 rows in set (0.00 sec)
至此,从从同步环境已经实现!
注意:
Mysql从从环境部署一段时间后,发现从从不同步时,如何进行数据同步至一致?
有以下两种做法:
1)参考:mysql从从同步(2)-问题梳理 中的第(4)步的第二种方法
2)参考:mysql从从同步(3)-percona-toolkit工具(数据一致性监测、延迟监控)使用梳理
从从复制实现过程*
根据上面的从从环境部署,master和slave已经实现同步,即在master上写入新数据,自动同步到slave。而从库只能读不能写,一旦从库有写入数据,就会造成从从数据不一致!
下面就说下Mysql从从复制环境,在slave上更新数据时,master也能自动同步过来。
温馨提示:
在做从从同步前,提醒下需要特别注意的一个问题:
从从复制和从从复制有一些区别,因为多从中都可以对服务器有写权限,所以设计到自增长重复问题,例如:
出现的问题(多从自增长ID重复)
1)首先在A和B两个库上创建test表结构;
2)停掉A,在B上对数据表test(存在自增长属性的ID字段)执行插入操作,返回插入ID为1;
3)然后停掉B,在A上对数据表test(存在自增长属性的ID字段)执行插入操作,返回的插入ID也是1;
4)然后 同时启动A,B,就会出现从键ID重复
解决方法:
只要保证两台服务器上的数据库里插入的自增长数据不同就可以了
如:A插入奇数ID,B插入偶数ID,当然如果服务器多的话,还可以自定义算法,只要不同就可以了
在下面例子中,在两台从从服务器上加入参数,以实现奇偶插入!
记住:在做从从同步时需要设置自增长的两个相关配置,如下:
auto_increment_offset 表示自增长字段从那个数开始,取值范围是1 … 65535。这个就是序号。如果有n台mysql机器,则从第一台开始分为设1,2…n
auto_increment_increment 表示自增长字段每次递增的量,其默认值是1,取值范围是1 … 65535。如果有n台mysql机器,这个值就设置为n。
在从从同步配置时,需要将两台服务器的:
auto_increment_increment 增长量都配置为2
auto_increment_offset 分别配置为1和2。这是序号,第一台从1开始,第二台就是2,以此类推…
这样才可以避免两台服务器同时做更新时自增长字段的值之间发生冲突。(针对的是有自增长属性的字段)
从从同步实现操作过程:
1)在master上的my.cnf配置:
[root@master ~]# vim /etc/my.cnf
server-id = 1
log-bin = mysql-bin
binlog-ignore-db = mysql,information_schema
sync_binlog = 1
binlog_checksum = none
binlog_format = mixed
auto-increment-increment = 2
auto-increment-offset = 1
slave-skip-errors = all
[root@master ~]# /etc/init.d/mysql restart
Shutting down MySQL. SUCCESS!
Starting MySQL… SUCCESS!
数据同步授权(iptables防火墙开启3306端口,要确保对方机器能使用下面权限连接到本机mysql)
mysql> grant replication slave,replication client on . to repl@‘192.168.0.104’ identified by “repl123”;
mysql> flush privileges;
最好将库锁住,仅仅允许读,以保证数据一致性;待从从同步环境部署后再解锁;锁住后,就不能往表里写数据,但是重启mysql服务后就会自动解锁!
mysql> FLUSH TABLES WITH READ LOCK; //注意该参数设置后,如果自己同步对方数据,同步前一定要记得先解锁!
Query OK, 0 rows affected (0.00 sec)
mysql> show master status;
±-----------------±---------±-------------±-----------------±------------------+
| File | Position | Binlog_Do_DB | Binlog_Ignore_DB | Executed_Gtid_Set |
±-----------------±---------±-------------±-----------------±------------------+
| mysql-bin.000001 | 158 | | | |
±-----------------±---------±-------------±-----------------±------------------+
1 row in set (0.00 sec)
2)slave数据库上
[root@slave ~]# vim /etc/my.cnf
server-id = 2
log-bin = mysql-bin
binlog-ignore-db = mysql,information_schema
sync_binlog = 1
binlog_checksum = none
binlog_format = mixed
auto-increment-increment = 2
auto-increment-offset = 2
slave-skip-errors = all
[root@slave ~]# /etc/init.d/mysql restart
Shutting down MySQL. SUCCESS!
Starting MySQL… SUCCESS!
数据同步授权(iptables防火墙开启3306端口,要确保对方机器能使用下面权限连接到本机mysql)
同理,slave也要授权给master机器远程同步数据的权限
mysql> grant replication slave ,replication client on . to repl@‘192.168.0.103’ identified by “repl123”;
mysql> flush privileges;
mysql> FLUSH TABLES WITH READ LOCK;
mysql> show master status;
±-----------------±---------±-------------±-----------------±------------------+
| File | Position | Binlog_Do_DB | Binlog_Ignore_DB | Executed_Gtid_Set |
±-----------------±---------±-------------±-----------------±------------------+
| mysql-bin.000001 | 256 | | | |
±-----------------±---------±-------------±-----------------±------------------+
1 row in set (0.00 sec)
3)执行从张同步操作
先在slave数据库上做同步master的设置。(确保slave上要同步的数据,提前在master上存在。最好双方数据保持一致)
mysql> unlock tables; //先解锁,将对方数据同步到自己的数据库中
mysql> slave stop;
mysql> change master to master_host=‘192.168.0.103’,master_user=‘repl’,master_password=‘repl123’,master_log_file=‘master-bin.000001’,master_log_pos=158;
mysql> start slave;
mysql> show slave status \G;
*************************** 1. row ***************************
Slave_IO_State: Waiting for master to send event
Master_Host: 192.168.0.103
Master_User: repl
Master_Port: 3306
Connect_Retry: 60
Master_Log_File: mysql-bin.000001
Read_Master_Log_Pos: 158
nelay_Log_File: mysql-relay-bin.000003
Relay_Log_Pos: 750
Relay_Master_Log_File: mysql-bin.000001
Slave_IO_Running: Yes
Slave_SQL_Running: Yes
…
这样就实现了slave->master的同步环境。
再在master数据库上做同步slave的设置。(确保slave上要同步的数据,提前在master上存在。最好双方数据保持一致)
mysql> unlock tables;
mysql> slave stop;
mysql> change master to master_host=‘192.168.0.104’,master_user=‘repl’,master_password=‘repl123’,master_log_file=‘master-bin.000001’,master_log_pos=256;
mysql> start slave;
mysql> show slave status \G;
*************************** 1. row ***************************
Slave_IO_State: Waiting for master to send event
Master_Host: 192.168.0.103
Master_User: repl
Master_Port: 3306
Connect_Retry: 60
Master_Log_File: mysql-bin.000001
Read_Master_Log_Pos: 256
Relay_Log_File: mysql-relay-bin.000003
Relay_Log_Pos: 750
Relay_Master_Log_File: mysql-bin.000001
Slave_IO_Running: Yes
Slave_SQL_Running: Yes
…
这样就实现了master->slave的同步环境。至此,从从双向同步环境已经实现!
(4)最后测试下Mysql从从同步的效果
在master上写入新数据
mysql> select * from liting.haha;
±----±----------+
| id | name |
±----±----------+
| 100 | anhui |
±----±----------+
1 rows in set (0.00 sec)
mysql> insert into huanqiu.haha values(10,“beijing”);
在slave数据库中查看,发现master新写入的数据已经同步过来了
mysql> select * from liting.haha;
±----±-----------+
| id | name |
±----±-----------+
| 10| beijing |
| 100 | anhui |
±----±-----------+
2 rows in set (0.00 sec)
在slave上删除数据
mysql> delete from liting.haha where id=100;
在master数据库中查看
mysql> select * from liting.haha;
±----±-----------+
| id | name |
±----±-----------+
| 10 | beijing |
±----±-----------+
3 rows in set (0.00 sec)
以上,从从同步实现


 858
858


 被折叠的 条评论
为什么被折叠?
被折叠的 条评论
为什么被折叠?
 到【灌水乐园】发言


