本文来自:http://www.airia.cn/FLEX_Directory/deploying_components/
向其他开发者发布你的组件的一个方式是使用MXML或者ActionScript文件。把他们放在与包结构匹配的目录结构中,并且压缩到一个文档中,文档格式可以使用PKZip。组件的使用者解压文档到他们的开发环境中,然后,在他们的应用程序中使用这些组件。这样做的缺点是,使用者拥有了你的组件的源代码和源文件,并且你的组件被反编译了。
分发组件可代替的方法是将你的组件打包为SWC文件,或者作为运行时共享库的一部分(RSL)。这样做的有点包括容易部署、运行时效率和安全性。
一个SWC文件是Flex组件的存档文件。SWC文件使得在开发者中交换组件变得简单。你只需要交换一个文件,而不是几个MXML和ActionScript文件、图像和其他资源文件。同样,SWF文件可以包含另一个编译好的SWC文件,这意味着代码非常混乱,属于业余。
SWC文件可能包含一个或多个组件,使用PKZip存档格式打包与解包。你可以打开和测试一个SWC文件,通过WinZip,JAR或其他存档工具。然而,你不应该手工改变SWC文件的内容,并且你不应该试图运行SWC中的SWF文件。
创建SWC文件
要使用FlexSDK创建一个SWC文件,使用compc命令行工具包,这个工具在flex_index_dir/bin目录下。compc工具包从MXML组件源文件或者ActionScript组件源文件生成SWC文件。
当你使用compc编译器创建一个SWC文件时,你可以包含仁义数量的组件。当你在你的Flex应用程序中使用来自SWC文件中的组件时,mxmlc编译器只包含你应用程序中使用到的组件和依赖的类到最终的SWF文件中。
作为开始,创建一个命名为QuickStartLibrary的文件夹,在文件夹中,创建components文件夹,并且放置下边的自定义组件到components文件夹文件夹中。
components/ApplicationClass.as
package components{
import mx.core.Application;
import mx.events.FlexEvent;
import mx.controls.Alert;
import components.AddressFormEvent;
import components.AddressVO;
import flash.utils.describeType;
public class ApplicationClass extends Application
{
// Components in MXML.public var addressForm:AddressForm;
public function ApplicationClass()
{
addEventListener(FlexEvent.CREATION_COMPLETE, creationCompleteHandler);
}
//
// Event handlers.
//
private function creationCompleteHandler(event:FlexEvent):void
{
// The custom AddressForm component dispatches a "submit"
// event the form is submitted. Listen for this.
addressForm.addEventListener(AddressFormEvent.SUBMIT, submitHandler);
}
private function submitHandler(event:AddressFormEvent):void
{
// Get the value object (data) from the event object
var data:AddressVO = event.data as AddressVO;
// Compose a string to display the contents of the value object to the user.
var msg:String = "You submitted the following information: /r";
// Use the new introspection API and E4X to get a list of the properties
// in the data object and enumerate over them to compose the string.
var dataProperties:XMLList = describeType(data)..variable;
for each (var i:XML in dataProperties)
{
var propertyName:String = i.@name;
msg += i.@name + ": " + data[i.@name] + "/r";
}
// Display the contents of the address form to the user.Alert.show(msg, "Thank you for submitting the form!");
}
}
}
components/AddressFormClass.as
package components
{import mx.events.FlexEvent;
import mx.controls.Button;
import mx.controls.TextInput;
import flash.events.MouseEvent;
import mx.containers.Form;
public class AddressFormClass extends Form
{
// Components in the MXML must be// declared public. This is a limitation in
// the current version of Flex and may change
// in the future.
public var submitButton:Button;
public var nameInput:TextInput;
public var street:TextInput;
public var city:TextInput;
public var state:TextInput;
public var country:CountryComboBox;
// Constructor
public function AddressFormClass ():void{
addEventListener(FlexEvent.CREATION_COMPLETE, creationCompleteHandler);
}
// Creation complete is a good time to add event listeners and
// interact with child components.
private function creationCompleteHandler (event:FlexEvent):void
{submitButton.addEventListener(MouseEvent.CLICK, submitHandler);
}
// Gets called when the Submit button is clicked
private function submitHandler (event:MouseEvent):void
{// Gather the data for this form
var addressVO:AddressVO = new AddressVO();
addressVO.name = nameInput.text;
addressVO.street = street.text;
addressVO.city = city.text;
addressVO.state = state.text;
addressVO.country = country.selectedItem as String;
var submitEvent:AddressFormEvent = new AddressFormEvent(AddressFormEvent.SUBMIT);
submitEvent.data = addressVO;
// Dispatch an event to signal that the form has been submitted
dispatchEvent(submitEvent);}
}
}
components/AddressForm.mxml
<?xml version="1.0" encoding="utf-8"?><custom:AddressFormClass
xmlns:mx="http://www.adobe.com/2006/mxml"
xmlns:custom="components.*"
><mx:FormItem label="Name">
<mx:TextInput id="nameInput"/>
</mx:FormItem>
<mx:FormItem label="Street"><mx:TextInput id="street"/>
</mx:FormItem>
<mx:FormItem label="City"><mx:TextInput id="city"/>
</mx:FormItem>
<mx:FormItem label="State/County"><mx:TextInput id="state"/>
</mx:FormItem>
<mx:FormItem label="Country"><custom:CountryComboBox id="country"/>
</mx:FormItem>
<mx:Button
id="submitButton"
label="submit"
/>
</custom:AddressFormClass>
components/AddressFormEvent.as
package components{
import flash.events.Event;
import components.AddressVO;
public class AddressFormEvent extends Event{
public static const SUBMIT:String = "submit";
private var _data:AddressVO;
public function AddressFormEvent (eventName:String)
{super (eventName);
}
public function set data (value:AddressVO):void
{_data = value;
}
public function get data ():AddressVO
{
return _data;}
}
}
components/AddressVO.as
package components{
public class AddressVO
{
// We are using public properties for the
// value object to keep this example short. In a
// real-world application, make these properties
// private and use implicit accessors to expose them
// so you can do validation, etc. if necessary.
public var name:String;
public var street:String;
public var city:String;
public var state:String;
public var country:String;
}
}
components/PaddedPanel.as
package components{
import mx.containers.Panel;
public class PaddedPanel extends Panel{
public function PaddedPanel(){
// Call the constructor of the superclass.
super();
// Give the panel a uniform 10 pixel
// padding on all four sides.
setStyle ("paddingLeft", 10);
setStyle ("paddingRight", 10);
setStyle ("paddingTop", 10);
setStyle ("paddingBottom", 10);
}
}}
components/CountryComboBox.mxml
<?xml version="1.0" encoding="utf-8"?><mx:ComboBox xmlns:mx="http://www.adobe.com/2006/mxml">
<mx:dataProvider>
<mx:String>United States</mx:String>
<mx:String>United Kingdom</mx:String>
<!-- Add all other countries... -->
</mx:dataProvider>
</mx:ComboBox>
要创建SWC文件,确定compc编译器在你的系统路径中(如果没有,添加到PATH环境变量中)。从QuickStartLibrary 文件夹开始,输入如下命令:
compc -source-path+=.
-output=bin/QuickStartLibrary.swc
-include-classes components.AddressForm
components.AddressFormClass
components.AddressFormEvent
components.AddressVO
components.ApplicationClass
components.CountryComboBox
components.PaddedPanel
注意:打字先前的命令在一个单独的行。前边是多行是为了清晰。
提示:你使用compc编译器创建SWC文件时,通过命名空间,或者manifest文件你可以包含任意数量的组件。这可以避免命令行变得过长和无法控制。更多关于使用命名空间和manifest文件的信息,参看Creating and Extending Adobe Flex 3 Components.
source-path选项在souce path中包含当前文件夹。这指明了compc如何发现include-classes选项列表中的各种类。
output选项指明输出SWC文件的位置。也就是,compc向名称为bin的文件夹输出QuickStartLibrary.swc文件。
include-classes选项指明你想包含进SWC文件中的类。他们是你定义的类。
提示:你也可以通过在Adobe Flex Builder中创建一个Flex库项目来创建SWC文件。耕读的信息请参考Using FlexBuilder 3。
部署SWC文件
当编译MXML文件的时候使用SWC文件。你一般要在library-path选项中指定应用程序中要用到的SWC文件。
下边的例子使用QuickStartLibrary.swc中”Creating SWC Files”一节创建的AddressForm组件。
例子
<?xml version="1.0" encoding="utf-8"?>
<custom:ApplicationClass
xmlns:mx="http://www.adobe.com/2006/mxml"
xmlns:custom="components.*"
width="400" height="310"
>
<custom:PaddedPanel title="Creating Libraries">
<custom:AddressForm id="addressForm"/>
</custom:PaddedPanel>
</custom:ApplicationClass>
要使用独立的Flex编译器编译这个离职,输入下边的命令,用本机的QuickStartLibrary.swc的位置取代,-library-path+=后的部分。在这个例子中,library是在../QuickStartLibrary/bin目录中。
mxmlc -library-path+=.;../QuickStartLibrary/bin Main.mxml
由于在flex_install_dir/libs文件夹中所有的SWC文件都被默认的加入到编译器类库中。你也可以仅将QuickStartLibrary.swc文件放入这个目录中,然后编译应用程序就能够找到他们。
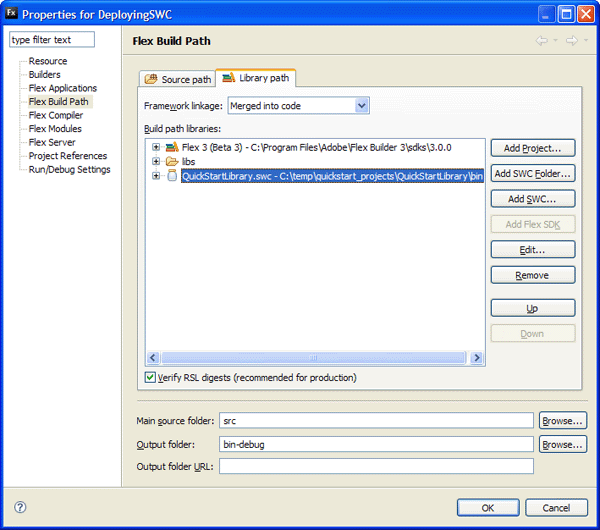
提示:你也能添加SWC文件到FlexBulder项目中。要添加你的SWC文件,选择“Project > Propertise > Flex Build Path”。在Library选项卡,单击“Add SWC”按钮,并且添加QuickStartLibrary到你的项目中。下边的图片展示了QuickStartLibrary.sec文件在你的项目库路径中。

可以在FLEX3帮助文档查阅以下内容获取更多帮助
- Compiling components with Flex SDK
- Using compc, the component compiler


 88
88

 被折叠的 条评论
为什么被折叠?


