


相对布局中的视图组件是按相互之间的相对位置来确定的, 并不是线性布局中的必须
按行或按列单个显示。示例布局文件如下:
main.xml
<? xml version = "1.0"encoding = "utf-8" ?>
< RelativeLayout
xmlns:android ="http://schemas.android.com/apk/res/android"
android:layout_width ="fill_parent"
android:layout_height = "fill_parent"
>
< TextView
android:layout_width ="fill_parent"
android:layout_height ="wrap_content"
android:text ="@string/name_text"
android:id = "@+id/text" />
< EditText
android:layout_width ="fill_parent"
android:layout_height ="wrap_content"
android:layout_below = "@id/text"
android:id = "@+id/edit" />
< Button
android:layout_width ="wrap_content"
android:layout_height ="wrap_content"
android:text ="@string/cancle_button"
android:layout_alignParentRight ="true"
android:layout_below = "@id/edit"
android:id = "@+id/cancle" />
< Button
android:layout_width ="wrap_content"
android:layout_height ="wrap_content"
android:layout_toLeftOf ="@id/cancle"
android:layout_alignTop ="@id/cancle"
android:text ="@string/ok_button" />
</ RelativeLayout >
说明:
android:layout_below="@id/text" :将该元素放到 id 为 text 的元素的下面
android:layout_toLeftOf="@id/ok" :放到 id 为 ok 的元素左边
android:layout_alignTop="@id/ok" :对齐 id 为 ok 的元素的顶部
还有很多关于相对位置的字段,希望大家能够自己去发现
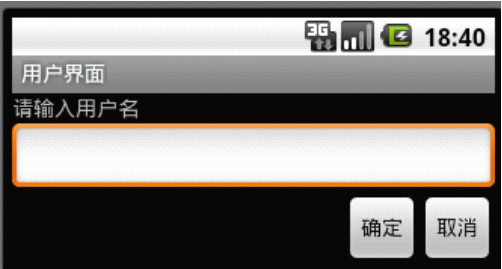
界面效果如图:
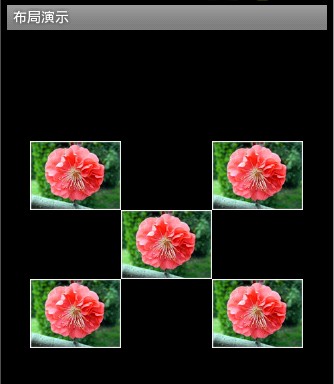
案例二:梅花效果
问题:利用相对布局实现下面的效果

案例分析:
我们可以从途中看出,四周的方框的角都与中间的方框相连,而且呈现出X字样.试想,中间的是不是有什么特殊含义?
好,养我们做一个假设:假设中间的方框为相对对象,那么各个方框如何表示呢?拿左上角的方框为例,它的位置是:既中间方框的上面又是中间方框的左边.好,那么其他的是不是可以同样再这样表示呢?答案是肯定的.按照这个思路,我们试着把代码写出来:
main.xml
<?xml version="1.0" encoding="utf-8"?>
<RelativeLayout xmlns:android="http://schemas.android.com/apk/res/android"
    android:layout_width="match_parent"
    android:layout_height="match_parent" >


    <TextView
        android:id="@+id/center"
        android:layout_width="wrap_content"
        android:layout_height="wrap_content"
        android:layout_centerInParent="true"
        android:background="@drawable/meihua"/>


    <TextView
        android:layout_width="wrap_content"
        android:layout_height="wrap_content"
        android:layout_above="@id/center"
        android:layout_toLeftOf="@id/center"
        android:background="@drawable/meihua"/>


    <TextView
        android:layout_width="wrap_content"
        android:layout_height="wrap_content"
        android:layout_above="@id/center"
        android:layout_toRightOf="@id/center"
        android:background="@drawable/meihua"/>


    <TextView
        android:layout_width="wrap_content"
        android:layout_height="wrap_content"
        android:layout_below="@id/center"
        android:layout_toLeftOf="@id/center"
        android:background="@drawable/meihua"/>


    <TextView
        android:layout_width="wrap_content"
        android:layout_height="wrap_content"
        android:layout_below="@id/center"
        android:layout_toRightOf="@id/center"
        android:background="@drawable/meihua"/>


</RelativeLayout>
运行图为:
android:layout_centerInParent="true" 图片垂直水平居中
android:background="@drawable/meihua"将该元素的id放到background下,"meihua"是我拷入的图片文件


 2939
2939


 被折叠的 条评论
为什么被折叠?
被折叠的 条评论
为什么被折叠?
 到【灌水乐园】发言


